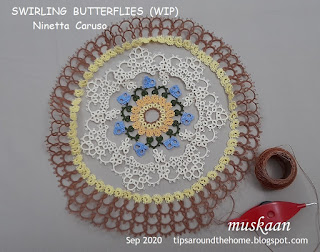
continuing Ninetta Caruso's Swirling Butterflies doily - rounds 6 to 9 ...

Round 6 : 15.5 cms in Anchor size 40, worked counterclockwise with one shuttle only.
Techniques - spiral ring, decorative picots, treble stitch (tds), lock join (substituted with a DYJ variation)

This light yellow colour was a compromise colour although Ninetta approved early on, and later even my hubby liked it a lot, despite my continuing doubts midways
 My first choice was this dark green in order to frame the large floral design. Unfortunately the thread turned out to be very difficult to work spiral rings! Notice the ugly bare thread and distorted rings in the inset above?! Not to mention eyesight difficulty in tatting with a dark colour

TIP : There are 13 long picots and a 14th vsp for the last treble stitch. I made All 14 picots long.
 During my failed green trial, in order to increase stability (and for peace of mind), I altered the lock join to a variation of the Dora Young Join (DYJ) and decided to continue with it in the yellow version.

 These 3 rounds are worked continuously, climbing out with a split chain and into the next round with a split ring. With only 2 SRs, I decided to work with 1 shuttle and ball.
 Ninetta warned us that rounds 7 & 8 ruffle but settle after round 9. The waves after round 7 already seem to be flattening as round 8 gets underway.
 Ruffling has decreased even more along the portion where round 9 portion has been made.
 Voila! Flattened! 3rd time was such a charm!

TIP : Quality of thread is very important to work spiral rings. The stitches should slide smoothly so that the ring closes easily without any tug on thread between rings.

The yellow was a charm - worked like a breeze! Especially since I did not use any picot gauge.
TIP : In order to avoid counting back all the picots, this coiless safety pin marked the picot (7th) on which a lock join needs to be made to coil the ring.

Dora Young Join (DYJ) variation - Start with making a lock join, but instead of pulling shuttle thread to tension it, tug at the loop thread that is at the back of work (like we do for the DYJ and CWJ) to remove slack, In next step, pass shuttle again through the open loop, front to back, and tension.
I'll have to try it with thicker thread to see how it looks up close.

This round is quite floppy with rings tending to dance and twirl since there are 7 unattached rings in between. I had to be real careful to keep them facing correctly when attaching 8th ring to previous round.
Rounds 7, 8, 9 : 17.5cms, 19.5cms, 21.5cms in Anchor size 40 worked counterclockwise. 2 shuttles, ctm.
Techniques - fs/bs tatting, split chain, split ring (all 3 optional).

All 3 rounds are identical!


I blocked (rolling pin) only after completing all 3 rounds.

Working 3 identical rounds consecutively could've been boring, but it was truly Fascinating watching the taming of the ruffles!
 Got me wondering if there was any other way to keep it flat and avoid ruffling. Here are my thoughts on the Design Options -

1. start with shorter chains and increase the number of stitches (1 or 2 ds per outer round) ;
2. include stabilising picot after 2 & 1 ds, to link adjacent chains in rounds 7 & 8 respectively.
3. progressively increase ring size in subsequent rounds.
All options come with their visual consequences - it all depends on what the designer is going for!
The next round consists of individual 3-round motifs very similar to the center. (7x2) motifs will take some time to tat. The very last round is simple rings, chains, and thrown rings.
I had intended to keep blogging as I worked this doily on the side. But I get so engrossed and Love the tat, that all blogging is side-lined. Hopefully I'll squeeze in a few posts this time.
🥰🌹thanks!
ReplyDeleteMy pleasure, Ninetta 😃💗
DeleteI wondered where you’d got to, now I can understand that you were engrossed in your tatting! It is certainly looking spectacular and sounds as though it’ll soon be even more amazing. Interesting that the thread was so crucial to the little spirals. I like the yellow. Your notes will be very helpful to anyone working the pattern. As usual, there are different ways of doing things.
ReplyDeleteJane, I apologise for my long absence again. I'm kind of a in a cyber-chatting slump, but am making an effort to get back into the 'groove'. Time management is partly the reason.
DeleteThank you for your kind words, always :-))))
Your tips are so valuable. Ninetta's pattern looks so intriguing. I really must slow down and master Trebles.
ReplyDeleteMel, if I were asked to name one element I enjoyed tatting most in this doily, it would be the treble stitch spirals! Very relaxing and 'musical'. Go for it :-))))
DeleteI like the yellow. The dark green might have been too abrupt a color change, unless you were planning to use different colors for the next rounds. This looks so nice!
ReplyDeleteStephanieW
Your observation made me look at the doily again with new eyes, Stephanie, and I totally agree - you have opened my eyes :-)))) Thank you
DeleteIt's beautiful!!! :)
ReplyDelete(I didn't read it all this time will come back and read it all later). ;)
The detailed notes are for anybody actually tatting the doily, so you are good to only scroll through the images, Sue ;-D
DeleteBeautiful doily, certainly a great pattern
ReplyDeleteIt certainly is a great pattern and am still fully enjoying it, Margaret :-)))
Delete