Tuesday 31 July 2018

wound tight

Pin It now!
Two more thugs wound tight by AliBaba ….

Blossoms Motifs#5 & #6
6 of 40 completed. 
All 6 threads are in play here! 
At the beginning of the project, I wound shuttles completely with each colour. 
The center 5 are from the Sunkist mix and the ones on the sides are from Ice mix (Lizbeth 20). 
If you remember, I discontinued the Green Ice since it was too light for a white background.
With fully loaded shuttles, it is easy to pick as desired.

Blossoms Motif #5
Pattern is notated in the pic.
 Measures under 2” x 1¼”. 

Blossoms Motif #6
Pattern is notated in the pic. 
Note that the number of petals in each flower varies.
Measures 2” x 1¼”

I finished both a while back, but haven’t been able to move further. They don’t take long to tat & I don’t mind hiding all the tails, either. Each is a single shuttle/thread component; so tat over tail in the beginning, leaving only one tail to whip stitch at the end. 

happy flowers make for happy tatting !


Sunday 29 July 2018

giving and receiving

Pin It now!
…. thanks q

According to the Hindu calendar, Guru Poornima is celebrated every year on full moon of the 4th month - this time it fell on the 27th. As per scriptures, it is a day to offer respect and gratitude to one’s teachers. So this may be almost a 3,000 year old legacy! 
Thought I’d give my thanks to each tatter/blogger I’ve had the pleasure to meet online – I always learn a little something and add to my knowledge, be it from a beginner question, peer consultation, or expert advice.

Firstly, I’d like to thank the extremely talented Mari-jan. We got acquainted, and have been in touch, when they asked to publish my pattern in their publication, De Frivolite(k)ring . Recently she celebrated her 1st blog anniversary and surprised me with this lovely handmade silk plum blossom and handwritten card. 
  
Update : Mari-jan has posted details about this technique here.

Next, as a thank-you gesture for helping her out with some tatting snags over time, Jean Gordon shared this joyful bookmark pattern! I got down to tatting it almost immediately, spurred by her tatted models.
This is the Butterfly Bookvine designed by Kimberley Donohue 
published in #16, KNOTS tatting newsletter, March 1997. 
Jean made a few tweaks and re-wrote it.
I really liked Jean’s colour scheme above! 

I chose the closest I could get from my Anchor size 40 stash. I want to make another with more colourful butterflies and vine using embroidery thread.
It measures 13×3cms without tail.
Butterflies are superb in that there was no need to hide ends at all since we end with a split ring! Instead of using 2 shuttles, I left a long tail in the beginning to use for the 2nd side of split ring and one antenna.
There are 2 versions of the butterfly in the pattern. I chose the more decorative one. 
For the vine, instead of SLT, I used the Reverse Join to switch threads, thus ending up tatting it with one shuttle and green ball thread. 
One has to keep track of the joins, though. I kept making mistakes linking to the butterfly and ended up retrotatting.
You know I like tails on my bookmarks. So a lock stitch chain it was. But for the tassel, I have to thank Stephanie Wilson. Last year, when she was test tatting one of my patterns, she shared her wonderful idea – collect all the scrap threads and make tassels! 

I finally remembered in time, and am so happy with the result, even though these were the only scraps left from recent projects in my tiny collection box. I added a green border on either side of the wrap-around -- ALL scrap!!!.

Here’s another of Jean’s tatting sample (still unblocked). She’s been tatting for just over a year and already learned interlaced rings (the 4-shuttle braid) & the floating twisted picot!

Blogging has brought me so many extraordinary friends!
Many many thanks to this tatting circle of friends qYq

Friday 27 July 2018

multiples

Pin It now!
….continuing from previous post ... 
The final post in this treble tatting series covers joining a tds to a previous element and my way of tds variations... multiple ways to skin a cat !


Any new element can be linked to a treble tat stitch as we would when working with normal double stitches. We can use a picot join, a lock join, etc. – whatever the pattern calls for. While so far all Ninetta’s patterns make the linkage between 2 tds, it is possible to link within as well – the long arch (when seen from top) can be used to pull a loop through.

What if one needs to link a tds to a previous element/picot? The triangle pattern needed such a linkage. I was stumped at first, then figured a way out. It looked similar to Ninetta's tatting, so I went ahead confidently.

Turns out, she does it in a different way! And she has graciously sent me a collage of her method to share here. And also a comparison between both methods !!!

How to join a tds to an element
Ninetta’s method :
1. 2tds made and now need to link to the white ring.
2. Make a picot join by pulling up loop through ring picot and …
3. … make the second half stitch of a ds.
4. Pull a loop through the ring picot again, and… (follow step 6 onwards)
5. pass shuttle through and work the 3 wraps.
6. 1 tds made with joined element.
The next pics show the front and back views.

muskaan’s method :
1. after making 4 tds, I need to join to the yellow ring.
2. insert hook through both the vsp of previous tds AND the yellow picot, and … (follow step 4 onwards)
3. …pull up a loop
4. pull up another loop through it to make a ‘chain’…
5. … and continue to finish the tds by wrapping thrice around the loop
1 more tds made after the join.

tds variations – my way
Nin and I had independently and simultaneously tried out variations in the tds. She has posted her method here and I had explained mine here (graduated). Turns out that they were again accomplished differently. I took a few pics and collaged them ...
Instead of explaining each step, I am merely pointing out the difference - for complete steps, please refer to this pictorial.

tds with 1 wrap
Skip steps 4 & 5 in pictorial (ie., skip a 2nd loop/chain) and make only 1 wrap (instead of 3).
This is almost like a dot picot (but wider) ; works well for a gentle slope/graduated effect.

 tds with 2 wraps
This follows the tds right upto the wrapping stage where only 2 instead of 3 wraps are made.
I made a regular tds after this (seen in pink)

tds with 4 wraps
Here, repeat steps 4 & 5 – ie. make an extra loop/chain ;
and make 4 wraps instead of 3.

tds with 5 wraps
similar to tds with 4 wraps, but with an extra wrap (5 wraps).
In the center, the tds & it's four variations are visible.

Ninetta made her 5 & 7 wrap variations similar to the normal tds, except for increasing the size of the first picot, and of course the corresponding number of wraps.
I still have to try this to see for myself how they compare and whether one looks better than the other.

Incidentally, this treble tat stitch can be made in needle tatting, too. Perhaps Ninetta will share some more info on this….

This post concludes my present foray into the tds, despite all the lovelies Ninetta continues to post (and challenge privately ;-P). I need to get on with my multiple pending patterns, projects, et al. 

hope to see this fun new stitch taking root and springing new designs.

Sunday 22 July 2018

dissecting the tds

Pin It now!
Before I start, a note about the edging pattern in previous post
There was a slight error in the diagram (I missed out a join). 
It is now corrected and post updated. Nevertheless, here is the new pdf link.

Ninetta's videos and posts are very clear and it was fairly easy to learn treble tatting

The tds has a multiple of steps reminding me of crochet, padded ds and vapour picot. Was the resemblance to them actually there? Why was there the need to pull up 2 successive loops for the first part? Where did the ds disappear? These were some of the questions that plagued me. 
I got the How easily enough, but the What and Why needed some minute dissection.

In order to observe each step of the tds closely, I chose thick threads in contrasting colours and took pics of each step. These pics visually tell the story of it’s construction, and also the engineering genius of it’s originator! 

So the following is how I deconstruct treble tatting and also list some characteristics (see also A visual study, here) .....
Just to be clear at the outset, this is how a crochet chain and treble look : 
the crochet treble is clearly different from this tatted treble stitch. 
A single chain stitch, however, is similar in both cases. 
YET, the chain is similar to what we would do in a picot join - pull a loop up !

Treble Tatting (tds)
Analysing each step
 1. I have started a chain with 4ds, 1vsp, 1ds.

 2. Insert hook and pull up a loop through the vsp -
just as if we were making a picot join.

3. The loop is visible.

 4. Insert hook through this loop now …

5. … and pull up another loop (again like a picot join!).
Notice that this looks like a crochet chain. 
NOTE: Keep this stitch taut. If it is loose, it spoils the appearance later.
Although not yet visible, this ds and chain form the 1st half stitch of a tds.

 6. Insert the shuttle through this loop from back to front. 
This is the start of the 2nd half.
Note the full ds at the base, with 2 'legs'

 7. This is how it all looks after step 6. 

 8. Now pass the shuttle through the open space between threads.
(this movement is similar to what we do for a vapor picot on the 2nd half stitch)

 9. The ball thread tends to twist.

 10. Repeat step 9 two more times, so that there are now 3 twists in the ball thread.
UPDATE: see how this step can be worked like a Twisted picot !

11. CAUTION: While making the wraps, the core thread tends to twist like in this pic. 
Make sure that all the twists are transferred to the ball thread (as in pic#10) 
and the core remains free to slide.

12. We now start pulling the ball thread upwards to tension the wraps. 
Though hazy, this is to show how the core thread is held taut around the pinkie 
and the ball thread is pulled up.

13. The wraps are closer now. Tug a bit more till all unwanted thread is pulled off.
Note the single thread (pink) around the core thread at the base. 
This forms the 3rd leg of a tds.

14. 2nd half complete.
Notice how the 1st half also looks coiled and similar to the 2nd half? I think this is where her brilliance truly lies! The 1st half, tends to ‘twist’ or lie on it’s side which has a coiled appearance!

However, at this point, the 2 threads (ball & shuttle) are quite apart, as you can see. 
They need to be brought together in order to continue….

15. Leave space that is equal to the height of the tds. Then tat 1ds.
(This space acts as a picot for the next stitch and the ds becomes part of the 2nd tds too. ) 

16. We now repeat steps 2 to 15 to tat the next tds. 
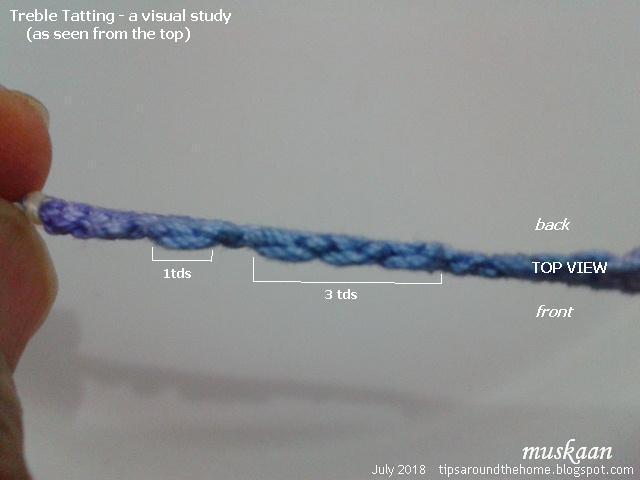
In above pic, 3tds have been made.
Notice that at the end of a single tds or a row of tds, 
there will always be a picot space followed by 1ds.

17. The crochet is pointing to where the picot lies between 2 tds. 
This is where we make joins when linking a new element to it.
If desired, this can be made longer to give a decorative effect.

But when we need to join a tds to a previous element/picot (as in this triangle motif), it requires a slightly different approach. There are 2 ways to do it, both of which will be shared in next post.
Also in the next post, I will share my way of making a 4-wrap tds.


A few more characteristics of the treble ds :

  • A tds is worked with one shuttle.
  • Tds can be made on chains as well as rings, including mock rings and thrown/floating rings.
  • 1 tds has 2 half stitches just like a ds. But each half stitch is constructed quite differently. They look visually similar, but are not mirror images as in ds.
  • A single treble comprises of : vsp, ds, 2 loops (chain), 3 wraps, vsp, ds, where the last ds becomes part of the next tds or element. 
  • Thus 1st half stitch of a tds comprises 1ds, 2loops ; and 2nd half comprises 3 wraps; both flanked by a vsp.
to be continued ...


happy trebling J

Saturday 21 July 2018

anybody interested?

Pin It now!
I need a couple more days to work on the treble tatting pictorials - mainly the presentation. Meanwhile here’s a free pattern in case anybody is interested….

Periodically this post turns up in the top-of-the-week scroll. I really don’t know who is interested and what they make of it. Anyway, you can see that it’s been trending again this week and finally caught my fancy. Despite the ideas I presented then, I didn’t make anything further myself. Thought it was time to rectify that lapse. So here is a circular edging made with a tweaked count of Mónica Manceñido’s Peace and Tolerance Tiny Heart motif. 

Tiny Heart Circular Edging
click here to download pdf


I was going to link adjacent motifs with chains and rings, but that would mean a whole lot of designing and testing work. So I decided to follow a simple path just to see how they lie first and then move on to more design elements or rounds.

In order to determine the exact number of motifs required for it to lie flat, 
I blocked it (rolling pin, of course). Hmm, just one more motif was needed.

design tip : I learned that if the count of the middle rings is smaller then I will get a closer circle, with fewer motifs. With the present count I need 16 motifs around. For a larger circle, one can add a split ring between each motif instead of a mock picot.


The pdf contains only a diagram and dimensions. 
UPDATE : If you have already downloaded the original pdf, please note that the middle rings of adjacent motifs link to each other. This linkage was missing in that diagram.
Or download this new pdf with correct diagram.

For those preferring a written pattern, here it is.

2 shuttles, ctm.
Split rings, mock/false picot,

Worked I Anchor size 40, each motif measures 1½ cm X 1½ cm.
Outer diameter of edging is 8½ cms and inner diameter is 5½ cms.

PATTERN

R1 : 10 – 4 – 4. rw
*Ch : 4 rw
R2 : 4 + 4 – 4 – 4.
R3 : 4 + 6 – 6 – 4.
R4 : 4 + 4 – 4 – 4. rw
Ch : 4 rw
SR : 4 + 4 / 10. mock picot
SR : 4 – 4 / 10. rw*
Repeat from * to * till there are 16 motifs. Join last motif to the first one (join R4 of last to R2 of 1st as well as last ring to first).
Note that the last ring of 16th motif can be worked as a normal ring.
Tie, cut and hide ends.

This is the basic pattern. It can be used as a frame, a coaster edging, on a card, sewn to a quilt block, etc.

For now, I am not doing anything further to this edging, 
but will keep it in mind for future adventures.

see also Tiny Heart Poppy - a 3D flower made from the heart motif. Some day I will get around to diagramming it in Inkscape.

Hope you enjoy tatting the pattern.
The circle of love and tatting is eternal!

Thursday 19 July 2018

treble with an M

Pin It now!
Yup,  I treMble in fear of how Ninetta will react to my crochet reference. But I get ahead of myself ....

First, a lovely triangular motif with both tatting stitches – the old ds and new tds.
Ninetta sent me a pic of her new treble triangle and I helped in writing the pattern. 

There are 3 rounds worked continuously in one pass. However I used different colours in each round to make it easier to demarcate stitches and counts.

I had to pause when joining a treble to an earlier element. After a couple of tries, I figured it out. I’m not sure if it is the right way, though it came out fine. I will share it in my next post where I dissect this new tatting stitch.
Ninetta Caruso’s
Triangular Motif (treble tatting)
(with pattern below)
A tad over 4 cms in Anchor size 40
The written instructions are for one-pass motif as in Ninetta’s model, climbing out with split ring. Or each round can be tatted separately as seen in the 3 colours I used in my model.

Abbreviations  (in order of appearance):
R – ring ; ds – double stitch ; vsp – very small picot ; tds – treble ;
BTS – bare thread space ; + - picot join ; - - picot ; SR – split ring ; rw – reverse work ; 
SS – switch shuttle ; TR – thrown/floating ring ; lj – lock join.

Notes :
  • Use ball and shuttle for each round is worked separately; use 2 shuttles, ctm, if working continuously.
  • BTS - since tds is ‘higher’ than a ds, leave enough bare thread space between rings.
  • How to make a tds video ; For all posts/info on Treble Tatting start here.
  • For how to join treble to a previous element (round 1) pull up thread through both picots – the vsp for tds as well as the picot on small ring. Stepwise pictorial in next post.
Pattern :

ROUND 1: (moving clockwise)

R1:  1ds vsp 1ds, 8tds, 1ds. BTS
*R2: 3 +(between before last tds) 3 – 3 – 3. BTS
R3:  1ds vsp 1ds, 1tds +(R2), 7tds, 1ds. BTS]*
Repeat from * to * once.
SR6: 3 + 3 / 3 + 3. mock picot

ROUND 2: (moving clockwise)

SR: 3 / 3,
*Ch 4 rw
R:   5+(after 2nd tds) 5 rw
Ch: 4 – 4 – 4.  SS
SR: 1ds vsp 3tds 1ds / 6 +(after 4th tds) 6. SS
Ch: 4 – 4 – 4 rw
R:   5 +(after 6th tds) 5 rw
Ch: 4 rw
R:   3 + 3 SS
TR:  3 – 3 SS*
Repeat from * to * around Round1.
Climb out with a split thrown ring (3/3). Mock picot.

ROUND 3: (moving counter-clockwise)

SR: 3 / 3. mock picot
R:   7 +(nearest picot on chain) 9. rw    
Ch: 2 – 4 – 4 – 2  lj(same picot) 4 – 4 rw
*R: 4 +(vsp) 4. rw    
Ch: 5 rw
R:   4 +(after 1st tds) 4. rw   
Ch: 5 rw
R:   4 +(after 2nd tds) 4. rw  
Ch: 5 rw
R:   4 +(after 3rd tds) 4. rw 
Ch: 4 – 4 lj rw
R:   7 +(picot on TR) 9. rw    
Ch: 2 – 4 – 4 - 2 lj rw
R:   7 +(2nd picot on chain) 9. rw    
Ch: 2 +(previous chain) 4 – 4 – 2  lj(same picot) 4 – 4 rw*
          Repeat from * to * till end. Tie, cut and hide ends.
******************

A visual study of ds and tds

I learned how to do the treble in these earlier motifs.
But while tatting this triangle more questions arose especially along design lines. I wanted to put these observations to the test. So, choosing thick threads, I set about trying to compare normal double stitches with treble tatting and a few variations. I think the pictures, with notations speak for themselves.
Both double and treble stitches are made of 2 half stitches, though constructed a bit differently.
However, a ds has only 2 ‘legs’ or threads on the core thread, while a treble has 3 ‘legs’ or threads around the core. 
Reason - the first half of a tds is actually a normal double stitch (2 legs) at the base.
This makes the tds wider than the ds by a thread. 

Moreover, a single tds, or a row of tds will start with [1ds,vsp,1ds] and end with [vsp, 1ds].
When I showed Ninetta this pic, she shared her precision-based tip; something I had merely observed as explained in the above para.
NINETTA'S DESIGN TIP :
“... one treble takes the place of 1 and half ds, and the contour is spaced as a normal height picot, ...”

While tatting the motifs I sometimes made a mistake in joining to a tds. I had to count each tds to establish which ‘picot’/space was the right one. Given my recent foray into the top view, I wondered how the treble looked from top. 
The trough is one long arc while there are 2 crests within/offsetting it !!! Wow.
In the 3tds segment in above pic, the small crest between the long trough is where the 'picot' is - where we join a future element.

Now here’s where I go into ‘crochet’ mode and treMble to use crochet terms. But I think it will help, so here goes.

A treble starts by pulling a loop through the vsp and again through this loop (1 crochet chain formed). Then we pass the shuttle through this 2nd loop and wind or wrap the shuttle thread 3 times around it before snugging tight.
I altered the number of loops pulled as well as the wraps made to see whether we can create viable variations of the tds. Yes, it works. (please note that Ninetta’s method is slightly different from the one I used here. A pictorial in next post will show the steps better).

So, from left to center the graduated tds –
1. like the single crochet (sc) –1 loop (no chain) thru vsp and 1 wrap with shuttle.
2. like a double crochet (dc) – 2 loops (1 ch) and 2 wraps
3. like a treble (tr) – 2 loops (1ch) and 3 wraps
4. like a double treble (dbl-tr) – 3 loops (2ch) and 4 wraps
This sequence was repeated in decreasing order. 

We can see the height changing clearly, as well as the number of ‘coils’ around the 2 halves of the treble stitch and its variations.
Please note that this is NOT a crochet stitch as Ninetta has explained in her posts. I have merely used it as a reference for visualization.

If all this is confusing, take a step back and the pictorials will soon reveal all. I have actually gained a whole lot of minute & detailed understanding even as I wrote out this post, and am truly amazed at Ninetta's brilliance especially the 1st half of a treble stitch! For the 2nd half of the treble, the closest similarity I could find was with her Vapor Picot.

to be continued - how-to pictorials

UPDATE : Stepwise pictorial ;

in helping a friend, one helps oneself