Showing posts with label new tatting techniques. Show all posts

Monday, 17 August 2026

help please

Pin It now!

 The DAL 2026 challenge is progressing nicely with 13 participants already sending in their start and/or finished models and a commitment from two others. Some have made/are making multiple versions and/or multiple rounds!!! Some have designed for the first time, but looking at their models, you wouldn't ever guess that! It is so exciting and inspiring. 

Since my blog has been silent for a couple of weeks, here's a quick write-up where I need your help.

This is an onion ring motif I created using Anne Fairchild's Skylark Join which works well to join both chains as well as true rings to a picot that lies below the current work. It is an old join (the Lark's Head Join) with a new function or application.

So here's where I'd like your suggestions -
  1. Should I add another round around the rings?  My intention was to add a chain round that dips in to resemble petals. What do you think?
  2. What should I name this motif? I am drawing a complete blank there.


I have been enjoying some tatting time and have taken stepwise pics for several of the projects, including the join and motif above. Many are for 'new' techniques. Some day I hope to upload them all.

Hope to hear from you, after which I will prepare a proper post with pattern, links, etc. ....

Tuesday, 26 May 2026

unhappy trials

Pin It now!

I was impressed by Lauretta Tondelli's experiments and effects which she shared in a FB group a couple of years back (she seems to have left FB when I checked before finalising this post and her posts are missing, too). Always meant to try them and here are two attempts - my first trials. Not happy but more details below ....

Lauretta Tondelli's Interlaced Onion Rings, a trial motif, placed inside a 2D medallion gone 3D!
 
The two images above show the piece from the 'front' and 'back' though it really depends on how you interlace the mock rings.

This interlacing effect of onion rings is made with one continuous chain starting with a small starter picot. Once all three mock rings made, they are interlaced through each other. Lauretta created a cute pair of earrings using this motif as the center and adding a teardrop.

My own reservation is about the third chain which I feel is too long in my trial and also the overall untidy visual. First trials, so perhaps there is still hope for me.
Okay this motif is supposed to be a flat medallion center for another effect that Lauretta was sharing. As you can see, my work has cupped enormously. I realised what was happening but continued nevertheless so that I can make the requisite changes in my next trial. For one, the picots should've been longer.
So now my issue was what should I make with this! It looks cute and has potential, doens't it? So I played around a bit ....
If we upturn the medallion it can make a nice bezel setting and one can add another layer beneath encasing the gem. I was too lazy to hunt around for the right sized gem, though.
I decided to add a base. This is a coil starting at the center with few slope and roll joins as the chain progressed. I should've stopped a bit sooner with a shorter coil.
The reason for the base is my idea to convert this into a miniature basket.
Same 'bowl' reshaped into a squarish bowl or potential basket.
And when I pinched the corners a bit more, ....
Some more pinching so that the cupping looks deeper and with addition of accessories, it can become a flower.

So, what is your verdict? What do you think it should grow into?

Many thanks to Lauretta for sharing her notes and apologies for my bungling ....

Friday, 23 January 2026

something new

Pin It now!

 For the last several weeks, starting around mid-December, I've been mainly focused on completing the Glossary for the book 'Six T's of Shuttle Tatting' by Net Best. Long back I had divided the glossary into separate letter files for ease of work and have gone through anywhere between 5 to 10 drafts of each over the years. Angela has been a patient and efficient support. This time it is 'final' ... my humble request to the tatting community is "Please stop bringing out new effects and techniques for this year so that I won't need to include it in the glossary ;-P Take a pause, my talented community!" 😁

So anyway, I've been tatting samplers for the glossary which were missing or for new entries. This, and the fact that I need a refresher on a few 'rarely' used techniques, I took up Natalie Rogers' Picot Bingo 2026 challenge again this year after skipping it last year. But instead of a completed project I might only make small samplers - to keep it short and quick. Some of these will actually dovetail with the glossary samplers, thus reducing any distraction or time constraint.

Learnt something 'new' - Stacked Dimpled Split Rings by Sandra Eichelberger (Crazy Mom Tats). It is a very clever application of techniques towards continuous tatting which she shared here - https://psychotatter.blogspot.com/2012/07/how-to-tat-stacked-dimpled-split-ring.html

NOTE: 'Stacked' is used for tatted elements that overlap and/or lay one above the other as a 3D formation. Hence in the present technique, 'stacked' is a bit of a misnomer and is probably used to indicate continuous tatting in a line or row of rings. (Thanks, Mary Arnold)

I used her stitch count. It is like working a split ring backwards where the 1st side is worked after working the 2nd side and the 1st side lies on the right instead of the left. Reminds me of Teri Dusenbury's SQDR (where she started with 1ds and then the entire ring was worked with reverse stitches) or a Reverse Ring, applied here to a dimpled yorkie split down the center.

It was a bit of a challenge to figure out the process but once I got it, it went smoothly. I think a pictorial or a video would help a great deal.
TIP: The main thing to keep in mind is to make the mock picot long enough. Notice how the dimple in the 2nd heart from top is less pronounced? The fault lies in a short mock or false picot.

Tied in a quick tassel made from the first scrap threads I could get my hands on. So one more tatted bookmark in my stash, though the body could've been longer.
The boxes crossed out in the Picot Bingo 2026 game (Level 2) -
  • Dimpled Ring - I'm sure these count even if they are split.
  • Tat a Rings Only Pattern - why do we limit ourselves to vintage rings only style patterns, LOL?
  • Tat a Heart - five hearts here.
  • Mock Picots - gravely important in this pattern/technique!
Two different levels of cards are shared by Natalie although I believe the above project falls in a bit of a higher category than even Level 2 (wink, wink). Check out the details and downloads here - https://www.patreon.com/posts/happy-new-year-147124370, 

UPDATE: (31 Jan 2026) Jane McLellan had worked on this technique to create a bookmark and a beaded bracelet here - https://janemactats.blogspot.com/search?q=stacked+dimple+rings
Many thanks to Sandra and Natalie !!! Keep it interesting and challenging! Great opportunities for new learning and consolidation of past learning.

Tuesday, 23 December 2025

armadillo join

Pin It now!

 Back in 2015 when I first ventured into tatting Eleonore Endrucks' patterns from her 1920 book, Die Schiffchen-Spitzen, (I had started with E22 for the summer homework by Georgia's Online Tatting Class) there were patterns including the very first one where the 2nd repeat/motif joins to the first with two consecutive joins. One is a normal picot join to a picot lying above the line of tatting (on the previous motif) and one is a lock join to a hidden picot lying below (on the same motif).  

I tried various methods to incorporate both joins into one continuous movement but was unsuccessful - the result just didn't seem neat. So you can imagine my immense excitement when I encountered Gretchen Miller's Armadillo Join earlier this year (July 2025)! She came up with it as a solution to linking two pieces of enameled metal for one of her patterns. She uploaded a video here -https://www.youtube.com/watch?v=9JRveDx6Wf4 . When I sought her permission to share a pictorial she was happy to note that the join could be used in pure tatted lace as well. And what I had missed in my 2015 trials was the final step, LOL.

ARMADILLO  JOIN
Gretchen Miller (Tattered Armadillo) July 2025

Since I have created a PDF for the pictorial which can be downloaded by clicking this link - https://drive.google.com/file/d/1PfM7UMj9YIIW3cA8fEVB1OgaXabFeo_L/view - I will keep the text below to a minimum.

Shuttle 1 - mustard thread ; ball or shuttle 2 - blue thread.
Note: The join is worked with a single shuttle.

Normally, one would consecutively make a lock join to the chain picot below and a picot join to the ring picot above and then proceed with the current chain. Armadillo join allows us to make both linkages simultaneously.....
... by pulling a loop of the ball thread up through the picot above and then bringing it down through the picot below.
Then shuttle is passed through it. Notice how it is basically a picot join, except that the loop goes through two picots on opposite side of the current chain.


But here's one extra step where the shuttle is brought back to the left by passing it under the loop.
The linkage is complete and now all we need to do is remove all slack.

Now steps 7 and 8, I find, require some practice and dexterity to remove slack from all the threads and loop.

Thus we have not only linked the current chain to two picots, but have simultaneously moved across to the right! Clever, right?! 

I haven't been able to experiment and explore it too much, although I did make it backside on the E1 sampler at the top. And my next post will feature a derivative pattern where it can be used.

Many many thanks to Gretchen for sharing this join!

Saturday, 28 September 2024

variably padded lines

Pin It now!

If you tat only for beautiful lace, this post might not be for you, though it does showcase some lovely effects. My approach to tatting is different and I enjoy all aspects, including delving a bit deeper and finding commonalities or differences. And there was one discovery here that really got me excited!

Another post in my Common Threads series, a consequence of my research, tatting, and editing for 'Six T's of Shuttle Tatting' by Net Best. Sharing my thoughts and observations and short explanation of concepts. 

PADDED DOUBLE STITCH (pds) or padding the stitch (as different from padded tatting) has been around for several decades, with Rhoda Auld's (1974) 'self-padded double stitch' followed by the balanced DS and double DS. You can read the detailed and comparative post, along with a pictorial and notations, here - https://tipsaroundthehome.blogspot.com/2015/11/pds-padded-double-stitch.html .

VARIABLE  PADDED  STITCH - In this 2014 post,  https://tipsaroundthehome.blogspot.com/2014/05/tatting-experimenting-with-stitch.html , I showed a few possibilities of padding only one half-stitch as in spiral tatting; of having more than 2 or 3 wraps; and more importantly of making a variable/uneven number of wraps in the half-stitches. This can be applied to both rings and chains.

TIP: Due to the wraps, it is essential to suspend the shuttle at intervals so that the thread regains its balance. 

LINE is a generic term used by Anne Dyer to refer to the different ways rings and chains can be 'knotted' - basically the different stitches we can use to achieve a certain look and effect. Some may require auxiliary threads and shuttles; some might apply only to one type of element; some may be better expressed through use of contrasting colours; and so on. We can all name multiple techniques starting with regular double stitches to pearl tatting, Victorian sets to lock chains, ....
💧💧💧💧💧

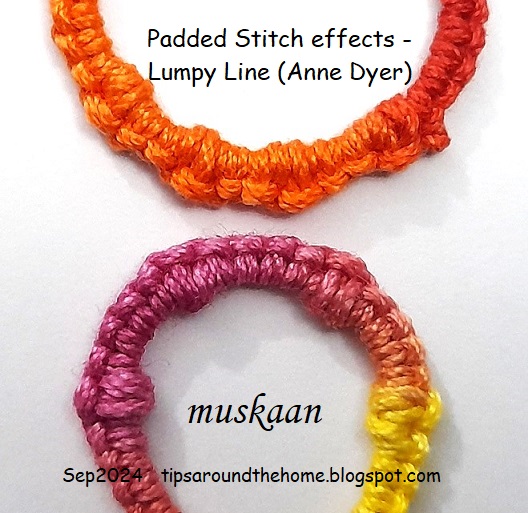
LUMPY LINE - another term and effect by Anne Dyer (1993) where she uses a padded stitch after every 3 or 4 double stitches creating a lumpiness to an otherwise smooth line. Here both halves of the padded stitch have three wraps giving it more body or bulk. The lump can become more pronounced if not tensioned too tightly.
Notation for Lumpy Line (the lower model) - 
Ring or Chain: [4, 1pds(3,3)]x4, 4. 
In the top red/orange model, I did not space the pds enough, leaving only 2 DS between.
💧💧💧💧💧

The following two effects of variable padded stitch threw up a very exciting observation!!!! It is the reason I took stepwise pics despite the existence of excellent resources, so that you can compare yourself!

SPIRAL  KNOT  STITCH - a term coined by Jennifer Williams (2012) along with a pictorial here - https://www.cariad-tatting.com/techniques . It is a textured effect made with a single padded half-stitch flanked by normal DS. An example of variable PDS.

1. Following a DS, tat a 2nd half-stitch (SHS) but do not snug. Instead pass your shuttle back to front thrice through the open leg as we would normally do for any PDS. 
TIP: There are 3 ways to make the wraps, but once transferred, the result is identical. Follow whichever method you prefer.
2. The 3 wraps are now being snugged ...
3. Notice how the wraps or spirals coil around the Core thread. 
They are, after all, the additional 'legs' of the stitch.
4. Continue with 1DS.
Repeat from steps 1 to 4 for desired length.

5. A ring and a chain with spiral knot stitch or variable padding.
Notation example for Spiral Knot Stitch (no FHS in the PDS) - 
Ring or Chain: 4, [1pds(-,3), 1]x4, 4.

💧💧💧💧💧

VAPOUR STTICH - by Ninetta Caruso (2011)    (https://www.flickr.com/photos/ninettacaruso/5660263485/in/album-72157625550124777) more popularly known as the Vapor Picot. This can also be considered a variable PDS, but with a notable difference in the initial step itself. 

UPDATE: This stitch was used in a ring by Rhoda Auld in her 1974 book but constructed a bit differently. More about it in a future post.

1. Make the first half-stitch (FHS) but do not snug. Pass the shuttle from front to back through the loop but BEHIND the open leg. The crochet hook shows how the shuttle would need to move.
2. Here the shuttle is following the path outlined above.
3. Repeat the step twice more, thus making three wraps behind the leg (they are now around the leg). The thread tends to twist.
4. Now transfer the wraps to the ball thread and gradually allow the wraps/spirals to move down snugly. Notice how the wraps are stacked one above the other vertically - the complete opposite of spiral knot stitch. (Compare pic #3 of spiral knot stitch with pic #4 of vapour stitch)  
5. Tat second half-stitch to complete the vapour stitch.
6. Vapour stitches on ring and chain. In the ring, they are contiguous. In the chain, 1 DS separates 1st and last vapour stitch from the 3-stitch cluster in the center.
Notation example for Vapour Stitch (wrapping behind leg of FHS) - 
Ring : 7pds(3,0).
Chain : 8, 1pds(3,0), 1, 3pds(3,0), 1, 1pds(3,0), 8.
 
Both effects together. I have limited my samples to the very basics. It is interesting to play with the number of wraps especially as shown by Ninetta. When you increase the number of wraps, we get a curved coil. 

When I told Ninetta of my discovery, she remembered that Karen Cabrera had also made the same observation, having consecutively shot videos for both stitches! Watch her demos in Lessons 131 and 132 (http://entrelanzaderas.blogspot.com/2010/10/clases-de-frivolite-tatting-lessons.html)

💧💧💧💧💧

Now this next effect is not strictly a padded double stitch but I found it so interesting when I had tatted my first sample as Anita and I worked through the book (or started to but never finished!) last year. (https://tipsaroundthehome.blogspot.com/2023/06/bigger-flower.html).

KNOBBLY  LINE - Anne Dyer (1993). The way this is worked is completely new to me, but very easy. I do hope to use the effect in some project. Applicable to both rings and chains.

We work 2 DS, but leave a very small picot space between them without snugging. Start the 3rd DS but move the ball thread loop over the open space before tensioning the half-stitch. Follow this by a normal SHS. This is seen in the right sample above. She says to make 'sure the twist is on the top and not at the back'. I found this a wee bit fiddly this time and had to manually coax the thread into the desired twist.
The sample on the left is made similarly, but I let the loop slide and sit 'naturally' following its normal grain or twist. Thus the 'bar' faced back. The difference in look is evident and I kind of prefer my variation, LOL. 
The same samples as seen from the back are also interesting.

So, while this knobbly line does not strictly conform to PDS or variable PDS, there is a tiny bit of 'padding' since a half-stitch is tightened over previous work. And I like the effect!
💧💧💧💧💧

If you have managed to read this far, I commend your patience and passion! And I'd like to stress that this is not a comprehensive listing of variable padded stitch effects. It is probably the tip of the proverbial ice berg. Why not create your own?

💧💧💧💧💧

Many thanks to all mentioned above - they enrich our world of tatted lace!

Saturday, 24 August 2024

on the fringes

Pin It now!

 Or not so much on the fringes? 

FRINGE(s) is a kind of decorative edge made of lots of hanging threads.  

FRINGE TATTING usually involves very long adjoining picots at the outermost edge of the piece, which are then cut and trimmed to size. These may be frayed if needed. (thanks to Anita Barry, who also shared a pic for the Glossary)


TATTED  FRINGE  AND  ADAPTATIONS -
Then came the Tatted Fringe shared by Corina Meyfeldt in November 2015 here - http://cmhandmade.blogspot.com/2015/11/fringe-sort-of.html . 
Unlike the former, the tatted fringe requires an auxiliary or spare thread.
She first tatted a chain with long adjoining picots on the main core thread; then snipped and trimmed the picots, spread them out and wound the shuttle to start the project. Snipping the picot tips separates the individual stitches.  Corina brought forth each fringe from the core thread as required. 

Tatted Fringe on Picot -
Notice that in the above WIP ring, I placed some of the fringes on the ring loop or left-hand thread while others remain on the shuttle thread. Thus we have the option of placing the fringe on the picot as well as on the core. Just like one would do for beads!

The above tatted fringe (made of metallic thread) is positioned on both the core as well as picot threads.
An extended application of Corina's method.
This can be done on rings as well as chains and gives a thicker fringe.

Spot Adaptation (using luggage tags) -
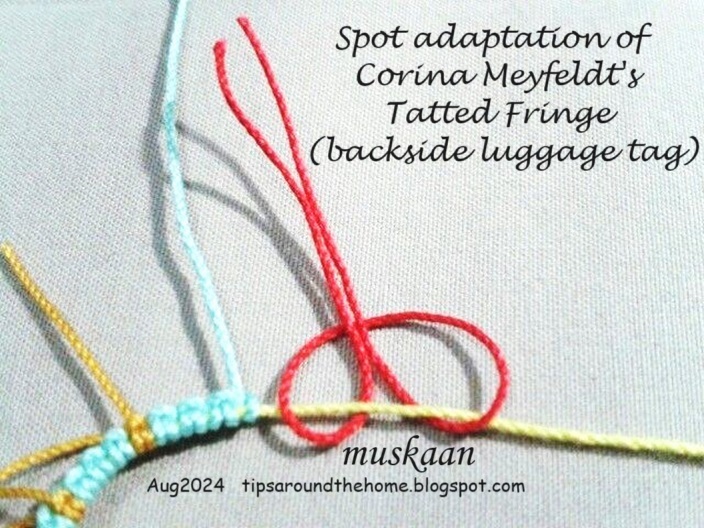
In December of the same year I shared my spot adaptation, with pictorial, here - https://tipsaroundthehome.blogspot.com/2015/12/fringe-benefits.html
Instead of tatting a chain of long picots, I used luggage tag loops to make a lark's head knot on the core thread wherever and whenever required. These scraps can be tied frontside or backside (see next pic).
Besides, we have the freedom to include as many colours and threads as desired. Again, though not shown, the tag can be tied to the left-hand thread (on picot) or the core thread.

Seen together on a chain. Look closely and you will see that I brought the left-hand thread over and between the luggage tag, thus securing the fringe. 

NOTE: Since the tatted fringe makes a stitch on the core thread, care must be taken with the total stitch count in a pattern not written for a fringe. 

Tatted Fringe Picot! -
Now this is probably something new. Or at least I haven't come across it yet.
Since I had a few fringes left on the shuttle after tatting the first sample, I tatted a second ring but put all the fringes on the loop around the hand. And made a picot! 

UPDATE (Dec2024): 
BEADED FRINGE - aka Beaded Stem (Corina Meyfeldt) and Single File Beaded Picot (Nina Libin)


So, that's all for now folks. Editing (and tatting samples for) the book Six T's of Shuttle Tatting, by Net Best, is taking me to the fringes of the tatting world and tatting literature! It is making me delve deep and wide and sometimes inspiration strikes and I go off on a short explorative excursion. Hope you enjoyed this short journey and can find some applications for these fringes. And if you have any new  technique or effect, please let me know so that it can be included in the Glossary.