Showing posts with label across joins. Show all posts

Tuesday, 23 December 2025

armadillo join

Pin It now!

 Back in 2015 when I first ventured into tatting Eleonore Endrucks' patterns from her 1920 book, Die Schiffchen-Spitzen, (I had started with E22 for the summer homework by Georgia's Online Tatting Class) there were patterns including the very first one where the 2nd repeat/motif joins to the first with two consecutive joins. One is a normal picot join to a picot lying above the line of tatting (on the previous motif) and one is a lock join to a hidden picot lying below (on the same motif).  

I tried various methods to incorporate both joins into one continuous movement but was unsuccessful - the result just didn't seem neat. So you can imagine my immense excitement when I encountered Gretchen Miller's Armadillo Join earlier this year (July 2025)! She came up with it as a solution to linking two pieces of enameled metal for one of her patterns. She uploaded a video here -https://www.youtube.com/watch?v=9JRveDx6Wf4 . When I sought her permission to share a pictorial she was happy to note that the join could be used in pure tatted lace as well. And what I had missed in my 2015 trials was the final step, LOL.

ARMADILLO  JOIN
Gretchen Miller (Tattered Armadillo) July 2025

Since I have created a PDF for the pictorial which can be downloaded by clicking this link - https://drive.google.com/file/d/1PfM7UMj9YIIW3cA8fEVB1OgaXabFeo_L/view - I will keep the text below to a minimum.

Shuttle 1 - mustard thread ; ball or shuttle 2 - blue thread.
Note: The join is worked with a single shuttle.

Normally, one would consecutively make a lock join to the chain picot below and a picot join to the ring picot above and then proceed with the current chain. Armadillo join allows us to make both linkages simultaneously.....
... by pulling a loop of the ball thread up through the picot above and then bringing it down through the picot below.
Then shuttle is passed through it. Notice how it is basically a picot join, except that the loop goes through two picots on opposite side of the current chain.


But here's one extra step where the shuttle is brought back to the left by passing it under the loop.
The linkage is complete and now all we need to do is remove all slack.

Now steps 7 and 8, I find, require some practice and dexterity to remove slack from all the threads and loop.

Thus we have not only linked the current chain to two picots, but have simultaneously moved across to the right! Clever, right?! 

I haven't been able to experiment and explore it too much, although I did make it backside on the E1 sampler at the top. And my next post will feature a derivative pattern where it can be used.

Many many thanks to Gretchen for sharing this join!

Tuesday, 29 May 2018

Mock Rings 1 U-O Join continued

Pin It now!
In my haste to upload, I missed adding some details to the pics in previous post. These have now been notated and updated.

Continuing from previous post ….


The following are again mock rings made using the Under and Over Join. But we now have a tiny picot at the start of the chain. When the chain is joined back to this picot, it creates a mock or false ring.


1C. Under and Over Join: With joining picot; Unattached rings

 
 Make a small picot at the base of the chain before tatting the ‘ring’ portion.
Since the mock ring is unattached, it is easy to place 
one thread above and other below the chain.

 
Pull up a loop of ball thread through the picot, pass shuttle, and snug. 
A simple picot join converts this chain into a mock ring. Continue tatting.
Note: Although we have made a picot join, this arrangement of joining an overlapping chain is included in under-over join. 

 
This time the shuttle thread is below and ball thread above.
Pull a loop of ball thread down through the picot, pass shuttle and tension the join.
Two unattached mock rings made with under-over join 

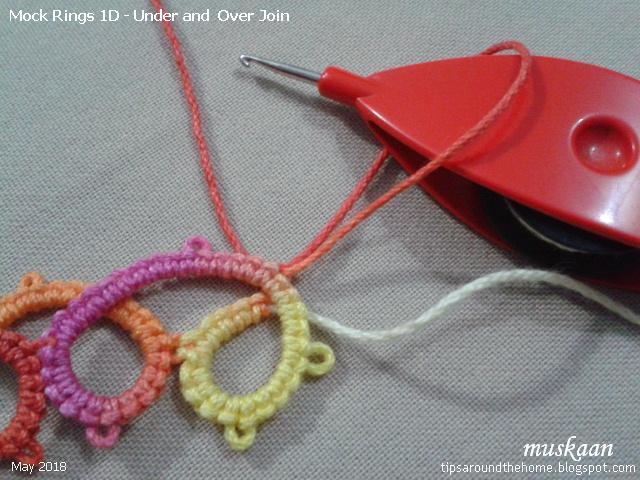
1D. Under and Over Join: With joining picot; Attached rings

 
Here the ‘ring’-chain is linked to previous ring and both threads are above the chain.
Pull ball loop down through picot, pass shuttle and make the join.
This is reminiscent of the down join.
 Continue tatting.

 
For mock ring #8 both threads are below the chain. 
Pull up a loop of ball thread through picot, pass shuttle and snug the join.
Notice the change in overlap between mr7 & mr8! Continue tatting.


as seen from the back.
This above sampler, with joining picots and overlapping chains that form loops is also known as the Running Scroll, for it’s flowing cursive style.


This join can also be used to create a line of back to back rings – called a Cord of Loops. We now prefer to work this as a split ring braid or mock rings with a flatter closure. The latter will be discussed in future posts.

Observations
  1. In all these mock ring instances, the core thread remains free to slide.
  2. They can all be worked with a ball and shuttle.
  3. All mock rings face the same side as the normal first and last rings when we reverse work after first ring.
  4. The under and over join creates a slight overlap/layer when crossing over, giving the mock ring a dimensional effect rather than lying absolutely flat.
  5. The overlap changes depending on which type of crossover we choose.

This completes the first category of mock/false rings using a join across a chain.
But there are so many more ways of joining or closing a chain to create a faux ring. While I work on that presentation, I invite you to sit back and recall all the different ways in which you may have made mock rings. It is quite an eye-opener. Please share your list in the comment box in case I have missed some.


Main references:
Tatting Technique & History – Elgiva Nicholls, 1962. (running scroll & cord of loops explanation  on p94, models on p96)
An Illustrated Dictionary of Tatting – Judith Connors, 2007.

…. to be continued 
See also -
https://tipsaroundthehome.blogspot.com/2018/05/mock-rings-1-under-and-over-join.html
https://tipsaroundthehome.blogspot.com/2018/06/mock-rings-2-lock-join.html
https://tipsaroundthehome.blogspot.com/2018/06/mock-rings-2-lj-mock-onion-rings.html

Monday, 28 May 2018

Mock Rings 1 Under and Over Join

Pin It now!
SCMR is a mock ring, but not every mock ring is a SCMR (self-closing mock ring).
While trying to explain this to someone who used SCMR as a default term, I started to remember so many different ways a mock ring can be shaped.

Mock Rings have been around for centuries. A mock ring is essentially a chain that is joined back on itself to create the impression of a ring. The difference lies only in the way the chain is closed.
In order to avoid overload I will break up the presentation into segments. This post covers mock rings made using the Under and Over Join.

Mock Rings 1: Under and Over Join


Once the tatted chain was invented, it was a simple step to convert it into a mock ring using an Under and Over Join - with or without a picot. Under and Over Join is a type of ‘across’ join, allowing us to move threads to the other side across an existing element.

A single shuttle filled with cream thread and a ball with variegated colour are used for clear distinction in this pictorial.
There are 5 stitches between every picot; each ring is 5-5-5-5 & chain 5-5.

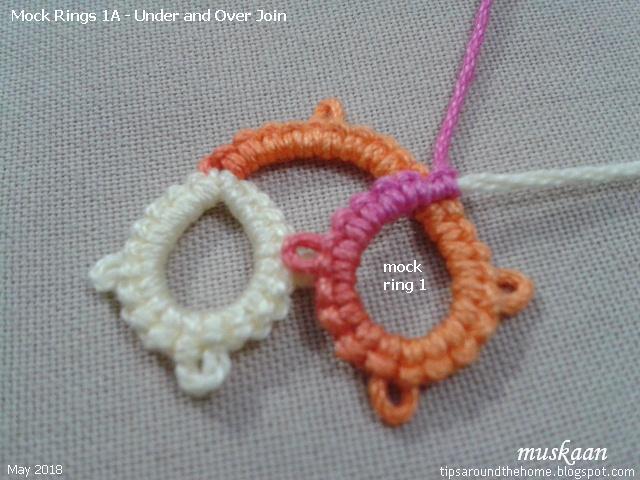
1-A. Under and Over Join: Without joining picot; Unattached rings

After a normal ring (cream), RW and 5-5 chain (above pic), we start working on a long chain (5-5-5-5) that will form the mock ring. 
 

Place shuttle thread above and ball thread under the chain. Continue tatting the chain normally, enduring that the first half stitch after the crossover is nicely snug.
A mock ring is made, with the chain (running scroll) moving across from above.

Note: Because of RW, the mock rings face the same side as the first normal ring.
We know this popularly as Alligator or Capture Join.


Let’s see what happens if we switch thread positions (ball above and shuttle under). 
It is difficult to control the shuttle enough to get a continuous chain above. 
But it can be useful in directional (fs/bs) tatting when working from the back side.

This method is useful when the elements (in this case mock rings) are free/unlinked and the threads can be positioned on either side.
But if the ring is attached to previous element, here’s how the join can be made.


1-B. Under and Over Join: Without joining picot; Attached rings

After linking the chain to previous ring, both threads are in front of/above the chain.
Pull a loop of ball thread down from under the chain, pass shuttle through loop, and snug tightly. Continue tatting chain.

In this case, after linking the chain, both threads are below/under the chain.
Pull a loop of ball thread up, pass shuttle through it, and snug tightly. Continue tatting chain.

This pulled loop is very handy when crossing over any previous element as in faux Celtic tatting. I used it in Teri Dusenbury’s Flurry snowflake. The pattern instructed slipping the long ball thread through the spaces and tatting the chain (as in #1A or alligator join). It was cumbersome and prone to tangling. Pulling a loop through the joining point is a quicker, more efficient method.
I made this in 2015, but am unhappy with my work.

This is a view from the back.

Without a joining picot at the start, there is greater flexibility in shaping the mock ring, but one also has to be extra careful to see that the ‘join’ is snug and secure. Adding a small picot at the start of the chain ensures accuracy and stability. I will show this in next post, along with some observations.


…. to be continued
Till then, enjoy tatting all over :-)))
See also -
https://tipsaroundthehome.blogspot.com/2018/05/mock-rings-1-u-o-join-continued.html
https://tipsaroundthehome.blogspot.com/2018/06/mock-rings-2-lock-join.html
https://tipsaroundthehome.blogspot.com/2018/06/mock-rings-2-lj-mock-onion-rings.html