Showing posts with label running scroll. Show all posts

Tuesday, 29 May 2018

Mock Rings 1 U-O Join continued

Pin It now!
In my haste to upload, I missed adding some details to the pics in previous post. These have now been notated and updated.

Continuing from previous post ….


The following are again mock rings made using the Under and Over Join. But we now have a tiny picot at the start of the chain. When the chain is joined back to this picot, it creates a mock or false ring.


1C. Under and Over Join: With joining picot; Unattached rings

 
 Make a small picot at the base of the chain before tatting the ‘ring’ portion.
Since the mock ring is unattached, it is easy to place 
one thread above and other below the chain.

 
Pull up a loop of ball thread through the picot, pass shuttle, and snug. 
A simple picot join converts this chain into a mock ring. Continue tatting.
Note: Although we have made a picot join, this arrangement of joining an overlapping chain is included in under-over join. 

 
This time the shuttle thread is below and ball thread above.
Pull a loop of ball thread down through the picot, pass shuttle and tension the join.
Two unattached mock rings made with under-over join 

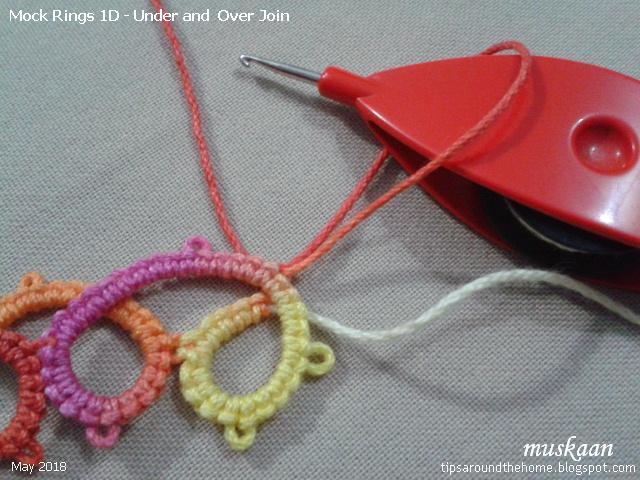
1D. Under and Over Join: With joining picot; Attached rings

 
Here the ‘ring’-chain is linked to previous ring and both threads are above the chain.
Pull ball loop down through picot, pass shuttle and make the join.
This is reminiscent of the down join.
 Continue tatting.

 
For mock ring #8 both threads are below the chain. 
Pull up a loop of ball thread through picot, pass shuttle and snug the join.
Notice the change in overlap between mr7 & mr8! Continue tatting.


as seen from the back.
This above sampler, with joining picots and overlapping chains that form loops is also known as the Running Scroll, for it’s flowing cursive style.


This join can also be used to create a line of back to back rings – called a Cord of Loops. We now prefer to work this as a split ring braid or mock rings with a flatter closure. The latter will be discussed in future posts.

Observations
  1. In all these mock ring instances, the core thread remains free to slide.
  2. They can all be worked with a ball and shuttle.
  3. All mock rings face the same side as the normal first and last rings when we reverse work after first ring.
  4. The under and over join creates a slight overlap/layer when crossing over, giving the mock ring a dimensional effect rather than lying absolutely flat.
  5. The overlap changes depending on which type of crossover we choose.

This completes the first category of mock/false rings using a join across a chain.
But there are so many more ways of joining or closing a chain to create a faux ring. While I work on that presentation, I invite you to sit back and recall all the different ways in which you may have made mock rings. It is quite an eye-opener. Please share your list in the comment box in case I have missed some.


Main references:
Tatting Technique & History – Elgiva Nicholls, 1962. (running scroll & cord of loops explanation  on p94, models on p96)
An Illustrated Dictionary of Tatting – Judith Connors, 2007.

…. to be continued 
See also -
https://tipsaroundthehome.blogspot.com/2018/05/mock-rings-1-under-and-over-join.html
https://tipsaroundthehome.blogspot.com/2018/06/mock-rings-2-lock-join.html
https://tipsaroundthehome.blogspot.com/2018/06/mock-rings-2-lj-mock-onion-rings.html

Tuesday, 17 October 2017

meddling with medallions

Pin It now!

Going over the medallions document, I realized that it needed more samples – visuals are so much better than words. Excited, I got down to it. Here are a few of them.

Most of the samples in the document seemed to have single rings around the center. But trefoils, clovers, layered rings (ANKAR style), etc. can also form an enclosed space. So I created this pattern using inward facing clovers. There are thrown rings on the chains.
‘Tis the season, hence I’m calling it the Clover Wreath. Wouldn’t it work well as the center of another doily ?! The large rings need to be joined, though.


Now here’s something I don’t remember ever doing – a Central/common Picot on a Chain.

I tried to create my own pattern with 1 horizontal and 1 vertical ring on each ‘spoke’, but it wasn’t working (do you have any idea why?). Finally I took the design idea from the model #69 in Elgiva Nicholl’s ‘Tatting: Technique and History’ but used my own stitch-count and single decorative picots.

TIP: For straight chains, avoid snugging the chain too tight – we don’t want it to curve/arch. 

A central ring with picots (also called rosette by Mlle Riego) is a common feature of many patterns. Traditionally it was tatted separately. Now we have multiple options to incorporate it without cutting off thread : climb out with a mock picot ; work it as a mock ring ; and so on.

In this square, the central ring is thrown off the first chain -
When I was first learning split rings during Jane's TIAS 2014, I attempted the Fandango coaster to practice on the side. So not happy with the working ! Time to try it again. Much better.

This is a Classic Tatted Daisy. It starts with a central ring with picots. Then we add a round of outward facing rings – lock joined to the picots and separated by bare thread. Traditionally it was worked as separate rounds and with a single shuttle, hence bare thread separates adjoining rings.

Now we make it in one pass and the bare thread is sometimes substituted with chains.

Incidentally, my Aspiration Doily (trial 2) now has a Daisy center ! It is a modern construction using 2 shuttles (or a long tail for shuttle 1) with the outward rings/petals thrown off the central mock ring (SCMR).
It lies flat and the center is more solid than bare threads between rings in previous trial. 

And here’s another interesting variation :
a central ring with picots, surrounded by concentric chains, lock joined to picots on previous rounds, and a final round tatted like the traditional daisy petals with bare thread and lock joins !
So, the rosette turns into a daisy !
(a central ring with closely packed chains around it is Also called a rosette!)

These were tatted over 15 years ago when I had no notion of a lot of tatting techniques nor how to hide ends. You can clearly see spiraling rounds rather than discreet ones. Although I did get better over time and in one of the size 40 yellow ones (made a few years after the size 20 red), the inner circle is almost round with equal-size picots.

Pattern is part of a lace from ‘Tatting Favourites’ by Anchor Design Center. Each medallion is worked in 2 parts but I now realise that the outermost rings can be worked as thrown rings. 
It has been one of my favourite go-to patterns when travelling. The medallions were later joined with a wavy scroll with opposing medallions, thus functioning as motifs. 

Medallions – never too meddlesome when tatted !


Sunday, 26 June 2016

creeping along

Pin It now!

Both my tat-alongs are creeping along (Lene's snowflakes & Renulek's doily) …

The Seventeenth Day of December Snowflake
Lene Björn

My little experiments are creeping along – trying to apply different techniques to a regular symmetrical pattern ….
Creeping around 

I visualized this snowflake as a cross section of a tree trunk with a flowering creeper around it . This determined my choice & placement of colours.
Round 1: single shuttle, scrap length thread, SSSR, lock join, mock picot. 1”
I started with a normal ring, mock picot, followed by SSSRs.
After each SSSR, I made a lock join on the picot to secure & move into position for next ring.
Last ring is again a normal/regular ring, with picot join to first ring.

Thoughts : the lock join may show up in lighter shades. The shape of SSSRs did not come out as evenly as I’d hoped, but that is perhaps because of my own limitations of thread size & eye sight when working tiny fiddly rings.
Round 2: 2 shuttles, directional tatting (fs/bs or RODS), mock rings, scroll, rotate work, direct tatting (reverse stitch/unflipped), very small picots, fold chain (2 first half st or 2 second half st).

Visualizing this round as flowers in profile on a climber with leaves, I wanted to add a bit of layering effect . Hence used the running scroll & mock rings for the green stem & leaves part.
For flowers, I used 2 strands of orange embroidery thread & 1 strand of silk thread. It created a soft sheen/sparkle, which is not captured in the photos. (Even the colours seem dull in the pics :-( 

The pattern called for a figure “8”, not just a single ring-and-chain scroll, as well as anchoring to chain. Another catch was that despite the spiraling ‘8’, all stitches needed to face outwards as in normal rings!
I tried a couple of different ways to get the layered scroll with mock rings on both sides.
1. Folded Chain using 2 half stitches before & after the outer ring in order to get the ‘8’. Made 4 in this manner, first without joining the chain back on itself, then making a very small picot & joining back as a mock ring.
2. Direct Tatting was used in last 2 repeats. Switch to reverse stitch (unflipped) when change of direction is needed. 
Because the green is a continuous chain, adding & joining of picots was adjusted according to the flow of the chain.
Measures < 3½” 
Thoughts : Getting the scroll & joins right was a bit of a struggle! At times I even messed up my directional tatting.
Method 1 with folded chain creates a lot of bulk underneath, with 2 twists ! However, it can be worked with single shuttle & ball, if required in any pattern.
What also complicated matters was the fact that the leaves were anchored at their end picots ! I don’t know how I crept out of that one !
Method 2 with direct tatting worked out much better. It was easier and visually better (the top & left pair of leaves/mock rings in the pic above) 

I have to be satisfied that I could just about put it together, even if it did not come out as neat. I did see a spectacular use of the elusive Rotate Work (I’ve always found it’s application a bit confusing)


I forgot to post Round 12 of the doily last time ....

A doily tat-along by Renulek
Super 17 butterfly & Morning Glory on the doily in above pic.

A super quick round ! Used ball & shuttle this time. Happy with my long chains. It was only while blocking (I still use the rolling pin) that I noticed one chain had twisted. Oh well, got to live with it.
Measures 13¼” after this round , in size 40 thread.
This pic is taken with the doily draped over the dining room chair. Lighting is not too good, but the background is maroon.
A super quick round ! Used ball & shuttle this time. Happy with my long chains. It was only while blocking (I still use the rolling pin method) that I noticed one chain had twisted. Oh well, got to live with it.

I’ve started Round 13 & it looks really pretty !!!

happy tatting :-)))


Related Posts :

Monday, 16 May 2016

Of long chains & large rings

Pin It now!

I keep telling myself that I will Not be distracted. Huh, as if that resolution lasts for long!
Yesterday I got this cute angel pattern in my mailbox & recently some experimentation on Mock rings held my curiosity. Of course I had to jump in ! You know the feeling, right ?!

by Sheila Heneise    
On May 16th, Georgia Seitz is revisiting this cute angel pattern as she some story to tell !
I took the opportunity to tat this minimalist, but happy angel.
This time I went with single shuttle & ball thread, in Anchor size 40 white.
Techniques I used : direct tatting, directional tatting, decorative picots, Join to Smooth Side (JSS), inward picot (held by pin), long picots, very small picots, turn work.
Size : approx. 1¾” x 1 ¼“
Instead of reversing work each time as instructed, I used direct tatting (reverse stitch) for many of the segments. It is a fairly quick & fun tat, but I could’ve done better with the chain shapes.
One can make the wings using Martha Ess' Folded Rings.
TIP : Switching from normal tatting to direct tatting (and vice versa) can create a distinctive pointed chain/tip at the turn. 
OOOOOOOOOOOOOO 

Large Ring Options

Each of the 4 large rings in the motif has been worked differently using the stitch-count given by Eliz. (links to respective posts & tips in the discussion below).

RING 1 : Normal Ring
Working large rings has become very comfortable ever since I came across Patty Dowden’s technique. I have my own version of it – looping the thread round the entire hand (all fingers) gives me lots of room & slack, without having to wind extra thread.
Conditions : stitches should not be tensioned too tightly ; 6-ply tightly twisted thread works best

RING 2 : Mock Ring with inward picot
Jane McLellan’s experiment with normal ring, self-closing mock ring (SCMR), & mock ring, led her to choose the latter for the large rings’ motif she was tatting. She used an inward picot (picot on the core thread), held in place by a pin/clip, at the start of a long chain which was then joined back to the picot to simulate a ring. She also used a SLT/overhand tie to change direction of chain for the ring. Instead of SLT, I switched shuttles.
TIP : SCMR is a ‘fancy’ Mock Ring (MR). The only difference is that the inward picot loop is drawn out & held on a finger, allowing the whole shuttle to pass through at the time of linking & closing. In MR, we make a normal picot join.

RING 3 : Mock Ring with scroll/overlapping effect
This was followed by Eliz Davis' mock ring where instead of an inward picot, she used a normal picot, tatted the long chain, curved it back into ring shape & linked it to the picot below as in stacked rings. She also shared the stitch-count which I used.
This was an interesting ‘twist’ not only in terms of visual effect, but also in terms of working it. In Jane’s MR, we continue to tat the chain & join to previous elements in clockwise direction, since the SLT or the switch shuttle made the directional change right at the beginning.
In Eliz’s MR, the chain is continued as normal, hence it is looped back in counterclockwise direction & joined to previous element accordingly !
TIP : Visually this is very similar to a Running Scroll in Elgiva Nicholl’s book . And one can choose the direction of overlap. The overlap in my trial is opposite to that of Eliz’s. Also, instead of a picot, one can use an under-over or alligator join.
UPDATE : Mock Ring pictorials and options in series of posts starting with .... https://tipsaroundthehome.blogspot.com/2018/05/mock-rings-1-under-and-over-join.html  

RING 4 : Folded Chain Mock Ring
I’ve used the folded chain many times, eg. in the Super 17 Butterfly. Would it simulate a ring ? At the point where ring has to start, make a very small picot and 2 SHS (2nd half stitches). The chain folds immediately, leaving the picot protruding outward for joining at the end. I counted the 2SHS as 1DS (but it is optional). Continue with chain & join back at base to the picot.
I could’ve made the picot even smaller.

Factors that may determine choice :
  • Thread colours & desired position in pattern
  • Individual ease & comfort with particular method
  • Whether working with single shuttle & ball or with 2 shuttles (The above motif can be tatted with a single shuttle & ball, irrespective of the method !)
  • Thread characteristics
  • Desired visual effect
OOOOOOOOOOOOOO  

Update

In the previous post, Set 1 of Common Threads has been renamed ‘Overhand Tie’ (instead of overhand knot) after a discussion on Craftree. Two ties in succession create a knot. A knot conjures up the image of something that has been tightened, whereas a tie is like a ‘half-knot’ with slack that can be loosened easily if required.


Related Posts : butterfly patterns