Showing posts with label Wiosna 2016. Show all posts

Wednesday, 10 August 2016

4 months of spring …

Pin It now!

4 months of wiosna lasting through the hot hot lato & the muggy dreamy monsun

Renulek’s Wiosna 2016 
A doily tat-along by Renulek
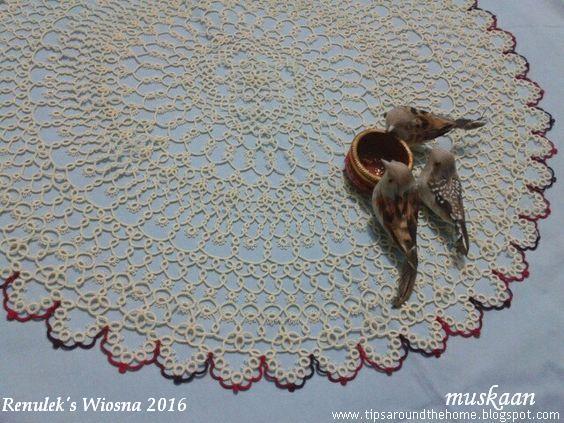
Started on 14 April ; completed yesterday !
4 months of this glorious Wiosna, spent with Renata (Renulek) has come to an end. Luckily, we all have something material to show & display & ogle at for many decades, thus the blissful lace carries on. This is her 4th doily I’ve tatted in 3 years - the Spring Doily 2014 ; Wiosna 2015 ; Snow Doily 2012
Not without a few boos-boos in the last round, though …

Materials : 2 shuttles
Anchor Mercer size 40 : cream 0300 ; shaded red w/ black : 1206
Techniques I used : directional tatting, thrown Josephine rings, SCMR (to use last lengths of thread)
Final Measurement : 21 inches


the boo boos !
1st start  – joined to wrong picot. Could’ve carried on, but decided to snip it off so that I had normal (DS) rings & reverse order (RODS) chains.
2nd start – One would’ve thought that at this age & experience, one has learned to count. Huh, not so – 6 inner rings instead of 7! Another snip. Can’t afford too many snips, coz running low on thread !
3rd start – all is well, phew.
¾ths of the way round, I came across 1 snipped joining picot in previous round :-(  At the time, in a panic, I dabbed some fabric glue on the cut ends to keep them in place & continued with the ring, adding a picot where it was to be joined. After completing the entire round, it was time for repair. Here’s how I went about it – sorry no pics . It might have been done before, but I haven’t come across it, hence sharing ….

Repairing a Chain with snipped joining picot
  1. Unravel 1 half stitch on either side of cut thus exposing the core thread. (preferably, do not apply fabric glue, because it becomes extremely difficult to unknot).
  2. Insert a doubled-up scrap thread length, & pass the looped end through the joining picot on next round.
  3. Pass the 2 ends under the previous round (where cut is), then over & through the loop. Tighten & snug.
  4. We now have a double stitch ! This lies on the core thread exactly as a normal ds would.
  5. I whip-stitched the 2 ends of the scrap thread on either side of the ring.
  6. I had to leave the cut picot thread glued back, since it was very difficult to unravel.
  7. However, without glue, one can unravel back along the chain on both sides of cut & use the scrap length to make stitches along both sides just as in a split chain or larkshead in macramé or in embroidery buttonhole stitch. Then hide all 4 ends.
There is one last major boo boo, that I will share at the end …shiver me timbers !

the tweaks
(I hope Renata doesn’t mind)
This is a beautifully designed round & I Love the slight overlap between the scallops in Renulek’s working, but failed to achieve it in mine. Can’t understand why. Or was it merely because I couldn't block it properly ?
Made a couple of tiny tweaks, in consultation with my DH. I was going to ask you wonderful tatters, but he was already in sync with me ;-P Added some colour finally, as an outline to the lovely rich cream. Since it was to be merely an outline, I left out the chain picots.
Also, preferring curves & arches to points, I substituted the thrown ring with a smaller thrown Josephine Ring – I love the perfect circle of a JR. This was done in directional tatting, starting with 1RODS, 10 1st half sts, 1RODS, post shuttle & close.
TIP : to make the JR lie flat, start & end with a double stitch.

in general
Used up 2 full balls, 20 gms each, of size 40 thread. Wouldn’t have lasted if I’d made the last round as per original pattern. This is all that’s left of this rich cream.
Here's an interesting observation - the first 13 rounds used up only 1 ball (20 gms), while the last 4 rounds consumed 1 ball !!!
This “Roll & Store” using a pillow cover is what kept the growing doily clean & flat. It was probably the reason why unblocked doily pics in my previous post came out okay.

the learning
Large projects can be time-consuming but they also offer the possibility to practice & improve. I got to practice direct tatting (reverse stitch), gaining speed. Climbing out with split chains also improved as the rounds progressed. I applied different ways to add new thread & hide ends & loved the whip stitch to sew in ends.
Made me think of the different ways of keeping projects clean while working/storing, especially large ones.
I finally got nicely closed rings in directional tatting due to experiments emerging while tatting this doily.

Working with a single colour has a Lot of practical benefits, but it can get a bit boring at times, especially when fellow tatters were using such lovely colours & transforming their work into a personalized statement.
I added colour in the last round, only for chains, as an indication of the finality of the tat-along; to give a feeling of closure to the single-colour pattern. This is what led to a major boo boo !

major boo boo
I love the variegated red w/ black. BUT the colour runs !!! Never faced this problem with Anchor threads.
When I dunked the doily in water for the blocking process, I suddenly remembered the recent thread colour travails of Eliz & Carolyn. Pulled the doily out, quickly laid it flat on the marble & dabbed it with a white towel. Sure enough, there were reddish imprints !!! Colour was just beginning to seep into some adjoining rings :-( Worked super fast, dabbing the doily dry with the towel. Phew, saved for the present. Might have to handwash it flat in the future, or experiment with small pieces …
Funnily enough, while I’m happy that this is over & I can shift my attention to other smaller projects, I’m sad to let it go – kind of an empty feeling, you know ?!

Many many many thanks to Renata
for sharing her elegant patterns with us, 
& organizing these tat-alongs … 
it is always fun to tat along !

happy tatting :-)  


Related Posts :


Friday, 5 August 2016

I wasn’t gonna …

Pin It now!

I wasn’t going to tat a large doily this year, but I did
I wasn’t going to tat a 4th Renulek doily, but I did
I wasn’t going to post these rounds till after completion, but I did
I wasn’t going to begin the last round now, but I did
I Was going to have Fun, which I Did, YAY !!!!

Renulek’s Wiosna 2016  Rounds 13-16
A doily tat-along by Renulek

Reason I am posting these 4 penultimate rounds is that I finally found what I wanted to do with the last round & I’m hoping it will deserve a post all to itself ;-) Will start tatting the last round this very evening.


Round 13 14¼" in size 40 thread
I loved this round ! And it finally unruffled the previous work, too. Used reverse stitch (direct tatting) for the chains & it went pretty fast, switching shuttles.
I'd forgotten to take pics of this round & was well into the next round before remembering. Hence, not blocked or ironed.
The 20 gm ball of size 40 thread got over after this round.

Round 14 - 15¾" in size 40
 Techniques involved 2 shuttles since there were thrown rings.
Climbed out to next round with split chain & split ring.
I like the scrolling effect. 

Round 15 – >17” in size 40

This round took much longer than I thought.
I tatted first half of the round using reverse stitch for chains; then I switched to reverse work. Both worked well.


Round 16 – 19” in size 40
A very very quick & enjoyable tat , probably because of lack of picots !!!! And a very pretty round, too, with the layered rings.
I ran out of threads many times in this round (once because I accidentally picked up a short length of ball thread) & I used different ways to make optimum use of the last lengths ....
Twice, I made the last ring a SCMR ; once I switched to reverse stitch for the short chain length ; in the last stretch, I had enough thread in one shuttle, so instead of a lock join, I used Reverse Join to switch shuttles - no need for that visible SLT !!!
Since it was a spur-of-the-moment decision, this round hasn't been blocked or ironed either. I simply laid it out & took the pics.

In Conversation 
I must apologize for not being able to respond to your lovely comments (I wasn’t expecting any) in my previous post – they are very much appreciated & I will respond when my internet link starts to work nicely again – it’s going in fits & starts – loooong fits & short starts ! Will also be able to bloghop again, hopefully very soon.

happy tatting :-)


Related Posts : 


Sunday, 26 June 2016

creeping along

Pin It now!

Both my tat-alongs are creeping along (Lene's snowflakes & Renulek's doily) …

The Seventeenth Day of December Snowflake
Lene Björn

My little experiments are creeping along – trying to apply different techniques to a regular symmetrical pattern ….
Creeping around 

I visualized this snowflake as a cross section of a tree trunk with a flowering creeper around it . This determined my choice & placement of colours.
Round 1: single shuttle, scrap length thread, SSSR, lock join, mock picot. 1”
I started with a normal ring, mock picot, followed by SSSRs.
After each SSSR, I made a lock join on the picot to secure & move into position for next ring.
Last ring is again a normal/regular ring, with picot join to first ring.

Thoughts : the lock join may show up in lighter shades. The shape of SSSRs did not come out as evenly as I’d hoped, but that is perhaps because of my own limitations of thread size & eye sight when working tiny fiddly rings.
Round 2: 2 shuttles, directional tatting (fs/bs or RODS), mock rings, scroll, rotate work, direct tatting (reverse stitch/unflipped), very small picots, fold chain (2 first half st or 2 second half st).

Visualizing this round as flowers in profile on a climber with leaves, I wanted to add a bit of layering effect . Hence used the running scroll & mock rings for the green stem & leaves part.
For flowers, I used 2 strands of orange embroidery thread & 1 strand of silk thread. It created a soft sheen/sparkle, which is not captured in the photos. (Even the colours seem dull in the pics :-( 

The pattern called for a figure “8”, not just a single ring-and-chain scroll, as well as anchoring to chain. Another catch was that despite the spiraling ‘8’, all stitches needed to face outwards as in normal rings!
I tried a couple of different ways to get the layered scroll with mock rings on both sides.
1. Folded Chain using 2 half stitches before & after the outer ring in order to get the ‘8’. Made 4 in this manner, first without joining the chain back on itself, then making a very small picot & joining back as a mock ring.
2. Direct Tatting was used in last 2 repeats. Switch to reverse stitch (unflipped) when change of direction is needed. 
Because the green is a continuous chain, adding & joining of picots was adjusted according to the flow of the chain.
Measures < 3½” 
Thoughts : Getting the scroll & joins right was a bit of a struggle! At times I even messed up my directional tatting.
Method 1 with folded chain creates a lot of bulk underneath, with 2 twists ! However, it can be worked with single shuttle & ball, if required in any pattern.
What also complicated matters was the fact that the leaves were anchored at their end picots ! I don’t know how I crept out of that one !
Method 2 with direct tatting worked out much better. It was easier and visually better (the top & left pair of leaves/mock rings in the pic above) 

I have to be satisfied that I could just about put it together, even if it did not come out as neat. I did see a spectacular use of the elusive Rotate Work (I’ve always found it’s application a bit confusing)


I forgot to post Round 12 of the doily last time ....

A doily tat-along by Renulek
Super 17 butterfly & Morning Glory on the doily in above pic.

A super quick round ! Used ball & shuttle this time. Happy with my long chains. It was only while blocking (I still use the rolling pin) that I noticed one chain had twisted. Oh well, got to live with it.
Measures 13¼” after this round , in size 40 thread.
This pic is taken with the doily draped over the dining room chair. Lighting is not too good, but the background is maroon.
A super quick round ! Used ball & shuttle this time. Happy with my long chains. It was only while blocking (I still use the rolling pin method) that I noticed one chain had twisted. Oh well, got to live with it.

I’ve started Round 13 & it looks really pretty !!!

happy tatting :-)))


Related Posts :

Thursday, 16 June 2016

a post about post - reposted

Pin It now!
…. where a simple doily round leads to musings & experimentation on rings and when to post a shuttle.
Wiosna 2016
A doily tat-along by Renulek
Measures 11½” in size 40 Anchor Mercer 4054-0300
Another very easy, leisurely round. I was scared of messing up the alternate floating/thrown rings – one with decorative picots, one with single small picot. But frequent checking kept me on the right path, phew.
There is one thing that has me flummoxed for a long time : the directionally tatted (frontside/backside or RODS) rings don’t close as flat as normal rings. Off & on I had experimented with many different tweaks but nothing seemed to work.
I took this opportunity, to experiment further. The rings were small and a botched experiment would not be too visible.
I was surprised at the trial result, and happy to have found a solution that works for me. And in my usual way, I didn’t stop at that. My curiosity to see how different ways of tatting & closing rings compare with each other led to this small experimentation below. The model is accompanied by a table with all details.
This may not be ‘original’, but it is part of my own learning process to make my tatting better.

Dear tatters, what is the secret to Your perfect rings  ???? 

R – ring ; FR – floating/thrown ring ; DS – double stitch ; RODS – reverse order DS ; fs/bs – frontside/backside ; fhs – first half stitch ; shs – second half stitch ;  post shuttle – pass shuttle through ring from front to back before closing ring ; . – close ring ; – – picot.

Points to ponder :
  • Base of ring at closure – in the images, point of closure of each ring lies on the right.
  • Does the core thread emerge from ‘front’ or from ‘back’ – after shs, core thread emerges from the front ; after fhs, it lies behind.
  • Size of the ring – perhaps there is a difference when closing small versus large ring ?
  • Desired shape of ring – tear drop or rounded.

All rings in the pic are 5 – 5 
Except for #1, all lower (aqua) rings are RODS (directional or fs/bs tatting)
Pink rings are thrown/floating rings.
Reverse Work before & after each lower ring.


For a long time now, I had been following Frivole’s tip in Ring 4 of adding an extra shs before closing ring, when working from the front. 
In the latter half of Round 11, where the rings were 4-4, and worked from the back (after reversing work), an extra shs and posting shuttle (as in Ring 9 above) seemed to work, making me happy.

But look what happens in Round 12 where the ring is 8-8 :
In these 'larger' directional rings, before closing, I added a 1st half stitch and posted the shuttle. They lie so much better than the first one on left which was extra 2nd half stitch and post shuttle ! I'm not sure whether size of ring is the reason ... that will require more trials to determine. 
Let's just say that we have many options to choose from as the situation demands.

What I also noticed is that the ring tends to remain slightly open, & requires one final tug to close it completely. Perhaps this is also the reason why I can open the ring much more smoothly in case of retro-tatting.

When to post shuttle ?
(Common Threads V)

I first learned about posting a shuttle through a ring on InTatters & when I tried it (then & later, too), it didn’t work for me. Don’t know why some things just take a long time to ‘click’ !
Although it hadn’t worked in regular tatting, I did find many applications where it is required – whether posting the same shuttle, the 2nd shuttle, or even multiple shuttles ; whether posting through an unclosed ring or through other elements or a loop. 
Here is my compilation (now updated) which I shared in a recent Craftree thread on posting a shuttleOf course, now I’ll have to go back & amend my answer :-D

(Most links are to my blog posts which have further direct links to respective tutorials )

  1. Interlocking Rings using shuttle – clearly, without posting the shuttle through the previous ring (before it is closed), there will be no interlocking of rings, whichever method one adopts for the latter effect. 
  1. Interlaced Split Rings – In this 4-shuttle braid, the one shuttle from the 2nd pair is posted through the open split ring of 1st pair, in order to interlace adjoining rings. 
  2. Teri Dusenbury's SQDR (split quadruple directional rings) which are rings thrown off a split ring. These thrown/floating rings twist if shuttle is not posted. 
    Arrow points to the yellow ring where I forgot to post the shuttle. 
  3. Freeform – when the 2nd shuttle or ball is posted through the unclosed ring, the next element (chain or ring) overlaps or is enclosed by the first ring, slightly. 
  4. Cluny Tatting – one small step behind the scenes, especially for multi-Warp tallies, requires the loom shuttle to be passed/posted through the horizontal bars at back. This step allows for easy closing of each Warp , when tally is closed. 
  5. Curled Cluny Leaf 
  6. Ninetta's small Curled Rings or Alternate Methods of Curling Rings – requires the other shuttle to be posted through the ring such that it gets encapsulated within the joining picot. 
  7. Ninetta’s Tiny Tatted Beads – In her 3-shuttle pattern, she posts 2 shuttles through the tiny ring, creating a cute beaded effect. 
  8. Celtic Tatting often requires a shuttle to be posted through elements.
  9. Directional rings - for neater, flatter rings, as demonstrated in experiment above. 
  10. Interlocking Split Ring Braid – consists of a  continuous braid of split rings interlocked together in a row. Made with 4 shuttles, it requires posting one pair of shuttles through the unclosed SR of 2nd pair & so on. Also check out this chainmail-type braid by Ninetta made with only 2 shuttles and her pictorial showing 3 methods here.                                                                                                     
  11.  Enrapt rings – one can wrap shuttle 2 thread around the rings in different ways as experimented here Overlapping Picots on rings & chains 
     
  12. Overlapping Picots in rings – in order for the layered picots to become intertwined & overlap through adjacent picots, posting shuttle is required. 
    14. Intruding Picot (UPDATE) - a new way to make inward facing picots that are hugely versatile and easily applicable in a number of techniques. Simply posting shuttle through an open ring or a chain, leaving bare thread for picot, creates this picot. Numerous applications!

15. Spiral Rings (UPDATE) - Lenka's Spiral rings - posting the shuttle makes rhe ring spiral in fhe opposite direction.  https://tipsaroundthehome.blogspot.com/search?q=Spiral+ring

While 'posting a shuttle' usually refers to dropping it through a closing ring, in a sense the movement is performed when encapsulating the other shuttle thread in most joins such as CWJ, LHP, S2LHP, etc. or perhaps SCMR & LTROR when shuttle is 'posted' through a loop.

But why muddy the waters more – haven’t you had enough of this ‘post’ already ?! ;-P

If you have, thanks for patiently reading through :-D
Thanks for leaving valuable feedback/comments earlier


Related Posts : as linked above (blue text) ,
and