Showing posts with label Lene Bjorn. Show all posts

Sunday, 5 February 2017

matter of the eye

Pin It now!

I would first like to thank everybody for their immense support and prompt help with testing the block heart pattern. I am very touched, to say the least. More when I post the pattern – and it will be within this week !


The Cosmic Eye or Anti-flake
Twenty-Third Day of December Snowflake
Lene Björn
This pattern always reminded me of our schoolbook atoms and molecules or of orbiting planets. The long chains made perfect elliptical orbits. And this book I’m currently reading ('Genius' by James Gleick) only reinforced that visualization.
Also, I wanted to see how a flake in black would work out – yup crazy me. Can’t say whether this is matter, antimatter or the universe. The beads (are they electrons or planets?) are very glittery in real – difficult to capture here. Sequins were a first, too.

I passed shuttle 1, back to front, through the space created in round 1 chains and then continued with the Josephine chain. A simple over-under ‘join’.

I’d had a tough time keeping count of the Josephine chain stitch count in the Day 22 flake. This time, my little bird came to my rescue. Every 10 half stitches, I take out a pin and stick it in the mattress. Yippee – so easy to keep tally and gaze at my little birdie (who doesn’t seem too happy with all those pin pricks !)

How I added the sequin here
My first attempt at sequins, though the principle of tatting with beads, buttons, etc. is essentially the same or similar.
I wanted the sequin to be flat inside the ring, rather than outside. So, start ring and when we come to the picot, first pull the picot loop through the sequin hole, pass the shuttle through this loop (as we would normally) and snug neatly but not too tightly. This keeps sequin flat and in place. Continue with the rest of the ring and close. 

I would’ve liked to work in 2 colours to better reveal the interweaving chains, but that might’ve become a very busy kind of rendition.
30 beads strung randomly on shuttle #2 in round 2, and brought forward on picots.

Do you see what I see ? Doesn’t it look like a fierce cheetah – eyes glaring out ?! Or perhaps it is Lord Shiva’s Cosmic/third Eye ?

The boring details !
TWoT notes : Round 1 worked counterclockwise ;
Round 2 worked clockwise.

Techniques : thrown rings and clovers, spiral or Josephine chains, beads & sequins on picots, over-under join.
Materials and Measurement :
Anchor size 40 in black ; seed bead soup (including tiny bugle beads) ; white sequins ; crochet hook to load sequins 
Rnd 1 : ~ 2½”  ;   Rnd 2 : ~ 4”
50 half stitches of Josephine chain in size 40 thread = ⅞”


‘Genius’ by James Gleick is a biography of Richard Feynman the exuberant ‘mad genius’ written in an engaging style! It is a very absorbing read. Even though I superficially ‘understand’ much of his work and the physics described, it is a commentary on the evolution and establishment of Physics & of course quantum mechanics. As I read, I am frequently reminded that all that we take for granted now, or what we thought was done ages ago, is not even a century old, even Medicine as a a science !!!

My husband had a couple of books by Feynman before our marriage and he has become one of my favorite scientist-writer – always so full of spirit, full of ideas, practical solutions, and such a great communicator. Down the years, we’ve bought many more of his books, but I’ll share more in future.


Now, back to tatting – besides ‘inspiring’ this snowflake, ‘Genius’ has also sparked off another set of tatting-related fun that I hope to share and would love for you to join in. Not revealing anything for the present ;-P


happy tatting happy reading J


Saturday, 28 January 2017

Days of my life

Pin It now!

Day 12 snowflake and Day 6 TIAS (and Day 7 to come) ... it's all about tatting !

Twelfth Day of December Snowflake
Lene Björn

When the chains, and colour for last round, didn’t work out, I left the piece and started a new one, experimenting with a different route this time.

What I wanted :

  • Ring spokes highlighted in a different colour
  • Rings in the spokes facing outwards
  • No colour blips in the chain.
Mock rings to the rescue. Picot space held in place by paper clips, to be joined on the way down.
Mock rings are simply chains joined back on themselves or at points to create a ring-like effect.
The mock rings are quite longish. Later, while blocking, a tug at each ring brought it back to a better shape.

I started with single shuttle, making the copper ring medallion, then joined yellow thread for chains in the next round.
This chain round would have mock rings thrown off. So, following my discovery in the poinsettia flake, I left a short length of yellow (seen going down near the blue clip in the previous pic) as CTM to use as core thread, on which the chain stitches would be worked, encapsulating the shuttle 1 copper thread within. When the 'thrown off' mock rings were needed, I pulled out the SH2 yellow to act as core and copper for the stitches. Partially successful.

The rest went quickly – long chains joined at base with lock join, and across mock rings with a crossover/ over-under / alligator join.
I used a picot gauge for the last round.

The partial one (in size 40 Anchor white & Lizbeth) measured 2¾” and this one is 2½ upto the same round !
So, I’ve been working with size 50 and didn’t know it ! No wonder, I couldn’t see the threads easily.
Techniques : mock rings, picot on core thread, encapsulation, alligator join, lock join, picot gauge
Measurement : 3¾” in size 50 Anchor Mercer (0302 – yellow  ; 0896 – copper) 


Tat It And See 2017 - DAY 6
Jane Eborall

Day 6 and awaiting Day 7 later in the day.
It could still be a butterfly, a wagon, a horse, and of course a gown. Clueless as ever :-D
Whatever it is, though, I like the look so far - nice shape and effect.


Oh, Great news !!! Remember when I bought the 3 Lizbeth balls at that exorbitant cost? Well, yesterday, they refunded about 10% - export duty overcharged ! Yippeee, now I can buy some more - restores one's faith and happy days ;-P 

 so it’s happy tatting … what better way to spend our days


Tuesday, 24 January 2017

bitter glitter pill

Pin It now!

Nineteenth Day of December Snowflake
Lene Björn


It was the last day of 2016 and  I was working against the clock to complete as much of the 24 snowflake challenge as possible. To save time choosinging colours and winding shuttles,  I used two half-loaded shuttles from my previous snowflake - white size 40. Remembered in time that Eliz had shared some notes on this snowflake. Thanks to her notes, I left a tiny picot (with paper clip) at the base of first ring. This is where the last ring would be attached before climbing out.
Notice that I did not start with 3 rings as per diagram; there is no need to. As Eliz pointed out, it changes the direction of the rings. So I started with SCMR with a single thrown ring throughout this round, ensuring symmetrical orientation of rings.
TIP : After closing each mock ring/SCMR, 1ushs (unflipped 2nd half stitch) was made. This is almost invisible, but secures and anchors the ring.
Like Eliz, I wasn’t successful in making the last split ring teardrop shaped as the rest of rings. I had wee bit more success later.

TWoT note : Round 1 is worked in clockwise direction using SH1. So the 5 SCMRs are made with SH1. But when we climb out using split rings, SH2 becomes the main shuttle for the new round. Thus, knowing which elements will require which shuttle, broadly helps us estimate the thread required in each shuttle, and also the colour play if 2 colours are used.
Techniques : 2 shuttles, starting with picot, mock ring (SCMR), split rings (SR), thrown rings (TR).
Measurements : worked in size 40 Anchor, white
Rnd 1 - 1" inner medallion of 6 outward-facing-rings & 2" for SCMR with TR.
Rnd 2 - 4½"  (3½" without TR)

Seeing others use it effectively, I've wanted to add glitter to one of the flakes, may be in multiple colours. What a disaster with the dense red in center ! Used only a sprinkling of silver for the rest. I used dry 'powder' over fabric glue (my self-adhesive glitter has all dried out !).

How do you apply glitter ?

happy tatting always :-)


Friday, 20 January 2017

flaky flowers or flaky me ?!

Pin It now!

a 3D tatted flower and another from a snowflake perhaps

3D Carnation (a prototype)


My whimsical tatting which started out as a chrysanthemum (perhaps a marigold in different colours) and turned into a carnation !
Flower is worked in size 40 thread & foliage in size 20

The stem should’ve been longer of course – and it isn’t actually a stem – it was a trial of my pine needles idea turned and sewn around to act as a stem ;-P 
Techniques used : How to work a ring on the picot of another ring ; Pearl tatting with snipped picots


Twelfth Day of December Snowflake (partial)
Lene Björn

Here, I wanted to highlight the radiating rings. Started with single shuttle (white) leaving a long white tail to climb out .

TIP : For outward facing rings with bare thread space(BTS) : to keep the symmetry of the medallion, I do not hide the tail in the first ring. Instead, when the last ring is tatted and closed, I thread this tail and sew it inside the last ring. This gives an appearance of continuity in the center.
In this case, since split ring was used to climb out, the tail was already long and used for 2nd side of SR stitches, thus completing the inner bare thread circle.

Ball with variegated thread was joined in round 2.
Instead of thrown rings, I opted to make the rings in the next round and attach to tiny picots on the previous round chains.

And going by previous false memory, I increased the chain stitch count by 1 on either side. Turns out it wasn’t needed, ughh.
I continued.
However, the last round caused me further grief because I couldn’t get the 2 white ‘8’ rings to stay in a line. Maybe SLT would’ve helped. Moreover this variegation didn’t work out as well as I’d imagined, especially on the last round, with lots of picots – it looked to ‘heavy’. A subtler tint, perhaps ? Cut off the last round midways. Decided to leave it and tat a new one. It looks more like a flower, though, with those chains arching like petals.

In size 40 Anchor (white), & Lizbeth (purple splendour)
Rnd 1 - 1¼” ;  Rnd 2 - > 1½” ; Rnd 3 - 2¼”  ; Rnd 4 - ~ 3" ; Rnd 5 – not tatted
Techniques : SR to climb out, outward facing rings, shuttle and ball.

Future idea -- make All 4 or 5 radiating rings as mock rings, with inward picot on core.
I also see a 3D flower - morning glory in these colours ! 

As it turns out, I actually used my future idea, but you’ll have to wait a bit to see it, while I write out the post :-)

 ® Are the flowers flaky or is it just me ?!
 happy tatting ®

Thursday, 12 January 2017

snowflake and TIAS

Pin It now!
blocks in snowflake and first block of TIAS !

Ninth Day of December Snowflake
Lene Björn

I was inspired by the same 2-colour working of this flake on Craftree as credited and also worked by Eliz here. And so, one of the threads had to be white.

I raided my size 20 stash looking for a colour to go with the white (which is a bit thicker than it’s counterparts), checking each by sight and feel despite my catalogue . I found only one that came closest in thickness – this aqua blue-green 4054-0185 !
For block tatting, equal thickness is critical.

I followed the same block tatting method as described in this snowflake. It works for me. The switching shuttles is too cumbersome. I prefer the flipped/unflipped (DS/RS) with a half stitch riser.

TWoT (This Way or tat?) note : For directional tatting or fs/bs tatting, start the chain backside with reverse order of half stitches. The thrown ring will also be tatted backside.
The snowflake is tatted in one continuous pass in clockwise direction overall.
But can it be tatted all from the front ?

Experiment with all frontside tatting : I tried a little experiment here. Since it is tatted in one pass, I wondered whether I could avoid reversing the work (RW) by using direct/reverse stitch chains and a reverse ring in the centre and tat the whole snowflake from frontside only.
Yes, reverse ring can be applied to thrown ring in this situation.
But I did not like the effect. As you can see, the chain arch is not as smoothly curved, and the base picot space is of 2 colours since core thread is white and ring stitches are green !
Better to avoid the reverse ring and stick to reverse work and normal thrown rings !
BUT, I now realise that I made a mistake in making the ring. If done correctly,  it would work except for 2-coloured base 'picot'.

Future Idea : Using a largish picot at both the inner and outer turns, tat the entire medallion in block tatting. An undulating braid of block tatting !

Techniques : block tatting, thrown rings, fs/bs tatting
Finished Size : 3½”

I Love the negative space in this flake. I'm pretty happy with this snowflake working – blocks and all. Do you share my feeling?

 YYYYYYYYYY

Tat It And See 
2017
Jane Eborall

And now for Day 1 of Jane’s TIAS that has TatLand excited … Yes, the fun has begun !


This little worm creeps out to see
the world in all it’s glory
What will it grow to be
we’ll have to wait, won’t we ?!

Her diagram seemed to indicate spaces between the rings. I hope it is so.
Lizbeth size 20, Vineyard Harvest..


happy tatting always Y

Tuesday, 10 January 2017

states of matter - 2

Pin It now!


Ripples !
Thirteenth Day of December Snowflake
Lene Björn

Clearly, this is the liquid form of water. I went for an ombré ripple effect. There's no white foam that one encounters if the ripples were closer to the shore, so perhaps the ripples are never-ending ☺  

Techniques : lock join, graduated picots.
Rnd 1 – >¼” ; Rnd 2 – ~1¾” ; Rnd 3 – >2½” ; Rnd 4 – 3¼” ; Rnd 5 – 4”

All embroidery threads (Art 4625 Anchor), 3 strands each.
I find that it is much easier to tame long chains in embroidery thread than in crochet cottons. Probably friction between the fibers prevents stretchability in the former ?

I didn't use split chains to climb out. However core thread from previous round was continued into the next round; only the chain thread was changed. This carry-over masked the lock joins (no colour blips).
Complete frontside tatting in clockwise direction.

The tatting went very quickly. It was separating the strands that took all the time ! Even got my DH to chip in – he held the skein, while I wound 2 cards simultaneously (one in each hand – quite a circus performer !!!).
I chose one card (acting like a ball), joined the thread to the work and continued to tat the round.
After round was complete, I wound the leftover thread on to a shuttle to use as core thread for next round. I now had less thread to wind J

TIPgapsosis in adjacent chains – midway along the chain ‘stem’ in round 2, I should’ve added a vsp to join adjacent chain, thus avoiding the gaps seen between a couple of the chain ‘stems’.

Future Idea : offset the graduated picots in each chain arch to create a swirling spiraling effect !
Or go 3D - smaller, with closer concentric chains, only 4 or 5 repeats, the right colours - voila a tuberose or some such!


ßßßßßßß

A question to all you experienced tatters :

When can a working be termed an “adaptation” of another designer’s pattern ?
  1. If only different colours are used or beads are added ?
  2. If techniques are changed but not the stitchcount ?
  3. If both are altered ?
  4. If something ‘different’ in appearance is created ?
  5. Any other ____
eg. I doubt the above Ripples would be termed an adaptation, right ? But could the Poinsettia be an adaptation ?
I would really appreciate your thoughts and answers to clear the confusion in my head ...

 happy tatting always  
ßßßßßßß

Related posts :


Monday, 9 January 2017

states of matter - 1

Pin It now!

is how I visualized and rationalize my choice of colours in the next two flakes - the 3 states of H2O.

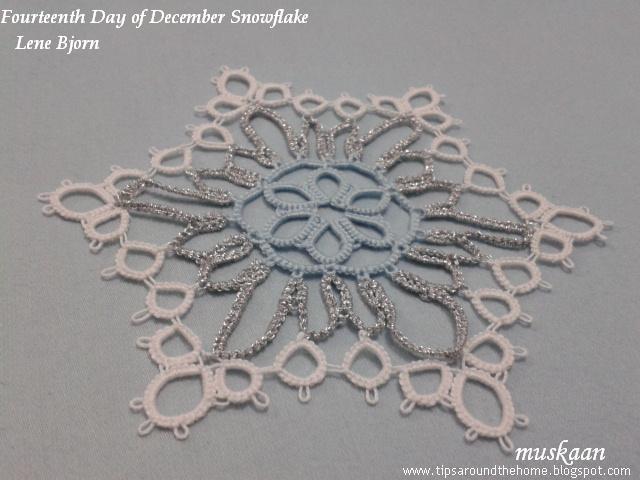
Fourteenth Day of December Snowflake
Lene Björn

Right off, I am very unhappy with my working of the chains. In an effort to keep the silver thread from fraying, I was making the stitches a bit loose. But they are too loose and the chains are floppy and well, you can see for yourself. Lesson learned, is all I can console myself with.

3 strands each of the embroidery threads (Art 4625) are used, and the white is size 40 Anchor cotton
This 3-round pattern was split into 4 rounds due to placement of colours without having to resort to shoelace trick (SLT). After rounds 1 & 2, using 2 shuttles loaded with blue, I snipped away one blue thread, and added the silver thread for chains, with core remaining blue. Last round was worked with 2 shuttles in size 40 white.

Besides colours, I wanted to see if I could tat split rings (SR) in a way that their orientation still appeared to be like normal rings and the teardrop shape faced ‘correctly’. Except for the large ring, all others are split rings. If the silver chains had been tatted correctly, the SR experiment would’ve worked much better.

TIP : A teardrop split ring : the trick lies in closing. While closing, manipulate ring into desired shape, then hold in pinch, and close but don't snug too tight. Check to see that the shape holds and 'fiddle' till it is 'right'. Then, if required, tension further.
For the single split ring on chains, the teardrop point can be emphasized by using a lock join with SH2  (refer : 1.3.c Joins in shuttle tatting ) rather than the usual split ring join (refer 1.3.a) .

Msts : Rnd 1 - > 1"  ;  Rnd 2 - 1.25"  ;  Rnd 3 - 3" approx.  ;  Rnd 4  - 4.25"
Techniques – SR, LJ, LJ with SH2

Not much of a ta-da here, but Great News --- I have Completed this challenge !!! All 24 snowflakes finished, with a few additional ones (adapted versions or left halfway). Phew, just in time for Jane's 2017 TIAS . I didn't join last year & am thinking of doing both 2016 & 2017 simultaneously.

In keeping with my resolve to be less wordy, I will share the other state-of-matter snowflake in the next post ….
till then, 
happy tatting & stay warm ã

Related Posts :

Wednesday, 4 January 2017

the poinsettia !

Pin It now!

a snowflake poinsettia.  ‘twas the season after all!

Realised I hadn’t used beads in any of her snowflakes. Beads are such an easy way to add another colour, and perfect for my visualization & easy execution of this pattern.

Twentieth Day of December Snowflake
Lene Björn
from 24 Snowflakes in Tatting
for 2016 Snowflake Challenge on Craftree 

Remember my the flower within (and here) conceptualisation where I tried to highlight the flower within a snowflake pattern ? Well, here the entire snowflake becomes a flower !

I strung 18 beads on shuttle #1 .... 
and wound shuttle #2, CTM for Round 1. This helped me climb out with a split chain.
Then I joined in the green thread on shuttle #3 and used encapsulation for chains, carrying the hidden green thread along till required for 'leaves'.
One can tat this round with only 2 shuttles, by using SLTs. I prefer avoiding SLT .

Encapsulation offers so much freedom if one can handle thread entanglement ;-) 
Also, instead of sticking to designated/conventional thread, one can chose to do elements & joins with whichever shuttle is closer, keeping colour format in mind. 
Thus, I used the red chain shuttle for the SCMR instead of the red core one. This also ensured that the chain arch remained a bit smoother, without a break at the SCMR point. And I used the red core for lock join.

A further bit of experimentation : making the first ring a SCMR with thrown ring. 
But experienced designer knows best ! It is prettier & easier to follow Lene’s diagram path, which I used for the remaining leaf sets.
I think it's a bit cramped at the central leaf joins, thus distorting the shape of individual rings. Or perhaps it's my own sloppy tatting and the 3-shuttle entanglement.
There was a tiny bit of ruffle in this flake and I could’ve tatted it better, but I am satisfied with the overall floral image.
Techniques & measurements : split chain (SCh), mock ring (SCMR) with thrown ring, encapsulation, beads on ring picot, simultaneous joins.
In Anchor size 40, (hued red - 4054-1206 & green 4054-00229) 
Rnd 1 - 1½” ;  Rnd 2 - <3½”  ; the 'flower' only is 2"

Future Idea : How about adding more chain-only rounds to increase the petal layers? Think chrysanthemum, dahlia, rose, etc.


That's it for now. Off to tat another snowflake ☺

happy tatting always :-) 
Z