Showing posts with label encapsulation. Show all posts

Sunday, 29 March 2026

freeform fun

Pin It now!

I've been enjoying some tatting time almost daily for the past several weeks/months. One of the outcomes is this freeform sprig with 4 colours which was tatted on the go using 'branching encapsulation' to pull out the desired colour where required (scroll to end for details).

I'm not fully satisfied with the shape or rather the length of some of the stems. Also I didn't spend time in choosing colours - just picked the first 'flowery' shades that had been used in recent samples. Wound four shuttles with the different colours, some of them using leftover threads. I've always multiple shuttles very freeing despite the risk and discomfort of tangling threads. 
I didn't start with all 4 threads together. Started normally with two colours and then added the 3rd and 4th colours where needed. If you look closely you might notice the difference in the thickness of the stems.
So this is the 2nd piece I am submitting for Natalie Rogers' PICOT Bingo 2026 (Level 2) which you can find here - https://www.patreon.com/posts/happy-new-year-147124370 and the boxes crossed out with this model include ....
  • free-form tatting
  • tat a flower
  • tat nature
Huh, if only I had included a butterfly, I could've had a row bingo!!! Oh well, next time ...


A bit about Branching Encapsulation -

 The term was coined by Sherry Pence (2012) and she published a book dedicated specifically to this technique and you can scroll through her posts and samples here - https://ladyshuttlemaker.blogspot.com/search?q=branching+encapsulation. You can find Karen Cabrera's Lesson #155 - Branching Encapsulation video here - youtube.com/watch?v=2oB08uUYfzo&feature=youtu.be.

Elgiva Nicholls called it multiple dead ends in her 1962 book Tatting: Technique and History. Recently Marilee Rockeley (2024) worked the menorah from Elgiva's book using this technique and she also uploaded a video and free pattern here - https://yarnplayertats.blogspot.com/search?q=branching+encapsulation

I had used branching Josephine chains in a card here - https://tipsaroundthehome.blogspot.com/2018/05/i-love-floating.html but since they were dead end chains without any flower or bead, I used scrap threads to hold the bare thread at the desired length. You can find pictorial with options here - https://tipsaroundthehome.blogspot.com/2015/03/dead-end-start-to-split-chains.html

Thursday, 25 July 2024

multifascination

Pin It now!

 This time I have not delayed, not by much essentially. A couple of months back I came across an Instagram post on tatting and their profile said they were a German group of 15-20 members with a common passion for occhi! I messaged them about our Endrucks 1920 Project and so began a lovely friendship with Elisabeth Dobler (she manages the account and is the founder of the group 'Occhi Freunde Oberschwaben'), a very talented tatter who enjoys pushing the boundaries and exploring new techniques.

Inspired by my E25 palm leaves, she belted out a range of effects from one basic model! We decided to call these Multifaceted Leaves. She graciously accepted to share the pattern and we worked together to create a presentation that is hopefully clear and easy to follow. She also made a presentation in German. Here are the links to both -
E24 Multifaceted Leaves by Elisabeth Dobler - https://drive.google.com/file/d/1ywaZcQP8b1M86jo4yLIwpH5fZ5kQ0_tX/view
E24 Facettenreiche Blätter by Elisabeth Dobler - https://drive.google.com/file/d/1-uFBNdM9aFOPUDCJyWC_dy1R_nyC4KRw/view
 
Multifaceted Leaf #1 (basic) 
This is the basic pattern which can be embellished as desired. She has worked the leaves in a clever and interesting fashion, entailing encapsulation. 
While the detailed pattern for this basic leaf is given, for the others an explanation of the effect/process is provided. Instead of repeating the description here, I request you download the pdf and understand the intricacies.

Multifaceted Leaf #2 - 
She has used metallic thread to embellish the leaves.

Multifaceted Leaf #3

Multifaceted Leaf #4
Maltese Rings adorn this leaf.

Multifaceted Leaf #5
Here the leaf starts at the mekik oyasi ring with cut picots and progresses back and forth to ensure it is worked in one pass. The crosshatch filling is so impressive.

Multifaceted Leaf #6

All six leaves together. 
Would these make a bushy mustache or even eyebrows, LOL? 
Simply add a stemmed flower in the center for a nice composition.

This is but a small slice of the enticing array of possible effects one can play with, using the basic model!

🍃🍃🍃🍃🍃
Patterns 24 and 25 from Eleonore Endrucks' 1920 book, Die Schiffchen-Spitzen, are very similar; E25 has a bit extra on the E24 as base. E24 was reworked by Ninetta Caruso for the Endrucks 1920 Project and you can find her work here ---
https://ninettacaruso.blogspot.com/2020/10/eleonore-thats-difficult.html - notes.

🍃🍃🍃🍃🍃

Elisabeth Dobler has published two books with tatting patterns - Tatted Necklace with Roses, and Tatted Faces! Oh the faces book is really interesting and fun! 

Just like with Sally (in my previous post), it is always a pleasure to correspond with someone who is receptive, prompt, and willing to learn and share mutually! Seeing her interest in new techniques and effects, I told her about Ninetta's flickr account and blog and her new Captured Picot. Elisabeth got right down to it, diligently learning the captured picot, teaching it to her group and also applying them creatively! Wish I had taken her permission to share the pics here ... perhaps in future. But you can check out her Insta posts with all her wonderful displays here - https://www.instagram.com/occhi_freunde_oberschwaben/

These Multifaceted Leaves and many other leaves (seen in Elisabeth's Insta feed) will be displayed in the Austrian Lace Association's Congress 2024 - Participation Leaves in Linz from 11th to 13th October. Wish I and our group could've participated - hopefully next year.

Many many thanks to Elisabeth and looking forward to more creations.

Related Posts - Palm Leaves from E25

Tuesday, 23 May 2023

solution

Pin It now!

 Remember my problem and the mood to give up on my own 3rd round design? Well turns out there were two possible solutions! Anna Bonelli suggested something in Italian which, though lost (on me) in translation actually threw up the first solution to my mind! After making the join I could leave some bare core thread, work and interlace the large ring, then go back and cover the bare thread with 'tied' stitches using the 2nd shuttle!

Anna then tatted a sampler to show what she meant, and that is the solution I adopted. Notice the ring is now horizontal instead of vertical, and I made it smaller too.
Meanwhile I had this idea to use block tatting at the tip. It caught my imagination and between these two elements I allowed my shuttles to do the work, starting with treble tatting arches.
 
I like how the block appears like a flame. 
In several places I hadn't made any picots. Used a finer crochet hook to clear enough space for a join.
To offset any denseness, I did the bare thread thing in the center. I could use dot picot strings, but wouldn't it be overkill?
Just like the Josephine Ring at the tip of the 'flame' is an overkill, right? Although I cannot decide on the JR above the treble tatting arch.
I was going to include decorative picots, but I like the clean lines here.

So what is your verdict? 
I am open to suggestions since I haven't yet started tatting. Oh and this time I'll be using a muted shade of yellow.

So far the design-along has roped in 12 tatters: 1 diagram only; 5 models only (1 WIP); 5 models with patterns; and 1 late starter. I will collect them all in a Google Doc with shareable link so feel free to join the game whenever you can .... 
My journey so far -
Many many thanks to Anna Bonelli for her wonderful solution that got me going!

Friday, 12 February 2021

beaded SR braid part 1

Pin It now! Before delving back into the Endrucks Project, I had this strong urge to learn a few techniques/effects that are floating around for pretty beaded split ring bracelets. Keep learning, keep trying. 
Turns out I got only one method done before succumbing to that heart motif idea I shared in previous post and other behind-the-scene commitments. 
No progress on the heart and none on this study, either. Turns out there are too many methods and no time to go into each nuance at present. But hopefully a step here, a step there ...
    
Disclaimer: This is not a serious study of origins, primacy, etc. of technique and effect. It is my whimsical & random exploration and experimentation. I will keep adding to this personal learning journey as and when I can. 

I try to avoid stringing beads whenever possible ;-D - a logistical problem with the smallish Pony shuttles. Now Jon had once incorporated a separate string of beads into her tatting. So many lovely applications, but not on a split ring braid (SR braid). Called for some adaptation.

Beaded SR Braids
In order to clearly differentiate what comes from where -
  1. shuttle 1 has pink thread strung with yellow seed beads;
  2. shuttle 2 has green thread with purple seed beads; and,
  3. where needed, a blue thread with pearl beads.
1. beads on third thread. 
Adaptation of Jon Yusoff's Beads on a String .
I thought this would be easy. Turns out the 3rd thread needs to be anchored before starting next SR! Here is what I tried -
1. Weaving: The beaded thread weaves up and down between alternate rings. 
Well, it leaves a colour blip when brought to the front, (notice the blue between SR1 & SR2) unless using fine, invisible, or same colour thread. Further, the string would be too loose.

2. Encapsulation : To avoid any colour blip I prefer the first of 2 ways to encapsulate the beaded string.
NOTE:  KEEP beaded string at back of work throughout

2A. Encapsulating Within SR (in last half-stitch): Make SR but do not close yet. Move bead to center, make final half stitch and pass beaded string through the open loop (parallel to core thread) of half-stitch before tensioning and closing ring. Thus string is held tight through the last hs and start next SR.
TIP: do it through the 2nd half-stitch, then move string to the back again. It does not leave any imprint!

2B. Encapsulating Outside SR (in unflipped half-stitch): Close SR, move bead to center, then make an unflipped or wrapped stitch with SH1 encapsulating both remaining threads, and start next SR. (I did this before the 4th and also the 5th SRs above). 
This will leave a tiny space between 2 SRs, but it can become a design element.

In both encapsulation methods, the beaded string is not locked and can be pulled to adjust. I went to town pulling away (see above), but the braid can be smoothed back into shape easily.

Despite being invisible from the front, encapsulation simply moves the blip to the back as seen in above pic. Obviously, we need to choose a string that will not be seen as pointed out earlier. I used 3 contrasting colours for purpose of learning. 

3. Knotting: In order to lock the beaded string in place, knotting is required. 
3A. Knotting with 2 threads: We can make an overhand tie or SLT between 2 threads, one of which is the beaded string. In above pic, after closing last SR with bead in center, choose any one shuttle thread and the beaded thread to make the knot, then continue with next SR.
3B. Knotting with 3 threads: Or we can make a knot using all 3 threads (as seen at end). This makes a larger, more visible knot and increases distance between SRs, but can act as a design element.

This is it so far - all my own 'ideas'. 
But before posting, I did a bit more research and found the following !!! 
However, none of these resources make any reference to anchoring the 3rd thread (I didn't check any class logs for possible discussion).  

....to be explored further

Sunday, 17 June 2018

wish to be a fish!

Pin It now!
Oh yes, you read it right! I do wish I could be a fish and stay in the water. It has been so horrid – hot and humid – here for the last 3 weeks that all one wants to do is laze in cool water or swim about like a fish. All energy is sapped out. We have been facing temperatures in the 110°F or 44°C range and no respite in sight.

So as I was saying, this adorable little fish tat-along came at the right moment!
I’ve admired this cute Kiss Kiss fish all along. Loaded my shuttles with thread and beads.

designed by Carollyn Brown

Size 20 Lizbeth – 132 Tropical Punch and 
pearl beads which are slightly larger than the required size 11

Day 1 – the tail fins and ventral part of the body.
Two long tails from each shuttle act as the padding for the body to allow the fish to keep it’s shape. I really like how she used the tails instead of adding thread separately!

Needless to say, the stitches are unflipped here (reverse stitch for encapsulation or padded tatting).

Day 2 – eyes, kissing lips and dorsal half of body.
With beads for eyes and lips in place, the encapsulation continues on. Dorsal and ventral fins are made with decorative picots.
After joining & knotting back to the tail fins, I simply tied a bow with the thread ends instead of hiding ends. Yup, lazy!

I thoroughly enjoy patterns that can be worked all from the front! And a sweet cute little fish is just so much fun! I do wish I could’ve taken pics against better background with seaworld props. But the weather does not permit all the physical activity involved ;-P I'm fried fish here ....

I intend to make this again with thread & bead sizes complementing each other. Perhaps then I will exert myself for a better background.

Carollyn has explained everything beautifully with stepwise pictures. She has given me permission to draw out a diagram for her patter pdf. So stay tuned to her blog !
It may be a small fish, but the designing is very clever - no small fry !

Thanks a heap, Carollyn, for this wonderful tat-along & pattern!
I still wish I could be this fish :-D


Monday, 28 August 2017

enchained ruby and beads

Pin It now!
cabochon tatting and another floating beads trial

Here's what I did last night , taking courage in both hands ...
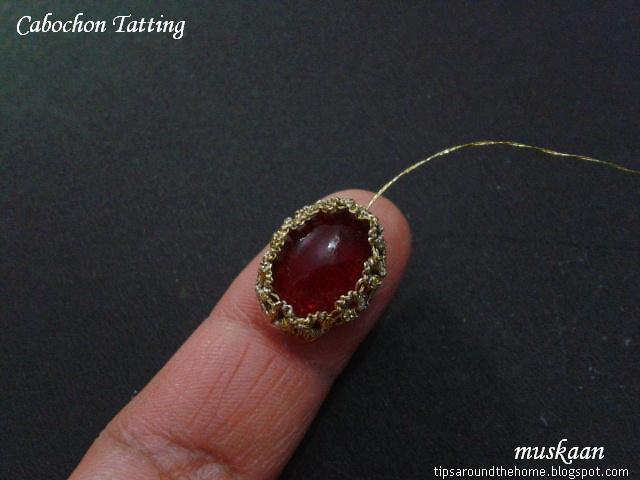
Encapsulating a tiny gem - 1 cm x 1.5 cms. It is a lone ‘rescued’ gem from long back, without any holes to string. I’ve admired the fine jewellery work that Marie & Ninetta do, but couldn’t muster the courage (except here).
When I told Georgia a few weeks back about encapsulating the ‘ruby’, she sent me a few pics for inspiration, one of which was this. I remember Nin saying she worked rings on both sides along the edge and as soon as I got in the mood, I started.
Seeing her entire post now & this one, too, I realize my freestyle pattern is slightly different. 
I think I have a great memory, but memory doesn’t agree with me ;-P Should've taken the time to look for it earlier! Hmmm, but perhaps it would’ve been too wide for this tiny gem.
Using 2 shuttles, wound CTM with 2 strands of unmarked gold thread (is it metallic – at least partly?) I worked 2 rings facing either side, and then a chain along the edge before making next pair.  The flat side has 2 rings less for curvature.
To ensure the gem stays snug and secure, I wove one tail through picots of the underside rings.

I've encapsulated a shell, but it was much larger and worked in size 20. Here, I had to wear the magnifier continuously to avoid shuttle straying through the 2 strands. 

ËÌËÌËÌËÌË

A few hours back, yet another floating beads idea struck ... 

Floating Beads under a chain !
The smaller pearl uses a slightly different first step while larger crystal bead follows the original method.
I like how the chain maintains it’s curvature despite the dangling bead. Of course we can dangle the bead lower by increasing the length of the shank.

Now I really must get back to completing the pictorials …

enchained in tatting is a happy experience :-)


Wednesday, 4 January 2017

the poinsettia !

Pin It now!

a snowflake poinsettia.  ‘twas the season after all!

Realised I hadn’t used beads in any of her snowflakes. Beads are such an easy way to add another colour, and perfect for my visualization & easy execution of this pattern.

Twentieth Day of December Snowflake
Lene Björn
from 24 Snowflakes in Tatting
for 2016 Snowflake Challenge on Craftree 

Remember my the flower within (and here) conceptualisation where I tried to highlight the flower within a snowflake pattern ? Well, here the entire snowflake becomes a flower !

I strung 18 beads on shuttle #1 .... 
and wound shuttle #2, CTM for Round 1. This helped me climb out with a split chain.
Then I joined in the green thread on shuttle #3 and used encapsulation for chains, carrying the hidden green thread along till required for 'leaves'.
One can tat this round with only 2 shuttles, by using SLTs. I prefer avoiding SLT .

Encapsulation offers so much freedom if one can handle thread entanglement ;-) 
Also, instead of sticking to designated/conventional thread, one can chose to do elements & joins with whichever shuttle is closer, keeping colour format in mind. 
Thus, I used the red chain shuttle for the SCMR instead of the red core one. This also ensured that the chain arch remained a bit smoother, without a break at the SCMR point. And I used the red core for lock join.

A further bit of experimentation : making the first ring a SCMR with thrown ring. 
But experienced designer knows best ! It is prettier & easier to follow Lene’s diagram path, which I used for the remaining leaf sets.
I think it's a bit cramped at the central leaf joins, thus distorting the shape of individual rings. Or perhaps it's my own sloppy tatting and the 3-shuttle entanglement.
There was a tiny bit of ruffle in this flake and I could’ve tatted it better, but I am satisfied with the overall floral image.
Techniques & measurements : split chain (SCh), mock ring (SCMR) with thrown ring, encapsulation, beads on ring picot, simultaneous joins.
In Anchor size 40, (hued red - 4054-1206 & green 4054-00229) 
Rnd 1 - 1½” ;  Rnd 2 - <3½”  ; the 'flower' only is 2"

Future Idea : How about adding more chain-only rounds to increase the petal layers? Think chrysanthemum, dahlia, rose, etc.


That's it for now. Off to tat another snowflake ☺

happy tatting always :-) 
Z

Thursday, 8 October 2015

Snow Doily - 2

Pin It now!
Two-Colour, One Pass Strategies

Round 5 and a pdf download*

Faced some dilemmas in this round ...
Round 5 consists of 3 separate motifs, joined to each other & to previous round.
{ Motif 5A is a snowflake ; 5B is a starlet ; 5C is a leaf clover for stability.}
Next there was the problem of colours – which colours to use, how to show them up at the right places, how to hide a particular colour, and so on.
And of course, the problem of hiding multiple ends!
I tried to balance practicality with pleasure, trying to be as precise as I could.

I would’ve liked to make at least the snowflakes ahead, & join as I tatted Round 4. But the all-cream snowflake (shown in previous post) did not appeal, hence shelved the idea. And I think it was a wise decision – the completion of rounds 1-4 gave me a better perspective on choice & placement of colours. Pretty happy with the outcome … wouldn’t you agree ? :-)
AND I got to learn a new technique, which Always generates immense interest & excitement !

List of abbreviations at end
* Click on titles/coloured font for links and pdf


A 2-round snowflake that can be tatted in one pass by using split chain.
Techniques required : 2-shuttle tatting for outer round; Floating/Thrown ring.
Techniques I used : FS/BS (RODS) tatting ; Floating Ring ; SSSR ; LJ .
Row 1 (yellow) – Made them all together. For 1st few, I hid the tail ends using Frivole’s finishing on a chain method. But since I was still sewing in the remaining tails under a few sts, I decided to simply go traditional (& practical). Knotted the tails, then sewed them under to hide. With size 40, knots are not discernible , Yay !
TIP : I tend to leave part of the tail ends visible till the motifs are completed & attached. It helps to easily identify the front & back sides of the motif. 
Snowflake motif measures 2" in size 40 thread
Row 2 (cream) – Ended with an SSSR for one tail. For other tail, I made a LJ to base for security & evenness ; then sewed under the chain caps. (the tiny telltale tail-ends are visible in above close-up pic)

TIP : One can use tiny picots at base of the thrown rings, to anchor them. However, considering that all 6 of these are joined to some part or other, I dismissed the idea. Would’ve been even pretty fiddly, too. Practicality ruled.
Ditto for the long chains – these could use a very small picot join at base (1ds away). But I kinda liked the flowery freedom & precision was discarded for pleasure :-)


These are very tiny motifs, especially in size 40, for me. Hence when these came up, I tried to use a little brainpower – surely they could be tatted together ?! Easy with single colour, but with 2 colours, in predetermined positions ?
There’s always a solution in our WonderTATland, isn’t there ;-)

I tatted the 2 parts together using Brown in SH1 & yellow in SH2.
It can be started from either end ( I tried one starting with clovers, followed by starlet) but I preferred starting with starlet & ending with clover leaves.
Learned & applied Double Core Single Shuttle Split Ring* to hide the brown in the yellow ring, when moving from starlet to clover (main steps indicated in pics below).
Part of the Starlet is complete, joined to snowflake. 
Now trying to hide brown within a yellow ring.
 Instead of SSSR, one can continue with SH2 to complete the ring normally ! 
Then cut & hide yellow thread.
If one opts for a normal double core ring, then make a Lock Join with SH1 
& start clover motif 
Starlet, in size 40, is 1" long & less than ½” wide
(Alternate Method - Double Core Ring shown below)
****************
1st ring of clover motif is SSSR. I added anchoring vsp (9vsp1/1vsp9) 
Yellow tail can be hidden within this ring or to previous yellow ring.
2nd ring of clover is normal, joined to adjoining vsp & then to Row 4 
3rd ring is also normal. Cut thread & pass through centre to bring it to the back
Hide threads. Motifs 5B & C complete
3-Leaf Clover, in size 40, is ½”across
****************
Techniques required : 2-shuttle tatting; Floating/Thrown rings; Onion Ring join ; Lock Join.
The 2 motifs are tatted separately in original pattern.
Techniques I used : FS/BS (RODS) tatting ; Floating Rings ; SSSR ; CWJ (for onion ring join) ; LJ ; Double core SSSR and later, Double core Ring ; Reverse Join.
I tatted the 2 motifs in one pass, using 2 colours.

I have prepared a diagram, with instructions, to show how I did this motif. Click to download file.


****************
Double core SSSR – quite a mouthful, right?! And if one really deconstructs it, this is only partially applicable.
1. the double core is for part of the ring only
2. the ring starts by using Two shuttles to tat !  And
3. one can complete the ring as a normal ring with the visible colour, as in this case.
This technique allows us to tat the complete ring in a single colour, while hiding one colour And positioning both threads as required. So in a SSSR, both threads emerge together at 'opposite' end, as in a split ring. But if one completes the ring as a normal ring, then the hidden colour emerges at one end, while the visible colour comes back to the base of ring !

It hit me almost towards the end, that for this particular pattern, why was I using SSSR after double core half ?! I could so easily avoid loop tatting by doing a normal ring for the 2nd half. The last few motifs were done in this manner :
Double core Ring

This also gives me more options to hide/sew in the yellow tail ! 
Notice where the yellow thread is emerging in this picture : it is at the base of ring... 
unlike in the double core SSSR, where the yellow thread emerges at opposite end, along with brown.


* I learned this technique by watching Karen's video (Lesson 43)

However, before posting here, I decided to do some more hunting. The first place to look is always Jane Eborall’s blog & sure enough there was the tutorial on Double Core SSSR with Two Colours Or how to crawl out of a round while using 2 colours and keep the SSSR one colour! 

And that also revealed that this technique was originally conceived by TattingChic in 2009. Read all about that interesting experiment & process (with pics) in her blogpost titled “A Tale of Two Split Rings” 

****************
I like how the brown clovers form a defined outline for previous round - almost like a large flower !
 
Measures around 11" in size 40, after round 5
Abbreviations used :
SH – shuttle
SSSR – single shuttle split ring
fhs – first half stitch
RODS – reverse order double stitch for frontside/backside tatting.
LJ – lock join
CWJ – Catherine Wheel Join
ds - double stitch


The brown doesn't quite show up against the blue background ; but colours get muted against the pale b/g !

Motif #4/III for 25 Motif Challenge 

****************

In Conversation ...
What I considered to be ‘routine’ repetitive rounds after Round 5, have suddenly perked up my interest.
As I was looking for the stitchcount in Rnd 6, something sprung up that I’d missed earlier. Rounds 2 & 3 have the side rings facing in one direction, while rounds 7 & 8  face the opposite direction ! And I think my round 2 & 3 rings face the ‘wrong’ direction ;-P
And the very latest includes new learning again – Join to Smooth Side by Anne Dyer
More about these in next post .


Till then, happy tatting :-)


Related Posts : Snow Doily Rounds 1-4