Showing posts with label reverse stitch. Show all posts

Thursday, 25 July 2024

multifascination

Pin It now!

 This time I have not delayed, not by much essentially. A couple of months back I came across an Instagram post on tatting and their profile said they were a German group of 15-20 members with a common passion for occhi! I messaged them about our Endrucks 1920 Project and so began a lovely friendship with Elisabeth Dobler (she manages the account and is the founder of the group 'Occhi Freunde Oberschwaben'), a very talented tatter who enjoys pushing the boundaries and exploring new techniques.

Inspired by my E25 palm leaves, she belted out a range of effects from one basic model! We decided to call these Multifaceted Leaves. She graciously accepted to share the pattern and we worked together to create a presentation that is hopefully clear and easy to follow. She also made a presentation in German. Here are the links to both -
E24 Multifaceted Leaves by Elisabeth Dobler - https://drive.google.com/file/d/1ywaZcQP8b1M86jo4yLIwpH5fZ5kQ0_tX/view
E24 Facettenreiche Blätter by Elisabeth Dobler - https://drive.google.com/file/d/1-uFBNdM9aFOPUDCJyWC_dy1R_nyC4KRw/view
 
Multifaceted Leaf #1 (basic) 
This is the basic pattern which can be embellished as desired. She has worked the leaves in a clever and interesting fashion, entailing encapsulation. 
While the detailed pattern for this basic leaf is given, for the others an explanation of the effect/process is provided. Instead of repeating the description here, I request you download the pdf and understand the intricacies.

Multifaceted Leaf #2 - 
She has used metallic thread to embellish the leaves.

Multifaceted Leaf #3

Multifaceted Leaf #4
Maltese Rings adorn this leaf.

Multifaceted Leaf #5
Here the leaf starts at the mekik oyasi ring with cut picots and progresses back and forth to ensure it is worked in one pass. The crosshatch filling is so impressive.

Multifaceted Leaf #6

All six leaves together. 
Would these make a bushy mustache or even eyebrows, LOL? 
Simply add a stemmed flower in the center for a nice composition.

This is but a small slice of the enticing array of possible effects one can play with, using the basic model!

🍃🍃🍃🍃🍃
Patterns 24 and 25 from Eleonore Endrucks' 1920 book, Die Schiffchen-Spitzen, are very similar; E25 has a bit extra on the E24 as base. E24 was reworked by Ninetta Caruso for the Endrucks 1920 Project and you can find her work here ---
https://ninettacaruso.blogspot.com/2020/10/eleonore-thats-difficult.html - notes.

🍃🍃🍃🍃🍃

Elisabeth Dobler has published two books with tatting patterns - Tatted Necklace with Roses, and Tatted Faces! Oh the faces book is really interesting and fun! 

Just like with Sally (in my previous post), it is always a pleasure to correspond with someone who is receptive, prompt, and willing to learn and share mutually! Seeing her interest in new techniques and effects, I told her about Ninetta's flickr account and blog and her new Captured Picot. Elisabeth got right down to it, diligently learning the captured picot, teaching it to her group and also applying them creatively! Wish I had taken her permission to share the pics here ... perhaps in future. But you can check out her Insta posts with all her wonderful displays here - https://www.instagram.com/occhi_freunde_oberschwaben/

These Multifaceted Leaves and many other leaves (seen in Elisabeth's Insta feed) will be displayed in the Austrian Lace Association's Congress 2024 - Participation Leaves in Linz from 11th to 13th October. Wish I and our group could've participated - hopefully next year.

Many many thanks to Elisabeth and looking forward to more creations.

Related Posts - Palm Leaves from E25

Wednesday, 23 June 2021

2nd shuttle or ball

Pin It now!

 A question was asked recently in the context of a specific pattern. The pattern contained chains that faced opposite directions in an edging. It would be an easy "switch shuttle" if one were to use 2 shuttles. But she wanted to know if it could be done with one shuttle and a ball?

Yes! Of course, the easiest way is to do a shoe lace trick (SLT) or overhand tie, but you know I avoid it as much as possible, preferring other options such as Reposition, Twist Work, Reverse Join, and/or Reverse Stitch, whichever is most effective at the time. (See https://tipsaroundthehome.blogspot.com/2020/07/lock-join-plus.html)

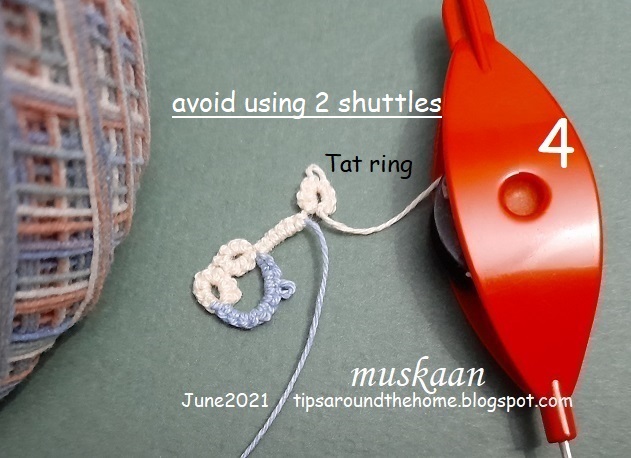
Here's a quick sampler I tatted to show one way of  How to Avoid Using 2 Shuttles - using direct tatting.

Please note that this is Not the original pattern, though the general shape, and direction of each element, is similar. I also made up my own stitch count.

1. I started with the middle ring, unsure how long the leftover thread would last. But basically, we are tatting ring and chain segments, reversing work (RW) each time.
2. Now here is where the chain changes direction and our single shuttle is not in position. To bring it in position, either do a SLT, or follow what I did -
Turn work (as if turning the page), and direct tat the chain ie. with unflipped or reverse stitched (as in 2nd side of split ring).
Notice the chain takes the colour of shuttle thread, unlike the previous chains. 
3. Reverse work after completing the segment. This brings the shuttle to the top ...
4. .... and tat the 1st ring of next repeat. It looks like a thrown/floating ring.
5. Rest of the motif is again worked as alternate chains and rings, with RW between each element. Repeat the direct tatted chain and continue for desired length.

TIP: If you want all chains to have the same colour, SLT or Repositioning at the start and end of chain would be a better choice, and the chain would be worked with normal flipped stitches.


A couple of days back I stumbled upon Jon Yusoff's How-to - Avoid using the 2nd shuttle . See, thrown rings using one shuttle !!!! 


One might inquire 'Why replace 2nd shuttle with a ball?

My answer is that it may be a matter of preference, sometimes mood! It can also be a means to reduce the number of tails to hide especially if it's going to be a looooong edging. Of course, one will need to either have 2 balls of the same shade (in order to reload the shuttle) or preload several shuttles before using the remainder of the ball for the 2nd thread.

One other scenario is when the rings are worked as mock rings (MR) or as self-closing mock rings (SCMR), a single shuttle and ball can work well.

Personally, I do not mind hiding ends, and 2 shuttles are more portable and manageable (a shuttle won't unravel if it slips off, unlike ball of thread). 2 shuttles also provide a lot of flexibility and freedom. 

As I always say, there's no absolute right or wrong in tatting. Choose what you feel comfortable with, or what the pattern demands, or how the pattern can be adapted to colour(s) and techniques. My point is merely Be Aware that there are several paths to the same destination, and with a bit of thinking ahead and adaptation you can travel any road!


You can find all tutorials here - 

Saturday, 4 April 2020

picoted S Chain cords

Pin It now!

Ever since I shared the S-chain cords using scrap threads, there has been a renewed interest in this beautiful effect. Last week Madhur asked for help with the picoted S-Chain I had used in a bookmark tail here. 
I took pics and prepared a quick pdf to send to her. I’m sharing some background notes here along with detailed steps and large pics, if you are interested.

S-CHAIN WITH PICOTS or faux Pearl tatting!
- PICTORIAL -

NOTES :
  1. Sabina Carden-Madden first wrote about the S-Chain, along with instructions and comparison. 
  2. 1 double stitch is followed by 1 reverse stitch or lark’s head knot. In other words, 1 flipped stitch is followed by 1 unflipped stitch/hitch, and repeated to desired length.
  3. If picots are added before every stitch, the cord looks like Pearl Tatting, without the hassle of 3 threads or even 2 shuttles.
  4. It can be tatted with single shuttle and a ball, but the effect is best seen when there is a contrast between colours.
  5. For initial practice, use a thick thread and 2 colours.
  6. For even picots, a picot gauge can be used. Scroll down to page 3, III-A – Direct Tatting, to see how a gauge is used in direct tatting or reverse stitch.  


Above pics show vertically and horizontally measured picots in 2nd side of split ring which uses reverse stitch.


Double Stitch v/s Reverse Stitch :
1 double stitch is made of 1st half-stitch (under-over) followed by 2nd half-stitch (over-under).     1 ds = fhs, shs
1 reverse stitch is made of unflipped 2nd half stitch (over-under) followed by unflipped 1st half stitch (under-over).     1 rs = ushs, ufhs
UPDATE - 1 reverse stitch is made of 1st hitch (over-under) followed by 2nd hitch (under-over). 1 rs = 1st h, 2nd h


Pictorial shows coloured thread in shuttle, and a ball of cream thread.
Tie threads or start with a ring in order to get a good grip.

The 1st image shows a ring (with tails hidden within) followed by (1ds,1rs)x4 already worked.
1.  
Start chain with picot followed by 1 double stitch. 


2.
The next stitch is a reverse stitch or unflipped stitch (as in 2nd side of split ring).
Bring shuttle over-under to make an unflipped half stitch.
Do NOT snug tight. Leave picot space at the beginning. See next pic for a better idea.

3.
Notice the bare threads after previous ds? This will later become the picot.
Make next unflipped half stitch (under-over) to complete 1 rs.

4.
Now snug the stitch.
The space converts into a picot at the beginning of this reverse stitch.
Also notice that the reverse stitch faces downwards as opposed to the double stitch.

IMPORTANT : Snug properly only after you are satisfied with picot length because each stitch locks the work in place. See above on how to use a picot gauge.

5.
Leave picot space and make another ds.

6.
Repeat the 2 stitches (p,1ds, p,1rs) for desired length.


See bookmark tail made using a doubled-up cord. It is also linked into a mock ring that resembles a Maltese Ring! 

Hope to see this cord being used in patterns - it can easily be substituted for regular chains, mock rings, etc. Vary the length of picots to create feathery effects! Let your imagination free

UPDATE : If distinctly contrasting colours in size 20 or thicker thread are used, a beautifully woven pattern emerges! Check the image in this post -  https://tipsaroundthehome.blogspot.com/2020/05/tracking-both-sides.html

Tuesday, 5 November 2019

frost flower pictopattern

Pin It now!
Notice the new entrant here? It is my 12-point variation of the frost flower. Didn’t quite turn out the way I had imagined – looks more like a wheel. Interesting how the entire character and focus seems to have altered!
Tatted in Lizbeth size 20, it measures 2 inches.

Should I share the pattern for this as well?

I have drawn diagrams of single motif/repeat to show sequence of elements and their stitch-count. It also has a written pattern which I found a bit difficult to write since there are numerous paths and techniques that can be chosen.
I finally decided to simply write what I have done and leave it to the tatter to substitute. In this pictorial, however, I have tried to point out the options.

Please help me decide whether the pictorial should be included within the pdf or should I simply give a link to this post for those who want to see each step? The image size will be smaller in the pdf and will add 2 or 3 pages. Of course, one can opt not to print those pages.

Once I have your answers, I will finalise and upload pdf.

  FROST  FLOWER  
snowflake pattern
© muskaan   Nov 2019

SCM(J)R with TR: Self-closing mock Josephine ring with thrown ring : Start mock Josephine ring using same half stitches, switch shuttle, leave bare thread and make thrown ring, close, switch shuttle, leave equal bare thread (a mock picot has been formed), continue with half stitches, close the mock ring.
I first shared this effect - SCM(J)R - with stepwise pictorial,  here.

Sh = shuttle ; - = picot ; -- = long picot ; rw = reverse work ; 
SS = switch shuttle ; JR = Josephine ring (worked with same half stitch) ;
TR = thrown ring (remember to switch shuttle before and after a thrown ring)
rs = reverse stitch or unflipped stitch as in 2nd side of split ring (optional)  

2 shuttles, continuous thread. Red is Sh1, yellow is Sh2

 1. Insert clip or pin on core thread (Sh1) for starter picot.
Chain : 3 – 6.
SCM(J)R: Start mock Josephine ring with 6 half stitches, leaving a loop at the base,  

 2. Switch shuttle for thrown ring but leave bare thread space before starting ring.
space, (TR: 3 -– 3), close,

 3. leave bare thread (a mock picot is formed), switch shuttle, and complete the mock JR with 6 half stitches. Pass shuttle through loop and close the SCM(J)R.
 4. Chain : 3 rs  

 5.  rw, SS, (TR: 3 -- 3), SS


 6.  chain : 3
(the above image is from the back)

ALTERNATE for steps 4 to 6 : rw, SS, chain: 3, (TR: 3 -- 3), 3.
Further reference : Changing Chain Curves

 7.  rw, JR : 6 + 6 (join to mock picot). SS 

ALTERNATE: This JR can be worked as a SCM(J)R. In this case, SS to work the mock JR, and continue with same shuttle for step #8.  


  8.  chain: 6 - 3


 9.  remove the pin or paper clip, insert hook through Both the starter and TR picots ....

 10.  ... to pull up core thread loop for a lock join.


 11.  This is how it will look after a lock join.

 12.  Chain: 2 rs - 2 rs. 

ALTERNATE for step 12: rw, SS, chain: 2 - 2, rw, SS.

One motif or repeat complete. Insert holder for picot and repeat 5 more times, joining the last repeat to the first.

With direct tatting, I didn't have to keep reversing the work, and was able to tat mainly from the front.

Waiting for your response. And I hope this pictorial helps. If it seems confusing, pick up your shuttles and work alongside. I find it helps.

Related Posts

Monday, 24 September 2018

hitch the loom

Pin It now!
I’ve been a real dolt – a blind one! Last year Georgia had sent me a 2-page pdf of Edwige Renaudin’s diagrams (with instructions in French) as a possible layout for my colour Cluny presentation. Edwige is a master cluny tatter and author…”
I will start diagramming if many of you are interested – 
please let me know through comment or email.

But anyway, the point is that she starts her tally weaving in a way that finally led to my perfect Cluny leaf! You have all been very supportive, overlooking the imperfections in my tallies, and I appreciate it so very much. Now, however, I am finally happy myself! Look for yourself (the Before and the After) - 


I have prepared a short pictorial to show the step and the difference it makes.

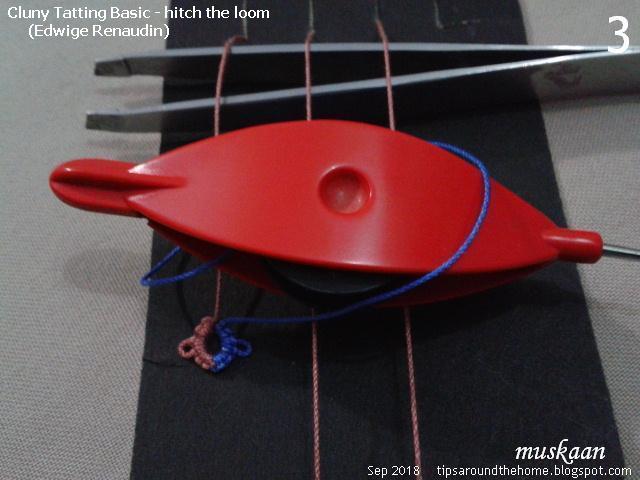
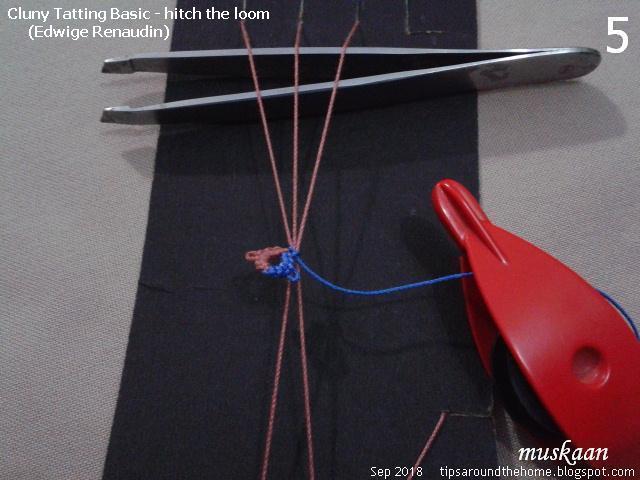
Cluny Tatting Basic : Hitch The Loom
(Hitch is the term used for an unflipped half stitch).

Winding the loom and weaving remains the same. Before weaving actually starts, there is one additional step where we capture all the loom threads within an unflipped half stitch (a hitch). 
This step can be used in any Cluny tatting ranging from basic single colour to 2 or more colours.

 1. Wind the loom as usual and bring weaving shuttle to the right.

2. Move shuttle to the left Under the Warps. *

3. Move shuttle to the right Over the Warps and through the loop.

4. Pull shuttle to tension and ...

5. Slide the unflipped half stitch (hitch) to the base, 
as close to the previous element as possible.
With the Warps tied snuggly together, weaving and shaping becomes easier!

6. Start weaving normally : 2 passes = 1 weave/wrap.

1 tally or Cluny leaf made !

Edwige takes the shuttle Over the 3 threads in step2, then Under and through the loop in step3, before tensioning.
Both ways work equally well, though I find moving the shuttle Under, then Over more convenient.

No colour blip at the base AND the leaf is centered.
The top braid shows the colour blip at the base.
I made some weaving errors in the 2nd tally of the lower braid, 
but the other 3 tallies are pretty close to 'perfection'.

Remember I said the half stitch (both flipped and unflipped didn’t work for me earlier – it would sometimes lock the tally when I started to close it. This happened because I was making that half stitch on only 1 Warp thread, instead of all 3. I may have misunderstood the instructions at the time, but even now they are not clear enough.

When I shared my excitement with Anita, she kindly sent me a video link of Edwige tatting a Cluny leaf on a box loom. I watched it many times but she seems to be starting her weaving directly (without the unflipped stitch). Nevertheless, it is worth watching – she makes it look so quick, easy and perfect! Notice how she removes the top loop and places it on the knob while closing? So the top loop remains on the loom, making it easy to close! Like I showed with the card loom, using the ‘one small step’.


I have found resources that were not listed before or links that no longer work. I will update my Resources page to include them all soon. 

Don’t you love how so many tatters weave their strengths and ideas,
sharing to create perfection around !