Showing posts with label options. Show all posts

Thursday, 6 October 2022

not just an edging

Pin It now!
Oooo là là
This stunning necklace is tatted by Ninetta Caruso for our Endrucks 1920 Project. An adaptation of Endrucks' 1st pattern!
But let me get the nitty gritty out of the way first, some of which has already been shared.

Edging pattern #1 from the book German book ‘Die Schiffchen-Spitzen’,1920, by Frau Eleonore Endrucks-Leichtenstern. The pdf shared earlier is now updated with a lot of cleaning up and additions. 
Above we have a straight edging, a circular edging, playing with 2-colours, and with a modified pathway for mirror imaging.


This collage shows some of the several paths ranging from 
1. the simpler but unsymmetrical original. However, it starts with a chain and moves from right to left;
2. the modified symmetrical adaptation which starts with a ring. This central ring is worked as a thrown ring from 2nd motif onwards (hence different colour) and the edging moves from left to right;
3. playing with some colour positions using Reposition Methods, and where the 1st motif is worked with 2 small side rings and each subsequent motif with only the right side ring to be made. Ninetta finds that this is easier than making the left ring in repeats.
4. (see square edging below) 2 small rings on each motif also makes it easier to keep the threads in place. 
These are but a few options and each tatter can follow their own path. 

This is Antonia Lai's adaptation of the edging as well as the addition of a corner, giving us a nice square or rectangular frame. - https://drive.google.com/file/d/1fsiET9ZJvXSD0kcAMKsuUNZt-rznFkO9/view
Pattern notes are included in the updated pdf above.

Happy Hands Linked Bracelet is almost exactly the same as the bookmark, except for using numerous colours and beads, and a different tail, etc. I made this specifically to represent our common efforts to create, complete, and continue the Endrucks Project.
If only the gold and silver beads sparkle in the photos as they do in real, sigh.
Pattern notes included in updated pdf.
 
This is my sampler from 2019 in Lizbeth 20 where I conceived the idea of a necklace and played around with bead arrangements. However, I knew I would never do justice to it, hence asked Ninetta to step in and she did so willingly and in such a spectacular fashion!

And now for the awesome part! This is a very short video Ninetta sent with her Happy Hands Necklace pics. And here is the link, in case - https://drive.google.com/file/d/1dOwk3l0vei-RApDrBPeJCe06FzpBeaqC/view

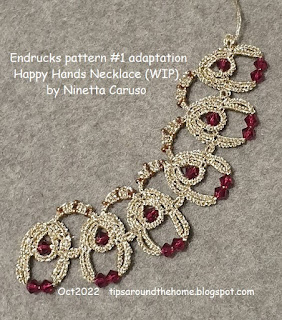
These are her work in progress pics. She used treble stitches to add height and texture to the chain arches between motifs.
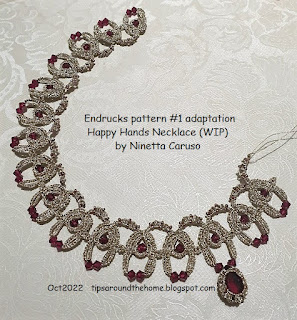
She substituted the hand rings with swarovski crystals.

This is the clasp at the back.
And a close-up of how she used tatting to join the necklace to the clasp.

The cabochon is attached later using this pattern - https://ninettacaruso.blogspot.com/2020/06/pattern-for-tiffany-bezel.html
As seen from the back.

The clasp and part of the necklace. This could so easily also become the front!
Notes, as well as tutorial links, are included in the updated pdf.

And Ninetta tatted yet another as a gift! 

Remember all these goodies are included in the updated Happy Hands Edgings and Adaptations pdfhttps://drive.google.com/file/d/1IRlJ7bnx-c27PYtgXymx_ps-KL2pen_m/view

The Sunflower coasterhttps://tipsaroundthehome.blogspot.com/2021/03/happy-sunflowers.html )  which was earlier a part of it, has been removed. I am in the process of adding diagrams to the pattern and cleaning up the presentation as a stand-alone. For the impatient tatter, I can send you the old pdf; although I'd prefer patience ;-D  

All modernised patterns and so much more can be accessed from the EP dochttps://docs.google.com/document/d/17LEVftXweztBIOWh4sL4BB7bX65ssoOsOn4oXIgCepY/view

Ninetta, my true partner in crime (PIC), thank you from the bottom of my heart! 
I'd also like to thank Winnie Ho for her feedback which made me 
re-think and re-do the presentation. Hopefully, it is now better laid out
with plenty of choices to work the pattern.

Wednesday, 23 June 2021

2nd shuttle or ball

Pin It now!

 A question was asked recently in the context of a specific pattern. The pattern contained chains that faced opposite directions in an edging. It would be an easy "switch shuttle" if one were to use 2 shuttles. But she wanted to know if it could be done with one shuttle and a ball?

Yes! Of course, the easiest way is to do a shoe lace trick (SLT) or overhand tie, but you know I avoid it as much as possible, preferring other options such as Reposition, Twist Work, Reverse Join, and/or Reverse Stitch, whichever is most effective at the time. (See https://tipsaroundthehome.blogspot.com/2020/07/lock-join-plus.html)

Here's a quick sampler I tatted to show one way of  How to Avoid Using 2 Shuttles - using direct tatting.

Please note that this is Not the original pattern, though the general shape, and direction of each element, is similar. I also made up my own stitch count.

1. I started with the middle ring, unsure how long the leftover thread would last. But basically, we are tatting ring and chain segments, reversing work (RW) each time.
2. Now here is where the chain changes direction and our single shuttle is not in position. To bring it in position, either do a SLT, or follow what I did -
Turn work (as if turning the page), and direct tat the chain ie. with unflipped or reverse stitched (as in 2nd side of split ring).
Notice the chain takes the colour of shuttle thread, unlike the previous chains. 
3. Reverse work after completing the segment. This brings the shuttle to the top ...
4. .... and tat the 1st ring of next repeat. It looks like a thrown/floating ring.
5. Rest of the motif is again worked as alternate chains and rings, with RW between each element. Repeat the direct tatted chain and continue for desired length.

TIP: If you want all chains to have the same colour, SLT or Repositioning at the start and end of chain would be a better choice, and the chain would be worked with normal flipped stitches.


A couple of days back I stumbled upon Jon Yusoff's How-to - Avoid using the 2nd shuttle . See, thrown rings using one shuttle !!!! 


One might inquire 'Why replace 2nd shuttle with a ball?

My answer is that it may be a matter of preference, sometimes mood! It can also be a means to reduce the number of tails to hide especially if it's going to be a looooong edging. Of course, one will need to either have 2 balls of the same shade (in order to reload the shuttle) or preload several shuttles before using the remainder of the ball for the 2nd thread.

One other scenario is when the rings are worked as mock rings (MR) or as self-closing mock rings (SCMR), a single shuttle and ball can work well.

Personally, I do not mind hiding ends, and 2 shuttles are more portable and manageable (a shuttle won't unravel if it slips off, unlike ball of thread). 2 shuttles also provide a lot of flexibility and freedom. 

As I always say, there's no absolute right or wrong in tatting. Choose what you feel comfortable with, or what the pattern demands, or how the pattern can be adapted to colour(s) and techniques. My point is merely Be Aware that there are several paths to the same destination, and with a bit of thinking ahead and adaptation you can travel any road!


You can find all tutorials here - 

Monday, 15 March 2021

balancing act

Pin It now!

Vintage pattern in modern format and pictorial showing some of the options available especially when using 2 or more colours.

Pattern Updated - March 17th, 2021 (in this colour). 

Pattern #1 (Happy Hands) from Frau Eleonore Endrucks Leichtenstern's 
book Die Schiffchen-Spitzen’,1920

Then - The above is an old model from 2015, tatted as per original pattern. Look closely and you will see that the left and right side of each motif is not a mirror-image; all chain stitches face the same way.. as in block tatting. It makes tatting very easy as seen in the notated sequence. You start with a chain, holding a picot with paperclip and work up and down towards the right.
modern sequence of work
Now - We would shudder at the nonsymmetrical nature of the original! We now prefer that everything is laid out properly, symmetrically. And when using 2 colours, their placement is balanced. Which led me to the reworked 2-colour model inlead pic, and a pictorial to describe the steps as well as options we have. The modernisation involves a bit of complexity in tatting sequence, but it is the best/easiest of all I tried/could think of.

Notations/Abbreviations used : 
-,p=small picot; --=decorative picot; =lock join; rw=reverse work/turn work; SS=switch shuttle; dnrw= do not reverse work 
Techniques used :
2 shuttles; thrown/floating ring; lock join; fs/bs tatting (optional); reverse join (optional); 2-colour tatting (optional) and related colour placement methods like SLT, etc. 

NOTE: 2 colours are used in pictorial to highlight which shuttle is in play.
Shuttle 1 - blue thread ; shuttle 2 - mustard thread.
All joining picots are very small.

OPTION 1
When working with single colour, follow the directions from 1 to 15. 
    1. ring: 4-4-4--4-4-4. rw
     B chain: p 4•4•4-4. rw
    2. C ring: 8-8. dnrw, SS
    3. D chain: 4•4• SS
          E ring: 3-3. SS
       F chain: 4•5•
NOTE: As often happens with concentric chains, you may need to adjust the count with an extra stitch or half so that they lie flat.
  
    4. G chain: p 4•4•4-4. rw
TIP: For smooth curves, use CWJ (Catherine Wheel Join) instead of LJ (lock join) wherever possible
    5. H ring: 8+8. dnrw, SS
       I chain: 4•4• SS
        J ring: 3-3. SS
      K chain: 4•5• . rw  (Instead of lock join at end, I prefer making a picot join as in Motif#2)
    6. L chain: 3-3-3-3. dnrw, SS
First Motif Complete.
NOTE: Unlike the original, with our tighter stitches and tensioning, this edging tends to curve (as in lead pic). If you want a straight edging, make L chain: 3-3-3-3-3.

Leave bare thread space before starting nest ring (as seen in #7 pic above)
    7. A ring: 4-4-4--4-4-4.
    8. reverse or rotate work
    9. B chain: 4•4•4-4. rw

 
    10. Make ring C & chain D as before
    11. Join to ring E above and lock join to chain below. Keep Both threads on same side (I prefer to keep them above). Continue chain F
    12. Make normal picot join and continue to other side, as in 1st motif.
NOTE: I found this normal picot join is neater than the lock join used in motif#1. I had even tried the under-over join but was not satisfied. You can choose whichever join you prefer.

    13. 14. 15. – continue as first motif. 
Second motif complete. Repeat this motif till you reach desired length.

OPTION 2 - Tatting with 2 colours.
Reverse Join for bilateral symmetry of colours 
    16. After making F chain, start making lock join and
    17. Entrap other thread between loop and shuttle before tensioning.
    18. Notice the shuttles switch positions after Reverse Join. Complete 3rd motif. See how the colours are positioned.
 
    19. 4th motif continues with shuttle positions switched, and another RJ while crossing over to right side. Notice that there is bilateral symmetry of colours, but they alternate with the 3rd motif.
TIP : See Lock Join Plus tutorials for more options on switching colours (shoelace trick, reposition, twist work, etc.) whether within a motif or between motifs.

Thus we have several options on how to place colours, which join to use, which sequence to work, etc. It is up to the tatter to play around with the options to create and adapt. 
This will be converted into a proper pdf with stepwise diagrams and uploaded to the Endrucks 1920 Project document. There are more adaptations of this pattern in the works - sunflower coaster, beaded necklace, interlaced bookmark, besides the heart already shared. In fact there are now adaptations of the heart by inspired tatters which I will share in another post!
Yet another idea is from the multi-coloured Girotondo here. I can visualize each motif in a different or alternating colour, and the connecting chains in another colour, encapsulating the motif thread(s). I plan on doing this for the bookmark adaptation. 
I hope Frau Endrucks will not be too unhappy with our 21st century style....