Tuesday 30 October 2018

heart to heart buddies

Pin It now!
It’s good to have friends in High places – High in creativity and generosity!
I had been in a kind of tatting funk for the past several days, despite the several ongoing projects. And then my buddy Anita sent a pic of her hearts with counts inked and I was immediately inspired into action! 
Loaded my shuttles and went to work, with a couple of my 
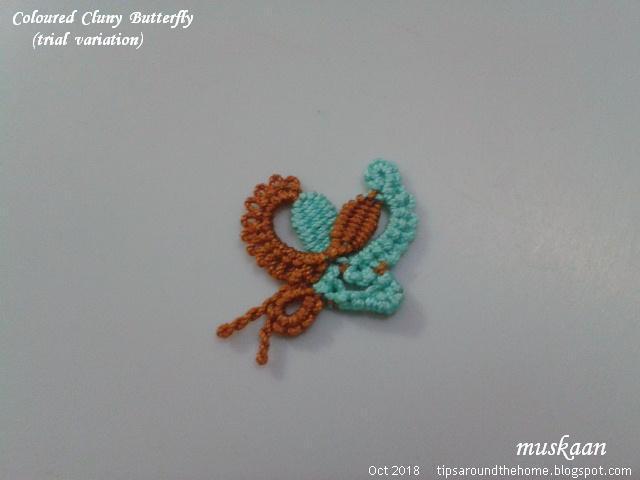
own patterns emerging. Couldn’t stop for 2-3 days! Towards the end I switched to 2 colours just to get a sense of the possible effect.

I keep forgetting to give the link to Anita's multipurpose site – Lavender & Laces. Do check it out. 

UPDATE (Feb 2019) : patterns shared here

Inside Your Heart
Anita Barry
The Anchor size 20 (in red) measures 3½ cms x 3 cms
I like how quick and simple this is! My ring didn’t turn out a perfect circle as her's did. A slightly loose tension while closing would help? It’s a bit better in the size 40 2-coloured version where I used a self-closing mock ring.
 
Cross My Heart
Anita Barry
In Anchor Size 40, it measures 1” x >1”

Worked with 2 shuttles using split ring to climb out, and thrown/floating rings in outer round.
TIP: Start with the top ring of cross, to climb out with a split ring on the left.

Not happy with my first, I made a few more with slight tweaks if you look carefully. Still not as pretty as Anita’s, it does give the sense of soaring wings - it's an angel; it's a butterfly; no, it's a heart! I like the 3-heart arrangement in the collage!

There was another folded ring heart which I didn't make. If interested, we can ask her to share all her patterns. 
 
So are you wondering what happened to that vintage butterfly from Corticelli?
It is still in same state as I left it (I have something else in mind to finish it off), but the lower wing florets have been purloined! I trapped them in my heart …

Budding Heart #1 
Worked in Anchor Size 40 & 20, it measures 3½ cms x 4½ cms
The floral rings have longer chains on the outside than the original, as I’d mentioned before.

TIP : Any pair, cluster or spray of florets can be used. Place it on a grid paper and draw the heart shape. Then join thread and tat the chain outline. Using the sketch as a constant guide. 

Here’s the heart pattern :
Floral Rings -
For central ring : Make 8 long and 7 normal picots separated by 2ds. Close ring and climb out with a mock picot.
Chains : 4 – 4 lock join to smaller picot … all around (8 times).
Similarly make the 2nd floral ring, joining to the first at any point in the outer chain.
For the heart outline, I switched to Anchor size 20 (similar to Lizbeth 10).
Join continuous thread to the picot of top floret, and work chain :
Chain: 3 CWJ 8 p 5 + 35. Join to 2nd floret, cut and tie and hide ends.
CWJ – Catherine Wheel Join gives a smooth continuous outline.
Budding Heart #2 
Months back, I had tried these Blossoms motifs in 2 strands of embroidery thread for my MIL’s hanky corner, but didn’t use. After snipping off a 3rd floret (forgot to take a pic), I placed it on the sketch, and hey, the same outline worked!

Wondering how a butterfly would look perched on the heart …
For the 2nd version, I actually tatted a Blossoms butterfly linking the right and left halves through additional picots for lifted wings. The body ring was worked Under the wings and curled around the heart chain lengthwise. For further reinforcement, I tatted a smaller ring behind and repeated the attachment. Butterfly should've been worked with 2 strands, instead of 3 - seems a bit disproportionate now.

Future Ideas : Instead of butterfly, wrap some green tendrils with leaves around part of the heart, emerging from the lower floret. 
And pearl beads in the center of the blossoms?
Interlocked rings for #1?
 
Trailing Hearts
I rarely go back to my old patterns, but just for the fun of it I tried this heart again. Could definitely do with some improvement – it is a bit dense in the center! Perhaps a single common join between the 3 rings? The pattern can be found here.
And speaking of hearts the Tiny Heart Poppy – a 3D flower made from a 2D heart - is back in this week’s popular list (see right panel)! Happens without fail every year during the Remembrance Day period (and occasionally when some group swoops down to tat it).
 
keep tatting buddies close to your heart, always

Sunday 28 October 2018

school photo day

Pin It now!
tatted butterflies, square and oval doily


In my previous post I uploaded a school photo day (of all the Coloured Cluny butterflies). But guess what, one of them was too knotty or too shy to face the camera! Found it only when it peeped out from under the looms! 
So here’s a special group photo in celebration, this time with an old teacher standing guard. 
Can you spot which one was missing? (answer at end of post)

A group of butterflies is called a “flutter”, so ...

Question 1 : What should a collective or group of tatters be called ????

This large butterfly is the Butterfly Medallion No. 169 from a 1916 Corticelli booklet. 
I found the pattern here. I followed the rewritten pattern, but some counts are missing.
I’d intended to work it in size 40 white for it’s delicate lacy effect. But with so many cuts and ties, what's the harm in colouring it up to highlight the floral wings?! 

 These are the individual pieces, to be joined later with a pretty trim around each of the ‘florets’. I had to add stitches to floret chains to accomodate the decorative picots.
Re-tatted the body and made twisted (floating) picots this time.

I continued but have already unravelled & re-tatted a number of times. 
With so much back and forth, I am no longer enjoying it. 
So did it get mutilated or transformed? 
To solve that mystery, stop by tomorrow – you may be in for a surprise!

Sparkle Fusion is Usha’s new medallion 
fusing together the dot picot string and variable treble stitches. 
I had the pleasure of test tatting it - her swirl join variation. Worked in Anchor size 20. 
A variable tds creates a nice little peak or scallop on the outer edge of the stitch! 

Scrappy Doily after 5 rounds 
In Anchor Size 20, it is now 4” x 3¼” – I got my oval !!! 
All those suggestions have helped. Too many tatters, unlike too many cooks, did Not spoil ;-P 

Placed on the grid to confirm. 
Click here for earlier musings & notes. 


The truant butterfly !


Question 2 : Should this Coloured Cluny Butterfly be called Ready to Fly butterfly?
One of the names has 2 votes out of 3 (not saying which!), but what’s your choice?

Eager to read your answers ....
flutter by with tatting , always

Tuesday 23 October 2018

this baby wants to fly

Pin It now!

and needs a little nudge from volunteers. Remember the trial butterfly that I wanted to convert to Cluny tatting? Well, it's finally done and I have many little butterflies to show for my effort... 

This is a composite pic of my various trials and tweaks. 
My tatting mates Ninetta, Jane M, and Anita 
have already been of tremendous help with their enthusiastic feedback.

Worked in size 20 Anchor (or similar thick thread), 
the final versions measure 2cms x 2cms.

Techniques include -
2 shuttles with 2 different colours
Colour Cluny tatting
Lock chain
Under – Over or Alligator Join


I am now looking for a couple (more the merrier!) of tatters to test the written pattern.
Anybody interested, please leave a comment or email me . 

It is a fairly quick tat if you know the techniques, 
or it can act as a practice pattern for Cluny tatting.

Thanks in advance :-)

Monday 22 October 2018

Shuttlebirds challenge accepted

Pin It now!
Shuttlebirds has started their Wednesdays Weekly Challenge after a hiatus of 4 years. I didn’t have a clue at the time, but when it showed up in my blog roll, I couldn’t stay away. Nicola’s patterns are always a treat – to see, to follow, to tat. And even though I’m no fan of tatting animals (except birds, butterflies, & bunnies) tatting long shapely chains are always a challenge.

Cheeky Monkey by Nicola Bowersox

Techniques I used:
2 shuttles, ctm (for 1st part)
scmr with thrown/floating rings
directional or fs/bs tatting
dimpled chain
lock join
lock join with 2nd shuttle
switch shuttles
In Anchor size 20, the monkey stands 3" tall x 2.5" wide

As always, the images, notations, and instructions are very clear.
However, for shuttle tatters, one needs to choose which shuttle to work with, when to switch shuttles and with which shuttle to make the lock join.
I sewed in 2 black beads for eyes later, though they can be pre-strung.

My ‘mistakes’
For the right armpit, I didn’t make the lock join with other shuttle. The ‘twist’ is glaring!
I was so focused on the stitchcount for the long tail that I forgot to snug the stitches more compactly.

Long chains are not easy to control or hold shape, but I’m fairly happy with how these turned out. It is a very cleverly designed and executed pattern and wish my monkey was more perfect.

ÿ|ÿ|ÿ|ÿ

I went through the list of previous challenges and chose the very first one. This butterfly has been flying around pinterest for ages and I first made it in 2013, before I started blogging. Not satisfied, it’s been in one of my to-retat boxes (don’t remember which one – I need to ‘organise’ a massive hunt!).

Butterfly by an unknown designer
UPDATE: Pattern is by Anna G.Vecherskaya in Frivolité  1991, p19.

The link on the site doesn’t work, but a quick search through pinterest will throw up the pattern. This is the one I followed (from a Russian book). It is a beautiful butterfly within butterfly design, tatted in one pass!

Techniques I used:
2 shuttles
scmr
directional or fs/bs tatting
lock join
slt  
very small & decorative picots
lock chain
In Anchor & Lizbeth size 40, the butterfly is 2” high with a wing span of 1½”. 

Knotted the 2 threads together and worked a lock chain for first antenna, then worked the 4 inner rings as mock rings separated by an unflipped 2nd half stitch to secure.
I had earlier started with normal rings but horrors, the thread broke while closing the last ring.
In the 2nd round SLT is used to keep the chain and rings of same colour.
Ended with the 2nd antenna, knotting and snipping off ends.
No sewing !!!
I tweaked the stitchcount on the lower wings (outer round) to get this shape.
Trying to play with colour combinations, though I’m not too happy with the pink shade.

This old butterfly from 2013 is worked in South Maid size 10. 
Normal rings instead of mock rings. And it is missing an antenna. Will tackle it when I find it, and update with the dimensions. 
ÿ|ÿ|ÿ|ÿ

Catch you later, folks :-D

Friday 19 October 2018

picot join to the right part 3

Pin It now!
(concluding part)
Common Threads - SET VII : the 'right' picot join 

Picot Join to the Right – Part 3
Terminology & Range
fig 1 - projects with the 'right' picot join

fig 2 - rosette
As beginners some of our first shuttle-only flowers and butterflies have free rings – a cluster of closely tatted outward facing rings. The next stage is when the adjacent petals are linked through picots and we learn the picot join. Easy - the joining picot is to the left of current work. And then comes the last petal/ring (7th ring in fig2) and we have to join it to the first ring. Huh! How to link it to the first petal?! How to reach through that picot without ending up with a twist or with a locked/snagged core thread?

There are many ways, and just as many terms, 
but the core principle/factor remains the same –
the linking picot is to the right of the element being worked.

fig 3 - more projects with picot join to the right
A great deal of tatted lace returns to the starting point before tying and cutting ends or climbing out to the next level. It could be a motif, medallion, doily, or even edgings on a fabric. Sometimes this linking back is through a picot on the first element(s).  Google any of the bold terms for an array of tutorials (add ‘tatting’ to the term). Some resources are listed here.
Last to First Join refers to this aspect – the last element linked back to the first element through a picot. It can be between 2 rings, 2 chains or a ring and chain.
Most frequently we apply this linkage to close a medallion in a circle.
Joining in a circle/in the round is another term for this final linkage arising from traditional medallions before the invention of the tatted chain. Medallions made of a cluster of linked outward facing rings were commonly called a rosette or flower (fig2). Hence Mary Konior also called it the Rosette Join.

As frequently mentioned, it is not just difficult to reach that joining picot, but there is a tendency for it to twist after linkage has been made. The following terms are based on the movement required to make that linkage.
Twisted picot join – where the picot is pre-twisted before pulling a loop through it for linkage, thus pre-empting or neutralizing the twist when completed.
Folded Join – where the work is folded in such a way as to reach that ‘pesky’ picot.
Avoiding the Folded Join – a simple reorientation or rotation of work results in avoiding any folding or twisting by bringing the linking picot to the left of work.
Riego Join is yet another term (coined by Teri Dusenbury) referring to the same join found in Mlle Riego’s books dating back to the 2nd half of 19th century. A long tail is cut, slipped through the picots, and the last ring is finger-tatted. Thus the linkage is made Before the ring is tatted.


The above list seems to suggest a fairly small range where this join to the right comes into play.
Not true! The following tatted models show us numerous circumstances where we have used the ‘right’ picot join. 
And to make it playful, try identifying that join to the right in each medallion or motif (click on image for larger view or on blue link for respective post)

          Does it have to be a circle?
 
Let us not take the ‘circle/round’ term too literally. It largely refers to closing/linking back to the start, not the shape. Shape is determined by the elements.(eg. the triangle in fig1. The 5-ringed flowers in this bouquet give a definite pentagonal outline. The 4 rings in the center of the cross clearly form a square or diamond, acting as a scaffolding. (figs 4 & 5)

          Only single or a cluster of rings?
Rosettes have very closely placed single rings. However, a larger, more open medallion, or an edging, when joined back on itself, may need the same join. 
 
And not just single rings, but a cluster of 2 or more rings can  be joined back. eg. the pair of rings in Butterfly Squares/Edging (fig6) or the last ring in a clover or trefoil (fig7)

          Does the join come into play only with outward facing rings?
Not at all, though most resources tend to focus on rosettes. The following examples have inward facing rings, but need to join the last ring to the first through the picot that is on the right of current work (fig8). 
 
In the Clover Wreath Poinsettia there are inward facing clovers. Last 2 rings need to be joined to the first 2 rings. But the last green ring on the final chain is also linked in same manner! (fig9)

Not just single, but multiple rings can need the join! And not just one but more linking picots within the same element may be involved.
 
The vintage edging with bare thread space has both inward and outward facing rings and since it is closed, the starting rings were on the right of the final rings (fig10). In the Quatrefoil medallions the number of inner rings reflect the overall shape of the polygon and the rings are bridged by split rings (ie. we move from one inner ring to the next via a split ring instead of bare thread or chain). Each of these needs the join for both the inward & outward facing rings (fig11).

          Does the join occur only between rings? 
  
In this medallion, the linkage takes place between the inner yellow rings as well as the first and last blue chains (fig12).
 
Again, there may be multiple linkages. Can you identify the ring-to-ring and the ring-to-chain links in the Classic square (fig13) ; Or the final chain-to-chain link in the snowflake? (fig14)

          Layered and 3D formations
Why stop at only 2D tatting? Tatting around a button, cabochon, gem, shell, doodad, may all end up with a last picot join to the right. 
 
Whether around a button, or around a gem for a ring, the final inward facing ring clearly needs to be joined back. The popular Ice Drops require the join both on the front and back. And even the final curled ring is linked back around the shell. (fig15). In the ANKAR-style earring not just the large blue rings, but the curled rings also need the picot join to their right (fig16).

          Is it always the final/last join? 
Again, No.
In both the part 1 & part 2 pictorials, as in majority of tutorials, the thread(s) end up at the front/above the work. It does not matter as usually the work is ending and after the threads  are snipped off, the tails can be repositioned as desired.
 
But there are patterns where one may need to continue further and hence both threads need to be on the same side - either at back of work or in front - as in the Curly Cross pendant (fig5) or this 3D flower (fig17). 
In the one-pass snowflake, ‘Celeste’ (fig18), each arm has rings that need to be linked to their right, and work continues! So ‘last to first’ is no longer applicable! 


I hope these projects provide a glimpse into the diverse usage of the join to the right, and why a generic term like ‘picot join to the right’ is more applicable than the smaller windows provided by other terms. Nevertheless, whatever term (or movement) is used, one should now be able to identify with ease, where and when the ‘right’ picot join is required. No more scratching one's head even if the pattern instructions do not specify it !!!