Showing posts with label tatting away. Show all posts

Wednesday, 21 September 2016

In the dark of night , quo vadis ?!

Pin It now!
(this post has two parts - scroll down for a preface to a soon-to-be-posted series)

Well, no, I wasn't tatting in the dark, but the light in my brain/mind was surely switched off! How else can this be explained, how else can it be rationalised ?! This is the third snowflake in a row that has a fraternal twin !!!


Reflected Nights
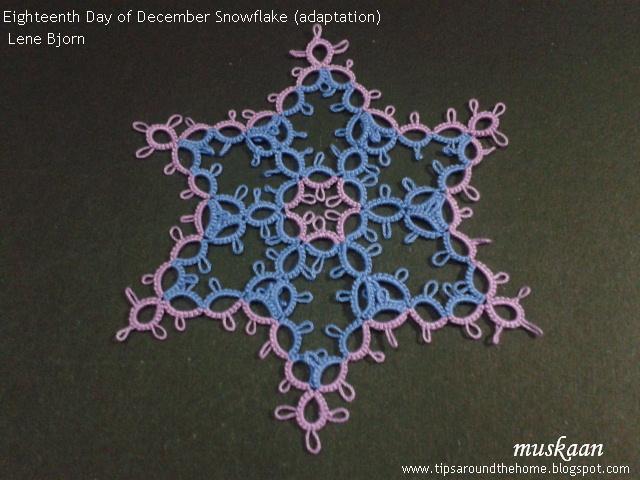
Pattern : Eighteenth Day of December Snowflake
Designer : Lene Björn
For : 2016 Snowflake Challenge on Craftree
So happy was I to have finished one WIP, and so eager was I to strike it off this list. Sat down to write the post and while referring to the book, a glaring mistake dawned on me!
True, I was tatting this in very short, interrupted spells – a ring here, another there.
True, I was getting a bit uncomfortable following the sequence.
True, I had been having trouble with the inner trefoil cluster - kept wondering why there was so much overlap.  Cross-checked not once, not twice, but almost every time ! Yet no light shone through :-( and I put it down to the joining picots being too small.

Sigh, nothing to it but tat again. There's a saying in Hindi idiom that fits in perfectly. It basically bemoans the fact that at a time when one is totally broke (financially), the dough (flour/food) too gets ruined. In my case, I was ‘broke’ for Time.  

Might as well make the most of it & bring in a bit of change. But first things first ….

Materials used : 2 shuttles; size 40 Anchor cotton (blue-4054-00131, lavender-4054-078); picot gauge (⅛th inch vertically or ¼th inch horizontally).
Techniques I used : directional tatting (RODS – reverse order double stitch), rings, split rings (SR), double core single shuttle split ring (SSSR), turn work (TW), switch shuttle (SS)

The Mistaken One !
As others have noticed, it is simpler to start with Ring 2, then Ring 1 (both normal rings), & continue thereof, all tatted in one pass, from the front side.
The inner round is worked clockwise while the outer counterclockwise.

To tell you the truth, I had started this snowflake in green & cream ! And I took a printout of the pattern in order to play with colour placement. The different rings (normal, SR, double core SSSR) were also marked on the sheet. Since I kept making mistakes, & unknotting, retro-tatting, this was boxed & I picked out 2 different colours more in keeping with my darkening mood.

I was working with 2 colours, hence all 6 innermost rings are SRs.
To climb out to outer round, 2 rings were worked as double core SSSRs, enabling me to hide (encapsulate) the lavender & get all-blue rings.
To work the rings at the tips, TW, SS, RODS ring, TW, SS & continue.
Shuttle 1 with blue thread  consumed 1 full bobbin load ; Shuttle 2 with lavender used up only half a bobbin.
Measures : 3½” 


The Un-Mistaken One !
Measures : 3¼” 
Switched colours to see effect.
Tatted outer round in clockwise direction.  Yay, worked really well !!!! The tatting went much faster & smoother. Mental grasp was easier, too.

Used the picot gauge horizontally (parallel to the core thread). Again, worked much better than vertical, especially since the thread was not easily visible.  When I first did it for the Elizabeth medallion, it didn't appeal much! Goes to show that one can always reset one’s comfort zone. Perhaps when working with finer thread, it is advisable to use the gauge horizontally ? What is your experience ?

TIP : One interesting observation : In first snowflake, when tatting went counterclockwise, the outer ring at tip had to be worked in RODS ; in this piece, where tatting was in clockwise direction, the ring at inner end had to be worked in RODS.
Both snowflakes together …. love the effect ! In above pic they are placed on a chikankari saree with mukesh work. Below, the correct version is placed above the 'adapted' one.

Related Post : double core SSSR


Quo vadis ?!
This Way or Tat - Preface

For the above two snowflake repeats, I deliberately chose to tat in a different direction. (And it threw up interesting ‘changes’ when combined with directional tatting, as pointed out in the TIP). I had experienced the same discomfort when tatting the Melt into Spring Snowflake in counterclockwise direction as the diagram called for.After snipping and re-starting in clockwise direction, the tatting went very smoothly.

But have you ever faced this dilemma where you Think you are going to be tatting a row/round in one direction, but turns out it wants to go in the opposite direction ?!
I have had this encounter many a time, in projects that have multiple rounds, irrespective of whether I was tatting with regular double stitches throughout or with directional tatting; whether I was cutting off the thread after a round or climbing out. All four of my Renulek’s doilies are witness to this dilemma and I have detailed my direction enigma for most of them.

Always wondered why, but it was my Scarlet O’Hara moment ‘hmm, I’ll think about it tomorrow’! Well, many tomorrows came but no thinking ensued. After all, an experienced tatter can easily make the shift - much easier to do for a simple symmetric pattern, but can be done nevertheless. 
That tomorrow finally arrived when a question was forwarded and I had to sit down and really think about it. 
Started with a few illustrative diagrams, it soon stretched to a series of diagram sets detailing situations and options. It even led to the discovery of some common rules/observations and the factors that affect the outcome.

But before I start with the 'This Way or Tat' series, the following scenarios might strike a chord somewhere?
  1. Whatever you are tatting right now, which direction is your tatting going ? Seems like a simple question, but there are 2 answers/parts to it. I’ll let you figure it out for now.
  2. Are you working directional tatting (frontside/backside with reverse order of double stitch) or simple double stitches all through? Do you think the former would make a difference to the direction of progression?
  3. Do you sometimes use direct tatting (reverse or unflipped or wrapped stitches as when working the split ring)? Have you noticed any difference in direction?
  4. Has it happened that the pattern/diagram calls for you to take a certain direction, but you find yourself tatting in the opposite – either deliberately or accidentally ?
  5. Have you faced the same dilemma when you climb out of one row/round to the next using a split ring or split chain? You thought you’d be going this way, but the shuttles are wrongly positioned?
  6. In multiple row/round patterns, how would two colours be positioned for next round after we climb out with a split ring or split chain?
  7. Similarly when working with colours in regular tatting. Have you wondered how to get the right colour in the right position/element ? There are some that flow naturally in a certain direction but in others we use a SLT. Are there other techniques or tweaks that could accomplish the same? How to decide what to employ and when?
  8. Would you much rather work from the front? How will the traditional pattern behave and how would we apply our choice?
  9. Do you sometimes wish the pattern diagram had given some indication of the direction in which to go?

If you think these questions deserve answers, and the answers interest you, look no further. I will start posting soon, along with practice patterns for all who are interested. The first post will be an introduction to the document with a quick practice pattern where the tatter can choose her/his own path since I will provide only the stitch count with no other instructions.

Are you up for the challenge ? Do I hear a resounding YES ?


happy tatting always :-)

UPDATE (Oct 8) : INTRODUCTION pdf with exercise posted here
Set I - RINGS ONLY post with pdf
Left-handed tatting by Eliz Davis


Sunday, 26 June 2016

creeping along

Pin It now!

Both my tat-alongs are creeping along (Lene's snowflakes & Renulek's doily) …

The Seventeenth Day of December Snowflake
Lene Björn

My little experiments are creeping along – trying to apply different techniques to a regular symmetrical pattern ….
Creeping around 

I visualized this snowflake as a cross section of a tree trunk with a flowering creeper around it . This determined my choice & placement of colours.
Round 1: single shuttle, scrap length thread, SSSR, lock join, mock picot. 1”
I started with a normal ring, mock picot, followed by SSSRs.
After each SSSR, I made a lock join on the picot to secure & move into position for next ring.
Last ring is again a normal/regular ring, with picot join to first ring.

Thoughts : the lock join may show up in lighter shades. The shape of SSSRs did not come out as evenly as I’d hoped, but that is perhaps because of my own limitations of thread size & eye sight when working tiny fiddly rings.
Round 2: 2 shuttles, directional tatting (fs/bs or RODS), mock rings, scroll, rotate work, direct tatting (reverse stitch/unflipped), very small picots, fold chain (2 first half st or 2 second half st).

Visualizing this round as flowers in profile on a climber with leaves, I wanted to add a bit of layering effect . Hence used the running scroll & mock rings for the green stem & leaves part.
For flowers, I used 2 strands of orange embroidery thread & 1 strand of silk thread. It created a soft sheen/sparkle, which is not captured in the photos. (Even the colours seem dull in the pics :-( 

The pattern called for a figure “8”, not just a single ring-and-chain scroll, as well as anchoring to chain. Another catch was that despite the spiraling ‘8’, all stitches needed to face outwards as in normal rings!
I tried a couple of different ways to get the layered scroll with mock rings on both sides.
1. Folded Chain using 2 half stitches before & after the outer ring in order to get the ‘8’. Made 4 in this manner, first without joining the chain back on itself, then making a very small picot & joining back as a mock ring.
2. Direct Tatting was used in last 2 repeats. Switch to reverse stitch (unflipped) when change of direction is needed. 
Because the green is a continuous chain, adding & joining of picots was adjusted according to the flow of the chain.
Measures < 3½” 
Thoughts : Getting the scroll & joins right was a bit of a struggle! At times I even messed up my directional tatting.
Method 1 with folded chain creates a lot of bulk underneath, with 2 twists ! However, it can be worked with single shuttle & ball, if required in any pattern.
What also complicated matters was the fact that the leaves were anchored at their end picots ! I don’t know how I crept out of that one !
Method 2 with direct tatting worked out much better. It was easier and visually better (the top & left pair of leaves/mock rings in the pic above) 

I have to be satisfied that I could just about put it together, even if it did not come out as neat. I did see a spectacular use of the elusive Rotate Work (I’ve always found it’s application a bit confusing)


I forgot to post Round 12 of the doily last time ....

A doily tat-along by Renulek
Super 17 butterfly & Morning Glory on the doily in above pic.

A super quick round ! Used ball & shuttle this time. Happy with my long chains. It was only while blocking (I still use the rolling pin) that I noticed one chain had twisted. Oh well, got to live with it.
Measures 13¼” after this round , in size 40 thread.
This pic is taken with the doily draped over the dining room chair. Lighting is not too good, but the background is maroon.
A super quick round ! Used ball & shuttle this time. Happy with my long chains. It was only while blocking (I still use the rolling pin method) that I noticed one chain had twisted. Oh well, got to live with it.

I’ve started Round 13 & it looks really pretty !!!

happy tatting :-)))


Related Posts :

Tuesday, 7 June 2016

connecting with joins

Pin It now!

Wanting to get back on track last month, I chose a ‘simple’ one like Day 10. But as always, I have a penchant for complicating everything ! I have continued to play with colour combinations & placements in this snowflake, too.

The Tenth Day of December Snowflake
Lene Björn

Con-joined !

Visualization : The USP of this snowflake, for me, is the elegant curves of the long chains, which I wanted to highlight in a single colour (yellow here), keeping the rest of the pattern in the background. Could this be accomplished without an overhand tie, since the SLT would create a slight dent or break in the chain ?! If not SLT, then what else ???  


Round 1 – measures just over 1”
3 strands of Anchor embroidery cotton : 0325 .
Techniques : single shuttle, rings-only, join last ring to first ring, hiding ends with SSSR, and hiding ends with whip stitch.
Simple round. To avoid hiding ends, I used SSSR for last ring . And hid the other tail with whip stitch on pink segment of 1st ring. 
The whip stitch really works !!! Much easier, too, and I have been using it this past month. Thanks Carollyn !


Round 2 – measures 3¼” final
Anchor Size 40 yellow 4054-0293 in shuttle 1
Anchor Size 50 lavender 4054-098 in shuttle 2
Techniques : 2 shuttles, mock rings, Reverse Join (RJ), outer thread join (otj) , ball thread join, folded chain, picot joins (PJ), floating or thrown rings (FR), decorative & graduated picots.
fhs - first half stitch ; shs - second half stitch ; vsp - very small picot

To fold chain, start with a very small picot followed by seta (2fhs) or by setb (2shs). Folding the chain automatically reverses work, re-positioning the shuttles/threads. The same is true for reverse join, where shuttle positions get switched. Hence, one may have to continue to tat from the back side, even though this has not been indicated in the pics. (Please note : all pics, except #6, are taken from front side, even though work may have been reversed)

Working Round 2
Except for the lavender floating ring, all tatting was done with shuttle 1 .

1. Mock ring in order to split it into 2 colours. Reverse Join used to link to Rnd 1.
I also experimented with outer thread join, but preferred RJ. 

2. Fold chain (vsp, seta) at end so that lavender thread comes to the left ; 
normal picot join to vsp of previous chain to make a 2-coloured mock ring (inset)

 3. Make last picot of floating ring very small ; fold chain (vsp. setb) at end .

 4. Reverse Join to Round 1 ; again complete 2-coloured mock ring, but with reflected colours.

 5. Ball thread join to vsp on lavender floating ring. 
Now there are yellow picots on either side of lavender ring !

6. (as seen from back) Make normal picot on chain; fold chain ; 
Reverse Join to Rnd 1, and continue from 1.
  
My notes :
  • To compensate for difference in thread sizes, I added a few stitches to size 50 lavender in Round 2.
  • The picots on both sides of the lavender floating ring should’ve been longer. This would’ve prevented the yellow chains from being pulled into an angular curve. The yellow chains stayed continuous, no breaks or colour blips, but the elegant curves were lost due to the picot lengths.
  • It was only after the 2nd join, that I realized that the picot colours on either side of the lavender ring were different !!! (arrows in pic below show the mismatch on either side of lavender rings)
    The ball thread join came in handy here. I chose yellow picots, but the alternate is equally possible – keeping all picots lavender. (pic #6) Hmm, yes, I should've gone with lavender picots ! 


Outer thread join is something I have used (& spoken of) in my patterns for a long time, without knowing the correct name. It is Teiko Fujito's "outer thread joining method". I even confused it with the slope & roll join since it's construction is basically the same, except that one ‘pops’ the shuttle thread through the picot. This ‘pop’ encapsulates the core (SH1) thread, giving a blipfree join. The formative movements are the same as split ring joins . 
And the fun part is that shuttles can be switched in function, but the result will remain the same !!! (more on this in a future post - Part IV of Joins in Shuttle Tatting series)


My visualization did not take shape, but the happy note is that I could figure out how to choose a path(s) in order to reach the destination. Learning never goes to waste, and my growing repertoire of tatting techniques & diverse joins afforded me this freedom. I may tat this one again.


I have completed Day 7 using 3-coloured onion rings a long time back, but haven't been able to put together a post. Am currently on the last part of Day 17, where again I have used the running scroll to create mock rings in same colour, without SLT. That takes care of 10 snowflakes. To be on par, I still need to tat 2 more snowflakes this month.
Renulek's Wiosna Round 10 is over, but needs to be blocked before photographing.

happy tatting :-)

Lene's Snowflakes Day 1 , Day 2 , Day 3 , Days 4 & 5 , Day 6 , Day 11


Wednesday, 13 April 2016

The rainbow within

Pin It now!
Colour adds the happy spark
In the midst of all our strife
A silver lining to a cloud dark
There's a rainbow in every life
                                   -  muskaan, April 2016

The Third Day of December Snowflake

Of all her exquisitely designed snowflakes, this is perhaps Lene’s Defining Pattern. One glimpse & we can identify the designer!
All along, the central rosette appeared like a rainbow to me. The spectrum requires many colours, and that is the reason I delayed tatting this snowflake, waiting till I was feeling very relaxed. Multiple colours for a multi-layered effect.
Having successfully tatted with 3 strands of embroidery cotton in Day 6 snowflake, I felt confident of being able to tackle this one without messing up.
One should frequently rummage through one’s craft supplies. I had Metallic embroidery thread 
(1 skein each of silver & gold)! What luck & what lousy memory ! 
Using only 2 strands for the centre, it is pretty easy to tat with.
I started with the original stitch count for chains-only round; but after trying out the purple, then a bit of dark blue, it felt like the fluffiness of picots will fall short on both sides of each chain. So, cut off & restarted below
Keeping the overall chain count the same as original, I increased the number of picots 
to make it fuller & fluffier. Each chain started with a very small picot 
to which Lock Joins were made in later rounds..
Each round was started CTM using 3 strands. 
A short length was wound on one shuttle, & the rest remained on the skein. 
Image of each chain round is a montage of 2 pics - 
the left is taken from above; the right from a much lower angle to show layers.
Had to solicit the help of my DH to confirm my choice of a couple of shades. 
He readily helps with such minor tasks.
Finding it difficult to sew in the tails, I cheated. 
After making a tight square knot, I simply snipped off the threads at a short distance. 
The shortened lengths merged perfectly with all the picots. Phew!
Each round was started with a 'phase-shift'. No 2 rounds started at same place.
This helps to disperse any visible line of beginning or ending. 
I use the same policy with crochet, embroidery, etc.
This red is an extra round in order to complete the spectrum. 
Wouldn't this make a great Rakhi bracelet, with braids or twines attached ?!
This is how it looks from behind. Thus far, it is less than 2 inches in diameter !


When I started with silver in center, my idea was to use it again for the final round - 
the silver lining !
But as you can see it did not do justice to the spectrum. Tried a mix of white & silver, 
but finally settled on plain solid white in size 40.
I had deliberately started with the inner ring & chain, so that I could hide tails 
in the last floating ring which is a Single Shuttle Split Ring 
It is the one at 6 o'clock position in above pic.
Factoring in the extra round, I increased the stitchcount of final round by 1 DS 
for each segment between picots on both rings & chains between 2 picots. It worked.
The final snowflake measures a tad over 3.5 inches. 
Techniques used : CTM, LJ, floating rings, SSSR to hide ends, square knots, 
multiple strands of embroidery floss/cotton & metallic thread for tatting. 


I am very satisfied & happy with the outcome. Hope you like it too. 
It is a spectacular design & fun to tat, especially with the shortcuts I took!
This completes 6 snowflakes for the Craftree Snowflake Tat-Along. I've completed the first round of Day Seven, but am busy with a lot of other activity around the home, hence it is going slowly ...

happy tatting always :-)

Related Posts : Rakhi Bracelet patterns


Thursday, 7 April 2016

chicken feet !

Pin It now!

The Sixth Day of December Snowflake
Lene Björn


I chickened out. Or was it jinxed ?! Whatever, but I had to keep aside my first working despite a few pick-ups & retrotatting. Firstly, I used a Split Chain to climb out to the 2nd round, which was fine, except that I climbed out at the wrong picot Both Times especially since directional tatting just complicated the working. Moreover, due to the colour placement I wanted, I had to use SLTs for the floating ring. Ugh – look at that unseemly pointed disfigured chain twisting every which way! Abandoned it with abandonment & started afresh. Round 1 wasn't any great shakes either.

But no trial goes unlearned! My observations from the abandoned piece :
1. the Reverse Join worked great to switch shuttles for chains ;
2. the yellow thread (an old ball) is closer to size 50, hence I used 2 strands of variegated, which was probably a mistake;
3. the solid yellow was too plain to highlight the variegated – needed a pick-me-up colour!

So I chickened out of trying the same colour placement again. With renewed enthusiasm, after a couple of weeks’ break, I changed the colour scheme a bit.
Abbreviation :
RS – reverse stitch (unflipped)
LJ – lock join
SH – shuttle
TW – turn work
RODS – reverse order double stitch
fs/bs tatting – frontside/backside or directional tatting
rnd – round
SS – switch shuttle
DS – double stitch

Threads used : AMC size 50 Yellow – 0302, Black for Rnd 1; Anchor embroidery cotton – 1305 3 strands .
Measurements : Rnd 1 – 1½”  ; Final - 3¼”
Techniques I used : 2 shuttles, direct tatting (RS), LJ, LJ with SH2.


Below, I have described two ways to tat Round 2 :
1. Turn Work to make the middle chain (and can use RODS in case of directional tatting) with picot at turn to attach next floating ring ;  for fs/bs tatting 
2. All frontside tatting using direct tatting ie. reverse stitch chains & LJs with either shuttle.
TIP : Make LJs with whichever shuttle is closer to picot. In Direct tatting, LJ is made with SH2 (Refer I.3.c)

Here is how Round 2 can be tatted : (Refer to WIP pic)
Start with floating ring with SH2
Chain with SH1 & LJ to rnd 1
(TW, RODS chain with SH1) or (SS, RS chain with SH2) & LJ to floating ring
(TW, chain with SH1) or (SS, chain with SH1) & LJ to rnd 1
Here, I count the LJ as 1st half stitch (as discovered while tatting the Mystery Doily) but it is up to the tatter.
Chain with SH1, picot.
(TW, RODS chain with SH1) or (SS, RS chain with SH2) & LJ with SH2 to rnd 1.
Chain with SH1 , floating ring with SH2, continue repeats as above.
The underlined option is the one I followed, never having to tat from the back side. All tatting was done in clockwise direction from the front.
However, if one is not comfortable with direct tatting (reverse/unflipped stitch), then one can turn work & continue chain (either as RODS in case of fs/bs tatting, or as normal DS).

I am always amazed at how many options one has !
Can you see the mistake I made while joining one of the chains (in 3 o'clock position in above pic)? Noticed only after the pics were taken - too late. It has been joined using the wrong shuttle. 

Overall, I think it turned out pretty okay, considering the initial tribulations.
And I Loved working with the embroidery thread - so smooth ! Although the silken sheen is not apparent in the pics.
I had an idea to snip & fray the picots, but again chickened out. May be some other time when I'm feeling more cocksure :-D


This completes 5 snowflakes for the Craftree Snowflake Tat-along. I'm now tatting Day 3 to get the first 6 done. Still have to catch up with two, but am not in any stress. Enjoying the journey.

happy tatting :-)
Related Posts : Lock Join with shuttle 2


Monday, 28 March 2016

marching along

Pin It now!


And the snowflakes march on …
My March installment of 2 snowflakes per month for the Year Long Snowflake Tat-Along on Craftree
There’s nothing much to write about these snowflakes, except for my colour adventure in one & my split chain practice in the other.

Day Four Snowflake
Pushing my colour boundaries.


Threads : Anchor variegated embroidery cotton 1325. 2 strands
Anchor Mercer Crochet Cotton size 40 pink 052
Measurements : Rnd 1 - 1.5" ; Rnd 2 - under 3"
Techniques : 2 shuttles, directional tatting, floating/thrown rings, Reverse Join, Lark's head picot joins (LHPJ), Lock Join

My go-to colour with this variegation would've revolved around blues & purples , or white, black. But pink ? Never. Hence had to give it a go.  Coz these snowflakes are also experimental ...
Rnd 2 continued clockwise after a Reverse Join to switch shuttles.
Added very small anchoring picots to a couple of outer Floating rings to stabilize, then discontinued.

LHPJ to link outer chains.

TIP : Elaine Gan's Reverse Join enables one to lock join to a point below the working element while simultaneously enabling the switching of shuttles, which is what I needed in order to change the colours. 


Day Five Snowflake
Lene Bjorn

Chaining the split chain

Threads : Anchor Mercer Cotton size 40. Aqua Blue. 4054-0185
MeasurementsRnd 1 : 1½”  ; Rnd 2 : 2¼”  ; Rnd 3 : <3½”
Techniques : 2 shuttles, directional tatting, lock join, split chain (SCh).

Started rings in Round 1 with RODS (reverse order DS) so that the chains would be normal stitches.
Climbed out of the round with a split chain.
Deliberately done in single colour because I wanted to practice SCh. I want to become comfortable working the SCh.

TIP : During the Craftree Mystery TAL, I realized that after a chain is lock joined to a picot & returns back up for another picot join, the adjacent chains lie flatter together if 1 half stitch is reduced. Or in other words, if the LJ is considered as a half stitch in the stitch count.
  

Lene’s snowflakes are much larger than I used to think before, and I’m glad I chose size 40 to work them. But each pattern has something new to learn or try out, besides being so beautifully designed.
I'm still behind by 2 snowflakes but hope to catch up soon. And I've skipped Day 3 for the present. Want to work on it at leisure.


                                               happy tatting :-)


Related Posts Mystery Doily
Day 1 and Day 2 snowflakes