Sunday 30 January 2022

who knew

Pin It now!

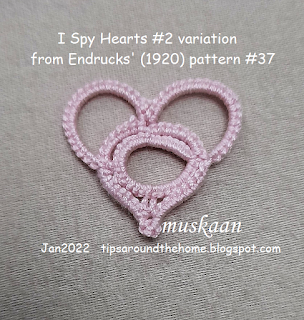
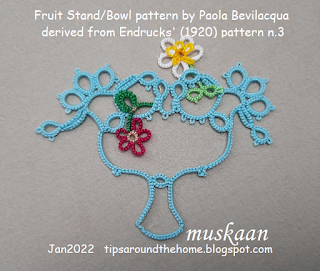
 ... who knew a fruit stand or fruit bowl would emerge from an edging pattern! Who knows what a designer's imaginative eye can see?!

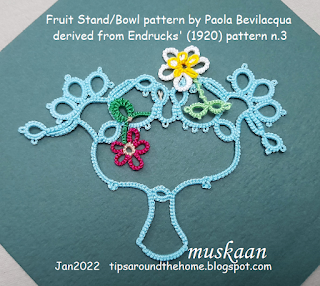
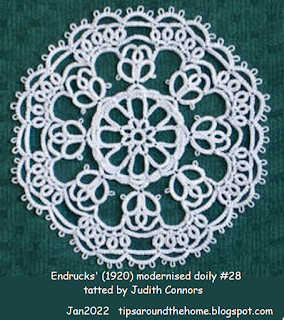
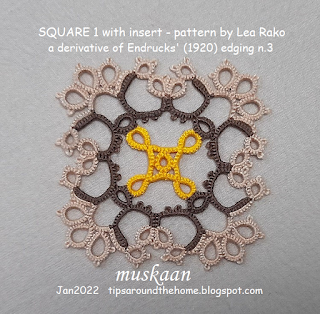
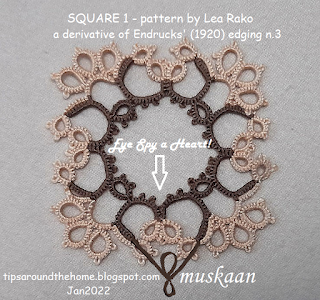
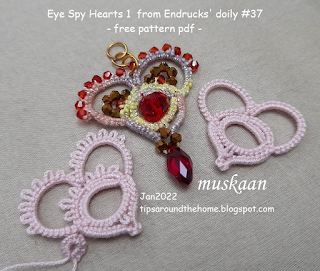
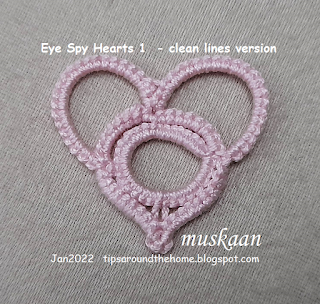
Endrucks' n.3 edging pattern gave rise to 2 square motifs and now the seed has sprouted a fruit bowl, thanks to Paola Bevilacqua. Recently she shared her prototype, with sketched pattern, in our Endrucks 1920 Project Facebook group and the very next day she tweaked the count and posted a beautiful new version with modified count, in stepwise pics and diagram. It immediately caught my fancy and I quickly tatted it up.

This is fresh off my shuttles, unblocked. And I was trying not to snug the chain stitches too tightly, resulting in uneven lengths on either side. Lesson re-learned: snug tightly; you are no good with loose tension ;-P Or, apply Anita's tip to measure the chain but using a grid paper background to assess the curve as well.
As I worked the motif, so many minor details emerged making me truly appreciate the thought Paola put in!

My Thoughts/Notes -
1. I started at the leftmost single ring.

2. Techniques: 2 shuttle tatting, fs/bs tatting, thrown/floating rings, changing the direction of a chain, inward picot, lock join, mock ring using a lock join.

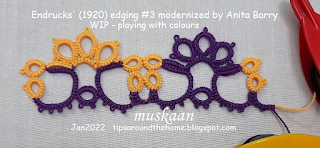
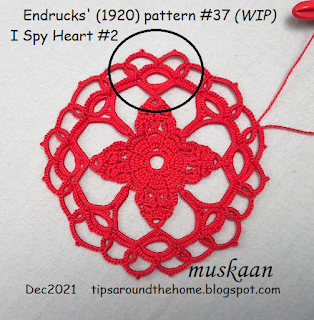
(refer to pic below)
3. Inward picot - the orange arrows show where I used a folded chain to flip a picot down - set-a (picot, 2fhs) and set-b (2shs, p) because I wanted a bit of space before the thrown ring. At other places I used a paper clip.

4. There are 3 types of paired chains
    BTworked as block tatting - parallel chains where the new chain lies above the previous one and a lock join is made through picot; 
    BBT: worked as block below tatting - parallel chains where the new chain lies below the previous one and is joined normally through an inwards picot;
    regular chains: where the stitches face each other and the chains are joined normally. Now here's an idea for yet another Block Tatting effect !!!
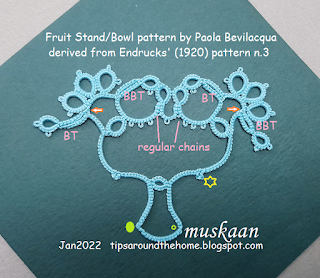
5. Tiny Mock Ring -The yellow star is another important designer detail. This is a 3ds chain lock joined at the base to form a mock ring. Now if it was a SCMR, we would've had a clear point/break/dip in the chain's inner edge. By using a lock join, the picot creates a kind of continuum with barely a break in the inner edge!
I should add small mock ring to my Mock Ring series since the visual effect is different from that of  larger mock rings

6. Pointed Chain - The small green ring is where I tried to make a 1ds SCMR to create a point, and failed miserably, forgetting that the chain turns course at that point. 
Hence I followed Paola's example for the left one, switching shuttles and reversing/turning work to continue. The point is more marked here. 

In Anchor size 20, it measures 10.5cm x >7cm at the extremes. I rummaged and found these 2 daisy picot flowers to add some colour and density. When I tat this again, I'd like to add lots more colour and picots for a bowl of flowers, and/or strategically placed beads to enhance the effect! 
It could well be a trophy, too, right?!
This is very appealing to applique or glue to a card topper. Otherwise it needs stiffening to hold it's shape. Of course the bowl outline can be padded tatting (either BDS or inserting extra core thread). Perhaps some graduated treble tatting, too, especially at the base!

Many many thanks, Paola, for stretching the boundaries!

Please don't go by my sub-par model.... once we have her permission, we can put her model and pattern in our Project doc here -

Thursday 27 January 2022

bridging gaps

Pin It now! I have some great news! Our Endrucks 1920 Project will be featured in the February issue of ‘Talking Tatting’ issue 50! Along with a short bio of Frau Endrucks and the doily #28 pattern (modernised version), all by Judith Connors. This is a quarterly newsletter of Queensland Tatters, Australia.

While this doily has already been tatted by several others, they referred to the diagram rather than the text. Hence it was left to Judith to point out a couple of errors, which are now corrected in an updated pdf.

Impeccable tatting from the inspiring teacher, researcher, and historian who was honoured with the Order of Australia Medal last year! And as you can see, she has managed to retain the octagonal shape of the doily after blocking.

We discovered that my tatting tension is way too tight! Worked in Coats No 40 cotton, Judith’s doily is 9cms in diameter to my 7cms in Anchor No 40 (which is also a Coats subsidiary).

My tension varied from yours in places. I managed the fluting, and when I blocked the mat it turned out to be quite octagonal.” – Judith

Alternate Path: “I worked it completely from the front side, not as you have suggested for Rounds 5 and 6. This means that the small rings of Round 5 were tatted in RODS (with a posting of the shuttle before closure).” – Judith

While enlarging the pic for posting, I noticed another thing about Round 5 in Judith’s doily. It appears the chains on either side of the ring are 8ds each instead of 5ds, creating a graceful arch instead of a flattish line.

Bridging/Mock Chain and Split Chain: Several ways to climb out of rounds for continuous tatting are indicated in this pattern pdf. However, Judith pointed out that what I termed split chain to climb out of round 4 is actually a bridging chain (b-Ch) and I should use this as a “teachable moment”. Got me thinking and this is how I see it:

The technique was invented by Dora Young for rings and then applied to chains – the knotless method (km or KM). Decades later, the term split chain caught on and became more popular. But the stitch and movements are the same in both – mock stitches or tied/manoeuvred stitches.

A Bridging or Mock Chain is functionally and structurally the same as a Split Chain. Each chain spans a space and emerges at a point to the left instead of the far right, and is made over a bridging or foundation thread. 

The difference lies in the Where the threads emerge/exit or where the point of climbing out is. A bridging chain is made completely of mock stitches and threads emerge at the ‘beginning’ of the chain. A split chain, as the name suggests, is split - partially made of double stitches and partially of mock stitches. Thus, the threads in this ‘hybrid’ chain exit somewhere along the length of the chain, not at the start.

Among the several beautiful versions of this doily tatted by enthusiastic lacers, I would like to show Stella Marina’s version in lovely metallic threads because it is yet another example of how we can alter our path. In a moment of distraction, Stella forgot to tat the 2 large twin thrown rings in Round 3. Instead of cutting back, she continued. She then tatted them as normal rings, facing inward, in Round 4! This happened by accident, but could easily have been a deliberate choice to make the rings red instead of silver. Planning ahead gives us so many bridges to cross smoothly!

Now I want to tat the doily again and bridge all my gaps!

Many many thanks to Judith and Stella - keep inspiring!

Related Posts/Resources –
For more tutorials and details scroll down to Techniques & Effects » CHAINS » Split Chain/Dora Young Knotless/Bridging https://tipsaroundthehome.blogspot.com/p/tatting-resources.html
Knotless Method in split SCMR - https://tipsaroundthehome.blogspot.com/2018/10/scrappy-doily-and-scmr.html
https://tipsaroundthehome.blogspot.com/2021/07/continuous-paths.html

Sunday 23 January 2022

more multiples

Pin It now!

 I couldn't resist! Lea Rako (of AlenAlea fame with her gorgeous hand dyed threads and patterns) turned an edging into 2 square motifs by turning it outwards and inwards! The pdf will soon be uploaded to the project doc and I will update the link here.

I tired it with colours. The insert is an optional variation to Square #1 for those who do not like large open spaces.  
This is how the square looks without the insert. I don't mind it at all. In this pattern, the edging is turned outwards and the motifs look like an open lotus to me.

This is how the edging is, which I tatted back in August. Anita Barry modernised the pattern and presented the pattern in modern style. I shared her beautiful sampler and direct pdf link here - https://tipsaroundthehome.blogspot.com/2021/09/700-and-promises-still-to-keep.html. And of course, you can access it from the main document.

 
I loved playing with colour positions, using repositioning methods (I don't exactly remember which was used where) - See Lock Join Plus series. I haven't cut off the threads, wanting to play some more in future. There are so many more possibilities!

In Anchor Pearl size 8, this measures 2.5cms across and 3cms diagonally. Good for a mug coaster.

Imagine the edging turned inwards; the triad lying inside and a few elements added to span the distance. That is the 2nd square pattern included in her pdf. 
Lea also tessellated the squares into a beautiful fabric! For both squares, Lea indicates the joining picots when tessellated. 

And before I sign off, Eye Spy yet another heart!!! It will require a bit of juggling to get a smooth outline since the 2 side rings tend to lie beyond the outline. Worth a try, though, right?

Endrucks 1920 Project link for all patterns and derivations - https://docs.google.com/document/d/17LEVftXweztBIOWh4sL4BB7bX65ssoOsOn4oXIgCepY/view

Thank you so much, Lea, for sharing these beautiful squares!

Tuesday 18 January 2022

a hearty meal of tinies

Pin It now!

 There was so much interest when I asked which of the 4 trial hearts tatters preferred, that I can't help but serve up a hearty buffet for whatever each person's preference might be. However since #4 received the most votes (only written comments, no reactions counted) - 33, and #2 - 19, these are the ones I am sharing first. 8 tatters liked all 4. 

This is the first batch of Eye Spy Hearts 1 from Endrucks' doily #37 - 3 versions in the pdf - click to download : https://drive.google.com/file/d/1Auf-CIZYLUQdkA6jalQR4hkS7Ah-Deld/view

Linda Reiff saw an eye in the middle and suggested I call it 'Eye Spy' instead of 'I Spy' .... guess what, this is exactly what Anita Barry calls her extracted hearts (I had forgotten).

The hearts measure just around 3cms in Anchor size 20 which is equivalent to Lizbeth size 10.

This is by far the most favoured heart, hence the one I started diagramming first. Ninetta says this pattern can be used as a teaching model. Quite true; there are so many possibilities to play with sequence, techniques, effects, etc. It's size makes it an ideal practice pattern.

If you remember, this was the precursor to the picoted version. For first trials I keep picots to a minimum, especially decorative ones. Several tatters pointed out their personal preference for clean lines. 
It is easy to needle tat the motif. I am not focused enough to give instructions. But any needle tatter who wishes to test and share notes, please go ahead. I will include it in the pdf.
2 resources that show how shuttle patterns can be converted to needle -

Amarilys Cwb wondered how a double picot would look. So I used that idea to string gold bicone beads over it! All the other crystals & teardrop are strung on shuttle 2 thread, with a single gold bead on shuttle 1. The large red crystal in the center can be sewn in later, or you can use this clever method by Ninetta - bead inside ring - https://www.flickr.com/photos/ninettacaruso/13713249233/.
Recently Alicja Kwartnik uploaded a video showing the same method - https://www.youtube.com/watch?v=7DbYw2A1G7Q.
I don't know why I chose this metallic thread and not the solid gold or silver! The effect would've been much better.

So, I hope you enjoy these hearts that can be made with leftover threads in a jiffy!
Here's the link again (please use it when sharing your version and also click on it to check if there are any updates, before you print or start tatting) - https://drive.google.com/file/d/1Auf-CIZYLUQdkA6jalQR4hkS7Ah-Deld/view

           I'd like to thank All respondents for taking the time to choose and answer, and also for your entertaining comments and suggestions 💖💖💖

Saturday 8 January 2022

here we go again

Pin It now!

 I shouldn't, but I am! Yeah, I should've been working on my numerous commitments, but these hearts were calling to me and I am taking life easy and don't want to regret my actions/inactions. Being tiny, they kind of fit into my Life Interrupted, so there! 

1 & 2 were what I shared yesterday - https://tipsaroundthehome.blogspot.com/2022/01/hearty-round-robin.html and they needed improvement. Enter trials 3 & 4 respectively.

I tried 2 things together. One was to make asymmetrical split rings (thanks, AlenAlea Rako), and the other was adding another row of chains below. I also added more joining picots for stability.

Trial #4 is the picoted version of trial #2 - gentle gradation - and I like it. 
TIP: This version can be made with shuttle and ball by using any of the Lock Join Plus options to change direction. ( https://drive.google.com/file/d/17zsM3JaLO7r0ajg8VOnv5IcJ-kLNqEiU/view )

Forgot to include this yesterday. The encircled portion is the heart I am trying to make. Notice how it is much broader here than in my free-standing ones? I tried to mimic the count for the most part in my first trials. But it is the pull from the rest of the round(s) that creates this stretched shape. Perle cotton versus mercerised cotton could also be playing a small part.

Here are the old and new versions together. Is there any improvement? I'm not so sure. And because I added a stabilizing picot for the long chains, the arch is higher than wider, changing the overall outline.
Picots are missing because I wasn't sure of the new count, but I think addition of decorative picots would certainly lift it up. 
Here the picots definitely perk things up! I even considered a Josephine Ring on the inner chain but Mickey Mouse came to mind.
Future idea - Make those 3 inner picots long and joined later to the curved chains, thus filling the negative space.
3 hearts in a Shamrock arrangement, just like Diana Howe had done with the Happy Heart from Endrucks' pattern #1 - https://tipsaroundthehome.blogspot.com/2021/03/lucky-hands.html

TWoT Notes: Interestingly, of the 4 hearts, 3 follow a different sequence/path! It helps to tat in multiples - each time you get a clearer picture, you focus on subsequent or peripheral aspects, .... and small pieces are just right to tat multiple times, LOL.  

So, dear tatters, what's your opinion and feedback? Which patterns should I share?

Friday 7 January 2022

hearty round robin

Pin It now!

 ...well, kind of. His Kid was inspired by my design within pattern forays, the latest being 3 possible hearts from Endrucks' doily #37 that I shared here - https://tipsaroundthehome.blogspot.com/2021/12/cupping-hearts.html She quickly belted out 3 trials from Mary Konior's Josephine edging - http://hiskid66.blogspot.com/2022/01/mary-koniors-josephine-edging-inspired.html

In turn, this spurred me to pick up my shuttles and attempt my own trials in whatever time I could muster. Being tiny I managed them both today itself. 

I chose to start with the 2nd encircled pattern from my earlier post since it was the smallest and would be quick to tat. Not bad, but not happy, either with my work.
3 cms wide and 2.75 cms high

Wondering how it would look without the spilt rings, I tried a variation -
Again, this needs better working (it is not blocked, either, just off my shuttles). But I like this version better with clean lines.
2.75 cms wide and 2.5 cms high

What do you think? Which do you prefer? Or would you like patterns for both? Any suggestions for improvement?
Worked in Anchor size 20 (equivalent to Lizbeth size 10). 

Future Idea - I have yet another idea - add a split ring at the side of the variant and repeat the heart and SR to create a round ring of hearts, all in one pass! Will have to work out how many hearts would form a complete circle.
And as I had hinted here - https://tipsaroundthehome.blogspot.com/2021/12/a-future-perhaps.html , I 'inaugurated' my new sketch book with these sketches :-D

Thanks, Sue, for getting me out of my stupor and joining this fun exploration 💖

Monday 3 January 2022

feeble firsts

Pin It now!

Believe me, I have never done bauble tatting! Oh, every year I think I will embellish at least one bauble, but all for nothing. In December 2021, the admin of the Italian FB group 'Chiacchierino: Filo Amore e Fantasia' held an online event with my MatheMagical Star pattern and several tatters used it to cover their bauble ornaments. All this really inspired me to do one..er 2, er 4.

Due to paucity of time and energy, I settled on using whatever motifs I had on hand - a SOUP (Sewing On/Using Pieces) moment. These 4cm ornaments will soon celebrate their 20th buy-day! At the time we didn't have a lot of options in this city and since the tree was decorated only the 1st 2 years, I am hesitant to buy. Next time I will certainly include more beads and crystals, more flamboyance. Perhaps I Should buy a few good quality and larger sized baubles. This little exercise has got me excited and more confident.

In chronological order - 

Bauble #1 - This edging is draped diagonally and temporarily taped down behind. (don't look behind!). But in Anchor size 20, it is too thick. A daintier edging/insertion would look better. And a tiny motif or 2 on the bare side spaces? 
Interlaced Cumulus pattern - https://tipsaroundthehome.blogspot.com/2020/05/puffy-clouds.html
Bauble #2 - There is no good angle to capture both flakes in a pic. These are in Lizbeth 20 and perhaps the reason I put them together. Spin Away above and ConcentriCity below.
I used a matching blue metallic thread to join the 2 flakes together. It really isn't difficult! Without cutting the thread from the reel, I sewed through the picots, and finally adjusted the tension and positions before snipping, tying, and hiding. Keeping the thread on the reel gave me a lot of leeway with no fear of running short.

Bauble #3 - This is the small version of the MatheMagical Star in size 40 - the only one that ... the others were too large for this bauble. And I kind of liked how the crystals sat like a crown on top.
On the underside is the Folded Fun Star. I hope you can see how I went a bit adventurous and joined the 2 stars.
Bauble #4 - Messy but looks better in real. I was going for an organic look by not tying down each twisted picot. But very difficult to photograph.

I simply sprinkled a few of my snowflakes instead of suspending them - yup lazy. Hubby even offered to put up a string of lights but I hope to be better prepared next time.

It happens Every year! I let the sunny days slip by and when I finally get around to decorating the tree, the sun gives me the slip! So the pic comes out insipid. Oh well, this should be a staunch reminder to start early this year!

I really want to thank all the wonderful versions shared by tatters around the globe - in the event (one tatter inserted it inside a transparent star ornament; and others who used beads in exciting arrangement) as well as ornaments in general - that got my juices running, finally. Feeble firsts, but determined to be better later this year!

All the star and snowflake patterns can be found here -https://docs.google.com/document/d/1r4OmXX_c5LjFebMN2UbSNiYqXYETLmoridK0X1YIQco/view