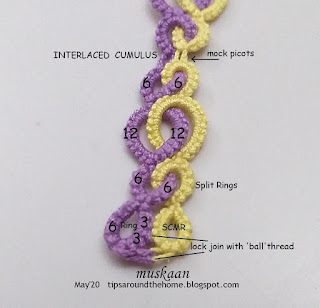
So
here’s the next pattern in the same Interlacing technique (tutorial links at end of post). It reminds
me of floating cumulus clouds, especially if one uses the right colours. The
pattern changed and emerged as I tatted, with the familiar ‘what if I do this?’ dictating my hands. Hence again there is a lot of scope to adapt and change.
Interlaced
Cumulus
pattern
for braid / bracelet / earrings
4 shuttles. In the model, shuttles
1 & 2 have purple thread, ctm ; shuttles 3 & 4 have yellow thread, ctm.
TO START AND
FINISH :
Sh1: Ring : 3 – 3 -– 6.
Sh3: SCMR: 6 + 3 + 3.
Please Note : In order to maintain
colour symmetry, I used the ball thread join (or lock join with 2nd
shuttle - https://tipsaroundthehome.blogspot.com/2016/04/shuttle-2-to-rescue.html).
This is also the reason why the 2nd ring is worked as a mock ring,
so that the ‘ball’ shuttle is free to make a lock join.
This
is optional, and one can start any way you wish.
PATTERN :
Sh1: Split
Sh3: Split
Sh1: Split
Sh3: Split
Sh1: Split
Sh3: Split
This completes one
motif. Leave bare thread for mock picot and repeat for desired length.
For
Interlacing, you can choose the
movement (back to front or front to back) and corresponding effect (under/over
or over/under). In the model, the movement is alternated between motifs.
TIP: In the center, where colours are
switched, the mock picots are ‘interwoven’, though not very clear in the image.
A single motif can work great as
an earring, with proper embellishment and findings! The braid can be turned
into a bracelet, lanyard, choker, etc.
I
like this design and hope you enjoy tatting it, too. Create your own versions
and please share images! happy tatting :-))))
Interlaced SR pictorials -
https://tipsaroundthehome.blogspot.com/2020/06/interlaced-rings-pictorials-revisited.html - new, clear pictorial
https://tipsaroundthehome.blogspot.com/2020/06/interlaced-rings-pictorials-revisited.html - new, clear pictorial
update - https://tipsaroundthehome.blogspot.com/2020/06/whimsical-interlacing.html - an experimental application, with pictorial.
update https://tipsaroundthehome.blogspot.com/2020/06/forever-young.html - Peony Doily
Tutorial Links
to other techniques - https://tipsaroundthehome.blogspot.com/p/tatting-resources.html


I like the ‘irregular ‘ look, though I know the pattern is repeated so it’s not really irregular. You tempt me...
ReplyDeleteYay, Jane 😍
DeleteWow! Pięknie wyglądają te zróżnicowane kółeczka w przeplatance 😍❤
ReplyDeleteThank you, Agnieszka 😍
DeleteCudowny wzór- dziękuje:)
ReplyDeleteLove it love it, I really will have to try this puffy clouds.
ReplyDeleteClever design, and very pretty, too. So many ways to use this braid. This definitely goes on my 'must tat this' list.
ReplyDeleteStephanie!
I love the pattern! Now you have me thinking of what color combinations would work with this.
ReplyDeleteFabulous!!! :)
ReplyDeleteThank you all so very much for your lovely comments! Cheered me up tremendously :-)))
ReplyDeleteStephanie, I am honoured!
Diane, obviously blue and white or a touch of grey ;-D
Lovely chain. Thanks for the pattern.
ReplyDeleteHope to see you tatting and showing it, Marja :-)))
DeleteYour pictures and explanations are so clear and easy to follow. Thank you.
ReplyDeleteThank you so much, Priti 💗 I actually want to add a couple of working pics to bolster the interlaced tutorial 😉
Delete