I
had last done interlaced split rings in November 2014. Last month when I
revisited the pictorials in order to refresh my memory for practice patterns, I
was confused by how to wrap the loop for the 2nd split ring! This
step was not photographed in any of the 3 pictorials I did in 2014. Time to
rectify that ‘misstep’ and also share a few new tips.
Interlaced Rings
Pictorials
revisited
The
focus of this revisit is to show how to wrap the 2nd SR loop round
the hand. For greater stepwise pics, please refer to original pictorials.
SR
= split ring ; Sh = shuttle
In most of the pics, only shuttle #3 (Sh3) is shown in action.
In most of the pics, only shuttle #3 (Sh3) is shown in action.
Starting the braid. 4 shuttles, wound in
pairs using 2 different threads. I have shared different ways of starting the
first pair in the recent 2020 patterns (all links at bottom of post). For original detailed pictorial click here.
The
pair above overlaps or interlaces front to back or over-under. A picot on first side of each split ring also helps to keep track of threads/shuttles, and sides, during initial practice.
Basic pattern :
SR1:
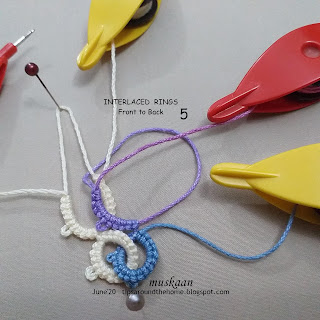
5-5 / 10. do not close. Post Sh3 front to back through open SR1.
SR2:
5-5 / 10. close both rings.
TIP: To keep track of shuttles : You can use different colours or
designs to distinguish the 4 shuttles. Or write/glue numbers on the shuttles. I
used red shuttles for the first side of each split ring, and yellow (or blue as
seen here) for the 2nd side of each SR. It was easy to keep track
since the thread colours were different.
Interlaced
Split Rings
Front
to Back or Over-Under
TIP: I close SR1 partially,
leaving just enough space to allow Sh3 to pass through it. This partially
closed SR1 is less likely to interfere with work.
2.
Pick up the SH3 thread as shown …
3. … and loop around the hand as you normally would...
4. and hold it in the pinch to start 1st side of 2nd split ring.
3. … and loop around the hand as you normally would...
4. and hold it in the pinch to start 1st side of 2nd split ring.
UPDATE TIP (Sep 2023): AN ALTERNATE for Steps 1 to 4 ----
Start looping the SH3 around your left hand,
post the active shuttle (SH3) front to back through the open SR,
and bring it back to complete the pinch.
You are now ready to start tatting the 1st side of the new SR with SH3.
In
original pictorial, 2nd side of SR2 is worked, then both rings are
closed one after the other.
TIP: But following is my new preferred method :
6. Pass Sh3 front to back through the open SR1, and …
7. … close SR1. Notice Sh3 thread is now at the back/under SR1.
8. Complete 2nd side of SR2 and close. 2nd SR overlaps over/under.
Repeat the pair for desired length.
TIP: But following is my new preferred method :
6. Pass Sh3 front to back through the open SR1, and …
7. … close SR1. Notice Sh3 thread is now at the back/under SR1.
8. Complete 2nd side of SR2 and close. 2nd SR overlaps over/under.
Repeat the pair for desired length.
TIP: For ease of working
with multiple shuttles and partially open rings, it may be a good idea to
adjust the length of thread of not-in-use shuttles, and to place the piece on a
flat surface for better maneuverability.
Interlaced
Split Rings
Back
to Front or Under-Over
2. Pick up the SH3 thread as shown …
3. … and loop around the hand as you normally would, and hold in pinch to start 2nd SR.
When
we pull to form the loop, there is some twisting of threads/ring at the back.
Ignore this, as long as you have the followed the steps correctly.
4. 5-5 worked. Notice that the core (Sh3) thread is above SR1. Ignore the twist behind.
5. Here, the twist seen in previous pics is smoothened, and this is how the rings, threads and shuttles will look at this stage.
6. Pass Sh3 back to front or under-over through the open SR1,
7. … this is how it will look once Sh3 is posted.
8. Close SR1. Pick up the open SR2 to work the 2nd side with Sh4 …
9. …and close SR2. 2nd SR overlaps under/over.
I
hope any confusion or difficulty encountered in original pictorials will be set
to rest now. But feel free to ask for any further clarification.
I will also do a pictorial on Interlaced SSSR since I was asked recently. However, that method has severe limitations.
I will also do a pictorial on Interlaced SSSR since I was asked recently. However, that method has severe limitations.


I’m definitely going to give this a go. Must finish the curtains first!
ReplyDeleteI will wait eagerly for your observations and experiments, Jane 💖💕💖
DeleteGoing to have a go at this again, I am sure I have done this some time ago and Puffy clouds love that pattern
ReplyDeleteWaiting eagerly to see your tatting, Margaret :-)))
DeleteThank you for another great lesson!! :)
ReplyDeleteand thank you, Sue, for your consistent support :-)))
Delete