Showing posts with label under & over interlaced rings. Show all posts

Friday, 12 June 2020

Interlaced rings pictorials revisited

Pin It now!
I had last done interlaced split rings in November 2014. Last month when I revisited the pictorials in order to refresh my memory for practice patterns, I was confused by how to wrap the loop for the 2nd split ring! This step was not photographed in any of the 3 pictorials I did in 2014. Time to rectify that ‘misstep’ and also share a few new tips.


Interlaced  Rings
Pictorials revisited
The focus of this revisit is to show how to wrap the 2nd SR loop round the hand. For greater stepwise pics, please refer to original pictorials.

SR = split ring ; Sh = shuttle
In most of the pics, only shuttle #3 (Sh3) is shown in action.

Starting the braid. 4 shuttles, wound in pairs using 2 different threads. I have shared different ways of starting the first pair in the recent 2020 patterns (all links at bottom of post). For original detailed pictorial click here.

The pair above overlaps or interlaces front to back or over-under. A picot on first side of each split ring also helps to keep track of threads/shuttles, and sides, during initial practice.

Basic pattern :
SR1: 5-5 / 10. do not close. Post Sh3 front to back through open SR1.
SR2: 5-5 / 10. close both rings.

TIP: To keep track of shuttles : You can use different colours or designs to distinguish the 4 shuttles. Or write/glue numbers on the shuttles. I used red shuttles for the first side of each split ring, and yellow (or blue as seen here) for the 2nd side of each SR. It was easy to keep track since the thread colours were different.

Interlaced Split Rings
Front to Back or Over-Under

1. Make SR1: 5-5 / 10, but do not close. Post Sh3 front to back through SR1.
TIP: I close SR1 partially, leaving just enough space to allow Sh3 to pass through it. This partially closed SR1 is less likely to interfere with work.

2. Pick up the SH3 thread as shown …

3. … and loop around the hand as you normally would...

4.  and hold it in the pinch to start 1st side of 2nd split ring.

UPDATE TIP (Sep 2023): AN ALTERNATE for Steps 1 to 4 ---- 
Start looping the SH3 around your left hand, 
post the active shuttle (SH3) front to back through the open SR,
and bring it back to complete the pinch. 
You are now ready to start tatting the 1st side of the new SR with SH3.

5. 5-5 worked. Notice that the core (Sh3) thread is above SR1.
In original pictorial, 2nd side of SR2 is worked, then both rings are closed one after the other. 
TIP:  But following is my new preferred method :
6. Pass Sh3 front to back through the open SR1, and …

7. … close SR1. Notice Sh3 thread is now at the back/under SR1.

8. Complete 2nd side of SR2 and close. 2nd SR overlaps over/under. 
Repeat the pair for desired length.

TIP: For ease of working with multiple shuttles and partially open rings, it may be a good idea to adjust the length of thread of not-in-use shuttles, and to place the piece on a flat surface for better maneuverability.

Interlaced Split Rings
Back to Front or Under-Over

1. Make SR1: 5-5 / 10, but close only partially. Post Sh3 back to front through SR1.

2. Pick up the SH3 thread as shown …

3. … and loop around the hand as you normally would, and hold in pinch to start 2nd SR.
When we pull to form the loop, there is some twisting of threads/ring at the back. Ignore this, as long as you have the followed the steps correctly.

4. 5-5 worked. Notice that the core (Sh3) thread is above SR1. Ignore the twist behind.

5. Here, the twist seen in previous pics is smoothened, and this is how the rings, threads and shuttles will look at this stage.

6. Pass Sh3 back to front or under-over through the open SR1,

7. … this is how it will look once Sh3 is posted.

8. Close SR1. Pick up the open SR2 to work the 2nd side with Sh4 …

9. …and close SR2. 2nd SR overlaps under/over.

I hope any confusion or difficulty encountered in original pictorials will be set to rest now. But feel free to ask for any further clarification.

I will also do a pictorial on Interlaced SSSR since I was asked recently. However, that method has severe limitations.

Tuesday, 26 May 2020

not for the faint-hearted

Pin It now!

It’s been years since I first posted the technique for interlaced split rings, and despite being among the all-time visited posts, I did not get around to creating any patterns. So when Lilas asked for a pattern, it got me thinking.

I started with one of my sketches and, gulp, I couldn’t get the looping right despite going through my own pictorials! A bit of perseverance, and now I’m happy with my rhythm.

I’ll be posting my trials, experiments, tips, and samplers. I have no intention of creating complete projects at this stage. But for those interested, I will share the count and instructions and you can play and adapt as you wish.

This is the very first of the present attempts. 4 shuttles.
Large rings are 10/10, alternating with small 5/5 rings. I tried both movements for practice.
Worked in Anchor size 20. I think the small rings should be 6/6 to avoid this cramped look. And the large rings can then be made 12/12.

Tried with 6 shuttles.
All rings are basically 12/12 – and the ones along the edge have a long picot for beads.
Here, I deliberately experimented with
back/front, front back movements on each row, alternating with front/back, back/front movements on next row. Look carefully and you can see the over/under and under/over effects.

I wanted a broad bracelet, hence the long picots on both sides, to be joined to interlaced braids. This is how far I have reached on the first side, and will snip it off... it is too broad! I have an idea on how to finish the bracelet, though.

This is just the start …. Lots of ideas and I welcome more - please share your thoughts :-)


Saturday, 28 June 2014

Interlaced Rings - II

Pin It now!
Tatting Tutorial
Part 2 : Under & Over Rings : Back to Front Shuttle Movement


Interlaced Rings make such an elegant braid, using 4 shuttles ! Judith Connors shared her beautiful braid on InTatters in a thread titled “Reverse Stitch”, which I have elaborated on in my previous post on Front to Back movement.
In a gist,
The overlap of rings depends on the movement of the 3rd shuttle. If it is passed front to back, then the 2nd ring (on right side of braid) will lie over & under the 1st ring.
If the 3rd shuttle is passed from back to front, the 2nd ring will lie under & over the 1st ring.

This post is a continuation from the previous one. Here I share how I did the Under & Over overlap of rings, by moving the shuttle back to front.

Common Details :

Thread used : Anchor Mercer Cotton size 20.
Lemon Yellow – 4054-0293  &  Mehandi Green – 4054-0256
Length of braid : 13 pair repeats = 5 inches.
It took less than half a bobbin of each shuttle to tat this length. So fully wound shuttles should give you a length of anywhere from 12-15 inches.
Abbreviations used :
CTM – continuous thread method
Sh – shuttle. Each shuttle is numbered from 1 to 4 : Sh1, Sh2 form one pair ; Sh3 & Sh4 form 2nd pair.
SR – Split Ring
RS – Reverse stitch (used in some pictures to indicate 2nd half of split ring stitches)
DNCR – Do not close ring.

Directions :
Start with 4 shuttles & wind threads :
1st pair - Sh1 & Sh2 : Wind yellow thread CTM
2nd pair – Sh3 & Sh4 : Wind green thread CTM
Each Split Ring : 9/9

A Short Note :

Please disregard the 1st pair of rings as seen in Figure 1 below. This was done front to back (tutorial in previous post) as per the photo that Judith had posted. This pair will, however, serve as an immediate comparison for outcome of the two directional movements of Sh3 : front to back & back to front. Notice how in the 1st pair, the green ring goes over & under the yellow ring . However, for back to front movement, the green ring goes under & over the yellow ring !
Update :  Here is the detailed step-by-step tutorial for how to begin the 1st pair of interlaced rings.

Secondly, many images do not show the shuttle 1 thread clearly; it is outside the frame of the picture on the left side. Mea culpa. I wanted to focus more on the green ring being made for a clear visual of Sh3 thread in relation to others. If you have gone through the Front to Back tutorial &/or tried it yourself, you will have got the hang of it already.

                                                     
BACK TO FRONT 
INTERLACED  RINGS

   
1. Make Split ring (9/9) with 1st pair of shuttles (Sh1 & Sh2) in yellow thread, but Do Not Close Ring (DNCR) !
It is through this unclosed loop that the adjoining SR will be interlaced.


2. Pass Sh3 through the unclosed yellow ring from back to front. Fig 1.


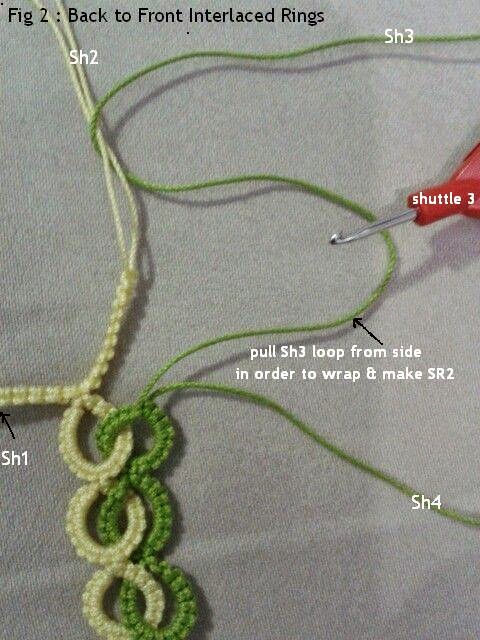
3. Insert your index finger between the right side of SR1 (yellow ring) & the Sh3 (green) thread. Pull a length of the Sh3 thread from the outside. (The shuttle hook points to which thread needs to be pulled in Fig 2.) This loop will be wrapped in order to start the green ring. Wrap & hold the thread in a pinch to form the core thread of the new ring with Sh3.

UPDATESee how to pick up and wrap the loop around the hand to start tatting this ring in this pictorial.


4. Make 9ds with Sh3 – 1st half of SR2 completed.  Fig 3.


5. 2nd half of SR2 (9ds or RS) are completed using Sh4. Fig 4.
Please Note : Needle points to how the SR2 loop & Sh4 thread are on one side (above or on top of) the yellow SR1 ring, while Sh3 thread is on the opposite side viz. under SR1 yellow ring.
If rings are closed at this stage, Sh3 & Sh4 threads will not be adjacent to each other & will mar the next green SR. Hence they need to be on the same side viz., on top. This is accomplished in next step.


6. Pass Sh3 back to front a second time in order to bring all components of SR2 in line/on same side, adjacent to each other. This is an important step as explained above. Fig 5.


7. Now that everything is aligned, start closing the rings. 
Figs 6 & 7.


(While notating the images, I noticed that Sh3 thread seems to be emerging from within SR2. This could be due to a bad photography angle or an inadvertent mistake. 
However, so as to avoid all confusion, for this step,  simply close the SR2 as you would Normally do with any ring.)


8. Both rings are closed & all 4 shuttles are now ready to start the next pair of rings. Fig 8.


Continue in similar fashion, starting with SR1, for as long as you would like the braid.


A Variation

Judith, in the 'Reverse Stitch' thread, has spelled out her variation, where the back to front movement is done twice together Before making SR2 (unlike mine where I pass it once, make SR2, then pass it back to front a second time)  :
* Take #1-B shuttle through the opening from back to front (twice) to form the wrap for the B split ring.
* Tat the B ring.
* Close both rings A and B.
* Tat a second ring with pair A, but leave it open slightly.
* Take the #1-B thread behind this ring and pass it back to front through the A ring (twice) to tat the B split ring.
* Close both split rings.
(Note: here #1-B refers to Sh3; B ring is SR2;  & A ring is SR1)


If you follow my instructions above, then Judith's method requires the Sh3 movement in Step #2; and Step #6 can be skipped since it has already been incorporated in Step #2.
Hence, the logic & basic technique is similar. Only the timing of Sh3 movement differs.
Yet I could not get it right, try as I might. I just could not figure out which loop to pull & how to wrap it in order to make SR2 !!!
Sometimes a mental block prevents us from accomplishing a task; but at a future date, this same daunting task comes almost naturally, like ‘what was the big deal’! So patience. Maybe an excuse for a 3rd pictorial post in the making when that happens ?!

My hearty thanks to Judith Connors, for this wonderful learning opportunity.


That's it for the present.
I continued on to make 1+9+3 pairs of interlaced rings (where only the 9 centre rings were done Back to Front) & since I was running out of thread in one of the shuttles, I closed off with an encapsulated cord, hiding the 4 shuttle threads. I used alternating ds & RS to encapsulate 3 threads at a time.  

Check out the TIPS on working with 4 shuttles & applications of the braid.

UPDATE : Patterns using interlaced rings have also been uploaded in 2020. Click to see all posts with interlaced rings.


Happy Tatting :-))