Showing posts with label overlapping rings. Show all posts

Tuesday, 13 May 2025

stop tatting

Pin It now!

Not literally, of course! But do read on for the full story ...

I didn't want to bore you with the continuing saga of my Just So Coaster, but it is one of the few pieces of tatting I can show at present; one of the very few that doesn't need too much effort to present. 

After round 5 the only thing I was sure about was to bring back the cream shade from round 3. After rejecting several design ideas, when I finally zeroed in on what felt good, I started second-guessing my choice of the shade. Asked hubby (all cream or cream rings with pink chains) and he said go ahead with all cream cautioning me that I would need to add another round with the dark pink shade outlining the piece. No problem, it was intended!
This is another scroll round with a slight difference. That is Not gapsosis you see between the triad rings. It is a deliberate design element and a version of stacked rings. Last year Anita Barry reworked a doily from the 1970s (by L. Uteg) which had 7 or more such contiguous rings with bare thread deliberately left at the base to maintain the curvature of the round and also act as a picot for joining future elements/rounds.
I only used three rings per set so it is essentially a trefoil here with overlapping rings.


ROUND 6
: A scroll with stacked ring sets.
Start with the 1st ring and move counterclockwise.
Each ring has 14 stitches and is joined in the middle to a picot on Round 5.
Chain counts are inked in the model above, with a lock join to Round 5.

TIP: For the mirror-image sets, each subsequent ring is worked or positioned 'above' the other. In the right set, leave a bit of bare thread space (yes, gapsosis!) between each ring and while joining to the previous round, position it behind the previous ring.

In size 10 Anchor Knitting Cotton, and after 6 rounds, the coaster now measures 15.5cms in diameter.

Sadly the pics don't do justice to how beautiful it really looks on my glass dining table. Anyways, when I showed hubby the coaster, he said stop tatting! It looks complete and beautiful just as it is, Just So! 
Yes, I agreed. I will certainly stop with this piece since I wouldn't know what to do with this thick 'hot pad?' when it grows larger.
However, I'm not done designing. I still feel the urge to continue with more rounds. The only way out is to start afresh with size 20 or 40 crochet cottons. Let's see ....

Related Posts
https://tipsaroundthehome.blogspot.com/2025/04/just-so-tatting.html
https://tipsaroundthehome.blogspot.com/2025/05/comfort-tatting.html
https://tipsaroundthehome.blogspot.com/2025/05/identity-tatting.html

Wednesday, 19 May 2021

rosebud heart rings

Pin It now!

Recently a tatter wished to understand how these inserted rings in the Rose Circle doily were made. I, too, had tried to figure it out back in 2018 from which arose this Rosebud Heart. Following is the roughly and quickly drawn sketch I shared in the group illustrating how the rings are interlaced/stacked/inserted .... 

Note that it can be made with one shuttle and ball. It has the Russian ANKARS-style stamp on it.


After a lengthy search in my compy, pen drives, and other storage areas, I finally found my original pictures (haven't looked for the real heart yet) and decided to share the prototype pattern. You are welcome to tweak it and hopefully share the adjusted count so that we can all benefit.

Start with the central ring (each ring is 15-15) and move around, ending with the tiny mock ring at the base.
Design TIP: The central (1st) ring is squished. My tip is to increase the chain segments , thus pulling that ring upwards.

Back to the original query (may 3rd, 2021) in the Chiaccherieno FB group.... It led to a diligent search for the original designer/pattern. This is Ninetta's summary of all the findings -
'Summary: The pattern of the centipede is by Reiko Akimoto (who signed ©️ April Fool's) and the pattern was granted by the author during a course held in Japan in 2016. This information can be found on the website of Ka-ryun (link is above in my comment). Until now the scheme has never been made available online, neither free nor paid. The pink element, formed by inserting circles into each other, is similar to the one used in a JTatter paid scheme (Celtic 3), on etsy (link is above in Linda's comment -https://www.etsy.com/listing/400761825/tatting-pattern-pdf-celtic-3?ref=shop_home_recs_1).'

If you wish to see the Rose Circle doily by Reiko Akimoto (April Fool’s) taking shape, check this out - https://ka-ryun.com/category/tattinglace/april-fools/


Sunday, 29 September 2019

the jinx of 13

Pin It now!

I don’t much care for the supposed jinx of this being the 13th flake ;-P But this back from the old snowflake/star has me stumped for a weird reason. It uses my Overlapping Split Rings effect. More effects here, including a square arrangement.
MUTANT  SNOWFLAKE - 
design evolution
Here’s some history –
1. This was a trial prototype from 2016 in Anchor 20. At 5 points/arms, it lays flat.

2. Elaborating on the idea, I converted it into a 6-point flake using Anchor Pearl cotton size 8. There was some cupping. I left it in my tatting box overnight and in the morning, it was pretty flat, and more so after some quick blocking.

I went back to my Jottings about cupping/ruffling and worked in the corrections in next trial... 
Basically cupping occurs when outer round is tight. To avoid it, decrease inner round or increase outer round.

3. Wondering how it would look in a single colour, I chose Anchor 20, but the center rings are 1 stitch short (to reduce the center and tackle cupping). Major cupping which did settle after tugging and blocking!
The split rings have 1 extra stitch and this translated into a slightly different more roundish overlap.

4. Fell back on the maroon pattern using Lizbeth 20 threads. And guess what, I had to make 8 repeats for the flake to lie flat by itself!

Pearl cotton differs in it’s looser twist when compared to Lizbeth, but they tat up to the same final measurements. So what just happened?!!

I was ready to share the 8-armed snowflake which is part of the reason it is called Mutant. Seems like the thread and picot characteristics can lead to anywhere from 5 to 8 arms ;-D
It is a mutant in terms of it’s faux Celtic effect. Not true Irish, a bit of a freak ;-P

The online tatting world has blessed me with some excellent friends. Jane McLellan came to my rescue recently; this time is was Ninetta Caruso & Anita Barry.

They sent me possible reasons, solutions, options and enthusiastically volunteered to tat the flake, too. They were ready to count from the image, but I managed to quickly type them some shorthand notations. They will be doing it today.

Would you like to read what these experienced designers/teachers have to say? It is a design bonanza - insightful designing tips, and if you are interested, I’ll share in my next post.

So, what do you think – would you like to tat this 8-armed snowflake or are you a stickler for 6 dendrites?!

UPDATE (Oct 2025) - Unfortunately I haven't yet been able to put together a post about our joint experience, observations, and the final pattern. However, Ninetta had shared a pic of her lovely, vibrant version here - https://ninettacaruso.blogspot.com/2019/10/distractions.html 

Wednesday, 28 February 2018

I love tatting 3D

Pin It now!
This month’s task was laid out by Renata – my favourite kind of tatting – 3D !!! She has listed some very inspiring projects and I wanted to tat them all !!! Participants have already sent in quite a few completed projects. My apologies for not being able to comment on each blog. I’ll wait to catch up in the round-up.

As soon as I read the task, my mind started building up ideas – it was getting difficult to choose! Time (the 4thD?) always sprints many paces ahead of me. This month it went even faster ;-P 
I have ended up with a medley of past, but as yet unshared, projects.

I Love Tatting / Kocham frywolitke – February 2018
3-Dimension 


While rummaging for this star flower medallion (bottom right), I came across an old edging. It is actually the center of Renulek's 2014 Spring doily. After 7 rings, I switched direction and repeated thus getting 4 alternating segments (see collage below). At the time I was trying to create an edging but it went awry ;-P

3D Carnation
It coiled easily into a possible flower, though as in the one against black background. Intending to make that 'rose' shape, I needled green thread through all the picots. When pulling tight, I liked the carnation-style shape much better! Worked a 3-sepal calyx (tubular), then carried on down encapsulating the thick threads, with a spiral chain and added floating twisted picots for leaves. For the bottom pair I twisted 2 threads together, then hiding one again.


3D Lavender trial
Next is the overlapping onion rings trial. many of you may recognise my inspiration - a pin from ameba.jp on pinterest.
I think it came out okay, considering it the only trial I did. Need to make time to practice and make more.

3D Star Flower trial/prototype
Remember my overlapping split ring effect I shared here? This is a 5-sided medallion that emerged from that motif.
The later repeats have the right stitch count to show a balance between overlap and negative space. 
Obviously need to change the colours used. But I also want to try it with 2 thread sizes. Would a thinner thread show a better effect? This looks too bulky.


3D Kayak trials
This was a request from a kayaking enthusiast (some of you may be able to identify who ;-P). I started it in early 2015! 
Again, to create a 3D effect, I used overlapping split rings. Notice the single curled ring on the right ? And a twisted picot for the pointed end. I wanted to come back with a straight line to show depth, once the body was completed.
Thinking I had a good idea of the process, I started afresh with the tinted blue. This time I used 4 overlapping split rings for the broadest center and also flipped the overlapping SR. 
Unfortunately this is as far as it sailed ;-( Haven't had time to pick it up again.
I still think the overlapping SRs have quite a potential to create any geometric shape with faux Celtic effect.


Hope these will be accepted by the talented Renata & Justyna. I do love 3D tatting - all my early patterns are 3D freeform! 
And the book from from which this pic was taken .....


happy tatting everybody J
  

Wednesday, 8 November 2017

CentriPetal

Pin It now!
Conflicting forces abound – centripetal, centrifugal – turning my brain mushy with overload at times and my hands work faster at others.
Randomly sharing some of the medallions I’ve been tatting over the last few days … Can you see them in the center of a larger design? 

My latest pattern – The Pinwheel !
There are few patterns with a central picot on chain and they usually have ‘spokes’ like the one here. I wanted something with curved chains and sketched this. But with the very 2nd chain I realized why they had to be spokes, unless one enlarges the picot vastly or one layers the chains as I resorted to here.
The little picots were meant for joining adjacent chains which was not logistically possible, but I kept them. I kinda like the sense of swirling, spinning motion in this piece.
Incidentally, I worked it with single shuttle attached to ball thread! The outer chains are Direct tatting ie reverse stitch (unflipped). All picots are very small. Lock join to the ring picot. Stitch count is notated on the image.
{õ|õ{

It is always so tough to estimate the length of a central picot (which is why we resort to other means). Moreover, according to Elgiva Nicholls a central picot should not be visible. 
I wanted to check out my Central Picot measurement tip/formula, hence chose a pattern from Lyn Morton’s ‘Tatting Patterns’ - Simplicity.
Central picot is all but invisible as it should be, but the earlier formula has been changed. If someone volunteers, we can give the new formula a quick test run. Please let me know – I realise it is busy-tatting season, yet…. 
This is round 1 of Simplicity .... and

my Layered Extension of Simplicity (round 1)
Using the same stitch count and central picot length as in original, 2 more rings were added, layering them consistently. This is how it looks. I have sketched an outer round for it. 
Or with a bead in center and more seed beads around, it could become a pendant, brooch or earrings!
{õ|õ{

ANKARS was another technique I wanted to revisit and chose this pattern by Verbena Creazioni.
This is the basic pattern for a pendant with beads. I think it works well even without beads.
But perhaps next time I will add beads. I’d like to add more rounds to this one and see where it goes. It is a modern variation of enclosed space medallion .
{õ|õ{

Finally, a central ring pattern from some Coats and Clark book
Worked in Anchor size 50, it is only the first 2 rounds. Worked in different colours, it shows the central ring clearly and I like how chains dip due to the small rings, creating a floral outline.

Here is the complete 3-round pattern - 3 motifs were linked to make a broad bracelet or bookmark. This was tatted and photographed 4 years back - when I rediscovered tatting. It has taken over my life since then ;-P
{õ|õ{

So, any volunteers, then, to try out the central picot measurement? 
Please leave a comment or email me

whatever the forces, center in on your tatting J


Sunday, 3 January 2016

Tatting Effects & patterns

Pin It now!

Mixed Effects

I usually like to post when there is something substantial or complete to offer.  This time I'm making an exception coz I don't know how soon I'll be able to prepare proper posts ...
These are a few effects I came up with over the last few months. Haven’t had much time or patience to develop or refine them . I also wanted to share something ‘new’ (I hope) at the start of the new year.
So, here's a sneak peek at some of the effects I have in the works (some my own, some borrowed) ... these are still in experimental stage & some kinks to be worked out … but they are pretty simple .

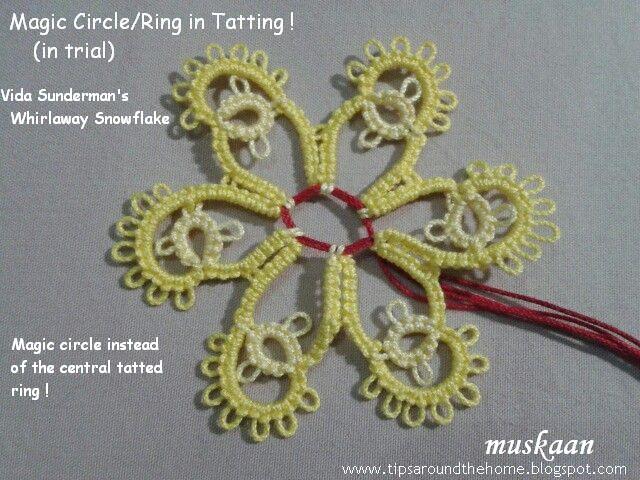
1. MAGIC  CIRCLE /RING
Crochet & knitting have a magic circle/ring, ...so why not tatting ? Should we be left behind ? Nnnnnoooooooo!
All one needs is a loop with a slip knot OR a simple length of scrap thread (if one wants decorative, use different colour, or a ribbon, etc.) . Skip the central ring in the pattern. Begin tatting the pattern & when it says to join in center or to a central ring, join instead to this loop – a normal picot join. That’s it ! Take care not to pull the loop thread through when tensioning the join. In end, tighten the slip knot & hide tails.
This was back in October but it took a while to think of wider application & usefulness. I believe it has potential for designers to estimate round size, or how many repeats can fit in a certain diameter, ... as well as for tatters faced with certain situations – such as not having the right sized finding/doodad/button ; to cover tree ornaments (baubles) easily (slip on/over & tighten !); estimate girth of suncatcher, etc….. Join many individual motifs to the magic string to make a bunting or a necklace!
The magic circle can't even be seen if pulled tight. But if one wants it to show, That's possible too.
**************

2. RINGS  ENRAPT / WRAPPED RINGS
A wrapped-around effect for rings, worked with only 2 shuttles normally.
The wrapping itself is Very easy & can be applied to any single shuttle ring (Not split rings, though) with or without picots.
Start ring. Make 1st half stitch But before tensioning it, pass SH2 through, along the core ((just as we do when hiding tail within)). The continue tatting normally. Before closing ring, pass SH2 through the ring, wrapping around it. Close ring normally & continue.
The wraps can be made on picoted rings too (topmost ring in above pic). If one wants the wrap Within a picot, one will need to position SH2 before starting the picot.
This effect can be a bit fiddly at times since the wrap does not slide easily over the double stitch & may have to be nudged into position.
Secondly, if one chooses to place colours in a certain way, there is a tendency for the wrapped thread to be pulled tight accidentally (unless one uses a shoelace trick). So this is a ‘flaw’ I need to fix with a few experiments. I have a few advanced effects in mind for this … let’s see.
Also tried the blanket stitch for fun :-) I like the look in the 2nd pic, where the picots make a nice angle & also anchor the wraps. It is fine to decorate a single ring but I wouldn’t recommend it for multiple rings – it is very difficult to obtain tension, being a topstitch.

UPDATE : This basic wrap was applied to bare thread / mignonette in order to use 2 colours in same round and add some bulk : http://tipsaroundthehome.blogspot.com/2016/02/identity-crisis.html

************** 

3. OVERLAPPING SPLIT RINGS
aka
FAUX CELTIC TATTING
Simple split rings (SR) ! 3 in a series, joined back at base of 1st SR.
Gives a ‘free swinging’ middle (top) ring. This has potential for 3D tatting, where one or more rings can be joined to picots on topmost ring, thus providing an enclosed cylindrical or barrel shape (something like the layered rings here but where the lower rings/petals are vertical too !). Tatted Bugle beads ?!!!  Or 3D flowers of course. 
If the stitches on the 2nd half of each split ring are increased, one gets this overlap in center. Imagine if one were to use 2 thread sizes – 20 for 1st half of SRs that form a peripheral outline ; & size 40 for 2nd half of SRs that give a clear overlap. Experiment with more number of rings to see what kind of overlap one gets. Look Ma, no Celtic shuttles ! 
**************

with a ‘double twist’
(This is not my original idea, hence post titled “Mixed” effects).
There are 3 tatted pin links here (excuse my shabbiness – first attempts) :
2. Using 2 colours,  and chain reduced to 18ds
3. Doubled up chain . One can add a vsp to chain & join before starting 2nd ring.

4. Further Ideas : use 2 thread sizes - thicker rings & thinner chains. Make a separate ring or use a metal ring. Wrap the cotter pin chain all around the ring/large chain, covering it completely.  Something like enraptured ring – this is something I really want to try out – it would look so nice as the center of a flower or around a cabochon, pearl, etc. !
**************

Ending with a quick & easy pattern using daisy picots to welcome the new year ….
DOUBLE  DAISY  FLOWERS

Very quick to tat & use up scraps of thread. Daisy Picot technique.
2 shuttles.
Pattern :
(Form ring loop with SH1)
♥ Sh1 : 1ds, p, 1ds
Sh2 : long picot, 1ds
Repeat from
♥ for 6 'petals'.
Close ring. T & C !
These flowers are going to be sewn to an embroidered neckline, hence I left the tail ends long, to be sewn through the fabric later.
Notice the difference between front (top & bottom pics) and back (above pic) of flower ? 
Which do you prefer ? 
**************
That’s it for this post. Still left with a lot of experimentation & trials & ideas to work on … hope some of the above inspire or generate even more & much better ideas


happy tatting :-)

Motifs #16-20 / III for 25 Motif Challenge

Saturday, 28 June 2014

Interlaced Rings - II

Pin It now!
Tatting Tutorial
Part 2 : Under & Over Rings : Back to Front Shuttle Movement


Interlaced Rings make such an elegant braid, using 4 shuttles ! Judith Connors shared her beautiful braid on InTatters in a thread titled “Reverse Stitch”, which I have elaborated on in my previous post on Front to Back movement.
In a gist,
The overlap of rings depends on the movement of the 3rd shuttle. If it is passed front to back, then the 2nd ring (on right side of braid) will lie over & under the 1st ring.
If the 3rd shuttle is passed from back to front, the 2nd ring will lie under & over the 1st ring.

This post is a continuation from the previous one. Here I share how I did the Under & Over overlap of rings, by moving the shuttle back to front.

Common Details :

Thread used : Anchor Mercer Cotton size 20.
Lemon Yellow – 4054-0293  &  Mehandi Green – 4054-0256
Length of braid : 13 pair repeats = 5 inches.
It took less than half a bobbin of each shuttle to tat this length. So fully wound shuttles should give you a length of anywhere from 12-15 inches.
Abbreviations used :
CTM – continuous thread method
Sh – shuttle. Each shuttle is numbered from 1 to 4 : Sh1, Sh2 form one pair ; Sh3 & Sh4 form 2nd pair.
SR – Split Ring
RS – Reverse stitch (used in some pictures to indicate 2nd half of split ring stitches)
DNCR – Do not close ring.

Directions :
Start with 4 shuttles & wind threads :
1st pair - Sh1 & Sh2 : Wind yellow thread CTM
2nd pair – Sh3 & Sh4 : Wind green thread CTM
Each Split Ring : 9/9

A Short Note :

Please disregard the 1st pair of rings as seen in Figure 1 below. This was done front to back (tutorial in previous post) as per the photo that Judith had posted. This pair will, however, serve as an immediate comparison for outcome of the two directional movements of Sh3 : front to back & back to front. Notice how in the 1st pair, the green ring goes over & under the yellow ring . However, for back to front movement, the green ring goes under & over the yellow ring !
Update :  Here is the detailed step-by-step tutorial for how to begin the 1st pair of interlaced rings.

Secondly, many images do not show the shuttle 1 thread clearly; it is outside the frame of the picture on the left side. Mea culpa. I wanted to focus more on the green ring being made for a clear visual of Sh3 thread in relation to others. If you have gone through the Front to Back tutorial &/or tried it yourself, you will have got the hang of it already.

                                                     
BACK TO FRONT 
INTERLACED  RINGS

   
1. Make Split ring (9/9) with 1st pair of shuttles (Sh1 & Sh2) in yellow thread, but Do Not Close Ring (DNCR) !
It is through this unclosed loop that the adjoining SR will be interlaced.


2. Pass Sh3 through the unclosed yellow ring from back to front. Fig 1.


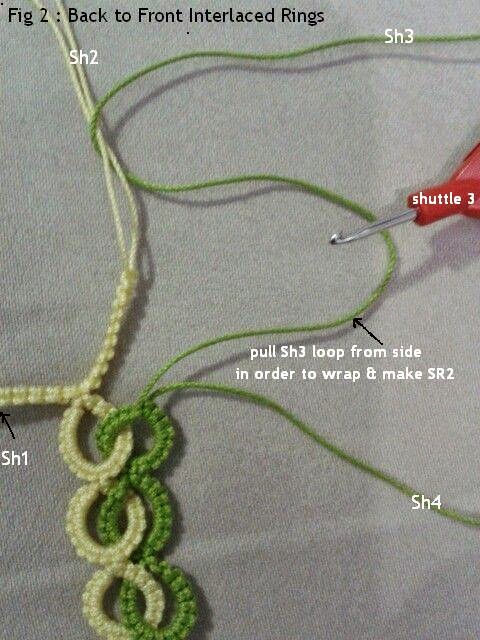
3. Insert your index finger between the right side of SR1 (yellow ring) & the Sh3 (green) thread. Pull a length of the Sh3 thread from the outside. (The shuttle hook points to which thread needs to be pulled in Fig 2.) This loop will be wrapped in order to start the green ring. Wrap & hold the thread in a pinch to form the core thread of the new ring with Sh3.

UPDATE :  See how to pick up and wrap the loop around the hand to start tatting this ring in this pictorial.


4. Make 9ds with Sh3 – 1st half of SR2 completed.  Fig 3.


5. 2nd half of SR2 (9ds or RS) are completed using Sh4. Fig 4.
Please Note : Needle points to how the SR2 loop & Sh4 thread are on one side (above or on top of) the yellow SR1 ring, while Sh3 thread is on the opposite side viz. under SR1 yellow ring.
If rings are closed at this stage, Sh3 & Sh4 threads will not be adjacent to each other & will mar the next green SR. Hence they need to be on the same side viz., on top. This is accomplished in next step.


6. Pass Sh3 back to front a second time in order to bring all components of SR2 in line/on same side, adjacent to each other. This is an important step as explained above. Fig 5.


7. Now that everything is aligned, start closing the rings. 
Figs 6 & 7.


(While notating the images, I noticed that Sh3 thread seems to be emerging from within SR2. This could be due to a bad photography angle or an inadvertent mistake. 
However, so as to avoid all confusion, for this step,  simply close the SR2 as you would Normally do with any ring.)


8. Both rings are closed & all 4 shuttles are now ready to start the next pair of rings. Fig 8.


Continue in similar fashion, starting with SR1, for as long as you would like the braid.


A Variation

Judith, in the 'Reverse Stitch' thread, has spelled out her variation, where the back to front movement is done twice together Before making SR2 (unlike mine where I pass it once, make SR2, then pass it back to front a second time)  :
* Take #1-B shuttle through the opening from back to front (twice) to form the wrap for the B split ring.
* Tat the B ring.
* Close both rings A and B.
* Tat a second ring with pair A, but leave it open slightly.
* Take the #1-B thread behind this ring and pass it back to front through the A ring (twice) to tat the B split ring.
* Close both split rings.
(Note: here #1-B refers to Sh3; B ring is SR2;  & A ring is SR1)


If you follow my instructions above, then Judith's method requires the Sh3 movement in Step #2; and Step #6 can be skipped since it has already been incorporated in Step #2.
Hence, the logic & basic technique is similar. Only the timing of Sh3 movement differs.
Yet I could not get it right, try as I might. I just could not figure out which loop to pull & how to wrap it in order to make SR2 !!!
Sometimes a mental block prevents us from accomplishing a task; but at a future date, this same daunting task comes almost naturally, like ‘what was the big deal’! So patience. Maybe an excuse for a 3rd pictorial post in the making when that happens ?!

My hearty thanks to Judith Connors, for this wonderful learning opportunity.


That's it for the present.
I continued on to make 1+9+3 pairs of interlaced rings (where only the 9 centre rings were done Back to Front) & since I was running out of thread in one of the shuttles, I closed off with an encapsulated cord, hiding the 4 shuttle threads. I used alternating ds & RS to encapsulate 3 threads at a time.  

Check out the TIPS on working with 4 shuttles & applications of the braid.

UPDATE : Patterns using interlaced rings have also been uploaded in 2020. Click to see all posts with interlaced rings.


Happy Tatting :-))