Showing posts with label magic circle. Show all posts

Friday, 6 June 2025

bridge tatting

Pin It now!

 Like I said in my recent posts, expert and experienced tatters have graciously come to my aid whenever I asked for it. And some have gone a step further by sharing their work and/or discussing techniques and terminology even before I asked.  One such is Judith Connors who has been instrumental in guiding and inspiring me through this past decade. My presentations have been influenced by her despite not being a perfect student.

Early last month, Judith sent me her article on 'Building Bridges' along with a pic of her Fan motif (If you are a member, you can see her model in the Queensland Tatters 2025 group post here - https://craftree.com/forum/threadfs/40423?page=1#258577). We had discussed bridging some years back, too. I was in a state of tatting inertia when this motif instantly spurred me to wind my shuttles and tat since this decorative/functional bridge had been on my trial list since 2019 (https://craftree.com/forum/threads/39159), but never got down to actually applying it. I did do the Rose Motif from Priscilla Tatting Book No.3!   

Bridging Flower Motif - based and adapted from Judith Connors' Fan motif
sharing my process, pattern, and tips/tricks

How many rounds does this motif have? 
Do we cut after the inner 'rosette' round?
Were Celtic shuttles or needle used for the Celtic effect?
Or were 4 shuttles used for the interlaced/overlapping chains? 

Getting back to the present motif, it occurred to me that I could use the element to create overlapping or interlaced chains instead of single lines! So off went my shuttles to confirm. 

Now this post is only about the adapted motif - process, pattern, and tips/tricks. I have pics for a pictorial, along with the background and explanation, terminology and history. Part of it is already explained in the link above (https://tipsaroundthehome.blogspot.com/2022/01/bridging-gaps.html). The rest will be shared in a few days to avoid stepping on Judith's class despite her permission. For the curious, we know the technique as split chain, which is a misnomer and limiting, meant mainly for climbing out.  

My first attempt. I ran out of thread and also realised that if I continued around there would be cupping (I had increased the count in some parts). Moreover the thread had a tendency to unravel, even though it is Anchor mercerised cotton. Cut my losses and started over.

Design Tip starting with a magic circle: Since I wasn't sure how big the central ring should be, I preferred to use the  magic circle (the multiple threads are to make the picot large enough to join to later). Wrap the thread around the magic circle and start the first inner chain. End each chain with a lock join around the circle. 
TIP to keep last half-stitch flipped: The marker on the right - since each bridge is a long chain, by the time it was completed, the last half-stitch often unflipped and locked the core thread below. This temporary marker on the core thread prevents it from happening. 
After a few repeats, I pulled on the magic circle to see whether it was working well. Successful; no cupping or ruffling.

Bridging Flower Motif pattern
  1. Only 2 shuttles are used with continuous thread and the entire motif is worked in one pass. 
  2. 8 repeats and all chains in this prototype. No space for a central ring. In Anchor mercerised crochet cotton size 20 (equivalent to Lizbeth size 10), the motif measures 6.5cms in diameter.
  3. In the image above, I have split the sequencing (A to F) to indicate where there is a change of direction , shuttles, or element. 
  4. The entire motif is worked clockwise from the front.
  5. Chains C & E are bridging chains aka bridge, bar. 
  6. I used a 2cms folded picot gauge to measure the bare thread for bar/bridge before lock joining it to a picot on the previous element.  TIP:  I found that making a lock join by pulling the loop down instead of up through the picot makes a neater start to the bridge.
  7. These bars are covered with Dora Young's Knotless Method or tied stitches worked from left to right. I worked them all from the front, though there are several variations of the method. 
  8. NOTE: The arrows for bridges indicate where the thread from shuttle2 goes, not the direction of working the stitches. 
  9.  While making each subsequent bridge, keep it in FRONT of the previous chain so that the overlapping is synchronised.  
10. For the bridges on the last rosette chain, TWO each had to be made! The above image shows the first pair done and the 2nd pair is being bridged.
After working the first bridge exactly like ch-C, then one more bridge is made joining to the first rosette on the right, at the base of the very first bridge. The stitches are then worked using the Australian method. This, too, is worked from the front, but in the opposite direction (right to left). Repeat this for the 2nd pair of bridges. 
Important: To maintain overlap, pass the shuttle under and over the last bridge both times.

11. After the motif is finished, and both threads are in the center, I threaded them together and inserted the needle through the picots held open with the magic circle, and kept removing the threads from the circle. Final tie, cut, and hide ends.
Option: One can use metallic thread or colour-coordinated thread for the magic circle and leave it be after tightening the slip knot. Then hide all ends - from the motif as well as the circle.

 
Possible Variation: However one can use a central ring of 10 small picots separated by 1ds and make a 10-repeat motif. 
Future Idea: Can we use this bridging technique to work block tatting over or across an element?

I will try to write the pattern in a more lucid form when I share the pictorials and other details. Here I wanted to focus more on the process.

Technique Option: Also, instead of the bridges going from right to left, we can move forward. Thus from chain A we can work the 'bridge'  like a floating chain or single shuttle split chain, leaving a picot open with a paperclip to join to later. 

Bridge tatting or bridging encompasses a lot more, not all of which is outlined here. In this post and motif, the bridges are ornamental - a design element; they can be functional too. Hopefully I will be able to cover it all in the pictorials post. 

I cannot thank Judith enough for her valuable mentorship and guidance since we 'met' at InTatters a decade ago! We may not always agree but the discussions are always lively and passionate!

Sunday, 3 January 2016

Tatting Effects & patterns

Pin It now!

Mixed Effects

I usually like to post when there is something substantial or complete to offer.  This time I'm making an exception coz I don't know how soon I'll be able to prepare proper posts ...
These are a few effects I came up with over the last few months. Haven’t had much time or patience to develop or refine them . I also wanted to share something ‘new’ (I hope) at the start of the new year.
So, here's a sneak peek at some of the effects I have in the works (some my own, some borrowed) ... these are still in experimental stage & some kinks to be worked out … but they are pretty simple .

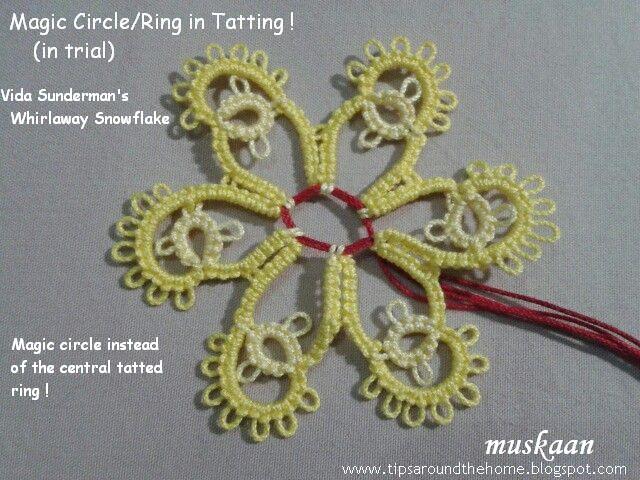
1. MAGIC  CIRCLE /RING
Crochet & knitting have a magic circle/ring, ...so why not tatting ? Should we be left behind ? Nnnnnoooooooo!
All one needs is a loop with a slip knot OR a simple length of scrap thread (if one wants decorative, use different colour, or a ribbon, etc.) . Skip the central ring in the pattern. Begin tatting the pattern & when it says to join in center or to a central ring, join instead to this loop – a normal picot join. That’s it ! Take care not to pull the loop thread through when tensioning the join. In end, tighten the slip knot & hide tails.
This was back in October but it took a while to think of wider application & usefulness. I believe it has potential for designers to estimate round size, or how many repeats can fit in a certain diameter, ... as well as for tatters faced with certain situations – such as not having the right sized finding/doodad/button ; to cover tree ornaments (baubles) easily (slip on/over & tighten !); estimate girth of suncatcher, etc….. Join many individual motifs to the magic string to make a bunting or a necklace!
The magic circle can't even be seen if pulled tight. But if one wants it to show, That's possible too.
**************

2. RINGS  ENRAPT / WRAPPED RINGS
A wrapped-around effect for rings, worked with only 2 shuttles normally.
The wrapping itself is Very easy & can be applied to any single shuttle ring (Not split rings, though) with or without picots.
Start ring. Make 1st half stitch But before tensioning it, pass SH2 through, along the core ((just as we do when hiding tail within)). The continue tatting normally. Before closing ring, pass SH2 through the ring, wrapping around it. Close ring normally & continue.
The wraps can be made on picoted rings too (topmost ring in above pic). If one wants the wrap Within a picot, one will need to position SH2 before starting the picot.
This effect can be a bit fiddly at times since the wrap does not slide easily over the double stitch & may have to be nudged into position.
Secondly, if one chooses to place colours in a certain way, there is a tendency for the wrapped thread to be pulled tight accidentally (unless one uses a shoelace trick). So this is a ‘flaw’ I need to fix with a few experiments. I have a few advanced effects in mind for this … let’s see.
Also tried the blanket stitch for fun :-) I like the look in the 2nd pic, where the picots make a nice angle & also anchor the wraps. It is fine to decorate a single ring but I wouldn’t recommend it for multiple rings – it is very difficult to obtain tension, being a topstitch.

UPDATE : This basic wrap was applied to bare thread / mignonette in order to use 2 colours in same round and add some bulk : http://tipsaroundthehome.blogspot.com/2016/02/identity-crisis.html

************** 

3. OVERLAPPING SPLIT RINGS
aka
FAUX CELTIC TATTING
Simple split rings (SR) ! 3 in a series, joined back at base of 1st SR.
Gives a ‘free swinging’ middle (top) ring. This has potential for 3D tatting, where one or more rings can be joined to picots on topmost ring, thus providing an enclosed cylindrical or barrel shape (something like the layered rings here but where the lower rings/petals are vertical too !). Tatted Bugle beads ?!!!  Or 3D flowers of course. 
If the stitches on the 2nd half of each split ring are increased, one gets this overlap in center. Imagine if one were to use 2 thread sizes – 20 for 1st half of SRs that form a peripheral outline ; & size 40 for 2nd half of SRs that give a clear overlap. Experiment with more number of rings to see what kind of overlap one gets. Look Ma, no Celtic shuttles ! 
**************

with a ‘double twist’
(This is not my original idea, hence post titled “Mixed” effects).
There are 3 tatted pin links here (excuse my shabbiness – first attempts) :
2. Using 2 colours,  and chain reduced to 18ds
3. Doubled up chain . One can add a vsp to chain & join before starting 2nd ring.

4. Further Ideas : use 2 thread sizes - thicker rings & thinner chains. Make a separate ring or use a metal ring. Wrap the cotter pin chain all around the ring/large chain, covering it completely.  Something like enraptured ring – this is something I really want to try out – it would look so nice as the center of a flower or around a cabochon, pearl, etc. !
**************

Ending with a quick & easy pattern using daisy picots to welcome the new year ….
DOUBLE  DAISY  FLOWERS

Very quick to tat & use up scraps of thread. Daisy Picot technique.
2 shuttles.
Pattern :
(Form ring loop with SH1)
♥ Sh1 : 1ds, p, 1ds
Sh2 : long picot, 1ds
Repeat from
♥ for 6 'petals'.
Close ring. T & C !
These flowers are going to be sewn to an embroidered neckline, hence I left the tail ends long, to be sewn through the fabric later.
Notice the difference between front (top & bottom pics) and back (above pic) of flower ? 
Which do you prefer ? 
**************
That’s it for this post. Still left with a lot of experimentation & trials & ideas to work on … hope some of the above inspire or generate even more & much better ideas


happy tatting :-)

Motifs #16-20 / III for 25 Motif Challenge