Showing posts with label Dora Young Knotless. Show all posts

Monday, 27 July 2026

calling them done

Pin It now!

 Several pieces of my tatted lace over the past months are 'incomplete' if one considers the respective pattern. Yet, I am calling them done. And interestingly, most patterns here were gifted to me by kind and friendly tatters. In no particular order .....

Dora Young's Round Pinwheel doily - from All New Knotless Tatting Designs (1974).

Back in April I had wondered how to continue since I had run out of thread. And Jane McLellan commented 'to leave it as it is'. Sound advice 'coz I really like these arches better than the final circle it turns into. 
Against a different background where the grey shows up. 
In Anchor perle size 8. the diameter is 17.5cm. 
There is a slight overlap at the dips in the arches but that's fine - hardly even visible. And hubby is quite happy with this on his table!
Related Posts - 

💜💜💜

Centri Rotondo - from Il Lavaro Chiacchierino 7, Mani di Fata (1994)

A while back there was a post in a FB group which mentioned Cyprus tatting where continuous tatting involved simply leaving bare thread right up to the point in the next round where the next element starts. This is visible unlike Mlle Riego who kept the bare thread at the back of work. 
I used this doily pattern, leaving off all decorative picots, to show this spiralling climbing out.

Only 5 rounds tatted in Anchor size 40 measuring 10cm in diameter. Yet I had to snip off two rounds because there was cupping, but I re-tatted only one adding 2ds to the chains. I have come to the conclusion that my chains are more snug than normal.
The pattern was gifted to me, along with her hand-drawn sketch, by Anna Bertini.
Related Posts -

💜💜💜

April Fool's Rose Circle (2016) -

This is merely the center motif which gets repeated in a later round of the doily pattern. This single round in Red Rose perle size 8. measures 9cm in diameter. The full pattern was gifted to me by Erika Tashiro. Hopefully I will complete it some day, but with different threads. Not happy with this perle cotton as seen in the stitches and imagine my surprise when the dye ran!!!

This angle highlights the raised/3D effect where the rings of a running scroll are interlaced one over the other and joined to create Celtic Interlacing and a realistic-looking rose motif. The pattern has very clear colour-coded diagrams, yet I found it easier to refer to my own sketches to confirm how the rings were inserted into each other. 

And remember Lauretta Tondelli's Interlaced Onion Rings earring (2024)?
Notice how it uses the same technique to interlace the three rings in an onion ring. In this case, however, the rings get kind of squished resulting in different shapes. This is the only piece I tatted, but single earring is not a new phenomenon for me ;-P
Related Posts - 
💜💜💜

Its been a while since I crossed out another box in Natalie's PICOT Bingo 2026 Level 2. This time I am offering the above two models for Celtic Tatting box. (Details: https://www.patreon.com/posts/happy-new-year-147124370 )

💜💜💜

My heartiest thanks to all named in this post (and some who wish to remain anonymous)

Thursday, 23 April 2026

2D solid tatting

Pin It now!

 Carolyn Craig's journey of 3D solid tatting started with a flat 2D fabric which she first made and shared publicly in 2020.

This was the piece. In her words -
"My first piece of solid tatting was for a tapestry purse in 2020. I tatted a flat piece of solid tatting for tube at the bottom of the purse for a scarf or umbrella."

This is what the 2D solid tatting fabric looks like without the appliqued tatted letters. It is worked continuously in to and fro rows with a shuttle and ball. Thus we work from the front from left to right, turn work and go back from right to left in continuous succession and repetition.
💟
Above is my first attempt when she privately discussed her process with me. I chose to start with a ring and worked in continuous chains around it.  It is worked all from the front and the joins are made through the waistband of each double stitch (she calls this LFW - lock join front waistband) of the previous round.

My mistake was to use knitting cotton size 10. This is not as firm as crochet cotton. Also I couldn't always make out the joining point and probably fudged.
Nevertheless it gave me enough of an idea of how Carolyn worked her solid tatting.
One can continue this piece and end up with a 3D model but more on that in the next post.
💟
Meanwhile Carolyn has created a PDF with her pictorial on flat or 2D solid tatting. She graciouslygave me permission to share her work here. I like the applications she included towards the end. 
2-D Solid Tatting with Carolyn Craig April, 2026 PDF - 
The tutorial starts with a foundation chain rather than a ring and I followed along ....
 
Her tip about using a marker or pin is Really helpful. 
This time I used Anchor crochet cotton size 20 in single colour and worked off a ball with single shuttle.There were some errors and I had to re-tat the 3rd row ... practice will make it neater.

This is how it looks from the back - like knitting!!! Seed stitch as some members said.

TIP: In a square or rectangular piece where we alternate between working rows from the front and the back, all joins are made through the 'hidden picot' since we are not deliberately making any picot.  Carolyn terms this the LBW (Lock join to back waistband), 
💟
Carolyn pointed out that while some pinholes are fine in a flat piece, if we wish to use it for 3D, the space should be as minimal as possible to avoid any stuffing from being visible. So I continued with tighter stitches ....

You can see the difference between the upper and lower halves. 
Texturally, too, the upper half is stiff. Although I do like the lower one - it feels more cloth-like when handled. Each has its use.
The same sampler from the back. The seed stitch pattern is more obvious in the lower half than the upper one, though it could be my own fault.

At present this is set aside. Oh by the way, I used 7 double stitches per row and am certain there was some fudging at some of the turns.  
💟
So far, when worked in ROWS of 1DS chains, it is nothing different than Dora Young's patterns. The difference is merely in design; in the combination of dense and open areas. And she deliberately made 'picots' at each lock join. 


Since I last posted, this is how far my Dora Young's Round Pinwheel Doily from her 'All New Knotless Tatting Designs' (2nd ed) has reached.  As of 5th Oct 2025, it is 14 cms or 5.5 inches in diameter. The dense pinwheel is complete and only the open chain rounds are left. However, I ran out of thread and couldn't decide on how to proceed. 
💟
To recap, 
Solid Tatting is simply dense area(s) in any tatted lace. Usually the dense is interspersed with lighter/airier portions in interesting designs. Solid tatting also includes tatted formations such as blocks, coils, tallies, onion rings, etc. Remember how many of Eleonore Endrucks'  patterns have broad and diversely shaped blocks interspersed with more open areas? Die Schiffchen-Spitzen, 1920 -https://docs.google.com/document/d/17LEVftXweztBIOWh4sL4BB7bX65ssoOsOn4oXIgCepY/view. The difference is that she uses longer chain segments as well as segmented blocks rather than single DS chains. Even before Endrucks. we come across a couple of projects in Lady Hoare's book (1910) where continuous rounds of tiered chains provide a dense highlight to patterns.
UPDATE: Double Chains also offer a solid design option, however they require a minimum of Three threads - https://tipsaroundthehome.blogspot.com/2024/09/pleasure-and-pondering.html

However solid tatting can also be applied to 3D models as we shall see in the next post. 

Many many thanks to Carolyn .... the best is yet to come! 

Friday, 12 September 2025

flower in flesh in thread

Pin It now!

This post has been waiting to be written for almost a fortnight .... I just couldn't form the words. While I miss chatting through my blog and through comments on other blogs, I was just not in that phase. While I read up most of the blogs during this time, sometimes I simply scrolled through the pics. I hope you will excuse and forgive me for being a lurker.

One morning my hubby brought me this portulaca flower from his garden. Can't say how it looks online, nevertheless it is a beautiful soft pink with dense layers - almost like a carnation! We usually allow these blooms to remain on the plant since they wither very quickly if not in water (unlike the jasmines I posted recently which remained in bloom even after 14 hours without any water). Of the two plants he has, one has already died away 'for no rhyme or reason' but this other one is flourishing quite nicely. We're hoping the number of blooms will keep increasing.
Pic was taken on 30th August 2025 as was the one below.

I had been engaged in doing up a block tatting pictorial in answer to a specific doubt. It spiralled into a virtual ready reckoner of various effects, methods, etc., etc. Had to shelve it for a while but will be back on it in a couple of days. Anyways, my dear friend surprised me with this pattern of Dora Young's Round Pinwheel Doily from her 'All New Knotless Tatting Designs' (2nd ed)! I just had to tat it!

Worked with Anchor Pearl Cotton size 8, ball and shuttle. I had started with grey in shuttle and a yellow ball. It dawned on me that a variegated or tinted thread should work well in such a pattern so I switched to this. 

This pic, taken on the 5th of this month has 17 picot-round completed. Since then I have added more rounds - I'm probably on the 21 picot round (amidst other Endrucks-related behind the scene stuff). 

The green scrap thread is a marker for the start of the round. It's not really required since the pattern is extremely simple and spirals around almost mindlessly. Haven't had to retro-tat even once. 

Not using a picot gauge - I prefer to eye ball picots as much as possible and while I know they are not all even here, it still seems to turn out fine.

The doily is so well-constructed, so well-designed, that it lays flat throughout. The frequent joins in the dense portions give it a nice texture. And it is exactly the type of patterns I enjoy working on -- tatted all from the front!

Friday, 6 June 2025

bridge tatting

Pin It now!

 Like I said in my recent posts, expert and experienced tatters have graciously come to my aid whenever I asked for it. And some have gone a step further by sharing their work and/or discussing techniques and terminology even before I asked.  One such is Judith Connors who has been instrumental in guiding and inspiring me through this past decade. My presentations have been influenced by her despite not being a perfect student.

Early last month, Judith sent me her article on 'Building Bridges' along with a pic of her Fan motif (If you are a member, you can see her model in the Queensland Tatters 2025 group post here - https://craftree.com/forum/threadfs/40423?page=1#258577). We had discussed bridging some years back, too. I was in a state of tatting inertia when this motif instantly spurred me to wind my shuttles and tat since this decorative/functional bridge had been on my trial list since 2019 (https://craftree.com/forum/threads/39159), but never got down to actually applying it. I did do the Rose Motif from Priscilla Tatting Book No.3!   

Bridging Flower Motif - based and adapted from Judith Connors' Fan motif
sharing my process, pattern, and tips/tricks

How many rounds does this motif have? 
Do we cut after the inner 'rosette' round?
Were Celtic shuttles or needle used for the Celtic effect?
Or were 4 shuttles used for the interlaced/overlapping chains? 

Getting back to the present motif, it occurred to me that I could use the element to create overlapping or interlaced chains instead of single lines! So off went my shuttles to confirm. 

Now this post is only about the adapted motif - process, pattern, and tips/tricks. I have pics for a pictorial, along with the background and explanation, terminology and history. Part of it is already explained in the link above (https://tipsaroundthehome.blogspot.com/2022/01/bridging-gaps.html). The rest will be shared in a few days to avoid stepping on Judith's class despite her permission. For the curious, we know the technique as split chain, which is a misnomer and limiting, meant mainly for climbing out.  

My first attempt. I ran out of thread and also realised that if I continued around there would be cupping (I had increased the count in some parts). Moreover the thread had a tendency to unravel, even though it is Anchor mercerised cotton. Cut my losses and started over.

Design Tip starting with a magic circle: Since I wasn't sure how big the central ring should be, I preferred to use the  magic circle (the multiple threads are to make the picot large enough to join to later). Wrap the thread around the magic circle and start the first inner chain. End each chain with a lock join around the circle. 
TIP to keep last half-stitch flipped: The marker on the right - since each bridge is a long chain, by the time it was completed, the last half-stitch often unflipped and locked the core thread below. This temporary marker on the core thread prevents it from happening. 
After a few repeats, I pulled on the magic circle to see whether it was working well. Successful; no cupping or ruffling.

Bridging Flower Motif pattern
  1. Only 2 shuttles are used with continuous thread and the entire motif is worked in one pass. 
  2. 8 repeats and all chains in this prototype. No space for a central ring. In Anchor mercerised crochet cotton size 20 (equivalent to Lizbeth size 10), the motif measures 6.5cms in diameter.
  3. In the image above, I have split the sequencing (A to F) to indicate where there is a change of direction , shuttles, or element. 
  4. The entire motif is worked clockwise from the front.
  5. Chains C & E are bridging chains aka bridge, bar. 
  6. I used a 2cms folded picot gauge to measure the bare thread for bar/bridge before lock joining it to a picot on the previous element.  TIP:  I found that making a lock join by pulling the loop down instead of up through the picot makes a neater start to the bridge.
  7. These bars are covered with Dora Young's Knotless Method or tied stitches worked from left to right. I worked them all from the front, though there are several variations of the method. 
  8. NOTE: The arrows for bridges indicate where the thread from shuttle2 goes, not the direction of working the stitches. 
  9.  While making each subsequent bridge, keep it in FRONT of the previous chain so that the overlapping is synchronised.  
10. For the bridges on the last rosette chain, TWO each had to be made! The above image shows the first pair done and the 2nd pair is being bridged.
After working the first bridge exactly like ch-C, then one more bridge is made joining to the first rosette on the right, at the base of the very first bridge. The stitches are then worked using the Australian method. This, too, is worked from the front, but in the opposite direction (right to left). Repeat this for the 2nd pair of bridges. 
Important: To maintain overlap, pass the shuttle under and over the last bridge both times.

11. After the motif is finished, and both threads are in the center, I threaded them together and inserted the needle through the picots held open with the magic circle, and kept removing the threads from the circle. Final tie, cut, and hide ends.
Option: One can use metallic thread or colour-coordinated thread for the magic circle and leave it be after tightening the slip knot. Then hide all ends - from the motif as well as the circle.

 
Possible Variation: However one can use a central ring of 10 small picots separated by 1ds and make a 10-repeat motif. 
Future Idea: Can we use this bridging technique to work block tatting over or across an element?

I will try to write the pattern in a more lucid form when I share the pictorials and other details. Here I wanted to focus more on the process.

Technique Option: Also, instead of the bridges going from right to left, we can move forward. Thus from chain A we can work the 'bridge'  like a floating chain or single shuttle split chain, leaving a picot open with a paperclip to join to later. 

Bridge tatting or bridging encompasses a lot more, not all of which is outlined here. In this post and motif, the bridges are ornamental - a design element; they can be functional too. Hopefully I will be able to cover it all in the pictorials post. 

I cannot thank Judith enough for her valuable mentorship and guidance since we 'met' at InTatters a decade ago! We may not always agree but the discussions are always lively and passionate!

Thursday, 27 January 2022

bridging gaps

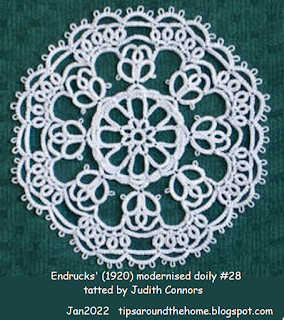
Pin It now! I have some great news! Our Endrucks 1920 Project will be featured in the February issue of ‘Talking Tatting’ issue 50! Along with a short bio of Frau Endrucks and the doily E28 pattern (modernised version), all by Judith Connors. This is a quarterly newsletter of Queensland Tatters, Australia.
 
[E28 pattern PDF: https://drive.google.com/file/d/1vG2g0JCVsy8cy2DfGKHEhxleq_7Rveba/view]

While this doily has already been tatted by several others, they referred to the diagram rather than the text. Hence it was left to Judith to point out a couple of errors, which are now corrected in an updated pdf.

Impeccable tatting from the inspiring teacher, researcher, and historian who was honoured with the Order of Australia Medal last year! And as you can see, she has managed to retain the octagonal shape of the doily after blocking.

We discovered that my tatting tension is way too tight! Worked in Coats No 40 cotton, Judith’s doily is 9cms in diameter to my 7cms in Anchor No 40 (which is also a Coats subsidiary).

My tension varied from yours in places. I managed the fluting, and when I blocked the mat it turned out to be quite octagonal.” – Judith

Alternate Path: “I worked it completely from the front side, not as you have suggested for Rounds 5 and 6. This means that the small rings of Round 5 were tatted in RODS (with a posting of the shuttle before closure).” – Judith

While enlarging the pic for posting, I noticed another thing about Round 5 in Judith’s doily. It appears the chains on either side of the ring are 8ds each instead of 5ds, creating a graceful arch instead of a flattish line.

Bridging/Mock Chain and Split Chain: Several ways to climb out of rounds for continuous tatting are indicated in this pattern pdf. However, Judith pointed out that what I termed split chain to climb out of round 4 is actually a bridging chain (b-Ch) and I should use this as a “teachable moment”. Got me thinking and this is how I see it:

The technique was invented by Dora Young for rings and then applied to chains – the knotless method (km or KM). Decades later, the term split chain caught on and became more popular. But the stitch and movements are the same in both – mock stitches or tied/manoeuvred stitches.

A Bridging or Mock Chain is functionally and structurally the same as a Split Chain. Each chain spans a space and emerges at a point to the left instead of the far right, and is made over a bridging or foundation thread. 

The difference lies in the Where the threads emerge/exit or where the point of climbing out is. A bridging chain is made completely of mock stitches and threads emerge at the ‘beginning’ of the chain. A split chain, as the name suggests, is split - partially made of double stitches and partially of mock stitches. Thus, the threads in this ‘hybrid’ chain exit somewhere along the length of the chain, not at the start.

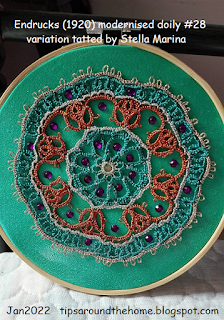
Among the several beautiful versions of this doily tatted by enthusiastic lacers, I would like to show Stella Marina’s version in lovely metallic threads because it is yet another example of how we can alter our path. In a moment of distraction, Stella forgot to tat the 2 large twin thrown rings in Round 3. Instead of cutting back, she continued. She then tatted them as normal rings, facing inward, in Round 4! This happened by accident, but could easily have been a deliberate choice to make the rings red instead of silver. Planning ahead gives us so many bridges to cross smoothly!

Now I want to tat the doily again and bridge all my gaps!

UPDATE (Nov2025): In Mar2022, Daniela Galli mistakenly tatted only 5 repeats of the E28 doily leading to a lot of cupping, which she converted into a cute little gift box. More pics and details - https://tipsaroundthehome.blogspot.com/2025/11/ep-medley-2.html


Many many thanks to Judith and Stella & Daniela - keep inspiring!

Related Posts/Resources –
For more tutorials and details scroll down to Techniques & Effects » CHAINS » Split Chain/Dora Young Knotless/Bridging https://tipsaroundthehome.blogspot.com/p/tatting-resources.html
Knotless Method in split SCMR - https://tipsaroundthehome.blogspot.com/2018/10/scrappy-doily-and-scmr.html
https://tipsaroundthehome.blogspot.com/2021/07/continuous-paths.html

Wednesday, 6 January 2021

knot stitch stepwise

Pin It now!

I'm not sure whether I will be using this stitch, but it does not hurt to have options. Never say never! It is not difficult and I soon got into a rhythm where the knot stitch, first seen in 1924, could be accomplished in one smooth movement. So, though my pictorial has numerous steps and detailed instructions, it is best to simply pick up your shuttle and tat along. Choose a thick thread in light colour for your first attempts.

The original diagrams in Priscilla Book 3 (free download from http://www.antiquepatternlibrary.org/html/warm/tatting.htm) are very clear. Snapdragon has shared the scans here - http://www.snapdragonlace.com/?p=183   More links in my previous post - https://tipsaroundthehome.blogspot.com/2021/01/old-in-new.html 

Rose Motif from the same book, in Anchor pearl cotton size 8. Bridging elements (chains) use the knot stitch. I am so much happier with this one and the thread behaved itself! More at the end of this post.

At the end of the pictorial I have also compared the knot stitch chain with a split chain, which was a later invention.

KNOT  STITCH  Pictorial

( https://tipsaroundthehome.blogspot.com/2021/01/knot-stitch-stepwise.html )

Shuttle and ball, continuous thread. Shuttle with a hook (or pick) is preferable for fluid movement. 

I start with a backside ring and reverse work, so that the shuttle is in position, to the right of ball thread. 
Always keep the ball thread taut; all movements are with the shuttle and there is no transference.  
1.  Wrap the ball thread over your left hand as when working a chain. In this method, ball thread becomes the core thread over which we make the knot stitches.
Move shuttle to the left Over the ball thread. Let's call this loop a , 
2. ...and bring the shuttle back towards the right to create a second loop on the other side of ball thread.
Important : The black arrow tells you to keep both threads in your pinch (between left thumb and finger) through to figures 6 or 7.
3. This becomes loop b. Notice that the shuttle thread is still over the ball thread as well as above a
4. Bring shuttle over a, but under the ball thread, and hook b 
5. With a slight rotation of the shuttle, it is easy to pull b through. Let's call this loop c. Keep shuttle tip under c. Note that loop c is under the ball thread and is pulled over a.
6. Pull all of b into c. Keep pulling c outwards, while keeping your pinch where the black arrow is. Notice how the shuttle has moved and rotated smoothly.
7. As c is being pulled out, you can simultaneously tug on the thread indicated by the crochet hook. This will shorten a. When c is large enough, pass shuttle through the loop. Then loosen your pinch on the left.
8. The shuttle has fully passed through c, and keep tugging to close a
I actually use my right hand (with shuttle still in hand) to pinch the indicated thread to ensure all slack from a is removed ... 
9. Notice that a has disappeared and only c is left. Now keep pulling shuttle thread to close c.
Important : Close all of a before closing c.
10. All loops are closed and 1 knot stitch is complete.
11. 7 knot stitches made. We have successfully climbed out of the central ring with a chain.
12. After the 7ks chain, I continued with a normal 4-4-4 chain using double stitches.
Then leaving bare thread of same length as the previous ks chain, make a lock join on ring picot.
13. With ball thread in left hand as if making a chain, cover the bare thread with knot stitches.
14. Another ks chain is complete, followed by a regular chain.

Comparing knot stitch (ks) and split chain (SCh) -
I wanted to compare these ks chains with a split chain (the 3rd segment on the right). At a glance, there is not much difference. 
SCh looks exactly like a normal chain, with exactly the same thickness and curvature. The simulated double stitches are made using Dora Young's knotless method.
The ks chain is slightly bulkier or denser/compact and just that tiny bit straighter. The ks does not have 2 distinct half stitches - it is more like one loop is nestled within (see fig 10 above - notice where the shuttle thread is emerging from). This creates a lovely texture along the edge which might be slightly more evident in lighter shades. 
Knot Stitch can do everything a Split Chain can - climbing out for continuous tatting; bridging between elements in any direction.  
It would be interesting to use ks as a design element, with perhaps a bit more slack on to look like picots. What about curlicues (single shuttle split chains), floating chains, and filet tatting? Playing with colours? See more links for variations here - https://tipsaroundthehome.blogspot.com/2021/01/old-in-new.html

Rose Motif from Priscilla Book 3. As in my first attempt here, I made graduated picots along the outer chains, but kept to the original pattern in all other respects. I started with a backside (RODS) central ring, reversed work and continued to next round. Both rounds are worked from the front in clockwise direction. The ks chains have thrown/floating rings; so remember to reverse work before and after each ring.
In Anchor pearl cotton size 8, the motif measures 3.5cms after 1st round and 5.5cms final. Worked with one shuttle and ball, ctm.

The one below is from Anita Barry. I roped her in and she readily agreed to refresh her memory. Her first one was years back. 


I hadn't noticed till she pointed out that all her ks chains do not face the same way. There is a tendency for the ks chains to twist a bit especially if the joining picot is long. But her picots were very small, as directed in the original instructions and seen in the 2 WIP pics. Hmmm. Any ideas?

Many thanks to all tatters who have shared across time 
so that we continue to have options and ideas!