Showing posts with label overlapping chains. Show all posts

Friday, 6 June 2025

bridge tatting

Pin It now!

 Like I said in my recent posts, expert and experienced tatters have graciously come to my aid whenever I asked for it. And some have gone a step further by sharing their work and/or discussing techniques and terminology even before I asked.  One such is Judith Connors who has been instrumental in guiding and inspiring me through this past decade. My presentations have been influenced by her despite not being a perfect student.

Early last month, Judith sent me her article on 'Building Bridges' along with a pic of her Fan motif (If you are a member, you can see her model in the Queensland Tatters 2025 group post here - https://craftree.com/forum/threadfs/40423?page=1#258577). We had discussed bridging some years back, too. I was in a state of tatting inertia when this motif instantly spurred me to wind my shuttles and tat since this decorative/functional bridge had been on my trial list since 2019 (https://craftree.com/forum/threads/39159), but never got down to actually applying it. I did do the Rose Motif from Priscilla Tatting Book No.3!   

Bridging Flower Motif - based and adapted from Judith Connors' Fan motif
sharing my process, pattern, and tips/tricks

How many rounds does this motif have? 
Do we cut after the inner 'rosette' round?
Were Celtic shuttles or needle used for the Celtic effect?
Or were 4 shuttles used for the interlaced/overlapping chains? 

Getting back to the present motif, it occurred to me that I could use the element to create overlapping or interlaced chains instead of single lines! So off went my shuttles to confirm. 

Now this post is only about the adapted motif - process, pattern, and tips/tricks. I have pics for a pictorial, along with the background and explanation, terminology and history. Part of it is already explained in the link above (https://tipsaroundthehome.blogspot.com/2022/01/bridging-gaps.html). The rest will be shared in a few days to avoid stepping on Judith's class despite her permission. For the curious, we know the technique as split chain, which is a misnomer and limiting, meant mainly for climbing out.  

My first attempt. I ran out of thread and also realised that if I continued around there would be cupping (I had increased the count in some parts). Moreover the thread had a tendency to unravel, even though it is Anchor mercerised cotton. Cut my losses and started over.

Design Tip starting with a magic circle: Since I wasn't sure how big the central ring should be, I preferred to use the  magic circle (the multiple threads are to make the picot large enough to join to later). Wrap the thread around the magic circle and start the first inner chain. End each chain with a lock join around the circle. 
TIP to keep last half-stitch flipped: The marker on the right - since each bridge is a long chain, by the time it was completed, the last half-stitch often unflipped and locked the core thread below. This temporary marker on the core thread prevents it from happening. 
After a few repeats, I pulled on the magic circle to see whether it was working well. Successful; no cupping or ruffling.

Bridging Flower Motif pattern
  1. Only 2 shuttles are used with continuous thread and the entire motif is worked in one pass. 
  2. 8 repeats and all chains in this prototype. No space for a central ring. In Anchor mercerised crochet cotton size 20 (equivalent to Lizbeth size 10), the motif measures 6.5cms in diameter.
  3. In the image above, I have split the sequencing (A to F) to indicate where there is a change of direction , shuttles, or element. 
  4. The entire motif is worked clockwise from the front.
  5. Chains C & E are bridging chains aka bridge, bar. 
  6. I used a 2cms folded picot gauge to measure the bare thread for bar/bridge before lock joining it to a picot on the previous element.  TIP:  I found that making a lock join by pulling the loop down instead of up through the picot makes a neater start to the bridge.
  7. These bars are covered with Dora Young's Knotless Method or tied stitches worked from left to right. I worked them all from the front, though there are several variations of the method. 
  8. NOTE: The arrows for bridges indicate where the thread from shuttle2 goes, not the direction of working the stitches. 
  9.  While making each subsequent bridge, keep it in FRONT of the previous chain so that the overlapping is synchronised.  
10. For the bridges on the last rosette chain, TWO each had to be made! The above image shows the first pair done and the 2nd pair is being bridged.
After working the first bridge exactly like ch-C, then one more bridge is made joining to the first rosette on the right, at the base of the very first bridge. The stitches are then worked using the Australian method. This, too, is worked from the front, but in the opposite direction (right to left). Repeat this for the 2nd pair of bridges. 
Important: To maintain overlap, pass the shuttle under and over the last bridge both times.

11. After the motif is finished, and both threads are in the center, I threaded them together and inserted the needle through the picots held open with the magic circle, and kept removing the threads from the circle. Final tie, cut, and hide ends.
Option: One can use metallic thread or colour-coordinated thread for the magic circle and leave it be after tightening the slip knot. Then hide all ends - from the motif as well as the circle.

 
Possible Variation: However one can use a central ring of 10 small picots separated by 1ds and make a 10-repeat motif. 
Future Idea: Can we use this bridging technique to work block tatting over or across an element?

I will try to write the pattern in a more lucid form when I share the pictorials and other details. Here I wanted to focus more on the process.

Technique Option: Also, instead of the bridges going from right to left, we can move forward. Thus from chain A we can work the 'bridge'  like a floating chain or single shuttle split chain, leaving a picot open with a paperclip to join to later. 

Bridge tatting or bridging encompasses a lot more, not all of which is outlined here. In this post and motif, the bridges are ornamental - a design element; they can be functional too. Hopefully I will be able to cover it all in the pictorials post. 

I cannot thank Judith enough for her valuable mentorship and guidance since we 'met' at InTatters a decade ago! We may not always agree but the discussions are always lively and passionate!

Saturday, 11 February 2023

truant heart

Pin It now! The truancy continues, well at least on some days. On other days I am simply vegetating hoping to rouse myself. 

This time it is with two heart patterns shared by our clever and prolific designers - Ninetta Caruso and Daniela Galli.


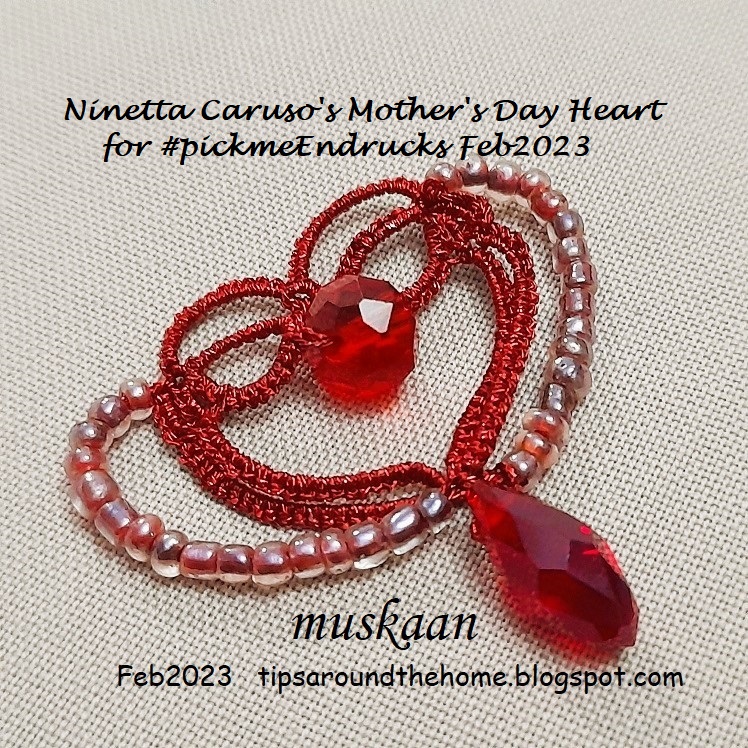
Mother's Day Heart by Ninetta Caruso - 
This is a derivative from Endrucks' pattern #5. I worked it in Sanbest metallic.

Instead of the beaded strings, Ninetta left bare thread on both sides - a nice effect! In a conservative mood, I strung beads on the thread after all the tatting was completed.

Can't say I am too comfortable working with metallics ... for one thing, the front and back side are not clearly distinguishable.
Just one more pic, LOL.
The pattern which was first included in the main pdf for pattern #5, is now shared as a separate pdf and is one of the patterns in our #pickmeEndrucks Feb2023 event in our Endrucks 1920 Project FB group.

Albero dell'amore (Tree of Love) by Daniela Galli - 
This heart shape is so biologically correct, isn't it?! 
There were large colourful beads added to the rings, and I was going to sew them in, too. But ....
 
I love the overlapping Victorian set chains. I worked this 2-round deign in one pass by starting at the left and climbing out with a split ring so that I could continue around with a 3rd round ...

Not willing to distract from the effect, I avoided the large beads. 
Instead, I added another round of chains to the top half, with seed beads ....

And this is what came of it - the biological shape ensconced in a stylized iconic heart shape.

Worked in Anchor size 20 (equivalent to Lizbeth size 10), it turned out kinda large.
This pattern was shared by Daniela Galli in an event in their Chiacchierino: Filo, Amore e Fantasia FB group.

I thoroughly enjoyed working on both hearts, and hope the designers don't mind my tweaks. And both hearts are quick tats, beads notwithstanding!

💗Grazie mille per questi meravigliosi schemi, Daniela and Ninetta 💗

Thursday, 11 March 2021

blistering barnacles

Pin It now!

 I started with gusto, especially after seeing the fabulous versions being posted in the Italian facebook group - Chiacchierino: Filo, Amore e Fantasia. Through the ups and downs, I ended up with a slightly modified version.

La Presentosa designed and shared by the prolific and hugely talented Paola Bevilacqua. And her handwriting is so beautiful!

The above was actually my 2nd start, since I had to unravel the first (I will share a quick tip about that in another post) where the teardrop proved too big. Although I noticed that the Josephine Ring and surrounding beads are a bit large for the blue arch space, I persevered, but ended up with a knotted ring that refused to come undone. Scrapped and restarted.
The central heart is a mock dimpled ring (lock joined at base). The crystal and beaded ring use Floating Beads method. While the crystal is loose, the silver beads were pre-strung. 
Continued with white as core, but added blue thread on chain.
And this time the JR is substituted with picot ring.
I crystal flanked by a silver bead is loaded on blue thread above the picoted ring. 
Round 1 complete. I finished off with 3 silver beads on either side of teardrop crystal which was attached with FB method. 
I'm very happy with this, though not impeccable.
Started round 2 at a different picot from the instructions so that I could hide ends in 'new' elements.
Billions of bilious blue blistering barnacles !!!
I joined the final teal arch incorrectly. AND this was despite the fact that I kept tugging and pulling before joining wondering why it was being so difficult! Instead of the southernmost tip, the penultimate arch should've gone over to the other side where that empty picot lies. I honestly debated long and hard whether to leave it be since I saw this only when I was blocking it. But Mr Meticulous moved in this time, sigh!

Snipped and unraveled and added new thread. But I still had to add an extra teal arch because of which it looks a bit cramped. If I hadn't, the teardrop and beads would get hidden.

When tatting round 2 I had to unwind from shuttle to weave for overlapping arches. Used only 1 shuttle throughout. The blue and teal were scrap lengths. Seed beads were strung. 

Anchor Pearl cotton (size 8) is my best choice for colour & shade range and for stringing tiny beads. However, not so good for tiny rings, Josephines, etc. with the fibres and loose twist causing friction. Which is why I switched to picot flowers instead of the JR.
Working with Lizbeth for the snowflake (in previous post), brought out the comfort, ease and joy when tatting with Lizbeth. But I have to ration myself ;-P

My apologies to Paola. Despite all the time and fiddling demanded by beads, I enjoyed tatting it and am happy with it. Only wish I'd done a better job with this medallion.

Many many thanks, Paola, for creating and sharing this pattern and the inspiration you provide. 

All tutorial links can be found here - https://tipsaroundthehome.blogspot.com/p/tatting-resources.html

Monday, 30 April 2018

I’ve got you covered!

Pin It now!
And just in time, phew!!! What an exciting range of projects to start off this month’s task of covering a cabone ring. I want to make each and every one of them someday. It was Renata’s turn to choose this time – Summer in Circle.
This is my April submission for 'I Love Tatting'

Royal Wave Bangle
 with free pattern directions

I didn’t have any hollow ring except for my loads of now neglected bangles which are unfortunately all circular. And I wasn’t confident with a glass bangle, so went with this metallic one despite the golden knobs projecting along the circumference. They made covering it more difficult and despite my diligence, the green peeps out at places.

Turns out I’d forgotten and had to consult tutorials on cabone tatting. This was a good refresher after my first bangle
But this time I wanted to use 2 colours alternately as a personal challenge. I chose thread colours to complement the lovely beads Usha sent me. These are vintage threads and closer to a size 50 or finer than the Anchor size 40 they claim to be ;-P

TIP : The thread not in use is encapsulated/hidden within the visible colour. The trick is simple. Keep the ‘not-in-use’ shuttle dangling and encapsulation becomes easy. The thread tends to stay alongside the bangle. Merely ensure that you pull the thread taut before switching colours.

I used scraps of the purple thread and had to join new thread at least 3 times, using a simple weaver’s knot and then encapsulating all tails within the next few stitches. This tiny knot is not visible.

Basic Pattern is simple and can be adjusted to any bangle size. I didn't have any specific pattern in mind - just let my shuttles take the lead.

Round 1 - covering the bangle (cabone tatting)
ROUND 1 : 2 shuttles each with different colour
2 vsp 4 vsp 2, switch colour and repeat, till end.
Carry the previous colour along the bangle, encapsulated within the stitches.
I ended up with 18 repeats of each colour.

Round 2A - Rollicking Waves - overlapping/interlaced chains 
ROUND 2ARollicking Waves
Next I strung beads to the 2 balls and joined these to the 2 shuttles to continue the next round. This round is all chains with beads on picots. Chains are interlaced/overlapping, so before making a lock join, ensure the threads are in the right position.
Chain1 : 2 B 2 B 2 B 2 B 2 B 2. switch shuttle.
Start next chain behind.
Chain2 : 2 B 2 B 2 B 2 B 2 B 2. SS
Lock join Chain1 to nearest picot, and Chain2 to next picot, ensuring the under/over overlap.
Repeat to end.
Round 2B - Frolicking Waves- undulating, overlapping chains 
ROUND 2BFrolicking Waves
I tried something different ¾th of the way around to change the shape of the 'waves'. Made the chains longer and twirled them around the bangle, joining to a picot above. The overlap continued as before.
There are between 6-8 beads in each chain before joining. And both shuttle & ball need to be passed through the bangle.

Finished off with 2 strings of beads and a teardrop at the end.

Hubby was rolling his eyes when I was choosing a bangle, wondering what I’m going to do with them after so many years - I stopped wearing them ages ago but still have a huge stash. Gradually, as the tatting started taking shape (including the simple covering without beads), he was all excited and ideated… how I could make earrings, and so on. Yeah, he’s finally ‘getting’ tatting – I’ve got him covered ;-P

I can’t thank Usha enough for her lovely seed beads. They are a delight to work with!

Do check out the beautiful projects (and tutorial links) lined up for
Thank you Renata, for another inspiring challenge :-)


tatting brings in joyful waves of creativity and togetherness