Showing posts with label test tat. Show all posts

Sunday, 10 December 2023

about Helix Tatting and more

Pin It now!

In late October, while working on the Dictionary part of ‘The Six Ts of Shuttle Tatting’, Anita introduced me to the term Helix Tatting and the developer of the technique, Richard Embrey. We worked on a definition or description to include in the dictionary and I also tried my hand at a quick trial to get a feel for it.
My very first trial (with mistakes) without shuttles

While I don’t want to reveal the definition, I will certainly do a sort of comparison to put things in perspective. Richard came up with this technique in 2019 while trying to make an I-cord in tatting when he couldn’t find a tatted equivalent. It started out as a tatted tube or cord but has since evolved and diversified into many more shapes, including a coronation cord and a fish! As always, it is our imagination that gets us soaring into new skies.

UPDATEhttps://tipsaroundthehome.blogspot.com/2024/01/helix-tatting-pictorials.html  -- Includes PDF OF HELIX TATTING Pictorials 

Let me list down the major characteristics of Helix tatting (HT) as well as include links to visually similar techniques. Please note that a lot of these are my own thoughts and notes. Feel free to critique or suggest.

1. It is basically a 3D hollow cord or structure, made solely of chains, using multiple shuttles (4 or more). The outward appearance is like a spiral, especially visible when different colours are used.

2. Each shuttle alternately and sequentially acts as an active shuttle to become the core thread, and then  as a ball thread to form the stitches.

3. It is NOT bauble tatting, though it can be considered to be a variation. No separate ‘ribs’ are added for a scaffolding. Instead, each shuttle, in turn, acts as a core thread and provides the necessary stability to the structure. It also 'locks in' the previous segment when shuttles are switched.

4. It is NOT a continuous spiraling chain since short segments are made with a sequential change of shuttles. Each segment can consist of merely 1 stitch or as many stitches as one desires to create a broader shape. Two or more stitches give a more distinctive spiraling of the colours. The spiral is directional and there are ways to determine beforehand which direction one wants the spiral to run.

For instance this 3D Pond Reed prototype I had made back in 2014 using 2 shuttles– it is a continuous chain spiraling around itself, where I used the slope and roll joins to hold the shape. Clearly it is very different from HT.

5. It is NOT block tatting, though chain segments are apparently ‘stacked’ over each other. No lock joins are used. However the outward appearance can be confused with tatted ropes, with or without beads. Ninetta has done a wonderful study of various ways in which these 3D tatted ropes can be made, with links to respective tutorials. A couple of them even create a spiral effect! https://ninettacaruso.blogspot.com/search/label/stacking

6. HT is not limited to merely spiraling chains. With so many shuttles in play, it is easy to throw off rings and chains, use beads, add picots, and so on. Versatile.

7. There is another tatted tube example where we use stacked or layered split rings. No chains involved, only rings. And if the picots are shortened, the stacking will be that much closer. Clearly this is not HT in any sense of the term, except that it is also a form of continuous tatting for a 3D hollow tube.

tatted beaded rope made with stacked or layered split rings https://tipsaroundthehome.blogspot.com/2019/10/tat-beaded-rope.html

See Ninetta's version of a spiraling tatted rope made with interlocking rings - https://ninettacaruso.blogspot.com/2020/08/gold-rope-chain.html 

8. BUT, there is something that definitely follows the same principle and concept as HT, and also gives a directional spiral! It is called Mac-Tatting (MT) and was first developed by Usha Kota in an attempt to imitate a crochet braid in tatting – it was a flat braid, worked too and fro. However, when I understood what HT was, it immediately crossed my mind that MT could be similar if worked continuously. And YES, it is the same, except that we work with unflipped or reverse stitches rather than flipped or double stitches! And you get a spiral, though the stitches face down while in progress. 

Helix tatting & Mac-tatting trials, together
In my first attempts, I found it easier to work the Mac-tatting version - I had a better control of the threads and there was no tension issue. Helix tatting is fine once you get into a rhythm, but it requires more finesse. And managing all those shuttles can of course be an issue.


A couple of weeks back, Richard was invited to TOTC as a guest teacher to demonstrate the Helix Tatting technique. You can watch the video here - https://youtube.com/live/DXO9Pm0fq1U
Bonnie Swank shared her notes on how to do HT with needles. Richard also shared a practice pattern called Watermelon Dreams, with the class. https://www.theonlinetattingclass.com/patterns
Creative members have already shared a couple of clever ways to organize their shuttles to avoid tangling. I simply laid them down spread-eagled, on my bed. I did find that it is better to leave a longish length of thread to avoid frequent winding/unwinding; and since it is only 1 or 2 stitches each, the long length is not a bother. 

I am test-tatting a pattern for Richard for his upcoming book. It is called Watermelon Dreams Beaded Helix Embellished Earrings
It took me a few hours to find and empty all my shuttles, glue the numbers (I did it on both sides, LOL), string beads and wind the shuttles. 
In progress.
I've completed Round 7. My version is a Caps In spiral where the double stitch faces inside the cord and tatting progresses in a clockwise circle. 

That’s it from me for now ….. Welcome your thoughts.

Many thanks to Richard, Anita, and all the creative minds mentioned above! 

Thursday, 23 November 2023

flaky antics

Pin It now!

 This time I have a snowflake pattern to share. It is a mix of the old with the new; partly derived and partly original; and I thoroughly enjoyed putting it together, though it got entangled in some flakiness midways. 

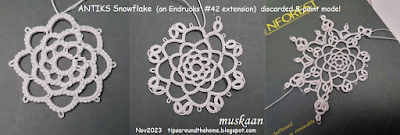
I call it the Antiks Snowflake which is a play on words and techniques; a combo of antique, ANKARS, and the antics involved in getting it just right! At the center is a 6-point adaptation of Endrucks' pattern #42 but the outermost round is all mine.

My first trial and prototype combined. Blogged about it here - https://tipsaroundthehome.blogspot.com/2023/03/antics.html. I was so out of practice with split chains! By this point in the final round, I had decided on which tweaks to keep and was happy that it would lay flat. Ran out of thread but it had done its job.  

After a couple of weeks I returned to tat a proper model along with the pattern presentation. Notice anything? Sigh, yes, there are 8 repeats as in the original Endrucks' pattern #42! I had kept wondering why the arms were so squished in and after wasting my precious Lizbeth white, I stopped. Foggy head leads to a flaky flake.

And since I had sent the same pattern to Anita Barry for test tatting, she too, worked an 8-point flake! She used this to decorate a purse and it looks gorgeous against a deep blue background. She displayed it at  the IOLI Convention this year.

I chose a different Lizbeth size 20 and went to work again, this time making sure the pattern was for 6 repeats. 

Tatted one more, this time in Olympus size 40 to consolidate the pattern and presentation.

And I didn't expect her to, but Anita actually tatted a second model with 6 arms in Lizbeth metallic! Now that's commitment.
Her help was also valuable in arranging the written pattern more systematically and clearly. 

I sent an article with this pattern to the IOLI Bulletin for their Summer issue. However, since they ran out of space, it was published in the fall issue above - IOLI Bulletin, Fall 2023 edition (Oct 2023, Vol 44, N.1).
It is a very nicely laid out presentation and Liz, the editor is always very diligent and helpful.

Their back cover carries a pic of the flake, too!

Interestingly, both Lizbeth 20 and Olympus 40 work out to the same size!

Now, now, don't go too far. Thought I'm flaky enough to forget sharing the pattern link?! Ah, see, the saga continues and I will share the link in my next post. 
... to be continued...

Many many thanks to Anita and Liz!  Excellent collaboration. 

Monday, 21 August 2023

sneak peek variation

Pin It now!

 This is my submission for our #TALme2Endrucks Aug2023 game of the month. It is a variation on Ninetta Caruso's Garland pattern derived from Endrucks' pattern #20. The pattern was shared in 3 parts during the 3 weeks, and a 4th part on some surprise variations will be shared in a couple of days. Here's a peek into part of what might be expected, ;-D

Most participants have already finished and shared their beautiful versions. So sharing my variation will not cause any confusion now.

It was meant to have 8 repeats and 5 rounds. I have 7 repeats and a 6th round of rosette motifs.
 
This interesting pattern is worked from the outermost round. It has onion rings with thrown rings.
Onion Ring with Thrown Ring. A few members seemed to find it difficult to understand. Hence I quickly prepared this pictorial using 2 colours to show which shuttle was in action. It is the same process as for the Happy Hands patterns from #1 (https://tipsaroundthehome.blogspot.com/2021/03/balancing-act.html). But each tutorial I referred to, was missing in one feature or other that was need for this particular pattern. Hence it was simpler to follow the steps of this pattern without the need for detailed written explanation.  

The 2nd round is worked on the inner edge of the previous round, made of block tatting 'flowers'. In my first repeats I am sure there are mistakes in the block (the very first one was snipped) - it needed mindful tatting.
I may not have gotten the shape of the flowers very nice, but the construction is very clever, as is to be expected of Ninetta.

The inner space is filled by working 3 rounds, this time in the 'proper' order - ie., from the inside out ;-D
The center rosette is worked and cut off. The thread for Round 4 is attached and worked around. 
The left one has 8 repeats, as per the pattern. This time I had counted and followed correctly, LOL.

Round 5 continues from the previous one without cutting and it is the round that connects to the outer rounds. It was only at the 'final' join that I realized there had been a miscount!!! Nothing to it but to bring out the scissors and snip snip snip.

Tatted Rounds 3,4, and 5 again, this time with 7 repeats, and joined successfully. However I did not wish to change the count which is why you see the slight curve in the linking chains. However I kind of like the organic feel of this imperfection.

TIP: To get a neat point in parallel chains or with chains that turn back, as in the middle round, I always count the lock join as one half of the double stitch. It leaves a much smaller footprint.

I had the pleasure of test-tatting and proof-reading this clever pattern back in June. Well I messed up with the repeats, but it gave us a variation that lay flat. So not much was lost.

For some reason the tinted green felt too overbearing. Hence I wanted to tone it down a bit. So after a long tatting break, I picked my shuttles for 2 nights in August for some 'mindless' tatting .....

This is what I came up with - repeated the inner flower motif around the edge. I measured the distance between the rings and the picots on the chains. It was a good fit!
Design TIP: I had initially tatted a 6-ring rosette. Surprisingly it did not look nice! So the 2nd one was made with 7 rings and these reflected the pattern well. So the first one was snipped off. 
 
I intended to fill in the space between the motifs with purple and white flowers connected with a plain green trellis. However, my tatting buddy Anita Barry, completely forbade it! She called it finished at this stage. To assuage my designing curiosity I might still try out one repeat, but not in the near future since I'm back in the no-tatting zone.

The model is worked in Anchor Pearl Cotton size 8 [green 0128; purple 00087; yellow 00291; white; tinted purple 5393. It measures around 12.5cms without and about 16cms with motifs.

I had a great time tatting it and apologize for the inadvertent error in counting. Must go back to a Maths refresher class! However yet again a mistake led to a slight variation - I should call it 'Mistake Designing', LOL.

Many many thanks to Ninetta for her beautiful pattern and all the work that went into it and into organising the game. 

Thursday, 27 January 2022

bridging gaps

Pin It now! I have some great news! Our Endrucks 1920 Project will be featured in the February issue of ‘Talking Tatting’ issue 50! Along with a short bio of Frau Endrucks and the doily #28 pattern (modernised version), all by Judith Connors. This is a quarterly newsletter of Queensland Tatters, Australia.

While this doily has already been tatted by several others, they referred to the diagram rather than the text. Hence it was left to Judith to point out a couple of errors, which are now corrected in an updated pdf.

Impeccable tatting from the inspiring teacher, researcher, and historian who was honoured with the Order of Australia Medal last year! And as you can see, she has managed to retain the octagonal shape of the doily after blocking.

We discovered that my tatting tension is way too tight! Worked in Coats No 40 cotton, Judith’s doily is 9cms in diameter to my 7cms in Anchor No 40 (which is also a Coats subsidiary).

My tension varied from yours in places. I managed the fluting, and when I blocked the mat it turned out to be quite octagonal.” – Judith

Alternate Path: “I worked it completely from the front side, not as you have suggested for Rounds 5 and 6. This means that the small rings of Round 5 were tatted in RODS (with a posting of the shuttle before closure).” – Judith

While enlarging the pic for posting, I noticed another thing about Round 5 in Judith’s doily. It appears the chains on either side of the ring are 8ds each instead of 5ds, creating a graceful arch instead of a flattish line.

Bridging/Mock Chain and Split Chain: Several ways to climb out of rounds for continuous tatting are indicated in this pattern pdf. However, Judith pointed out that what I termed split chain to climb out of round 4 is actually a bridging chain (b-Ch) and I should use this as a “teachable moment”. Got me thinking and this is how I see it:

The technique was invented by Dora Young for rings and then applied to chains – the knotless method (km or KM). Decades later, the term split chain caught on and became more popular. But the stitch and movements are the same in both – mock stitches or tied/manoeuvred stitches.

A Bridging or Mock Chain is functionally and structurally the same as a Split Chain. Each chain spans a space and emerges at a point to the left instead of the far right, and is made over a bridging or foundation thread. 

The difference lies in the Where the threads emerge/exit or where the point of climbing out is. A bridging chain is made completely of mock stitches and threads emerge at the ‘beginning’ of the chain. A split chain, as the name suggests, is split - partially made of double stitches and partially of mock stitches. Thus, the threads in this ‘hybrid’ chain exit somewhere along the length of the chain, not at the start.

Among the several beautiful versions of this doily tatted by enthusiastic lacers, I would like to show Stella Marina’s version in lovely metallic threads because it is yet another example of how we can alter our path. In a moment of distraction, Stella forgot to tat the 2 large twin thrown rings in Round 3. Instead of cutting back, she continued. She then tatted them as normal rings, facing inward, in Round 4! This happened by accident, but could easily have been a deliberate choice to make the rings red instead of silver. Planning ahead gives us so many bridges to cross smoothly!

Now I want to tat the doily again and bridge all my gaps!

Many many thanks to Judith and Stella - keep inspiring!

Related Posts/Resources –
For more tutorials and details scroll down to Techniques & Effects » CHAINS » Split Chain/Dora Young Knotless/Bridging https://tipsaroundthehome.blogspot.com/p/tatting-resources.html
Knotless Method in split SCMR - https://tipsaroundthehome.blogspot.com/2018/10/scrappy-doily-and-scmr.html
https://tipsaroundthehome.blogspot.com/2021/07/continuous-paths.html

Tuesday, 20 October 2020

multiples of 7

Pin It now!

 and a voracious scissor!

My journey leading to this destination - https://tipsaroundthehome.blogspot.com/search?q=swirling+butterflies  

Ta-daa! My variation of Ninetta Caruso's beautiful and multi-technique Swirling Butterflies doily, with due apologies. But let's continue from the last post where I had worked split round 10 to make all motifs similar, preferring to work the butterflies separately.

I've used numerous little tricks to keep my working smooth but those are mostly personal preferences, not compulsory.

ROUND 10 (part 2) - Cedronella, and 'Hugging' Butterflies variation.
Each of these 3 butterfly motifs has no tails to hide, since threads end at the head and tails are snipped into antennae. In each case, a short length was left at the start to finger-tat the final few stitches in the split ring head.
The profile butterflies are identical mirror images, one worked frontside, the other backside (optional).
To attach the side butterflies to green chains, I used the luggage tag loop at start and Dora Young Join, thus showing a complete stitch at both ends of the body.
TIP : For maximum overlap of wings, keep the joining picot in previous ring as small as possible.

Remember the lasagna I showed last time? Well, what does this look like, with the motifs turned under? I couldn't resist the sensation of autumnal forest floor.

ROUND 11 (a variation) with butterfly (Cedronella) and leaflet motifs
Oh, the heartache of having used that dark green! None of the lighter colours worked for the final round. Following are the 3 trials I did ....

Hubby gave me a lecture that the final round should be a dark shade, DUH (the all yellow was his choice)! But in 20/20 (or was 2020 at work?) hindsight, the flower motifs should have included cream, leaving me with the dark green or brown for round 11.

I was so disgusted by the end of this that, with the gracious permission from Ninetta, I worked on a different final round which was required in order to link the adjacent flowers. I visualized inserting cream leaf and flower motifs (from the earlier cream rounds) on the outer margins. 
But when Ninetta sent me her idea of placing the florets on the inner side, I loved it. And the free butterfly I had fit perfectly! So I made 7 of these between the 14 large flowers. I attached the wings directly to the green chains in a bid to decrease the darkness.
And then inspiration struck. What if I make an EPJ (Grace Tan's encapsulated picot join here). Even though there is no layering. The one on right neat, but the one on left shows the picot - my insertion was incorrect, but I didn't re-do.
Always options!
On the outside, I went with my original idea of leaflets linking adjacent flowers. This is similar to the ones on round 4, with an extrapair of rings. One shuttle. Attach thread with a luggage tag loop, tatting over tail. The 1st ring is joined to the next green chain. On the way back from the tip, 5th and 7th rings are joined to adjacent motif. I deliberately layered it slightly to hide some green.
Again 7 such motifs. And love the gentle swirl they create.
Going for minimal instead of inserting 14 motifs inside and outside.

UPDATE : For a continuous swirl, the leaflet motif can be worked between all 14 motifs.
But if one works 7 motifs in the opposite direction, they can appear like a laurel wreath over Motif A (the ones without butterflies) - like those on Roman Emperors!
It was fiddly to insert these motifs, though. And my scissors had a field day! There are still 2 butterflies I'd like to change, but it's a wrap. Hence if a tatter wishes to make this variation, it is advisable to do it simultaneously rather than at the end. 
After soaking to block, I remembered a snipped chain! Oh well, Mr Downplay decided to let it be! Can you spot the snip?
But in a moment of weakness, Mr Meticulous took over and I fixed it ;-P

The final doily just touches 14 inches across the widest part, worked in Anchor cotton size 40.

This is the colour palette. The black labels indicate the threads are about 15-20 years old - vintage. 
It was already late night and I 'threw' the doily on my dining table in order to keep it flat. And suddenly the swirls and butterflies came to life! Quickly took a couple of pics. Hubby is happy, too, and approves the choices ;-P

My sincerest thanks to Ninetta for choosing me to tat this wonderful doily. It kept me happily engaged (except for the last stages where it kept my scissors engorged ;-P) as a tatter and learner. Hope some of the learning rubs off in my future designs. 
Her pattern presentation (in Italian at present) is Stupendous! What an eye for detail - both in the text and and the schem
https://ninettacaruso.blogspot.com/2018/08/spiral-rings-with-treble-tatting.htmlatics. She also included detailed pictorials of elements and techniques used here (many of which are already shared in her blog). I just wish my colour placement had been a bit better. Oh well ...

Complete list of posts so far (chronologically) (click on blue link) : 
Ninetta

My posts (including the tat-along) -