Showing posts with label Dr Downplay. Show all posts

Wednesday, 29 April 2026

clover mat

Pin It now!

Question - Is there a specialised tatting term for a fabric made by repeatedly joining multiple tatted motifs? Or were they simply called doilies and mats, and the like? Tessellation and/or tiling are terms that could be applied but I'd like to know what this arrangement was called historically ....

This is a portion of Jon Yusoff's Clover Mat/Doily/Runner. This free pattern can be found here - https://tatsaway.blogspot.com/2008/11/clover-matdoilyrunner.html It is made up of 3 different motifs, attached in a regular pattern. It is a diagram-only presentation, which I prefer!
Worked in Anchor Pearl Cotton size 8 (equi to Lizbeth size 20).

Motif A worked in blue shade - 00131 
Made a few wrong joins between the trefoils in the beginning and even untatted back to rectify the error.
Future - I had decided to use two colours - one for rings and other for chains, but totally forgot when I wound my shuttle CTM with the ball. Hopefully somebody will give it a go since they would outline some nice shapes when joined.

You might notice that the picots are not perfect. Dr Downplay was dancing on my shoulder and urging me to just let go and have fun and that's what I did - no picot gauge - sheer unadulterated pleasure of the shuttle moving back and forth!

Didn't realise the amount of thread this was consuming, LOL. For fear of running out of this shade I switched to a lighter blue - 00130.

12 Motif A joined.

Next I chose to add Motif C because the outer unattached motifs made the piece floppy. Also, being a single shuttle motif, I took it to my doc's appointment where I could finish 5 motifs. 
The florets that are joined to 3 motifs should actually have been filled with Motif B. However this small motif not only fit the space perfectly; it also left me the option of enlarging the fabric at a later date by snipping them off.

Motif C is a much darker shade of blue - 00133
When working with multiple colours or shades in frontside/backside tatting, one has to be mindful of colour blips at the joins. This time I used Lark's Head Join (the 2nd method) throughout and it is truly quite easy and quick! It has become my go-to. Watch Karen Cabrera's Lesson #101.

Motif B fills in the negative spaces. After some deliberation I chose two shades of purple - dark 00106 and light in the center 00104.

The final mat measures 20.5 cms or 8 inches length and breadth. It is already in use!

Background Options -
Being of different values, it was very difficult for all shades to show up. The best was against this wooden board. I usually brighten the image and increase the contrast. Which is when I noticed the options in the top bar of Photos .... Is it a new AI option put in by Windows 11 or was I just blind all this time?! Anyways, here is what I did ....
Open pic in Photos and click on Edit.
Next click on the last icon. (The last two icons are AI features, I think)
This is the window that opens on the side with 3 options. I chose to remove the background, hence clicked on the center option. Then Save your image.
TIP - The image might save as .png which is heavier. Choose 'Save as' and select .jpg or the format of your choice from the drop down menu.
Before and After versions of the same pic. All colours and values are better visible against the white background.
 
NOTE - I used the other two options (blur and remove background) in a pic each of 2 other projects. While I haven't played with it much, I believe some distortion can occur especially in close-up pics. Hence use judiciously.

Many many thanks to Jon for sharing this lovely pattern and to Karen for her clear demo of the LHJ!

Thursday, 12 December 2024

fulgent and folly

Pin It now!

This month Ninetta has hosted the Bead Me Endrucks game in the Endrucks 1920 Project FB group. Simple and single rule - to choose any pattern from the original or derivatives and bling it with beads. Here's my fulgent attempt...

I extracted a motif from Endrucks' pattern #10 and worked it into a complete circle. Since I haven't decided what to use it for - so many possibilities - it's a medallion for now.

I used Wally Sosa's version (page 4) in the reworked pattern presentation by Ninetta Caruso here - https://drive.google.com/file/d/1YFBYqbgssthqDKYi8YkTX-fvAPmIYbm-/view. After taking the length of bugle bead into account, I doubled the stitch count in the rings. Since the bugle bead covers the chain length, there are only 2ds on the ringside and 1ds, p, 1ds, bead, 1ds, p, 1ds on the inner side. See TIP below.

Materials - This is a pic after I gathered all the supplies needed. I chose to go with a ball and shuttle instead of 2 shuttles. Red Heart metallic thread size 40; yellow seed beads size 16/0; red beads size 5/0; twist bugle beads #4. And beading needles and crochet hook #11. I selected beads from my stash, though I do need to buy more in different sizes.

As per my visualisation, I pre-strung the bugles on ball thread and the red and yellow beads on the shuttle. However, the shuttle beads didn't work out the way I had hoped. Hence all the beads were removed and re-strung differently. One yellow bead between a pair of bugles on the ball thread and alternating 1 red and 2 yellow beads on the shuttle.

This is how I ended up doing the effect I had in mind. On the ring, a long picot holding 14 yellows...
I loaded the beads using sewing thread and size 28 tapestry needle as seen in the background. 

Followed by 1ds, red, 1ds, join to the beaded picot, continue. This centered all the beads beautifully.

Can't say how much of the brilliance and shine the camera caught, but in real it is quite the shining medallion!

Folly - not one but many! If you look closely, most are easy to spot.

  • I should've used pure metallic thread instead of this single metallic strand twisted around perle cotton, size 40. Tons of trouble with the metallic strand breaking while closing the large ring even after I started working the stitches loose. Had to start afresh many times! Took the shortcut but tying a slip knot and tatting over both tails. The number of rings you see in the final medallion are only half the rings I tatted, LOL. 
  • Once I forgot to work the twin ring and had to cut off two repeats. 
  • Not making a lock stitch at the end of the bugle bead to avoid the core thread from being pulled too tight. Did it for the last few beads. 
TIP: If the bugle bead is not on the core thread, it may be a good idea to add an unflipped stitch at the end before continuing, so as to lock in the core thread and bead.

  • Noticed the difference in bugle bead size in one arm only in the pics, LOL, though I kept wondering why it wouldn't stay even. And not to mention the space between two rings where the thread got pulled while closing the ring and I didn't notice in time. Dr Downplay at work here, though lessons learned for future.

It measures a wee bit over 7cms across. 

Mr Meticulous is not happy at all, but Dr Downplay rules the day. What's your verdict?

Many thanks to Ninetta and Wally for their work on the main pattern and thanks for organising the game, Nin!

Saturday, 26 October 2024

done

Pin It now!

 Done for now, to be clear. And not because I've tired of it. Au contraire, it is just too enticing, distracting, and addictive. I want to simply sit and tat this, and ignore all other tasks, including a couple with deadlines. So, done for now, threads unwound from shuttles and back in their respective boxes. And my apologies to my tatting buddy Anita, for leaving it here. I do hope to pick it up again some time next year.

In Anchor Pearl cotton size 8, it measures about 7cms across.
This was completed several days back. It's taken me this long to take pics and prepare a post.

At this stage I am calling it my Sunflower version. Going forward, it might become a dahlia or chrysanthemum with more colours being added.
I followed Patty's diagram again, alternating the 2nd join between the inner scallops. Later realised that the original doily throughout had a single join between the inner scallops, not alternate. By then I had already completed 2 whole repeats (4 scallops each), hence went ahead as before. Not that it shows either way at least in my version. 

How does it Always happen?! The one slice I chose for the close-up is the one where I missed a join in round 1, LOL. I missed a join in round 2, too, and also a 2ds chain segment. However, it was easy to ignore the first and for the second, I inserted a fine hook through the 'hidden picot' (viz, through the stitch) for a join. Can't even locate where this all happened. Dr Downplay zindabad!
  
I wish there was more of the chrome yellow rather than the yellow ochre in this model, but I was going from a light to dark shade using whatever I had in my stash. And the brown could've been a a couple of shades lighter if only I had enough.

My intention is to use two shades of orange then two shades of red for the remaining four rounds. I could repeat the same yellows, but that would become kind of boring ;-P
What do you think of the colour scheme?

Oh and I had updated my previous post with the completed round 1, but here's the pic again in case you missed it - 

Many thanks to Jon Yusoff for hosting the TAL. Don't know when I'll be back to complete this.

This mini-doily or coaster is my October submission to splocik's Small Decorations game. Only two months left and I still have so many ideas/projects I could submit! It's been a fun game for sure and will definitely look forward to joining again if splocik hosts it in 2025.
Check out the range of creativity and crafts for September here -https://splocik2.blogspot.com/2024/10/male-dekoracje-2024-galeria-wrzesniowa.html

Friday, 12 July 2024

what the heart wants

Pin It now!

.... the heart follows! I hadn't planned on playing the game of this month - Pattern Me Endrucks (July2024) because I wanted to focus on other tasks and had told Ninetta. Yet the heart yearns and one gives in to that knotty call. 

E43 Pattern pdf https://drive.google.com/file/d/1JRu7OggaSna0eXDRA2P18dRu6uE4-1J7/view

Some entries have already come in and wow, each of the participants has seen a different aspect in this motif and followed that direction! Can you blame my heart for wanting to join them? I could see an orange segment, but you know my penchant for complicating my life. So, while not a very unique idea or shape, I decided to go for a 3D flower.

Mind you, this is a prototype with a few mistakes, lots of retro-tatting, and Dr. Downplay ruling. Hopefully the next petals will turn out better.

My goal was to deviate as less as possible from the original pattern. 

My Notes, TIPS, and Future Ideas 

Since I wanted to work with two colours, here's how I started without tying the threads together -

A] Started with false CTM, pulling out a short length (A). from the shuttle.
B] Attached a marker/luggage tag loop to the starter picot (B).
C] Using A as core thread, finger-tat the chain using thread (C) from shuttle for the stitches.
D] 2nd shuttle with thread in another colour was added at the end of the chain. The A thread is cut short and hidden in the next element (tat over tails).
For more False CTM scenariosPart 1 ; Part 2 .

  • The tatting proceeds from right to left, unlike the diagram. I think the reason could be that if one direct tats the chain (reverse stitches), it will proceed from right to left. This dawned on me when I noticed the inset diagram showing the start! The written instructions are for normal tatting.
  • As it turns out, on reaching the other end, I decided to keep the chain maroon, hence you can see the colour difference between left and right.
  • In order to position colours lots of Reverse Join (RJ) is used.
  • Midways I decided to use the Catherine Wheel Join (CWJ). However I was tatting the return chain backside. I have done the CWJ from the back before, several times, including my cheat trick of a half-stitch shift! However this time I watched Marilee Rockeley recent video CWJ from the back sidehttps://www.youtube.com/watch?v=EqxTqb8UMww

  • The outer row of chains is done with Victorian sets or zigzag tatting. Continued down.
  • The left chain was made first and is a bit longer than needed.
  • I decided to use the small motifs on the sides (in original pattern) to cover some of the negative space. Added a 3rd colour to make the twin rings and cut off the thread. I've deliberately left short tails instead of hiding them.
  • Then picking up the original shuttles I continued with the chains to complete the first petal.
The shuttles are still attached and I can easily continue with the next petal. I'm thinking a total of 3 petals should complete the flower. While I'm not too thrilled with my colour choices, Dr Downplay rules! 
I have deliberately created a 3D version for the petal. Otherwise the motif lies flat.
You can find tutorial links to the terms mentioned, here - https://tipsaroundthehome.blogspot.com/p/tatting-resources.html

FUTURE IDEAS

  • This same petal, with a bit of tweaking can become a peacock plume! 
  • Or joining 3, 4, or more motifs in the round to create a broad round for a doily. And then design inner and outer rounds to complete the doily. This, however, will be a big project for another year!
  • And of course, orange fruit carpels/segments!

Do you have any suggestions for improvement or any more ideas? Please share ....

More to come; hoping to finish tatting this today so that I can get back to the other stuff.

Many thanks to Maria Grazia and Ninetta Caruso for the reworked pattern, and to Marilee Rockeley for her demo.

Related Posts -

Friday, 9 July 2021

a pernickety question

Pin It now!

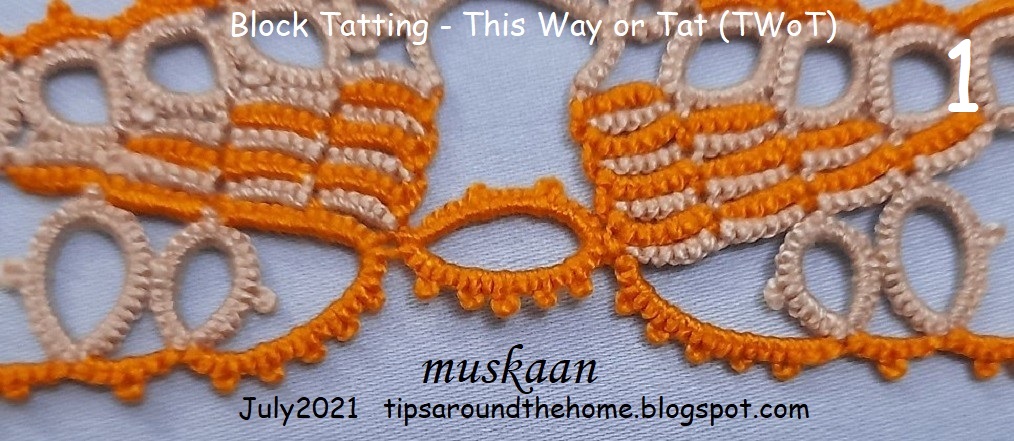
 When I focused on bilateral symmetry in this pattern, I forgot about the blocks (see 3rd pic below). Thus, while most rings on left and right halves face the same way, the chains in the left and right blocks are incongruous -- instead of being mirror images, they all face the same direction.

Block Tatting is made up of rows/tiers of chains. These rows/tiers can be worked one above the other, or one below the other.

1. Block tiers moving up ie. tatted ABOVE the previous, are simple to make, joining below with a lock join to the picot(s) on previous chain. Like the blocks in pic #1 below -

The block on the right is tatted the same way starting from the shortest chain on top, and moving 'above' to the next row/tier (though it looks upside down).
Now compare the left and right blocks with respect to 2 variables - the colour of each chain/block, and where the chains face. Not symmetrical, right?!

2. When the next tier is tatted BELOW the previous one, it means we need a picot on the core thread to which the new chain level can join. We need down/downward/inward facing/intruding picots! Of the many methods, holding the picot space with a paper clip is most common. This is how the right block was tatted ....

In above model, the left block is tatted 'normally' with chains stacked above. But for a mirror image, the block on the right is tatted with the next chain worked Below the previous one, with a regular picot join instead of lock join. The penultimate chain (beige) in the right block held 4 paper clips till each join was made! (sorry about the shoddy tatting)
Again, compare the 2 blocks in terms of colour placement and chain direction.
Mirror images!!! 
This is the way Pina Pinto has worked her sampler for the Endrucks Project - I will be sharing the pattern when it is diagrammed.

In the above model, all the blocks (in cream and in purple) face towards the right. (The cream rings along the 'belt' are not mirror images since I did not think ahead). Since the row moves from left to right, it is easier to tat in this manner.
Frau Endrucks tats all her blocks with the next chain above the previous one, although she states clearly in her tips that it is not necessary to have picots. Simply move the stitches a bit, clearing space to make the join.

Now here's my pernickety question - Would you be Mr Meticulous with perfect mirroring of blocks despite the invasion & interference of all those paper clips or would you rather be Dr Downplay, just going with the flow without bothering overly much about the left and right sides?
 
Which factors would influence your choice -  whether working with 1 or 2 colours; mood; time constraints; competition submission; etc. 

Please enlighten and entertain ....


And hopefully you will join the global lace community on International Lace Day (July 11th) ....choose your form of lace-making and celebrate the day. I have already registered (free, but only a few hours left, so hurry) with this ILD group on Facebook and intend to tat a new earring/pendant - the motif can actually be repeated to create a lovely edging! I am hoping it will work .... let's see. Off to load my shuttles. Maybe I can upload a diagram on or before 11th, in case you wish to tat and experiment with the same pattern? Stay tuned .....

Tuesday, 20 October 2020

multiples of 7

Pin It now!

 and a voracious scissor!

My journey leading to this destination - https://tipsaroundthehome.blogspot.com/search?q=swirling+butterflies  

Ta-daa! My variation of Ninetta Caruso's beautiful and multi-technique Swirling Butterflies doily, with due apologies. But let's continue from the last post where I had worked split round 10 to make all motifs similar, preferring to work the butterflies separately.

I've used numerous little tricks to keep my working smooth but those are mostly personal preferences, not compulsory.

ROUND 10 (part 2) - Cedronella, and 'Hugging' Butterflies variation.
Each of these 3 butterfly motifs has no tails to hide, since threads end at the head and tails are snipped into antennae. In each case, a short length was left at the start to finger-tat the final few stitches in the split ring head.
The profile butterflies are identical mirror images, one worked frontside, the other backside (optional).
To attach the side butterflies to green chains, I used the luggage tag loop at start and Dora Young Join, thus showing a complete stitch at both ends of the body.
TIP : For maximum overlap of wings, keep the joining picot in previous ring as small as possible.

Remember the lasagna I showed last time? Well, what does this look like, with the motifs turned under? I couldn't resist the sensation of autumnal forest floor.

ROUND 11 (a variation) with butterfly (Cedronella) and leaflet motifs
Oh, the heartache of having used that dark green! None of the lighter colours worked for the final round. Following are the 3 trials I did ....

Hubby gave me a lecture that the final round should be a dark shade, DUH (the all yellow was his choice)! But in 20/20 (or was 2020 at work?) hindsight, the flower motifs should have included cream, leaving me with the dark green or brown for round 11.

I was so disgusted by the end of this that, with the gracious permission from Ninetta, I worked on a different final round which was required in order to link the adjacent flowers. I visualized inserting cream leaf and flower motifs (from the earlier cream rounds) on the outer margins. 
But when Ninetta sent me her idea of placing the florets on the inner side, I loved it. And the free butterfly I had fit perfectly! So I made 7 of these between the 14 large flowers. I attached the wings directly to the green chains in a bid to decrease the darkness.
And then inspiration struck. What if I make an EPJ (Grace Tan's encapsulated picot join here). Even though there is no layering. The one on right neat, but the one on left shows the picot - my insertion was incorrect, but I didn't re-do.
Always options!
On the outside, I went with my original idea of leaflets linking adjacent flowers. This is similar to the ones on round 4, with an extrapair of rings. One shuttle. Attach thread with a luggage tag loop, tatting over tail. The 1st ring is joined to the next green chain. On the way back from the tip, 5th and 7th rings are joined to adjacent motif. I deliberately layered it slightly to hide some green.
Again 7 such motifs. And love the gentle swirl they create.
Going for minimal instead of inserting 14 motifs inside and outside.

UPDATE : For a continuous swirl, the leaflet motif can be worked between all 14 motifs.
But if one works 7 motifs in the opposite direction, they can appear like a laurel wreath over Motif A (the ones without butterflies) - like those on Roman Emperors!
It was fiddly to insert these motifs, though. And my scissors had a field day! There are still 2 butterflies I'd like to change, but it's a wrap. Hence if a tatter wishes to make this variation, it is advisable to do it simultaneously rather than at the end. 
After soaking to block, I remembered a snipped chain! Oh well, Mr Downplay decided to let it be! Can you spot the snip?
But in a moment of weakness, Mr Meticulous took over and I fixed it ;-P

The final doily just touches 14 inches across the widest part, worked in Anchor cotton size 40.

This is the colour palette. The black labels indicate the threads are about 15-20 years old - vintage. 
It was already late night and I 'threw' the doily on my dining table in order to keep it flat. And suddenly the swirls and butterflies came to life! Quickly took a couple of pics. Hubby is happy, too, and approves the choices ;-P

My sincerest thanks to Ninetta for choosing me to tat this wonderful doily. It kept me happily engaged (except for the last stages where it kept my scissors engorged ;-P) as a tatter and learner. Hope some of the learning rubs off in my future designs. 
Her pattern presentation (in Italian at present) is Stupendous! What an eye for detail - both in the text and and the schem
https://ninettacaruso.blogspot.com/2018/08/spiral-rings-with-treble-tatting.htmlatics. She also included detailed pictorials of elements and techniques used here (many of which are already shared in her blog). I just wish my colour placement had been a bit better. Oh well ...

Complete list of posts so far (chronologically) (click on blue link) : 
Ninetta

My posts (including the tat-along) -