Showing posts with label 3D flower idea. Show all posts

Monday, 15 July 2024

so many

Pin It now!

 Quite by chance I noticed that this is my 912th post since starting in Dec 2013. So many posts, hmmm, and yet not enough coz there are so many more that haven't yet seen this space. Hopefully in time. Today's post also shows the many potential forms the simple E43 petal from my last post can take. Many of these shapes were suggested by keen observers (listed at the end)! So many eyes :-)))

It is difficult to photograph a 3D model and I truly wish I could've done a better job or taken a video. Nevertheless, ... 

Please Note that in the right colours, with the right number of petals, and if and where the petals are joined, a range of flower impressions can be achieved, besides other shapes. Hence I am calling this a E43 3D Generic Flower. I still need to tat in the stem, pistil, sepals, etc. For pattern details - https://tipsaroundthehome.blogspot.com/2024/07/what-heart-wants.html . I will share the specific petal/flower pattern soon.

In the following, the join is made at the side of petal and at the base.

1. Three petals joined, curved inwards. In the right colours, it could be a spiderwort, a buttercup, a tulip (with unattached petals). And how about a butterfly (2 or 4 petal wings)?!
TIP: When joined, the petals (and flower) hold their shape though each one can be pushed in or out. If left unattached, stiffening or some wire would be needed to hold the petals in place.
2. Two petals facing each other. Could be a flower bud, pendant, fairy light bulbs, or even a strawberry!

3. Two petals could also become a clam shell, oyster with pearl, or a tulip bud. Perhaps even a little gift pouch.

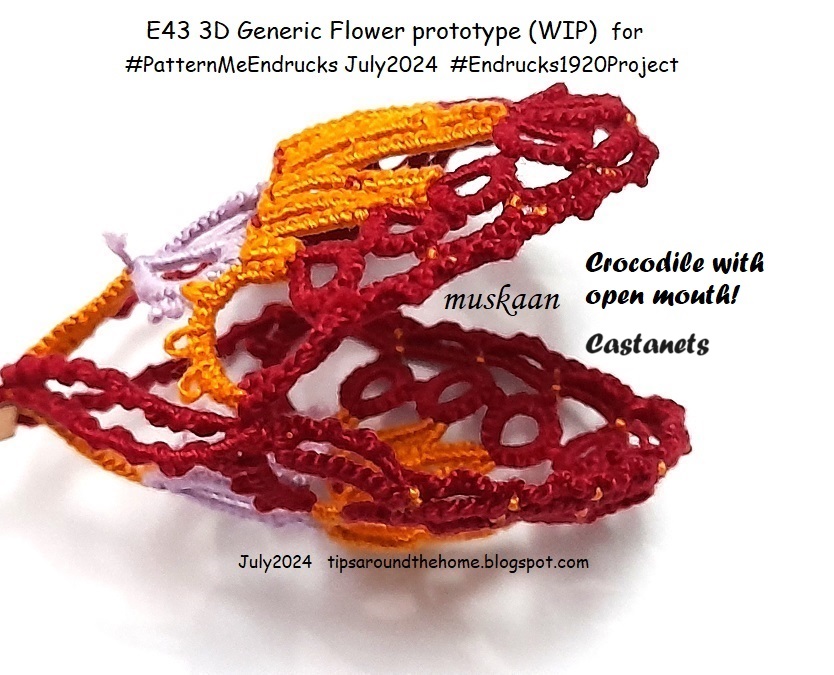
4. Two petals. Now this reminds me of an open-mouthed crocodile. Or castanets? Perhaps even a pair of oven mitts.

5. Two petals, another angle. These pics were taken at night when I was too lazy to get some pearls to insert inside. 

6. This is the 3rd petal. Now the entire flower with any number of petals and joined only at the sides and base, can be tatted in one pass, provided the outermost row is worked in one go at the very end. I had to tat this separately since there wasn't any forethought, LOL.

7. Single petal (#3) without the outermost additional trim around the rings. With beads and gems it would make a lovely pendant or earring.
TIP: For a more rounded tip, remove the middle ring of the trefoil.

8. Three petals joined. Don't you see a butterfly?

9. Three petals joined, facing inward. Same flower, but upended. Could be any number of decorative embellishment or jewellery. Perhaps even a candle decoration at the base.

10. Three petals joined and curved outwards. With the right number and colour of petals, and additional pistils, etc., this really would make a nice hibiscus or petunia.
 
11. And I have to share the lead pic again coz Anita saw this ... 
"This looks like a frightened lady. Can you see her? Her lavender eyes are wide open & picots look like eye lashes, and her orange mouth is open wide, with her orange hair standing straight up.
Or, an Alien. Hmmmm. What’s in my coffee today? Hahaha.
The lady in the petals.
Spell-bound flower, maybe?"

And what do You see? 
Giving credit to my friendly eyes ... what each one saw ...
  • Pendant - Maria Burgo & Vani Kattoju
  • Shell - Jane McLellan
  • Tulip - Ninetta Caruso, Anita Barry
  • Petunia, Hibiscus - Anita Barry
  • Open umbrella for a clown - Anita Barry
  • Spiderwort - Ninetta Caruso
Further, Ninetta has this to say -
"The E43 is like a festoon imho, you had a great idea to extract petals! This pattern has that last double chain over the rings, it "close" the drawing, something that is not present in the E14 even it is similar. So E43 makes a better petal than E14 (or E10)."

Related Posts -

 Thanks for all the friendly suggestions and nudges, ladies! There can never be too many!

Friday, 12 July 2024

what the heart wants

Pin It now!

.... the heart follows! I hadn't planned on playing the game of this month - Pattern Me Endrucks (July2024) because I wanted to focus on other tasks and had told Ninetta. Yet the heart yearns and one gives in to that knotty call. 

E43 Pattern pdf https://drive.google.com/file/d/1JRu7OggaSna0eXDRA2P18dRu6uE4-1J7/view

Some entries have already come in and wow, each of the participants has seen a different aspect in this motif and followed that direction! Can you blame my heart for wanting to join them? I could see an orange segment, but you know my penchant for complicating my life. So, while not a very unique idea or shape, I decided to go for a 3D flower.

Mind you, this is a prototype with a few mistakes, lots of retro-tatting, and Dr. Downplay ruling. Hopefully the next petals will turn out better.

My goal was to deviate as less as possible from the original pattern. 

My Notes, TIPS, and Future Ideas 

Since I wanted to work with two colours, here's how I started without tying the threads together -

A] Started with false CTM, pulling out a short length (A). from the shuttle.
B] Attached a marker/luggage tag loop to the starter picot (B).
C] Using A as core thread, finger-tat the chain using thread (C) from shuttle for the stitches.
D] 2nd shuttle with thread in another colour was added at the end of the chain. The A thread is cut short and hidden in the next element (tat over tails).
For more False CTM scenariosPart 1 ; Part 2 .

  • The tatting proceeds from right to left, unlike the diagram. I think the reason could be that if one direct tats the chain (reverse stitches), it will proceed from right to left. This dawned on me when I noticed the inset diagram showing the start! The written instructions are for normal tatting.
  • As it turns out, on reaching the other end, I decided to keep the chain maroon, hence you can see the colour difference between left and right.
  • In order to position colours lots of Reverse Join (RJ) is used.
  • Midways I decided to use the Catherine Wheel Join (CWJ). However I was tatting the return chain backside. I have done the CWJ from the back before, several times, including my cheat trick of a half-stitch shift! However this time I watched Marilee Rockeley recent video CWJ from the back sidehttps://www.youtube.com/watch?v=EqxTqb8UMww

  • The outer row of chains is done with Victorian sets or zigzag tatting. Continued down.
  • The left chain was made first and is a bit longer than needed.
  • I decided to use the small motifs on the sides (in original pattern) to cover some of the negative space. Added a 3rd colour to make the twin rings and cut off the thread. I've deliberately left short tails instead of hiding them.
  • Then picking up the original shuttles I continued with the chains to complete the first petal.
The shuttles are still attached and I can easily continue with the next petal. I'm thinking a total of 3 petals should complete the flower. While I'm not too thrilled with my colour choices, Dr Downplay rules! 
I have deliberately created a 3D version for the petal. Otherwise the motif lies flat.
You can find tutorial links to the terms mentioned, here - https://tipsaroundthehome.blogspot.com/p/tatting-resources.html

FUTURE IDEAS

  • This same petal, with a bit of tweaking can become a peacock plume! 
  • Or joining 3, 4, or more motifs in the round to create a broad round for a doily. And then design inner and outer rounds to complete the doily. This, however, will be a big project for another year!
  • And of course, orange fruit carpels/segments!

Do you have any suggestions for improvement or any more ideas? Please share ....

More to come; hoping to finish tatting this today so that I can get back to the other stuff.

Many thanks to Maria Grazia and Ninetta Caruso for the reworked pattern, and to Marilee Rockeley for her demo.

Related Posts -

Friday, 17 March 2023

flat to 3D

Pin It now!

 Over a month since I last blogged. After my last post I was on a roll, tackling so many presentations, reviews, etc., leaving me no time to blog or tat. A concerned email had me picking up my shuttles for a night of tatting. And suddenly life came to a standstill due to health issues. Oh what a tremendous roadblock! However, I am back now to the extent possible, though shuttles lie idle. 

This is part of what I did before my enforced break (I will show the 2nd motif I tatted later) -

Remember the 3D Buttercup idea I showed here - https://tipsaroundthehome.blogspot.com/2021/11/a-trip-to-beach.html. This time I converted it into reality.

This is pattern #39 from Eleonore Endrucks' book. It is the discarded trial piece. Along with one separate all-yellow motif, I curled the lace into a 3D flower ...

And also added pearls and beads in the center while sewing. There is 1 green seed bead between each pearl, and then a string of the same green beads encircling the pearls.

I like how it created a kind of wavy look. I also lifted the 'petals' for a more buttercup shape.

Another side-view to show 3D. I've left the green thread tails, intending to add some foliage when  possible.
This is one of the patterns shared for the #pickmeEndrucks February 2023 event in our Endrucks 1920 Project FB Group.

Our pattern (and idea) collection is burgeoning at such a fast pace that it is difficult to keep track. Hence we have started creating categorised Directories where derivatives will be showcased. The main EP doc will finally become a collection of mainly the reworked 44 original patterns. 7 such directories are complete. More about this in future.

Hope to catch up on some blogs soon ....

Saturday, 2 May 2020

double trouble motif

Pin It now!
So, here’s what I did with the treble arches (from previous post) to showcase their gracefulness! And despite the title of this post, I found it very relaxing and enjoyable ;-D Perhaps you would like to give it a go as a practice piece?

I started with the same first round rosette as in the snowflake since I wanted to check on something. It can be made smaller, of course, and the next rounds adjusted accordingly.

Treble  Arches  Flower  Motif pattern
muskaan © May 2020
Abbreviations : ctm = continuous thread method ; SCMR = self-closing mock ring ; 
rw = reverse work ; tds = treble tat stitch

NOTATION for Graduated or Variable Treble Tat Stitch (tds)  :
The original tds is made by pulling 2 loops consecutively for 1st part, and 3 rolls/wraps in 2nd part. In order to create a relatively smooth gradient, both halves of the tds have been tweaked. A notation that can convey this clearly was needed. I find the following notation (similar to the pds) easiest to indicate the range of variability.
Following the above logic, a normal tds would be notated as tds(2,3) where 2 loops are pulled and 3 wraps/rolls are made. However, tds is retained in instructions. 

The following tds variations have been used in this pattern :
tds(1,2) = 1 loop pulled, 2 wraps/rolls made.
tds(3,4) = 3 loops pulled, 4 wraps/rolls made.
tds(4,5) = 4 loops pulled, 5 wraps/rolls made.
tds(5,7) = 5 loops pulled, 7 wraps/rolls made.

A single tds is tatted each time, hence, no number is indicated on the left in this pattern.

All rounds are tatted using a single shuttle and ball, without cutting the thread between them (ctm). Shuttles require only short lengths.

Round 1 : Red ball and shuttle, ctm
SCMR: 4 ± 4 ± 8 – 8 – 4 – 4. close. rw
Chain: 1
Repeat this 5 more times, joining to previous ring and last ring to first ring.
I direct-tatted the chain using reverse stitch. See details here.

Round 2 : yellow ball and shuttle, ctm
Note: Each arch starts and ends with 2 double stitches.
Attach thread to 2nd picot on Round1.
Chain: 2, tds(1,2), tds, tds(3,4), tds(4,5), tds(5,7), tds(4,5), tds(3,4), tds, tds(1,2), 2, lock join. Repeat 5 more times.
One can stop after this round.

Round 3 : mustard yellow ball and shuttle, ctm
Attach thread to free picot on Round1, from the back.
Repeat Round 2 all around.

Possible variations
  • Overlap the arches of 3rd round with previous round.
  • Add more rounds/layers.
  • Instead of blocking flat, keep the petals raised in 3D effect – in the right colours one could make a water lily or lotus surrounded by leaves!
  • Add beads and findings to convert into earrings or pendant.
Measurements when worked in Anchor size 20 - 
Round 1: <4cms (with picot)
Round 2: >5cms. (3 cms as a hexagon side)
Round 3: 5½ cms (3½ cms as a hexagon side)

So what do you think? Are the instructions and notations clear? If you can suggest an alternate or better notation, please do share. 

happy tatting :-)


Tuesday, 5 March 2019

a Celtic flip

Pin It now!
Remember how I wondered about a Celtic variation here? This is how I went ahead to complete a Celtic variation of Ninetta’s Curled Ring ice drop.

Notice there are no curled rings here, but the beaded rings are raised. I was hoping for more of a water lily effect.  

The pattern for 2 motifs/medallions remains the same as Ninetta's original (I have inked the count in the pic above for easy reference).
BUT, I flipped the cabochon, switching the motifs in the process : the lower one is now in the front/on top, and vice versa.

I didn’t tat a new one, simply added to what was already tatted. One can call this a prototype variation if you will,  with scope for improvement. 

For outermost green round, after the first lock join to previous round, I continued with the Slope and Roll join. It looked better.
There was a very geometric and open shape after completing the green, hence I added more silver rings in the empty spaces to look more like petals. If properly planned, a full round of 16 silver petals would give it more of a lotus/water lily effect. 

as seen from the back
I still don’t understand why the outline is more square than circular despite all chains being 7-7 ! Anybody?

In Gautam (green size 8) and Red Rose (size 20) metallic threads, the motif/pendant measures 4½ cms across and 5½ cms diagonally. The cab is 2cms.

Friday, 31 March 2017

fresh fragrance of jasmines

Pin It now!
second of the 3 spring garland patterns ...
(the 1st can be found here)
UPDATES (April 2017) : part 3 shared here  ;  compete spring garland shared here ; and
Jasmine braid diagrammed pattern pdf

Spring Garland 2 –
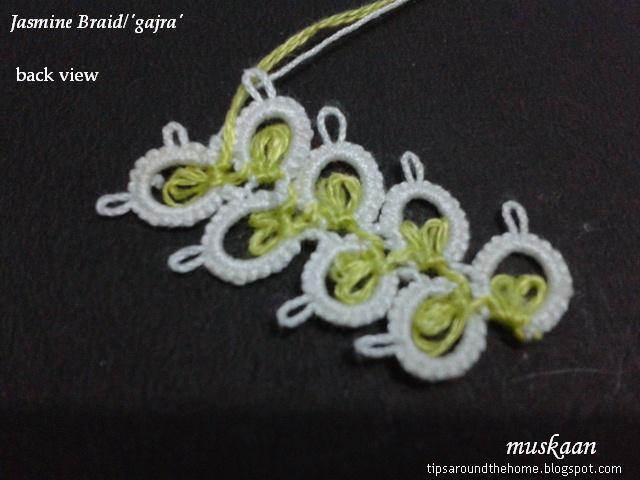
Jasmine Braid/‘Gajra’

Many Indian women love to wear a string of fragrant flowers in their hair. The most common and refreshing ‘gajra’ is made with white mogra buds or jasmines.
This tatted version is a split ring braid where each ring is folded inwards at the base to represent sepals.
The braid tats up straight, but can turn corners with minor adjustments (this will be shared in a later post).

Size 50 Anchor white. For the calyx, I used 2 strands of Anchor embroidery thread. Besides the right shade, the 2 strands also give a fuller look.

Materials : 2 shuttles; white in shuttle 1 & sap green in shuttle 2
Techniques : Folded split ring, long picots, very small picot, lock join, turn work
Measurement : ½ inch wide in size 50 thread
Abbreviations :
SR
split ring

p
picot

LJ
lock join
ushs
unflipped 2nd half stitch

vsp
very small picot

+
picot join
TW
turn work

fs/bs tatting for even rings optional

Important Notes :

1.  When working the next ring, do not start the shuttle 2 stitch very close to base. Leave some bare thread space allowing the segment to fold inward.

2.  Post shuttle 2 from front to back, through the ring, before closing it. It defines the fold and brings shuttle in position.

3.  Keep the green thread at the back/wrong side of the braid throughout.


Basic Pattern :

Join both threads and start with shuttle 1 :
SR1: 10 p 6 vsp 2 / 2ushs (p,1)twice . TW
SR2: 10 p 6 vsp 2 / 2ushs (p,1)twice . TW LJ to vsp of previous ring

Repeat SR2 for desired length, following all instructions.

Optional :

fs/bs tatting: I tatted the even-numbered rings using reverse order of stitches (RODS or backside tatting) only for the white segment. The green segment was tatted same throughout. And I posted both shuttles through the ring before closing it.

Blocking : While the braid lies flat, I did block it in order to pull the rings into a longish shape.


Pictorial :

Starting the first split ring .
In order for the green segment to fold easily, leave some slack at beginning, and ....

... post shuttle 2 through the ring before closing it. If required, turn the green picots inwards with fingers before closing ring.
1st jasmine bud made. Turn work as in turning the pages of a book (see next pic)
Related post : about folded rings


TW. Start 2nd split ring. Before starting the green segment, leave bare thread space. Post shuttle. Close, lock or shuttle join to previous ring and turn work again.

3rd split ring made and lock join being made. Ensure that the green thread stays at back of work.

TW, and repeat ....
Odd numbered rings (along left of braid) are worked from front. Above pic shows a close-up of the braid from front.
Even numbered rings (along right of braid) are worked from the back. As mentioned above, these rings can be worked with backside tatting. Always remember to post shuttle.
This backside close-up shows the zig-zag of green bare thread between rings.

UPDATE (Apr 10): There was some confusion about the direction in which 3rd ring was formed, and a suggestion to add a diagram or arrows showing direction. In response, I have diagrammed the pattern, along with main instructions. This one-page pdf is a complete pattern.

Yet again, this is a basic braid pattern and playing with beads, colours, and sizes, can broaden the scope & effect.
Ideas for 3D
One idea is to add a very short Josephine/spiral chain between rings and twist the ‘buds’ around. 
Another idea is to use 3D Josephine rings for buds as used here, and maybe a curled ring for calyx. I would love to give this a go sometime!


Wishing everyone a fun-filled, fragrant, fabulous

International Tatting Day 2017 (April 1)

This pattern was shared with the Online Tatting Class on April 3, 2017