Showing posts with label 3 shuttle tatting. Show all posts

Sunday, 8 September 2024

pleasure and pondering

Pin It now!

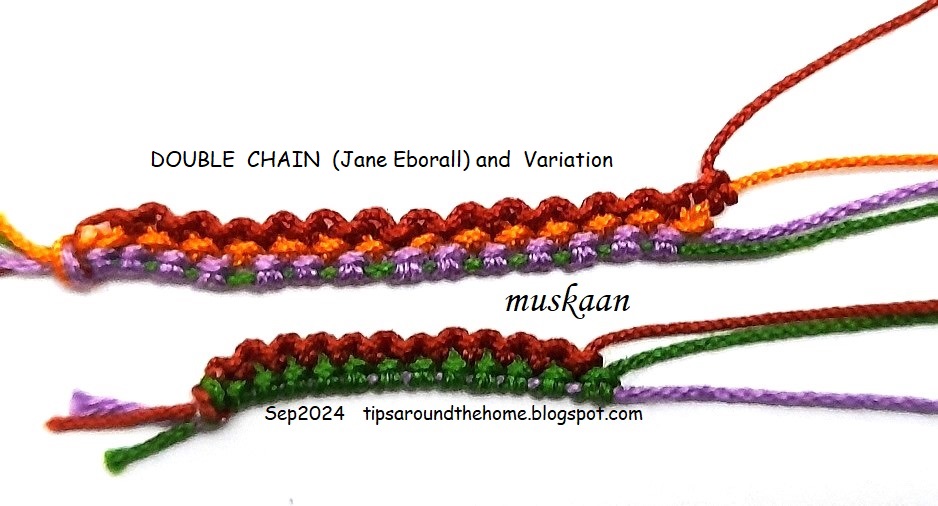
 Something old something new with loads of fun and possibilities. I found it listed in Karen Cabrera's Lesson #151 - Double Chain. At the end of the video is a model which was clearly a Jane Eborall pattern. However when I went to Jane's Techniques page, there is no listing for it. Finally I traced down the pattern where she used it - Butterfly with Fancy Edging (2001 rewritten 2011).

And I went a couple steps further, playing with some effects. This is merely a small window into possibilities which can be explored in future. In the above pic you see the three samplers and details follow ...
Abbreviations used: SH = shuttle ; SS = switch shuttles ; DS = double stitch ; RORS = reverse order reverse stitch (as in RODS) ; DC = double chain

Original Double Chain using 3 threads. All double stitches, but you switch shuttles and core threads. 

Step1: SH1 is the active shuttle (lavender) and SH2 thread forms stitches (green). Make 1DS and SS.
Step2: SH2 is the active shuttle (green) and SH3 thread forms stitches (brown). Make 1DS and SS.
Repeat steps 1 & 2 to desired length.
If using 3 colours, the first one remains hidden.

What if we added another thread? 'Double Chain' or should we say 'Triple Chain' using 4 threads. At least 3 shuttles are required while the 4th one can be a ball.
The process is exactly the same, except for the additional thread requiring an extra step.

Despite how they've been photographed, these are not straight chains. When I tried to straighten the DC variation, the SH1 core thread (green in this case) became visible between the stitches. Does make for a nice effect, though. The more threads you add, the wider this colour blip.
TIP: Yes, they can become straight if we use a thicker thread in SH1. 

NOTE The SH1 core thread remains free throughout but the other core threads become 'locked in'. Hence care should be taken to snug each stitch properly.

Since multiple shuttles are used, we can throw off rings and make chains! Imagine the free-styling one can do! And of course we can add beads in so many wonderful arrangements and colours!
In the above sample, I allowed the chain to curve.
TIP: This double chain can be used to make mock rings.


When I showed Ninetta a sneak peek, she sent me a link to Edda Guastalla's site where she has used and diagrammed the double chain technique.

Its not just fun and games. There are several lessons and some startling observations that emerged from this project! Let me share these with you and would love to read your insights and feedback.

Comparing Double Chain with other Techniques

1. Is it Pearl Tatting? 
To the extent that there are extra/auxiliary/additional threads, it can be considered pearl tatting. However there are differences - 
    the chain is not straight ;
    stitches face the same way, not opposite ; and
    the stitches are in two separate tiers, not on a common core thread.

2. Is it a Cord or cord tatting?
No, because the chains have a tendency to curve just like regular chains. The reason is obvious because the broader stitch caps are all lined up on one side. See TIP above.

3. Is it similar to Daisy picot?
Yes, it can be considered a chain version of the daisy picot technique. This is something I tried on the last few stitches and it worked.
    the stitches are two-tiered ;
    the double chain can be worked with only one shuttle (SH2 in the tatted sample) and 2 balls, making DS with one thread and RORS with the other thread. The reverse order reverse stitch (RORS) has to be coaxed gently to face outward (like the DS) and then repeat. 
    
4. Is it Helix Tatting?
Now here's the clincher! It is actually a precursor to helix tatting! It is the 2D version with exactly the same technique/process.
If we add more threads and join it back to the first thread, voila, we have a hollow tube as in helix tatting! 

5. Is it ATT?
Alternate Thread Tatting is a term coined by Shuttle Brothers where two threads (and often two shuttles) are used to make rings and chains incorporating an array of effects involving picots, thrown rings, colour switches, etc. 
    stitches all face outwards and they use the daisy picot a lot ;
    but the ATT chain is made with only two threads, not three (or more) ; 
    While rings (ATR) are made with two threads, the double chain (with 3 threads) can only be joined back as a mock ring. 
I think we can clearly rule out ATT.    

6. Is it TATHing?
Tatting with Alternate Thread is a term coined by Judith Connors where two shuttles are used alternately on the core thread as in pearl tatting, Maltese rings, daisy picot. 
    In this double chain, the stitches or picots (if any) face the same way, but it can be tatted using the daisy picot method. 
    However, the chain does need three threads to be made.
So where do we stand on this point? I'm not sure. Does TATHing include effects where the stitches face the same way? 

This is it for now. Hope to hear your thoughts and input.

UPDATE (10th Sep 2024): In Priscilla Tatting Book No.3, a 'double chain' is illustrated (Diag. 7) for the Tatted Centerpiece made with Needle and Shuttle pattern. Here some stems are worked as normal chains with a shuttle and then a second tier of stitches are inserted between the stitches below using a needle. Thank you, Mary A!

Many thanks to all mentioned. Its always a productive day when we learn something!

Sunday, 12 August 2018

the correct guess

Pin It now!
A couple of emailers & Ninetta came close, but Stephanie nailed it! In fact more than nailed it, giving 2 more ways to tat the braid/bracelet. Read her comment in this post. Thank you for playing along, tatters.

The July 19th Bellaonline newsletter carried an article on some of the laces featured in the latest IOLI publication. Skimming through, one word caught my attention – ‘split/self-closing mock ring (S/scmr)’First time I’d heard this term and was especially keen to understand because of my ongoing Mock Ring series. Randy Houtz’s tatting picture frame image was too small to realise what was going on. 
I asked Georgia immediately and she introduced me to Randy Houtz! What a stroke of luck ‘coz the internet-recluse was online! And this is what he graciously shared …

For making a split/SCMR –
after desired chain tatted past thread loop of SCMR, place thread loop on little finger, add third thread and tat un-flipped stitches (ufs) as would regular split ring over both thread of the thread loop. when desired stitches obtained, pass core thread through thread loop and close mock ring. Since you've added the third thread, it can be used for rings on the inside of the split ring. Hope this is clear enough to get you started?

This is my very first attempt following the above instructions, 
till I ran out of the scrap threads but not ideas.


This is my next trial from which resulted the first braid. 
I’m calling it Buttercup Trellis. Like the combo of split ring and scmr, this name is a combo of suggestions from God's Kid (Sue) and Anita Barry!

I continued on with more effects for the next two braids. Still working on them. 

UPDATE (Aug 2018) : A slight variation/adaptation of the s/scmr technique in the 2nd braid is shared with Sunrise Sunset bracelet pattern here.


Here’s the first pattern if you wish to give it a go, using the split/self-closing mock ring (s/scmr) technique … Let me know if you want in-process pics of the technique or the bracelet.

Buttercup Trellis
braid/bracelet pattern


Wind 3 shuttles with 3 different colours.
Sh1 – beige. This is the main shuttle throughout. 
Sh2 – purple
Sh3 – green
Note: If one does not want to switch colours in the trellis, then use ball instead of Sh3.

In Anchor size 20, 4 repeats of the motif measure 5cms in length, and ½cm wide. The tatted model (merely a sampler) with 8 repeats and end rings is about 11cms in length..


Abbreviations :
Sh – shuttle ; R – ring ; S/SCMR – split/self-closing mock ring ; SLT – shoe lace trick

How to start: Following is the way I started it, but you can choose to start in your favourite way.
Make a starting ring (R1: 12) with only Sh1, tatting over tail. Then make a loop for scmr and fold Sh2 thread over it. Start the chain, tatting over Sh2 tail.
For 2nd side of the s/scmr, fold Sh3 thread over loop. Work unflipped stitches, hiding this tail in the first few stitches.
Both halves have Sh1 as the core thread, but the top half has single core, while the bottom half has a double core since the unflipped stitches are worked over the loop.
In case of bracelet, attach findings to the 2 end rings.
The pattern is worked all from the front, from left to right.

With Sh1
R1 : 12.
**S/SCMR : 10 / 10. close.
R2 : 1-1-1-1-1-1.  rotate
R3 : 1-1-1-1-1-1. 
(make a 3rd ring for the center)
SLT with Sh2 & Sh3 from behind the flowers**
Repeat from ** to ** to desired length.
S/SCMR : 10 / 10. close.
last R (Sh1) :12.

To finish :
Make picot rings at end of each tail, at varying distances. Make 2 overhand knots at base of each ring to secure. Tie & Cut. No tails to hide!

For variation :
Try using a thinner thread for Sh1.
Add beads.
Finish off with tassels dangling on the tail(s).


The scmr has already had such an impact on modern tatting. I hope you create many more designs using this split/scmr variation with due credit to the Houtz brothers.

Gary & Randy Houtz’s latest book, Tatting GR-8 Triangles has several different tatting techniques, such as the split/scmr and a variety of two-shuttle rings i.e. alternate thread rings, un-flipped stitch rings, wrapped rings, and others. click here for more info on their books & resources.

In Randy’s own words …
Good luck with the Split/SCMR. It has tremendous potential since it gives opportunity to place rings on both sides of a split ring…. It is a technique that enhances the art of tatting and folks should know about it.

So, let’s rally round to thank him!

Loads of thanks to Randy
for promptly and selflessly sharing the technique
with the tatting community
Many thanks to all my tatting playmates, & a great big hug to Georgia.

Friday, 10 August 2018

guess the technique

Pin It now!
I have to make a comeback somehow… after the glut of posts last month, I seem to be spent ;-P I've continued to tat, but am not spending much time at the computer or online. And all the while my pending pile grows higher, deeper, wider! I'm just so split on how to close the gap !!!

So here’s a quick query – 

can you identify the technique used in this braid?


3 shuttles were employed, but it can be done with 2 shuttles & ball if the purple & green are not alternated.
I came across the technique in a recent Bellaonline newsletter. Only the term was mentioned and on further digging, the originator graciously explained the technique and also gave me permission to post. But I’d like to prolong the mystery for a bit :-D
But if you need some clues, ask & I will respond (there is a bit of a clue in this post itself).

So this is the first of my 3 braids/bracelets. But what should I call it?!
Any help with naming it is also very much appreciated. I’m at a total loss for names right now.


Meanwhile, I’ve made 2 more Blossoms motifs, and a corner motif for a handkerchief. And am tatting Jane McLellan's leaf braid for the edging.
Also completed one design round robin doily which I converted into a snood and using it already!

And if you haven’t seen any comment from me, it’s because I’m just not online for long enough. I do try to keep abreast as far as I can, though, and hope to catch up …

eager to hear from you …