Showing posts with label Jane Eborall. Show all posts

Monday, 14 April 2025

playful tatting

Pin It now!

I had started tatting these cute balloon dog doodles couple of days before ITD and realised that there were a couple of elements left to tat, which started off my 'shagun tatting' for the day! Of course, I later found the time to tat the heart, too! Actually my list had contained a different heart which I still haven't gotten around to tatting. Some other day, soon, perhaps. 

Sarah Nielson shared two versions of her Balloon Dog Doodles - 2D & 3D. You can download the pdf from her blog here - https://laceandbees.blogspot.com/2025/03/balloon-dog-doodle.html
Quick to tat with lots of split ring practice. And one doesn't have to hide ends! Simply tie an overhand knot and snip close for the nose or 'balloon' end. 
I chose this tinted colourway for the added fun factor. Size 20.

The model starts at the tail end. 
My piece doesn't much resemble a dog here, does it? Is it how the shades spread themselves out ... how the darker shade pooled at the lower half? Or is it my tatting tension?

Now this 3D version I like. It does look like a dog frolicking in the park or flying high! Very happy indeed.

Technically, the highlight of this 3D doodle is the Folded Split Ring

Overall, I am happy with these doodles - fun and quick and excellent doodles to embellish cards, etc. Some time in the future I will paint some background to give them a context, a story ;-D

Many many thanks to Sarah for these innovative and fun doodles!

Related Posts -
https://tipsaroundthehome.blogspot.com/2025/04/shagun-tatting.html
https://tipsaroundthehome.blogspot.com/2017/02/in-fold.html

Tuesday, 11 February 2025

dizzying no more

Pin It now!

.... thanks to Ninetta who always delivers with her engineering brain! I was trying out Mark Myer's (Tatman) Dizzy Double Stitch and simply could not get the 1st half-stitch right. Sought Ninetta's help and she surprised me with a video showing the process! I based my pictorial on this video. 

'Tatman' Mark Myer's DIZZY  DOUBLE  STITCH
Ninetta Caruso's video (Feb 2025) - https://drive.google.com/file/d/1U2SwGQGFf-zbn24ANMIxNmotW8l7-uIe/view
Muskaan's pictorial PDF (Feb 2025) -https://drive.google.com/file/d/1WymeZxilPxO159R2kz0mX19O-3LUBTjz/view

This stitch can be considered a form of padding the stitch where only the knotting thread has extra bulk or padding while the core thread remains unaffected. See Padded Double Stitch - http://tipsaroundthehome.blogspot.com/2014/05/tatting-experimenting-with-stitch.html
The extra twist in the thread creates a nice texture and height and tries to recreate a crochet stitch. We now know of another tatting stitch that mimics crochet - the Treble Tatting Stitch!
💟💟💟💟💟

Above is my first trial while following Ninetta's video. Notice the extremely thick cord I used, LOL!
💟💟💟💟💟

While I am sharing all pics for the pictorial here, for more details, please refer to the links given above.

 
1. Working in two colours, blue in shuttle and yellow ball. I started by making a small ring followed by a chain with a few double stitches (DS) and 3 dizzy DS. Here’s how the latter is done …
2. 1st half-stitch: Make a loop with the ball thread keeping it behind the shuttle thread. Hold the base of the loop in a pinch along with the shuttle thread (black arrow).The loop is held taut around your other finger- middle or index finger, whichever you use (red arrow).
TIP: It is very important to know where to insert the shuttle and which thread to pull while snugging.

 
3. Bring the shuttle above the loop and
4. pass it through the loop from back to front, from the lower/right part that lies behind your finger ...

 
5. and pass the shuttle from behind the core thread (between loop and shuttle thread).
6. Transfer/flip and remove all slack by pulling on the upper/left part of the loop. Notice there is a twist in the half-stitch.
 
7. 1st half-stitch of the dizzy DS is made and neatly snugged.
TIP: For the twist to show, keep the stitch a bit loose. Pulling on the ball thread too much will hide the ‘weaving’ effect. 
8. 2nd half-stitch: Start a loop just like for the 1st half-stitch and hold in pinch. Refer #2.
 
9. Bring the shuttle up keeping the thread in front and
10. pass it through the loop from front to back at the lower/right part of loop and above the core thread between the space between loop and shuttle thread.

 
11. Transfer or flip the stitch and remove all slack. Again, keep the stitch a bit loose for the twist to show. 
12. 2nd half-stitch made and neatly snugged.
One Dizzy Double Stitch made. Repeat the steps for as many stitches as needed.

A chain with dizzy DS. Notice how the stitch gets better when I kept the knotting/ball thread 'loose'.
A dizzy DS chain joined back for a mock ring.

TIPS / NOTES:
Tatted by Anita Barry (comparing tightly snugged and loose stitches)
  • The samples above clearly show the reason why we need to keep the dizzy DS a bit loose.
  • Ninetta 'cracked' it because Mark pointed out the similarity with working the 2nd side of a split ring. Perhaps this can be kept in mind.
  • It is a good idea to leave a small picot before the first stitch and after the last stitch to compensate for the extra height (Ninetta).
  • Picots can be made in the normal way by leaving space in the ball thread.
  • For a straight chain, use a thicker core thread. 
💟💟💟💟💟
  
Initially I thought we couldn't use the stitch in a ring. However, when Ninetta said we can, I gave it a try and it worked! However, it turns out that I approached it a bit differently, reminiscent of a Loop Tatted Ring! Meanwhile Ninetta made another video for a ring, following Mark’s instructions. 
Ninetta's video for Dizzy Double Stitch in a Ring - https://drive.google.com/file/d/1WhDgd9w1U7PZ9buVq_c8r8FA0-VIU5gn/view
So here's my slight variation .... 

I started a ring with 1DS. And above is how I worked the dizzy DS, just like in the chain. I divided the ring loop into two and held the base of loop and shuttle thread in a pinch. On the lower/right part of the top loop, I followed the steps for each half-stitch as shown in the chain pictorial. 
💟💟💟💟💟

Jane Eborall (2009) used the 2nd half-stitch to make textured Josephine Rings that are denser. Josephine Ring (alternative way) – http://janeeborall.freeservers.com/TipsAssorted.html
I had used this in the buds for my Poppy pattern back in 2014 -https://tipsaroundthehome.blogspot.com/2014/09/tatting-pattern-tiny-heart-poppy-part-2.html

Karen Cabrera (2010/11) shows a slightly different method of working the stitches which can be considered a variation of the original. Lesson 37 - http://www.youtube.com/watch?v=CUtHpsIIknE
Ninetta Caruso (2025) compares Mark’s and Karen’s stitch in this video - 
https://drive.google.com/file/d/1UGlvqk4mPiWz9BEQ4AoKVnkxhQw72Blt/view
I hope you like this revisit to a 'forgotten' stitch and will use it to decorate some of your future tatted lace. It's a fun and quick tat once you get a hang of it! You can find tutorial links for all terms mentioned here - https://tipsaroundthehome.blogspot.com/p/tatting-resources.html

Many many many thanks to all mentioned above!

Sunday, 8 September 2024

pleasure and pondering

Pin It now!

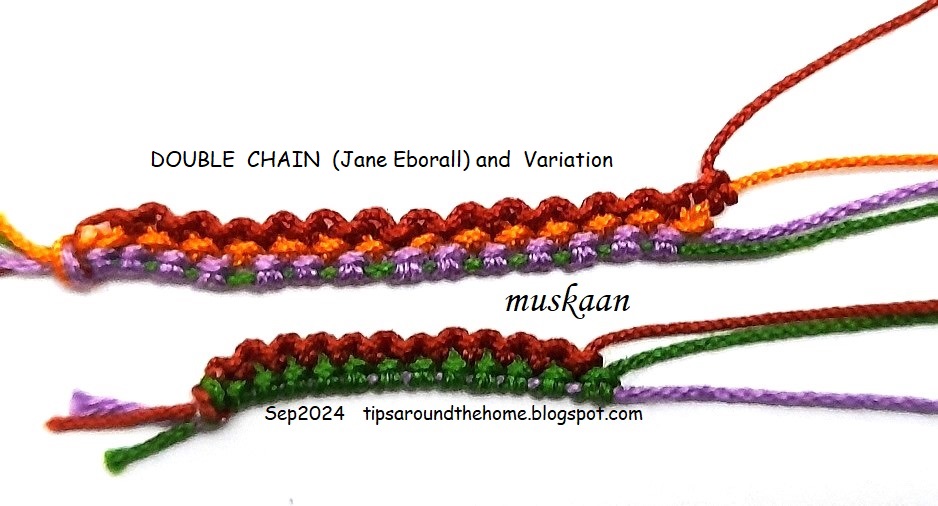
 Something old something new with loads of fun and possibilities. I found it listed in Karen Cabrera's Lesson #151 - Double Chain. At the end of the video is a model which was clearly a Jane Eborall pattern. However when I went to Jane's Techniques page, there is no listing for it. Finally I traced down the pattern where she used it - Butterfly with Fancy Edging (2001 rewritten 2011).

And I went a couple steps further, playing with some effects. This is merely a small window into possibilities which can be explored in future. In the above pic you see the three samplers and details follow ...
Abbreviations used: SH = shuttle ; SS = switch shuttles ; DS = double stitch ; RORS = reverse order reverse stitch (as in RODS) ; DC = double chain

Original Double Chain using 3 threads. All double stitches, but you switch shuttles and core threads. 

Step1: SH1 is the active shuttle (lavender) and SH2 thread forms stitches (green). Make 1DS and SS.
Step2: SH2 is the active shuttle (green) and SH3 thread forms stitches (brown). Make 1DS and SS.
Repeat steps 1 & 2 to desired length.
If using 3 colours, the first one remains hidden.

What if we added another thread? 'Double Chain' or should we say 'Triple Chain' using 4 threads. At least 3 shuttles are required while the 4th one can be a ball.
The process is exactly the same, except for the additional thread requiring an extra step.

Despite how they've been photographed, these are not straight chains. When I tried to straighten the DC variation, the SH1 core thread (green in this case) became visible between the stitches. Does make for a nice effect, though. The more threads you add, the wider this colour blip.
TIP: Yes, they can become straight if we use a thicker thread in SH1. 

NOTE The SH1 core thread remains free throughout but the other core threads become 'locked in'. Hence care should be taken to snug each stitch properly.

Since multiple shuttles are used, we can throw off rings and make chains! Imagine the free-styling one can do! And of course we can add beads in so many wonderful arrangements and colours!
In the above sample, I allowed the chain to curve.
TIP: This double chain can be used to make mock rings.


When I showed Ninetta a sneak peek, she sent me a link to Edda Guastalla's site where she has used and diagrammed the double chain technique.

Its not just fun and games. There are several lessons and some startling observations that emerged from this project! Let me share these with you and would love to read your insights and feedback.

Comparing Double Chain with other Techniques

1. Is it Pearl Tatting? 
To the extent that there are extra/auxiliary/additional threads, it can be considered pearl tatting. However there are differences - 
    the chain is not straight ;
    stitches face the same way, not opposite ; and
    the stitches are in two separate tiers, not on a common core thread.

2. Is it a Cord or cord tatting?
No, because the chains have a tendency to curve just like regular chains. The reason is obvious because the broader stitch caps are all lined up on one side. See TIP above.

3. Is it similar to Daisy picot?
Yes, it can be considered a chain version of the daisy picot technique. This is something I tried on the last few stitches and it worked.
    the stitches are two-tiered ;
    the double chain can be worked with only one shuttle (SH2 in the tatted sample) and 2 balls, making DS with one thread and RORS with the other thread. The reverse order reverse stitch (RORS) has to be coaxed gently to face outward (like the DS) and then repeat. 
    
4. Is it Helix Tatting?
Now here's the clincher! It is actually a precursor to helix tatting! It is the 2D version with exactly the same technique/process.
If we add more threads and join it back to the first thread, voila, we have a hollow tube as in helix tatting! 

5. Is it ATT?
Alternate Thread Tatting is a term coined by Shuttle Brothers where two threads (and often two shuttles) are used to make rings and chains incorporating an array of effects involving picots, thrown rings, colour switches, etc. 
    stitches all face outwards and they use the daisy picot a lot ;
    but the ATT chain is made with only two threads, not three (or more) ; 
    While rings (ATR) are made with two threads, the double chain (with 3 threads) can only be joined back as a mock ring. 
I think we can clearly rule out ATT.    

6. Is it TATHing?
Tatting with Alternate Thread is a term coined by Judith Connors where two shuttles are used alternately on the core thread as in pearl tatting, Maltese rings, daisy picot. 
    In this double chain, the stitches or picots (if any) face the same way, but it can be tatted using the daisy picot method. 
    However, the chain does need three threads to be made.
So where do we stand on this point? I'm not sure. Does TATHing include effects where the stitches face the same way? 

This is it for now. Hope to hear your thoughts and input.

UPDATE (10th Sep 2024): In Priscilla Tatting Book No.3, a 'double chain' is illustrated (Diag. 7) for the Tatted Centerpiece made with Needle and Shuttle pattern. Here some stems are worked as normal chains with a shuttle and then a second tier of stitches are inserted between the stitches below using a needle. Thank you, Mary A!

Many thanks to all mentioned. Its always a productive day when we learn something!

Sunday, 25 June 2023

refresher samplers

Pin It now! Another quick post with refresher samples. It feels good to refresh one's memory and skills.

There was a time long back when I found it difficult to do a SCMR (self-closing mock ring), let alone Interlocking SCMRs! Hence my trials and study focused on interlocking with normal rings but with shuttle instead of needle - https://tipsaroundthehome.blogspot.com/2014/05/interlocking-rings-using-shuttle.html
Over time I have come to adopt the SCMR as a convenient and often useful 'technique' and effect. And the above sampler is tatted following the pictorials by Sue (His Kid) and Umi & Tsuru. Sue's instructions are clearer while the latter's images are sharper. Hence my model utilizes both instructions.
The bare thread between rings should be long. If you look closely, a couple of segments don't lay flat because i used a relatively shorter BTS.  

There are a number of other ways to make 'flat' IRs - scroll down for all the links here - https://tipsaroundthehome.blogspot.com/p/tatting-resources.html


Jane Eborall left a comment and link in my previous post about an Alternate Way to make Josephine Rings. I had tried them back in 2014 and used them to create 3D buds (above) for the Tiny Heart Poppy - https://tipsaroundthehome.blogspot.com/2014/09/tatting-pattern-tiny-heart-poppy-part-2.html

However, it was time for a refresher! And this is what I made last night - 
This time I made the half-stitches in such a way as to leave 'picots' . They create a lovey twist! And they are more stable than Interlocking Picots and can be used for joining with care. However tatting them required a bit of calisthenics and keeping all the loose half-stitches under one's pinch meant the size of the ring was limited. This is not an issue if we remove all slack and snug the stitches without 'picots'.

UPDATE: Is this similar to Mark Myers' Dizzy Double Stitch (DDS)? It certainly appears so. He seems to use the same movement for the half-stitches but makes normal (double stitch) rings instead of Josephine rings. 


And today is International Lace Day. In the morning I wound my shuttle with Lizbeth (s0ze 30), sought out the brown ball (Anchor) and will tat the E14 autumn tree again. The one in the pic has mistakes as I had pointed out here - https://tipsaroundthehome.blogspot.com/2023/06/impressions.html
Kind of refreshing the model, huh?!
With the reworked tree I would've finished the tatting part of the #colourmeEndrucks project.


Wishing everybody a very creative and happy ILD!
and many thanks to Sue, Jane, and Wendy for their wonderful tutorials!

Tuesday, 17 October 2017

meddling with medallions

Pin It now!

Going over the medallions document, I realized that it needed more samples – visuals are so much better than words. Excited, I got down to it. Here are a few of them.

Most of the samples in the document seemed to have single rings around the center. But trefoils, clovers, layered rings (ANKAR style), etc. can also form an enclosed space. So I created this pattern using inward facing clovers. There are thrown rings on the chains.
‘Tis the season, hence I’m calling it the Clover Wreath. Wouldn’t it work well as the center of another doily ?! The large rings need to be joined, though.


Now here’s something I don’t remember ever doing – a Central/common Picot on a Chain.

I tried to create my own pattern with 1 horizontal and 1 vertical ring on each ‘spoke’, but it wasn’t working (do you have any idea why?). Finally I took the design idea from the model #69 in Elgiva Nicholl’s ‘Tatting: Technique and History’ but used my own stitch-count and single decorative picots.

TIP: For straight chains, avoid snugging the chain too tight – we don’t want it to curve/arch. 

A central ring with picots (also called rosette by Mlle Riego) is a common feature of many patterns. Traditionally it was tatted separately. Now we have multiple options to incorporate it without cutting off thread : climb out with a mock picot ; work it as a mock ring ; and so on.

In this square, the central ring is thrown off the first chain -
When I was first learning split rings during Jane's TIAS 2014, I attempted the Fandango coaster to practice on the side. So not happy with the working ! Time to try it again. Much better.

This is a Classic Tatted Daisy. It starts with a central ring with picots. Then we add a round of outward facing rings – lock joined to the picots and separated by bare thread. Traditionally it was worked as separate rounds and with a single shuttle, hence bare thread separates adjoining rings.

Now we make it in one pass and the bare thread is sometimes substituted with chains.

Incidentally, my Aspiration Doily (trial 2) now has a Daisy center ! It is a modern construction using 2 shuttles (or a long tail for shuttle 1) with the outward rings/petals thrown off the central mock ring (SCMR).
It lies flat and the center is more solid than bare threads between rings in previous trial. 

And here’s another interesting variation :
a central ring with picots, surrounded by concentric chains, lock joined to picots on previous rounds, and a final round tatted like the traditional daisy petals with bare thread and lock joins !
So, the rosette turns into a daisy !
(a central ring with closely packed chains around it is Also called a rosette!)

These were tatted over 15 years ago when I had no notion of a lot of tatting techniques nor how to hide ends. You can clearly see spiraling rounds rather than discreet ones. Although I did get better over time and in one of the size 40 yellow ones (made a few years after the size 20 red), the inner circle is almost round with equal-size picots.

Pattern is part of a lace from ‘Tatting Favourites’ by Anchor Design Center. Each medallion is worked in 2 parts but I now realise that the outermost rings can be worked as thrown rings. 
It has been one of my favourite go-to patterns when travelling. The medallions were later joined with a wavy scroll with opposing medallions, thus functioning as motifs. 

Medallions – never too meddlesome when tatted !


Thursday, 11 May 2017

the bugle calls again

Pin It now!
updated on May 13, 2017

Sally’s Bugle Snowflake
Jane Eborall
Jane has been truly prolific with this lovely pattern, displaying such a range of colour combinations on her blog. When she uploaded the pattern, I had to give it a go.

The highlights of this pattern, to me, are the beads radiating in the centre and the lock chains forming a lovely petal shape. Jane’s tutorial on how to add beads that face outwards helped a great deal.

My Notes & thoughts

  • 12 seed beads (size 11) are needed for the long beaded picot (LBPbug) in center. Since my bugle beads are shorter (4mm instead of ¼ inch), I used size 8 or 9 beads in gold, thinking that these would make up for the length.
  • When loading LBPbug, make sure the loop for ring still slides.
  • Also, managing the 5 LBPbug with dangling paperclips can be a bit tough. I had to make certain each time before joining to them in next round, that they were in the correct sequence and not twisted around. I did use different colored clips for each, to keep track of sequence.
  • This technique for loading beads on a long central picot such that they radiate out, was first described by Frivole and also demonstrated here.
  • These kind of reminded me of LTRORs (loop tatted ring on rings)!
  • The central picot should’ve been more tightly snugged.
  • As in my previous forays, I again used picot gauges for the LBPbug on chains (as seen in pic above). 2 sizes were required for the beads I chose – ⅜ inch and ⅝ inch. And this time I used thread to load the beads later (one of the many ways of adding beads in Jane's tutorial).
How does one gauge the length of picot ?
Well, load beads as instructed and hold with paperclip. Tat the next couple of stitches. Then remove the clip and beads and measure. Voila . No hanging clips getting in the way and slowing one down. Once the length is known, use the gauge for future beaded picots, adding beads only at time of joining. 
And the added benefit is that one can usually use beads from one's stash rather than order new ones if the pattern calls for a size one may not have.


  • The lock chains could’ve been a tad longer for a more graceful curve as in Jane's snowflakes. One additional stitch would accomplish that for my tatting tension.
  • The split rings are another spot of genius ! They look like thrown rings, but being split rings, they become well-anchored with an ever so slight broad base.
In order to hide the space in center where some bare thread is visible, I placed a large crystal bead in center. Doesn’t it perk up the flake even more ?!

Measures 4” from tip to tip. Inner round is 2”.
Techniques used : 2 shuttles, lock chain, beads on central picot, lock join, picot gauge, beads on picots, split ring.


Many many thanks to Jane for all her lovely patterns and tutorials

happy tatting always J


Wednesday, 8 February 2017

TIAS-es

Pin It now!
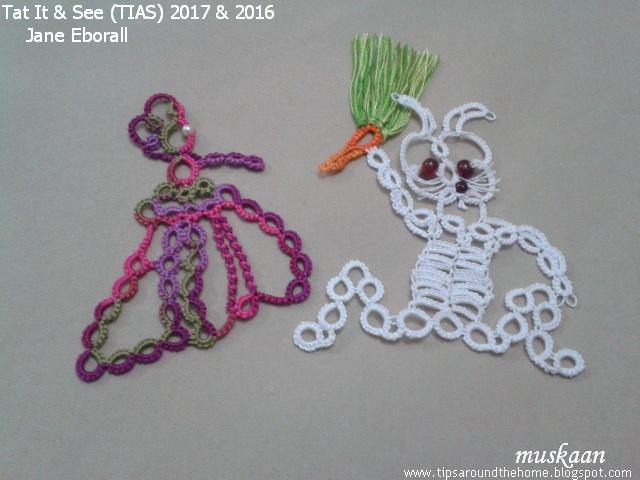
2 TIASes and a book

Tat It And See 2016
Jane Eborall
I didn’t participate last year. But there's always so much to learn from Jane's ingenuity :-)  So I started both projects together, tatting and taking day-wise pics, but didn’t keep it up.
The carrot & greens are made with some leftover embroidery strands. For the greens , I used my spot adaptation of Corina’s fringe. Instead of the core thread, though, I joined them to the picot thread, while forming the picot, and snugged the picot tight. I found this quicker, easier, leaving no floppiness either.
This Brer Rabbit has found a juicy carrot and is excitedly calling out to his friend Herr Hare to share it together. Brer Rabbit is wily, though and might just give the greens to Herr Hare, keeping the carrot for himself ;-p 

 World of Wildlife
Anthony & Jacqueline Nayman
This is one of a set of 3 coffee table books including ‘The Oceans’ and ‘Space’ by Fergusson Publishing, Chicago.
At the start of each chapter, the wildlife of each region is depicted on the map graphically, giving a bird’s eye view of the range & distribution of fauna. And of course, there are lovely photographs and history. Have I read the entire book ? Ummm, no! But I like to flip pages and settle randomly on something.


Tat It And See 2017
Jane Eborall
The final came all you soon, but journey was joyful, with so much enthusiasm from all participants. 
She measures a petite 2½"× 2¼" in size 20 Lizbeth Vineyard Harvest.

This dame must enjoy her walk (it's almost sunset!), too, flaunting her beautifully designed gown from The House of Jane ! She's just as much a trooper as our Jane is ☺ 


happy tatting always J