Showing posts with label ITD. Show all posts

Wednesday, 1 April 2026

too clever by half

Pin It now!

or too lazy ... take your pick, LOL. So I actually completed a motif from scratch today as celebration of the International Tatting Day! Wanted to tat enough to upload to our Endrucks 1920 Project FB group and then continue tomorrow along with a blogpost. Wonder of wonders, my smart take meant I 'finished' the motif et al much before the end of the day! 

I had decided to tat a butterfly when I realised it would mean a line/row bingo as mentioned in my post here. And my first search was in the EP directory of butterfly derivatives. This was one motif I hadn't tatted, so mind made up. That it would happen so soon, well .... and that it had block tatting was something I hadn't planned on either.

This is the E16 Grazia Butterfly derived and designed by Pina Pinto for the #Endrucks1920Project; pictorial and written pattern by Ninetta Caruso. with a bit of input from me. Here is the direct link to the PDF - https://drive.google.com/file/d/10mqdUjIcdRADIuGt5il0C2PUvGn0HthK/view

And as you can see if you compare the models in the PDF to mine, this is in profile! After tatting two wings it looked pretty complete for a butterfly in profile! I think it looks good even though it is only Half the pattern. Folded the central (body) ring and added one more antenna and voila, it's ready to fly or alight.

The decision was possible because I followed my alternate path (diagram on page 9 of PDF) and tatted the wings separately. However, I also followed my own tip to tat the antenna in one pass which is why the first antenna is too long. Shortened the 2nd one at the end, though.

In Anchor and Red Rose pearl cotton size 8, the butterfly is 3cm high and 5.5cm wide (without antennae). In Lizbeth size 20, these measurements should hold true. I didn't want the ombre tinted colourway to overwhelm the pattern, hence paired it with ecru/cream.

And so I submit my 4th motif for Natalie Rogers' Picot Bingo 2026 Level 2, crossing out two boxes and one line, yay!
  • Block Tatting
  • Tat a Butterfly
Here's where I stand at present ... please note that I have a couple more motifs already tatted but not shared, which is why I did not cross out any of the respective boxes.
PICOT BINGO for the last row, teehee! (Details here - https://www.patreon.com/posts/happy-new-year-147124370)

Hope you had or are having a great ITD. Ciao for now!

Happy Tatting

Pin It now!

A very happy International  Tatting Day to all tatters! 
While I will be tatting and also gobble up some chocolate today, what I am sharing here is a coaster or mat I worked on recently. It is a tessellation pattern by Karen Bovard from her 2013 book, 'MORE Fun With Split Ring Tatting'. 
It is made by joining individual houndstooth motifs on the go and there are slight differences in the motif depending on where it is positioned - whether in the main body or on a side, etc. The tails in the above piece are hidden but not trimmed. These acted as markers for my own comfort.

While the tatting itself is easy if you are comfortable with split rings, the arrangement of where each motif is attached needs careful attention. At least I needed that and had to cut off or retro-tat a few times.

The diagram was for a rectangle but I cut it short to a square. Which meant eliminating a row in the main body. To mark my place I marked the finished motifs in the diagram.

While I like the shape as is, it is not practical to use with all the arms sticking out. Hence I will be filling in the gaps, following Karen's pattern, but also outline it. Trouble is I can't decide the colour! Hubby suggested black or brown (the dark shade here is purple, not black) but I haven't made up my mind. Do you have any suggestions?
 

I had bought this book almost a decade back and so glad to have finally tatted something from it. The instructions at the beginning are very clear and detailed and make it easy to read the diagram-only patterns. There are myriad possible arrangements using some basic motifs as blocks or tiles and their niched arrangement in several patterns reminds one of MC Escher's tessellations. Of course, Karen has a lot of other designs, too as evident in the book covers. There are several I would love to try.

Karen even has a tip about making the split rings more circular. Huh, it just confirms why my own ring was circular too! (https://tipsaroundthehome.blogspot.com/2026/02/who-knew.html)

However, the spine of the book did not allow the book to remain open at the desired page. Hence I scanned and printed out the necessary pages and consulted them. 

UPDATE: (April 2, 2026) Karen has a new site which unfortunately does not show up in my feed. All the material from her old blog are also included in this new site. And she has some great tatting memes going ... looking forward to more. Here's the link - http://www.theshuttlesmith.com/

And I submit this as the 3rd piece for Natalie Rogers' PICOT Bingo 2026 Level 2 (https://www.patreon.com/posts/happy-new-year-147124370). Only one box to cross this time, though this too is a rings-only pattern, viz.,

  • Tat from a diagram

Monday, 14 April 2025

playful tatting

Pin It now!

I had started tatting these cute balloon dog doodles couple of days before ITD and realised that there were a couple of elements left to tat, which started off my 'shagun tatting' for the day! Of course, I later found the time to tat the heart, too! Actually my list had contained a different heart which I still haven't gotten around to tatting. Some other day, soon, perhaps. 

Sarah Nielson shared two versions of her Balloon Dog Doodles - 2D & 3D. You can download the pdf from her blog here - https://laceandbees.blogspot.com/2025/03/balloon-dog-doodle.html
Quick to tat with lots of split ring practice. And one doesn't have to hide ends! Simply tie an overhand knot and snip close for the nose or 'balloon' end. 
I chose this tinted colourway for the added fun factor. Size 20.

The model starts at the tail end. 
My piece doesn't much resemble a dog here, does it? Is it how the shades spread themselves out ... how the darker shade pooled at the lower half? Or is it my tatting tension?

Now this 3D version I like. It does look like a dog frolicking in the park or flying high! Very happy indeed.

Technically, the highlight of this 3D doodle is the Folded Split Ring

Overall, I am happy with these doodles - fun and quick and excellent doodles to embellish cards, etc. Some time in the future I will paint some background to give them a context, a story ;-D

Many many thanks to Sarah for these innovative and fun doodles!

Related Posts -
https://tipsaroundthehome.blogspot.com/2025/04/shagun-tatting.html
https://tipsaroundthehome.blogspot.com/2017/02/in-fold.html

Wednesday, 2 April 2025

shagun tatting

Pin It now!

 'Shagun' is a Hindi word derived from Sanskrit which denotes good omen, auspiciousness, a token, .... Though it it is associated more with Hindu rituals, we also use it in daily life to commemorate an event, an occasion, or any good news with the elders blessing the young with a symbolic token. Or if we cannot perform an entire task, some small part of the ritual/task is started on an auspicious day.  

This is what I try to do every International Tatting Day! This day is also very special for personal reasons and I tend to be busy elsewhere. Yet I make it a point to pick up my shuttle and thread and tat at least a ring or two and not let the day 'pass by' ;-D Despite a very busy first half, I managed to find time from evening onwards and actually completed not one but two motifs! One had only 2 rings and a chain left to tat (I'll share this tomorrow) while the heart motif I started from scratch and completed! 

doesn't it look like a possible angel?!
My new version using graduated and 'erect' vapour stitch which is more like a picot here. I was inspired by a recently shared Turkish Tatting video by Eftelyanin Mekikleri where there are many more than 3 wraps and the bare thread is not pulled down so that the stitch/picot stands erect. Also, the wraps are followed by a complete stitch rather than the 2nd half-stitch. 
I did it all in tatting. But it was not easy and many of my stitches are not as neat as they should/could be. I had started one in perle cotton but the thread unraveled so much that I snipped it off and started afresh with this Anchor size 20 thread. 
TIP: I suggest using 2 shuttles so that the thread can be balanced again by suspending the shuttle frequently. And use tightly twisted thread, polyester, silk, ....

I winged it and don't really have an exact count for the decorated chain. I started and ended with vapour stitch (3 wraps) but graduated up to 7 wraps.
The motif is 4cms wide and 3cms high.

For more Vapour Stitch info and links - https://tipsaroundthehome.blogspot.com/2024/09/variably-padded-lines.html and a few effects - https://tipsaroundthehome.blogspot.com/2025/01/the-years-flow.html

My previous E28 hearts & pattern from prototype to tweaked versions and a beaded jewel version - https://tipsaroundthehome.blogspot.com/2023/06/yet-another-heart.html   and  https://tipsaroundthehome.blogspot.com/2025/04/happy-tatting-day.html    Pattern PDF - https://drive.google.com/file/d/1-rWqmDAd51VwxOqtt9spD-FIX5zYDAUE/view

I had more shagun tatting to share - something tiny and fun, but will continue in a couple of days. Time to juggle ;-D Meanwhile I also have much more to share on the vapour stitch as well when I can take some pics .... 

I hope you did much more than shagun tatting, like I ended up doing ;-D

Tuesday, 1 April 2025

happy tatting day

Pin It now! The happy day of tatting, tatted lace, and tatters is here again! Hope you are well-stocked with threads, shuttles/needles, patterns, and ideas to feed your creativity, and of course tea and chocolates to feed your tummies! I hope to get tatting later today. 

In our Endrucks 1920 Project Facebook group, Ninetta has initiated a small event with a small motif pattern. The E28 Heart which I had derived from Eleonore Endrucks' pattern #28. 

When she shared the idea with me, I realised that my presentation from 2023 had been a quick one. So I took some time to update the PDF as well as tat another heart to refresh my memory, this time in two colours. 

You don't need to be a member of our FB group to join in! Here's the pattern link and if you send me or Ninetta a pic of your finished heart, we would be so happy to include it. (see top right section of my blog for relevant links under 'Follow Me'). And if it is your first Endrucks' pattern, you will be the recipient of a token gift.

E28 Heart by Muskaanhttps://drive.google.com/file/d/1-rWqmDAd51VwxOqtt9spD-FIX5zYDAUE/view

Ninetta tatted a pair of beautiful earrings. What will you do with the motifs you tat? I have a few ideas but it all depend on how much time I can devote.

So, happy tatting and happy ITD to all my readers and followers! Spread the cheer! 
And a huge thanks to Ninetta!

Sunday, 31 March 2024

happy ITD 2024

Pin It now!

 A day early, but we love our tatting year round, don't we?! So, keep your tatting tools and materials ready, choose your pattern, friends, and location, and have a blast with chocolate, tea, and chatting!!!

This is such a quick and fun medallion from Rebecca Jones' 'The Complete Book of Tatting', Fig. 123.
Tatted in Lizbeth size 20, with half-closed rings (HCR) instead of chains or bare thread to bridge the distance. A single-shuttle pattern obviously.

TIP: Notice how the top and top right cords appear more pointed than the rest? It shows how you can change the curve by changing how far you close the ring! The middle ring in both is closed more than halfway as seen in the shorter bare thread space. I'm tempted to tat another with a sharper pentagon shape, LOL.

I did use a folded picot gauge for the HCRs , but messed up with some of the rings. Of course the sure shot method would've been to use beads.

🌹🌹🌹🌹🌹

After a hiatus of three months, we begin our new game of the month for this year tomorrow, in the Endrucks FB group! Let me know if  you wish to join even if you aren't on FB. This is our pre-announcement:

A game of decoration where you will get a chance to
  • Refresh your skills
  • Learn something new
  • Apply your new learning
  • Do a bit of designing
  • And all while beautifying a little model!
It all depends on how far you wish to take it! But let us warn you that this can be quite addictive!

🌹🌹🌹🌹🌹

🌹🌹🌹🌹🌹 Once again, a very happy International Tatting Day to all 🌹🌹🌹🌹🌹

Saturday, 1 April 2023

Happy ITD

Pin It now!


From one end of the earth to the other, from one tip to the other, hopefully all tatters have celebrated or will celebrate their passion today 🍫❤️🍫❤️🍫

Wednesday, 6 April 2022

honoured and humbled

Pin It now!

I wanted to share this post on 1st April but got delayed. My bag of expected and unexpected gifts had arrived just 36 hours prior!!! But let's start from the beginning ....

Last November I was approached by an awesome designer whose blog I have been following for some years now - Erika Tashiro, better known as Tat-Marmelo (or tass_tat on Instagram). She was going to publish her 1st book of doily patterns in English (the Japanese version had been published in September) and needed some help with the Techniques. How could I refuse - it was such an honour.

This is her fabulous Lotus Flower motif she sent. Each stitch is perfect, each chain arched evenly, the thread has a stiffness that I haven't normally encountered in Anchor, Red Heart or Lizbeth. The tatting is so seamless, that one cannot locate the start/finish. Such a joy to hold in my hand.
She offered me a generous fee and free books (up to 30!) I immediately declined the former but asked for 4 copies. When they did  not arrive after a month and she couldn't get any clear response from the postal service, she kindly sent me 4 copies by air, along with the motif. So now I have 8 copies, 2 messages in her neat hand, and all these goodies! I am truly humbled.
I have always admired her artistic patterns and had printed out a couple of her free patterns years back. To have them all compiled in this spectacular book is bliss. Colour-coded diagrams accompanied with textual patterns, tips, and techniques. Clear pics of tatted lace. Very high quality throughout. Impressive and inspiring!
In the foreground is a cute cherry blossoms pop-up card with birds. 

These small Clover shuttles are ideal for tatting with size 80, and am so happy these are bobbin shuttles since post shuttles refuse to move in my hand.

See that reddish circle? It is April Fool's (Reiko Akimoto) 2016 Rose Circle Doily. Erika remembered my attempt to decipher the inserted rings and sent me the diagrammed pattern and technique! One more doily coming up, besides all the lovelies in Erika's own book! 

5 balls of size 40 thread - yummy!!!

Erika's book provides plenty of minute engineering and visual tips for impeccable tatting using Jan's method. Normally we have a few simple 'rules' for directional or fs/bs tatting. Her minute observations have revealed aspects I never even considered. She has micro-managed Jan's method and the above motif bears witness. 

For years now, I do fs/bs tatting and often choose to start a ring or round backside. Erika has done the same and lays out her philosophy in a prioritized list of which elements/rounds to start frontside or backside.

Clover polar grids that double up as design guides and blocking sheets. The last pages in her book have these grids, too! These, however are made of non-woven fabric and I'm sure they are washable, too.
This cloth fabric from Atelier Shishicass, has 2 halves of large polar grid printed on it. Very functional and practical. Now I have no excuse (except laziness ;-P) to not pin out my lace instead of using the rolling pin.

'Tatting Lace, Marmelo. Pattern Book 1' has so many gorgeous doilies, motifs, and jewellery to tat. I haven't been able to start on any, but treat my eyes on them frequently. And of course, she made my ITD memorable!

I mainly helped with the techniques section, that too at the final stages, and did not deserve the Supervisor tag, but she insisted. It was such a pleasure to communicate and work with her. She has been very receptive to all my suggestions and made respective edits, including some on one of her patterns. Her graphic depiction of beading and some other schema and legends are so clear and I hope to learn and apply the same to my patterns.    

Erika has already started to design and tat in preparation for her next book! Yet for close to 2 years she worked on her book, leaving little time to create new designs. Her 'inside story' of the entire process with lots of relevant information is something any designer wishing to publish a book would find useful. She uploaded 3 consecutive posts, the last of which is for her English version - https://tat-marmelo.blogspot.com/2022/03/3.html

Many many thanks for the opportunity to work with you, Erika, and for all your generous gifts! I wish you success and creative satisfaction in all you do.

Thursday, 31 March 2022

a happy day flower

Pin It now!
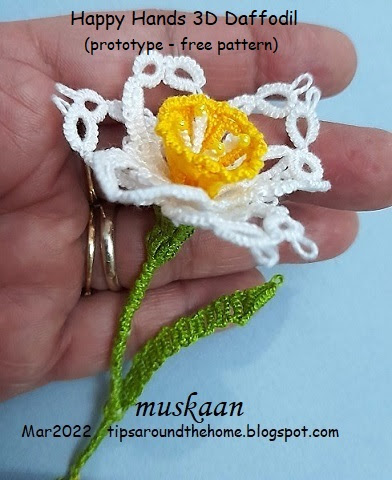
After the grumpiness last time, this flower seems to have settled down for now as a daffodil, which happens to be the flower of the month! She understands that there is a lot of improvement as well as diversity possible, but this is my little gift to all tatters on the eve of International Tat Day, 2022

Happy Hands 3D Daffodil  (prototype pattern continued)
adaptation of Endrucks' edging #1
The odd one out, but continuing the pattern for this prototype .....
After the first 3 petal fiasco, I chanced upon a superb daffodil pic posted by Coretta L where 3 petals were curved and the other 3 were pointed. This is the reason I chose to go with daffodil and after a bit of Googling, it turned out that it was the flower for March-born, besides having more meanings. Timely, huh!

Some abbreviations : ch = chain; LJ = lock join; fhs = 1st half-stitch; shs = 2nd half-stitch

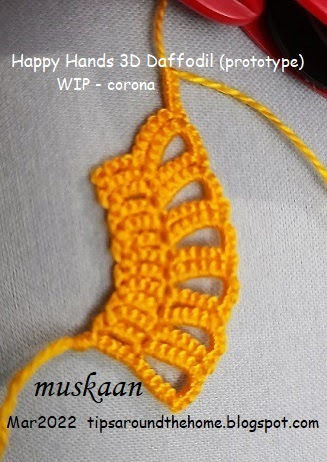
Corona : Use your preferred method of block tatting. I have followed Endrucks' style, using 2 shuttles, turn work (tw) and switch shuttle (SS). I simply knotted the threads, leaving the tails to add to the stalk.
ch-1: 1 - 4 - 6, tw SS
ch-2: - 4 - 6 LJ 4 LJ, tw SS 
ch-3: [ 1 - 4 LJ 6 LJ, tw SS
ch-4: 4 - 6 LJ 4 LJ, tw SS ]x6

Make one last chain and remember to join it to BOTH the 1st and previous chain at 2 points respectively. This creates a conical structure, with both threads emerging along the top edge. Continue ... 
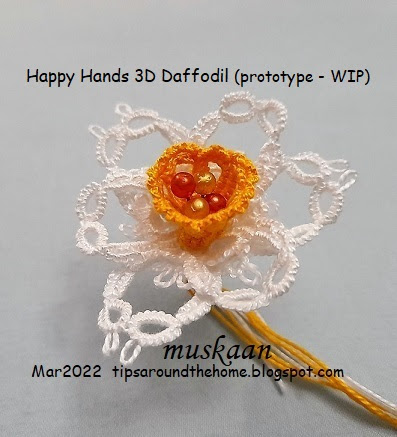
Corona Frill : is made with a row of Node stitch or Victorian Set chains, lock joined to the picot below. You can choose a different colour. 
Victorian Set Chain: [ 3fhs 3shs 3fhs 3shs, LJ ]x7

This is how it looks after the corona and frill is finished. I simply put in a few pearl head pins in the center. All tails have been inserted through the center space of the petals, and before snipping off, join the base of corona to the base of petals. If desired, we can use one of the tails to sew and anchor it.

TIP: We can add a 2nd row for a wider and more pronounced frill. This could be with sets of 4 or 5 half stitches each.
Anthers : Each is made separately with a bead at the tip of a lock chain. Use leftover thread, short lengths are sufficient, and single shuttle. String bead and work the lock chain below it. You can decide the length of each stamen. I varied the lengths using between 6 to 9 lock stitches, for 4 stamens.

Again, insert the tails through the center space and cut off, leaving a few inches of tail. After inserting the last stamen, make an overhead knot at the base, encapsulating all the tails.

Calyx : Block tatting. Start with a paper clip to hold picot or a lock stitch (without paperclip, which is what I did here). 2 shuttles, ctm. 
TIP: You can make a join to the base of a petal midways through the calyx 
ch-1: - 6 - 4, tw SS
ch-2: - 2 - 4 LJ 6 LJ, tw SS
ch-3: 1 half-stitch - 6 LJ 4 LJ, tw SS
ch-4: 2 - 4 LJ 6 LJ, tw SS   
ch-5: 1 half-stitch - 6 LJ 4 LJ, tw SS 
ch-6: - 2 - 4 LJ, tw SS   
ch-7: 4 LJ, tw SS
These are the 7 chains seen in the image above.
Repeat chains 2 & 3 twice. Wrap the open calyx around all the tails at the base of the petals. Make one last chain joining to BOTH 1st and last chain at both joining points so that we have a cone.
I used a drop of fabric glue to keep the tails and the calyx in place since I had not anchored the calyx. At the base, I made 2 overhand ties, keeping all tails within the knot.
Do not cut threads. Continue for stalk and leaf.
Stalk : Here we are encapsulating all the tails while covering it with unflipped stitches. You can choose to do a Josephine chain or simple direct tatting. I used an odd method to make a Lock Chain for a straight stalk. 
Lock Chain encapsulation : Always keep the tail ends encapsulated while making each half-stitch. Make unflipped shs, slightly rotate the stalk towards you, make a manoeuvred fhs, rotate stalk back to original position, and repeat this process for the desired length.

TIP: We make a manoeuvred half-stitch in Twist Work, as follows : https://drive.google.com/file/d/1To6YwZSkh2ffQH3XBcKZ-Ed3l4myW34c/view 

Stalk worked to the point where I now want to start a leaf. Continue without cutting threads.
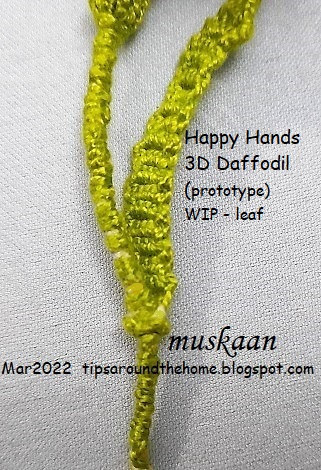
Leaf : is made with ring (forming a node), followed by a kind of phase-shift block tatting, ending in a folded ring.
ring: 4 - 6. Before closing, pull all tails through this ring and adjust the position.
ch-1: [ 1 - 3 LJ(to ring) 1, tw SS
ch-2: 1 - 4 LJ, tw SS ]x10-12
folded ring: 8 - 2fhs 8 2shs. 
You can either cut and hide ends, or whip stitch them back to the base of the leaf if you wish to continue with the stalk. I ran out of thread despite keeping the shorter length as core thread for the final chain, otherwise I would've liked the leaf to be a wee bit longer.
Having run out of thread, I joined new thread at the base of the leaf....... and continued the stalk for a short length. Then I tied and snipped off all tails and put a drop of glue to hold them together.
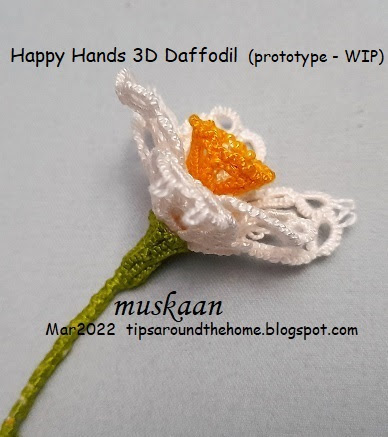
The stalk is semi-stiff and when held at the base of the leaf, it can hold the flower up. I have not done any kind of finishing here. This entire flower is as it is when it came off my shuttles.
I wanted more of a slant in the block chains for the leaf, but not quite successful. Will require more trials and testing.
A side view with displaced leaf. Yes, as I said in the beginning, this is a prototype and I have made several mistakes besides not being as neat as I would've liked. But hubby really likes it and I am happy for now. 
If there is sufficient interest, some day I will draw diagrams and create a pdf presentation.
Worked entirely with Anchor Pearl Cotton size 8. The flower spans 5cms, and the complete sprig is 8cms high; leaf is 4.5cms high.
Beware, some of the elements can be a bit fiddly, being small and 3D. Satisfying result, nevertheless.

Wishing you a very happy, chatty, chocolatey Tatting Day tomorrow. 
I have received such a wonderful gift and will share it as soon as I take pics!

All patterns from the Endrucks 1920 Project can be found here as pdfs - https://docs.google.com/document/d/17LEVftXweztBIOWh4sL4BB7bX65ssoOsOn4oXIgCepY/view


Monday, 31 May 2021

hopping around

Pin It now!
Bunnies and Tulips for Easter 2021
pattern - Kathleen Minniti

Couple of months back I was in a tatting funk - had lost the will to pick up my shuttles. And then suddenly patterns sprang into my inbox from generous friends! One such was from the very talented Kathleen Minniti. She sent me these bunnies and tulips pattern as an International Tatting Day gift on April 1st!

My shuttles came to life! Tried these, adding a bead for nose. The one on the right has whiskers and a dense tail which was supposed to have been frayed, but haven't gotten around to it yet. These were straight off the shuttles, without blocking or shaping or trimming the whiskers (made from sewing thread)
I still have thread left in the shuttle for a 3rd one, this time with a bead for eye.
Although I made little tweaks - so many what-ifs floating around in my head - there are no notes to share. I went with the flow and pleasure of simply tatting away.....

I Love the sense of movement this pattern has. Almost as if the bunny is about to hop, or is already hopping! Above, the black-nosed bunny is enjoying the fragrance of the tulip while the red-nosed bunny wouldn't be left behind and hops closer ...

... and displaces the smaller black-nosey who switches to the other side, awaiting it's turn again.

Aha, our curious red-nosey has found a new flower to explore, so black-nosey gets right back to it's original perch!

Although tatted around 4th/5th April, it's taken me so long to take pics and post. There's a whole lot more I wish to try out which was one of the reasons for this delayed post. There are lots of little versions to choose from or to tweak for our pleasure! Kathleen's genius in designing is evident in the use of simple techniques and effects to create several versions of swaying tulips and hopping bunnies.
And the great news is that all these patterns are now public - shared with the Online Tatting Class recently - https://www.georgiaseitz.com/2021/lessons_loglinks_reg2021.html 
You can be sure I'll be getting back to this again some time to make a proper composition!

Many many thanks to Kathleen, a generous friend and constant inspiration !