Showing posts with label vapour stitch. Show all posts

Saturday, 21 March 2026

Dedicating my 1000th

Pin It now!

For this 1000th post I kept musing on the choice of subject. And I finally decided to dedicate it to some of my favourite people who have shaped and inspired my tatting journey. This is a symbolic gesture to ALL the tatting teachers, designers, innovators, experimenters, explorers who have shared their own learnings and experiences. 

Three Geniuses and a brand new stitch in tatting!

Two years back I stumbled upon two drawings that gave Ninetta Caurso's treble tatting stitch a basis in tatting history! 

A drawing on page 31 in Anne Dyer's 1994 book, To Boldly Go Where No Shuttle Has Gone Before, showing the decorative chain picots. 

A drawing on page 85 in Rhoda Auld's 1974 book, Tatting: the contemporary art of knotting with a shuttle showing her twisting the thread (this twisted picot is something I had pointed out in my pictorial) and passing the shuttle through it. Her tatted model is what we now call the vapour stitch.

Well, our very talented Ninetta engineered the two movements to create her treble tatting stitch (tds) all on her own! At the time she did not posses either of the books and till I pointed it out to her, she had not noticed! Basically, the chain picot became the 1st half of the tds while the vapour stitch became the 2nd half of the tds! 

💧One of the reasons for the delay in posting this was ambiguity about whether I could share the diagram pic from the book with due credit. Anita suggested I ask Tamie Montgomery, who now runs The Online Tatting Class and is very mindful of such issues. She was very receptive and we discussed it. Although she said it was okay to use the accredited pics (like Georgia had done) since it was a 'technique', I still wasn't comfortable, till I hit upon the idea of showing it in thread as above. 

💧💧💧

Auld is gold bead effects!

Last year I found some new beading effects by Rhoda Auld in the same book and took the liberty to give them each a name based on words used by her.

Framed Bead - The diagram on page 107 has been in circulation through Georgia Seitz's classes for several years now. Georgia pitched it as a way to add a bead in the center of a ring and I used it in this butterfly


However, Rhoda showed it as a way to add a free bead on a long picot with bare thread framing the bead on both sides when slack is removed. Makes for some good possibilities.

Piggyback Beads - Now this was fun to discover! On pages 99-100 Rhoda shows how to place two free beads one over the other using simple movements. I tweaked it a bit to make it easier to tat.
Instead of loading the bead on the core thread where she has to move the chain stitches, I loaded it on the knotting thread (teal in above sample) and the rest of the process remains the same. On an earlier page, Rhoda makes the teal picot longer and ties up both picots till required for joining. Hence there are many options depending on the pattern.
My sample is a bit wonky, but you get the picture, right?
💧💧💧

Generosity knows no bounds!

💧I can't thank Anita Barry enough for gifting me so many vital books on my list. Without these I wouldn't have been able to review and edit Net Best's, Six T's of Shuttle Tatting, not with any satisfaction or confidence. These have helped me to confirm, correct, or refine terms for her glossary, and even understand and discover so many gems, some of which I took the liberty of adding to the glossary.

💧Judith Connors has been taking an active interest in the glossary, too, either as an answer to my question, as a reaction to my blog post, or reaching out on her own privately. You can imagine what a treasure trove of knowledge she is and how lucky we are to benefit from her skills. 

Judith sent me a copy of her 2000 book, Creative Tatting with beads, shuttle, and needle. It has some of my all-time favourite patterns besides numerous interesting effects and applications. While I read the book, tatting models will be later in the year. 

💧Late last year I received a wonderful digital book by Carin Jansen, Riego ReTatted (2023).  She needed some advice on selling the book through the USA, not being sure of its reception. With permission, I sought Anita's advice and we both gave our respective take urging Carin to put it on the market. Eventually she decided against it for personal reasons, though she has shared her Dutch version within her group. It is such a labour of love and we hope she will change her mind in future. Carin has chosen patterns from each of Mlle Eleonore Riego's books (1850-1886) and shared detailed steps and modernised versions/tips in a pleasant format alongside diagrams and written patterns. 

💧💧💧

I'd like to think that my blog has stayed true to its name to the extent that almost 95% of my posts have a tip of some kind. Unfortunately I couldn't stay true to the url since this blog soon turned into a tatting blog ... not that I'm complaining, LOL. 

Hope you continue to follow my blog and read my posts. 💞

You will find tutorial links to terms in this post here - https://tipsaroundthehome.blogspot.com/p/tatting-resources.html and you can use the search box on the right panel to look for past posts on the tags used here and much more.

💧💧💧

Many many thanks to all the wonderful tatters mentioned here and also to those not mentioned who have influenced, inspired, and improved my tatting journey and maintained my eagerness to blog.

Wednesday, 2 April 2025

shagun tatting

Pin It now!

 'Shagun' is a Hindi word derived from Sanskrit which denotes good omen, auspiciousness, a token, .... Though it it is associated more with Hindu rituals, we also use it in daily life to commemorate an event, an occasion, or any good news with the elders blessing the young with a symbolic token. Or if we cannot perform an entire task, some small part of the ritual/task is started on an auspicious day.  

This is what I try to do every International Tatting Day! This day is also very special for personal reasons and I tend to be busy elsewhere. Yet I make it a point to pick up my shuttle and thread and tat at least a ring or two and not let the day 'pass by' ;-D Despite a very busy first half, I managed to find time from evening onwards and actually completed not one but two motifs! One had only 2 rings and a chain left to tat (I'll share this tomorrow) while the heart motif I started from scratch and completed! 

doesn't it look like a possible angel?!
My new version using graduated and 'erect' vapour stitch which is more like a picot here. I was inspired by a recently shared Turkish Tatting video by Eftelyanin Mekikleri where there are many more than 3 wraps and the bare thread is not pulled down so that the stitch/picot stands erect. Also, the wraps are followed by a complete stitch rather than the 2nd half-stitch. 
I did it all in tatting. But it was not easy and many of my stitches are not as neat as they should/could be. I had started one in perle cotton but the thread unraveled so much that I snipped it off and started afresh with this Anchor size 20 thread. 
TIP: I suggest using 2 shuttles so that the thread can be balanced again by suspending the shuttle frequently. And use tightly twisted thread, polyester, silk, ....

I winged it and don't really have an exact count for the decorated chain. I started and ended with vapour stitch (3 wraps) but graduated up to 7 wraps.
The motif is 4cms wide and 3cms high.

For more Vapour Stitch info and links - https://tipsaroundthehome.blogspot.com/2024/09/variably-padded-lines.html and a few effects - https://tipsaroundthehome.blogspot.com/2025/01/the-years-flow.html

My previous E28 hearts & pattern from prototype to tweaked versions and a beaded jewel version - https://tipsaroundthehome.blogspot.com/2023/06/yet-another-heart.html   and  https://tipsaroundthehome.blogspot.com/2025/04/happy-tatting-day.html    Pattern PDF - https://drive.google.com/file/d/1-rWqmDAd51VwxOqtt9spD-FIX5zYDAUE/view

I had more shagun tatting to share - something tiny and fun, but will continue in a couple of days. Time to juggle ;-D Meanwhile I also have much more to share on the vapour stitch as well when I can take some pics .... 

I hope you did much more than shagun tatting, like I ended up doing ;-D

Wednesday, 1 January 2025

the years flow

Pin It now!


I've taken a few decisions for 2025 - objectives I hope to achieve. Focus on completing the book edit and hope for it to be published before this year is out, and also blog more. There's so much I learned in the past year but didn't get around to sharing.

This also means cutting down or pausing a few other tasks and projects. 

Hope you have sorted out your priorities for this year? May the underlying thread remain the enjoyment of self and also spreading the joy of the journey and destination.

💙💚💙💚💙 

The above collection of samples kind of symbolize my past year and perhaps even the future. These are all rings with the vapour stitch where I experimented with variables wraps, etc. Some look fine, others do not. While the bouquet looks fine, the unfinished/unpolished and incomplete nature also comes through. 2024 was a year spent in learning, exploring, experimenting, completing some projects while some remained unfinished. I chased a lot of projects, wanted to take up more than I did, and enjoyed almost all despite the paucity of time. I was happy to push through my comfort zone, too. And you have joined me in all my journeys. Hope to read your comments again this year!

💙💚💙💚💙 

UPDATE: I had sent this to Natalie to cross off the Vapour Stitch box in her PICOT Bingo game. However I could not complete the game.

Saturday, 28 September 2024

variably padded lines

Pin It now!

If you tat only for beautiful lace, this post might not be for you, though it does showcase some lovely effects. My approach to tatting is different and I enjoy all aspects, including delving a bit deeper and finding commonalities or differences. And there was one discovery here that really got me excited!

Another post in my Common Threads series, a consequence of my research, tatting, and editing for 'Six T's of Shuttle Tatting' by Net Best. Sharing my thoughts and observations and short explanation of concepts. 

PADDED DOUBLE STITCH (pds) or padding the stitch (as different from padded tatting) has been around for several decades, with Rhoda Auld's (1974) 'self-padded double stitch' followed by the balanced DS and double DS. You can read the detailed and comparative post, along with a pictorial and notations, here - https://tipsaroundthehome.blogspot.com/2015/11/pds-padded-double-stitch.html .

VARIABLE  PADDED  STITCH - In this 2014 post,  https://tipsaroundthehome.blogspot.com/2014/05/tatting-experimenting-with-stitch.html , I showed a few possibilities of padding only one half-stitch as in spiral tatting; of having more than 2 or 3 wraps; and more importantly of making a variable/uneven number of wraps in the half-stitches. This can be applied to both rings and chains.

TIP: Due to the wraps, it is essential to suspend the shuttle at intervals so that the thread regains its balance. 

LINE is a generic term used by Anne Dyer to refer to the different ways rings and chains can be 'knotted' - basically the different stitches we can use to achieve a certain look and effect. Some may require auxiliary threads and shuttles; some might apply only to one type of element; some may be better expressed through use of contrasting colours; and so on. We can all name multiple techniques starting with regular double stitches to pearl tatting, Victorian sets to lock chains, ....
💧💧💧💧💧

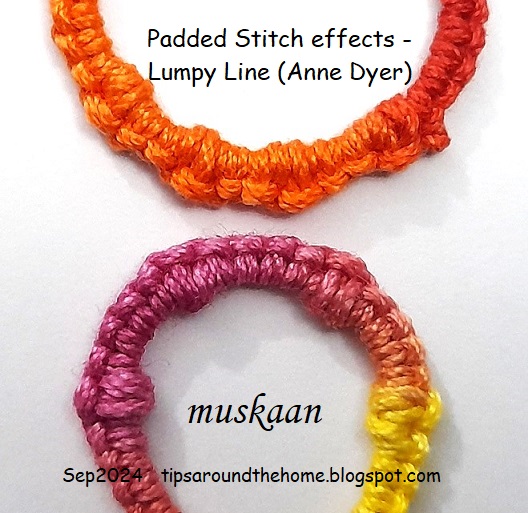
LUMPY LINE - another term and effect by Anne Dyer (1993) where she uses a padded stitch after every 3 or 4 double stitches creating a lumpiness to an otherwise smooth line. Here both halves of the padded stitch have three wraps giving it more body or bulk. The lump can become more pronounced if not tensioned too tightly.
Notation for Lumpy Line (the lower model) - 
Ring or Chain: [4, 1pds(3,3)]x4, 4. 
In the top red/orange model, I did not space the pds enough, leaving only 2 DS between.
💧💧💧💧💧

The following two effects of variable padded stitch threw up a very exciting observation!!!! It is the reason I took stepwise pics despite the existence of excellent resources, so that you can compare yourself!

SPIRAL  KNOT  STITCH - a term coined by Jennifer Williams (2012) along with a pictorial here - https://www.cariad-tatting.com/techniques . It is a textured effect made with a single padded half-stitch flanked by normal DS. An example of variable PDS.

1. Following a DS, tat a 2nd half-stitch (SHS) but do not snug. Instead pass your shuttle back to front thrice through the open leg as we would normally do for any PDS. 
TIP: There are 3 ways to make the wraps, but once transferred, the result is identical. Follow whichever method you prefer.
2. The 3 wraps are now being snugged ...
3. Notice how the wraps or spirals coil around the Core thread. 
They are, after all, the additional 'legs' of the stitch.
4. Continue with 1DS.
Repeat from steps 1 to 4 for desired length.

5. A ring and a chain with spiral knot stitch or variable padding.
Notation example for Spiral Knot Stitch (no FHS in the PDS) - 
Ring or Chain: 4, [1pds(-,3), 1]x4, 4.

💧💧💧💧💧

VAPOUR STTICH - by Ninetta Caruso (2011)    (https://www.flickr.com/photos/ninettacaruso/5660263485/in/album-72157625550124777) more popularly known as the Vapor Picot. This can also be considered a variable PDS, but with a notable difference in the initial step itself. 

UPDATE: This stitch was used in a ring by Rhoda Auld in her 1974 book but constructed a bit differently. More about it in a future post.

1. Make the first half-stitch (FHS) but do not snug. Pass the shuttle from front to back through the loop but BEHIND the open leg. The crochet hook shows how the shuttle would need to move.
2. Here the shuttle is following the path outlined above.
3. Repeat the step twice more, thus making three wraps behind the leg (they are now around the leg). The thread tends to twist.
4. Now transfer the wraps to the ball thread and gradually allow the wraps/spirals to move down snugly. Notice how the wraps are stacked one above the other vertically - the complete opposite of spiral knot stitch. (Compare pic #3 of spiral knot stitch with pic #4 of vapour stitch)  
5. Tat second half-stitch to complete the vapour stitch.
6. Vapour stitches on ring and chain. In the ring, they are contiguous. In the chain, 1 DS separates 1st and last vapour stitch from the 3-stitch cluster in the center.
Notation example for Vapour Stitch (wrapping behind leg of FHS) - 
Ring : 7pds(3,0).
Chain : 8, 1pds(3,0), 1, 3pds(3,0), 1, 1pds(3,0), 8.
 
Both effects together. I have limited my samples to the very basics. It is interesting to play with the number of wraps especially as shown by Ninetta. When you increase the number of wraps, we get a curved coil. 

When I told Ninetta of my discovery, she remembered that Karen Cabrera had also made the same observation, having consecutively shot videos for both stitches! Watch her demos in Lessons 131 and 132 (http://entrelanzaderas.blogspot.com/2010/10/clases-de-frivolite-tatting-lessons.html)

💧💧💧💧💧

Now this next effect is not strictly a padded double stitch but I found it so interesting when I had tatted my first sample as Anita and I worked through the book (or started to but never finished!) last year. (https://tipsaroundthehome.blogspot.com/2023/06/bigger-flower.html).

KNOBBLY  LINE - Anne Dyer (1993). The way this is worked is completely new to me, but very easy. I do hope to use the effect in some project. Applicable to both rings and chains.

We work 2 DS, but leave a very small picot space between them without snugging. Start the 3rd DS but move the ball thread loop over the open space before tensioning the half-stitch. Follow this by a normal SHS. This is seen in the right sample above. She says to make 'sure the twist is on the top and not at the back'. I found this a wee bit fiddly this time and had to manually coax the thread into the desired twist.
The sample on the left is made similarly, but I let the loop slide and sit 'naturally' following its normal grain or twist. Thus the 'bar' faced back. The difference in look is evident and I kind of prefer my variation, LOL. 
The same samples as seen from the back are also interesting.

So, while this knobbly line does not strictly conform to PDS or variable PDS, there is a tiny bit of 'padding' since a half-stitch is tightened over previous work. And I like the effect!
💧💧💧💧💧

If you have managed to read this far, I commend your patience and passion! And I'd like to stress that this is not a comprehensive listing of variable padded stitch effects. It is probably the tip of the proverbial ice berg. Why not create your own?

💧💧💧💧💧

Many thanks to all mentioned above - they enrich our world of tatted lace!