Showing posts with label Jennifer Williams. Show all posts

Saturday, 28 September 2024

variably padded lines

Pin It now!

If you tat only for beautiful lace, this post might not be for you, though it does showcase some lovely effects. My approach to tatting is different and I enjoy all aspects, including delving a bit deeper and finding commonalities or differences. And there was one discovery here that really got me excited!

Another post in my Common Threads series, a consequence of my research, tatting, and editing for 'Six T's of Shuttle Tatting' by Net Best. Sharing my thoughts and observations and short explanation of concepts. 

PADDED DOUBLE STITCH (pds) or padding the stitch (as different from padded tatting) has been around for several decades, with Rhoda Auld's (1974) 'self-padded double stitch' followed by the balanced DS and double DS. You can read the detailed and comparative post, along with a pictorial and notations, here - https://tipsaroundthehome.blogspot.com/2015/11/pds-padded-double-stitch.html .

VARIABLE  PADDED  STITCH - In this 2014 post,  https://tipsaroundthehome.blogspot.com/2014/05/tatting-experimenting-with-stitch.html , I showed a few possibilities of padding only one half-stitch as in spiral tatting; of having more than 2 or 3 wraps; and more importantly of making a variable/uneven number of wraps in the half-stitches. This can be applied to both rings and chains.

TIP: Due to the wraps, it is essential to suspend the shuttle at intervals so that the thread regains its balance. 

LINE is a generic term used by Anne Dyer to refer to the different ways rings and chains can be 'knotted' - basically the different stitches we can use to achieve a certain look and effect. Some may require auxiliary threads and shuttles; some might apply only to one type of element; some may be better expressed through use of contrasting colours; and so on. We can all name multiple techniques starting with regular double stitches to pearl tatting, Victorian sets to lock chains, ....
💧💧💧💧💧

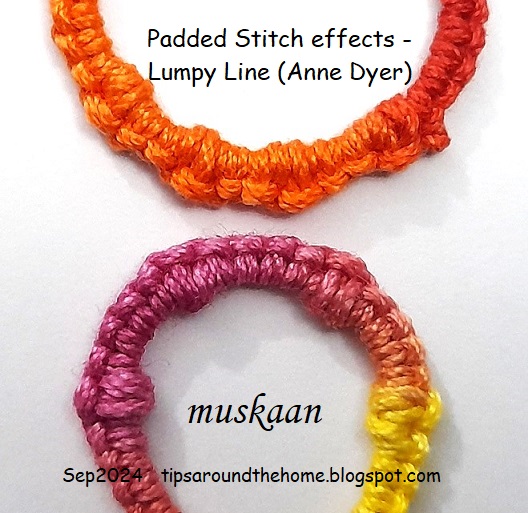
LUMPY LINE - another term and effect by Anne Dyer (1993) where she uses a padded stitch after every 3 or 4 double stitches creating a lumpiness to an otherwise smooth line. Here both halves of the padded stitch have three wraps giving it more body or bulk. The lump can become more pronounced if not tensioned too tightly.
Notation for Lumpy Line (the lower model) - 
Ring or Chain: [4, 1pds(3,3)]x4, 4. 
In the top red/orange model, I did not space the pds enough, leaving only 2 DS between.
💧💧💧💧💧

The following two effects of variable padded stitch threw up a very exciting observation!!!! It is the reason I took stepwise pics despite the existence of excellent resources, so that you can compare yourself!

SPIRAL  KNOT  STITCH - a term coined by Jennifer Williams (2012) along with a pictorial here - https://www.cariad-tatting.com/techniques . It is a textured effect made with a single padded half-stitch flanked by normal DS. An example of variable PDS.

1. Following a DS, tat a 2nd half-stitch (SHS) but do not snug. Instead pass your shuttle back to front thrice through the open leg as we would normally do for any PDS. 
TIP: There are 3 ways to make the wraps, but once transferred, the result is identical. Follow whichever method you prefer.
2. The 3 wraps are now being snugged ...
3. Notice how the wraps or spirals coil around the Core thread. 
They are, after all, the additional 'legs' of the stitch.
4. Continue with 1DS.
Repeat from steps 1 to 4 for desired length.

5. A ring and a chain with spiral knot stitch or variable padding.
Notation example for Spiral Knot Stitch (no FHS in the PDS) - 
Ring or Chain: 4, [1pds(-,3), 1]x4, 4.

💧💧💧💧💧

VAPOUR STTICH - by Ninetta Caruso (2011)    (https://www.flickr.com/photos/ninettacaruso/5660263485/in/album-72157625550124777) more popularly known as the Vapor Picot. This can also be considered a variable PDS, but with a notable difference in the initial step itself. 

UPDATE: This stitch was used in a ring by Rhoda Auld in her 1974 book but constructed a bit differently. More about it in a future post.

1. Make the first half-stitch (FHS) but do not snug. Pass the shuttle from front to back through the loop but BEHIND the open leg. The crochet hook shows how the shuttle would need to move.
2. Here the shuttle is following the path outlined above.
3. Repeat the step twice more, thus making three wraps behind the leg (they are now around the leg). The thread tends to twist.
4. Now transfer the wraps to the ball thread and gradually allow the wraps/spirals to move down snugly. Notice how the wraps are stacked one above the other vertically - the complete opposite of spiral knot stitch. (Compare pic #3 of spiral knot stitch with pic #4 of vapour stitch)  
5. Tat second half-stitch to complete the vapour stitch.
6. Vapour stitches on ring and chain. In the ring, they are contiguous. In the chain, 1 DS separates 1st and last vapour stitch from the 3-stitch cluster in the center.
Notation example for Vapour Stitch (wrapping behind leg of FHS) - 
Ring : 7pds(3,0).
Chain : 8, 1pds(3,0), 1, 3pds(3,0), 1, 1pds(3,0), 8.
 
Both effects together. I have limited my samples to the very basics. It is interesting to play with the number of wraps especially as shown by Ninetta. When you increase the number of wraps, we get a curved coil. 

When I told Ninetta of my discovery, she remembered that Karen Cabrera had also made the same observation, having consecutively shot videos for both stitches! Watch her demos in Lessons 131 and 132 (http://entrelanzaderas.blogspot.com/2010/10/clases-de-frivolite-tatting-lessons.html)

💧💧💧💧💧

Now this next effect is not strictly a padded double stitch but I found it so interesting when I had tatted my first sample as Anita and I worked through the book (or started to but never finished!) last year. (https://tipsaroundthehome.blogspot.com/2023/06/bigger-flower.html).

KNOBBLY  LINE - Anne Dyer (1993). The way this is worked is completely new to me, but very easy. I do hope to use the effect in some project. Applicable to both rings and chains.

We work 2 DS, but leave a very small picot space between them without snugging. Start the 3rd DS but move the ball thread loop over the open space before tensioning the half-stitch. Follow this by a normal SHS. This is seen in the right sample above. She says to make 'sure the twist is on the top and not at the back'. I found this a wee bit fiddly this time and had to manually coax the thread into the desired twist.
The sample on the left is made similarly, but I let the loop slide and sit 'naturally' following its normal grain or twist. Thus the 'bar' faced back. The difference in look is evident and I kind of prefer my variation, LOL. 
The same samples as seen from the back are also interesting.

So, while this knobbly line does not strictly conform to PDS or variable PDS, there is a tiny bit of 'padding' since a half-stitch is tightened over previous work. And I like the effect!
💧💧💧💧💧

If you have managed to read this far, I commend your patience and passion! And I'd like to stress that this is not a comprehensive listing of variable padded stitch effects. It is probably the tip of the proverbial ice berg. Why not create your own?

💧💧💧💧💧

Many thanks to all mentioned above - they enrich our world of tatted lace!

Friday, 29 December 2023

oversew and so on

Pin It now!

For the longest time since (mid-1980s) I have wondered what ‘oversew’ meant when hiding tails at the end of a tatting project. I came across it in my Anchor and Coats books. Tried my own methods (including overcast stitch as in embroidery) but none worked out – knotting was the only way I knew and continued with it despite the 'ugliness'. 

Two decades later, on the net, I asked around, to no avail, but I switched to whip stitch some years ago.  Until a few months back when Jean Inglis used the term in her FB post! At my request, she explained and also uploaded a WIP pic. It got me thinking and I obviously had to try it out to compare and contrast with other sewing methods of hiding ends/tails as compiled here -. https://tipsaroundthehome.blogspot.com/2016/11/beginning-or-ending.html

In my current study, I found two main methods that are commonly used to sew in the ends. Please excuse my shoddy samplers below (the sewing thread/tail should not be visible once it is pulled tight). I have used a contrasting blue thread as tails or ends for the purpose of clarity.

The first is what I will now refer to as OVERSEW

Here, we sew the tail Under the cap or waist band of the double stitch, and weave between the legs of the ds - under and over the half-stitches.  Hence a 10 ds count segment will give you 10 stitches front and behind. This method is diagrammed clearly by Jennifer Williamshttps://www.cariad-tatting.com/techniques.  

A variation of this method is shared by Lily Morales where we weave between the double stitches. Hence if there are 10 ds, you have 5 stitches under the caps in front, and 5 behind. [the link from The Online Tatting Class is currently unavailable]. 

The second method is WHIP STITCH. Here we sew the tail across the Top of the caps, weaving in between the double stitches. You can clearly see the tail (blue thread) moving over the top of the stitches instead of through the sides. This is my go-to method for 7 years now, when Carollyn Brown uploaded her video - https://www.youtube.com/watch?v=7Q-JloBBdIM and it just clicked with me.

Jean Inglis'  Mom taught her to tat in 1980 and to sew in her ends as above. She used the term 'oversew'. She unravels the tail and uses the thinner thread to sew and hide, thus leaving a tinier footprint. But look closely, and you realise it is actually the whip stitch! Yet, this unraveling of thread can be used for the oversew methods described above, too.

This is also called OVERCASTING in some literature.

In conclusion, I'd say traditionally 'oversew' would simply have meant to sew in the tails whether you wove the tail under or over the caps; between double or half-stitches. However, if we wish to fine tune it, we can differentiate oversew from whip stitch as explained above.

Feel free to share your own thoughts and experience; no need to hide them!


For an annotated and frequently updated listing of the many ways to start, add, or hide ends, mostly knotless: https://tipsaroundthehome.blogspot.com/2016/11/beginning-or-ending.html

Many thanks to all mentioned above, and those not mentioned, who constantly help us improve our knowledge, understanding, and skills.

Saturday, 27 April 2019

ribbon hairband pattern

Pin It now!
I was looking for a gift for a little girl when someone posted their working of Jennifer Williams’ Bookmark 3 (bookmark with 2 layers). It could work nicely as a hairband!  But could I adapt my positivity ribbon to it? 

Positivity Ribbon Hairband
an adaptation of an awareness ribbon and a bookmark !
(Bookmark 3 by Jennifer Williams)

Tadaa – quick and clean with just some minor tweaks. Completed in a day!

  • It would look nice in 2 colours, but I chose single colour, and added different ribbons to her gift box so she can change as desired.
  • The clever design is also reversible whether worked in same or different colours.
  • Use it as a hairband, bookmark, or a hatband. Or tie it as a bracelet or choker!

Materials & Measurement:
2 shuttles, continuous thread
Anchor pearl cotton size 8 (yellow shade – 00297)
½” wide satin ribbon
Finished ribbon band measures 13”x1” after 26 upper and 14 lower rings
  
NOTE:
1.      For every 2 rings above, there is 1 ring below
2.      Rings on top, and chains are worked with shuttle1 ; rings below are worked with shuttle2.
3.      For directional tatting, all chains and lower rings are worked backside (RODS)
4.      For joining the top rings, refer to diagrams in this Positivity Ribbon pattern.
5.      Also refer to Jennifer’s Bookmark in two layers for detailed instructions on construction.

PATTERN:
2 shuttles, ctm

top ring1 : 7-5-7   rw, ss
lower ring : 8-8 fold the ring , ss
chain : 2(-2)x5  rw  [5p]
top ring2 : 7-5-7  rw
chain : 2+2(-2)x4  rw  [5p]
Repeat these 5 elements to desired length.
To turn the back:
chain : 2+2(-2)x17 [18p]

On the return, repeat the same pattern but remember that each ring is joined to it’s counterpart, ending with the long chain. 
A hollow pocket is created through which ribbon can be inserted. Change the ribbon colour to match the outfit! 
  
There is one difference that occurs in this adaptation – the rings below join at an angel creating a slanting ladder. I like the effect, though not very distinct here.

I can vouch that the hairband looked Gorgeous when she tied it on (as did she ;-P)!

Many many thanks, Jennifer ! 

Related Posts :


Tuesday, 29 January 2019

Jennifer's heart

Pin It now!

Life is too much in the way to get some uninterrupted quiet time to tat. I face this slow-time during winters. I am barely spending an hour every other day at the desktop L No wonder the pattern presentations I’m working on is sloooooow!

But this beautifully designed filigree heart warmed me and was quickly shuttling away! Jennifer Williams has so many beautiful patterns to try out. And her instructions are easy to follow and presentation is superb! 

Worked in Anchor size 40 (shade 00047), it is 6cms high and just under 7cms wide.

Made with the most basic techniques, in one pass, using a shuttle and ball. One only needs to be mindful of the chain segments, which she points out clearly.

TIP : Inner round starts with a picot on chain to avoid cutting thread and a good skill to possess. But if a beginner is uncomfortable, they can start with any inward-facing ring and end with chain, cut and tie. Then start the outer round afresh.

TWoT analysis revealed that my shuttle will remain on right side when climbing out to the next row where there are chains with lots of picots. Hence I decided to do the chains frontside and rings backside (rods). It helped to think and plan ahead. 

I am tempted to keep this heart - it feels so good to look at, and to touch ;-D


Friday, 14 September 2018

Cluny basic colour variation

Pin It now!
Colour Cluny Tatting contd.

In the previous post the tally was worked in a single colour. But what if we wish to use 2 colours in a pattern? There are a few examples out there, but I find that the tallies are of the same colour in all. In a couple of examples, SLT was used to switch colours for the next element. What if we could switch the colours easily within the tally, with no need for a SLT? It’s what I tried in this braid and motif.

Confession: My Cluny leaves are far from perfect. Please do not let my limitations dissuade you from trying it out yourself. I’m sure you will do a much better job than I.

What we have here is a kind of transition between the basic single colour tally (where both loom & weaving threads are of same colour) and the multicoloured tallies where 2 or more colours can be seen in the leaf itself. As in the basic Cluny, we are still using only 2 threads, albeit in different colours. And this entails an additional step to hide colour blip.

UPDATE : practice pattern for basic colour variation : 2-Tone Cluny Bracelet.


Cluny Tatting –Basic Colour Variation
Basic (2 threads) Cluny tatting in 2 colours
(where Warp/loom thread is of different colour)
Resultant tally is single coloured

The following will be covered here :
  • Weaving a different coloured tally (2 ways – A & B)
  • Exiting in a way that the desired colours/shuttles are in position for next element (A4 & B2).
  • Hiding a colour blip (A6 &B3)
 
A1. As seen, the loom/Warp threads are mustard, while the weaving thread is green.
A2. We start weaving by bringing the shuttle to the right – Under Warp2 & Over Warp3

 
A3. First pass made to the left – Under, Over, Under. To complete the 1 wrap/weave, bring shuttle back to right – Over, Under, Over. (not shown here)
A4. The tally is woven and shaped. Shuttle is back to the starting position - on the right.

 A5. Start closing loom by pulling the top loop off the loom.

A6. If we close normally, the Warp colour will show at the tip. 
In order to minimize it, I introduced an extra step
Pass shuttle back-to-front through the top loop
NOTE : In certain cases, it may become necessary to pass shuttle front-to-back.

 
A7. … the shuttle is through and we can start closing the top loop
A8. Top loop is closed. Now close the bottom loop.
 
A9. All loops closed and tally is complete. 
Notice I haven’t pulled the lower loop tight enough, leaving a colour blip at the bottom (I still need lots of practice). This would be unnoticeable in a single colour basic tally, but when working with more than one colour, it can pose a problem.
If we follow this weaving pattern, there is a tendency for the weaving thread to emerge on the right, and the loom shuttle on the left.

A10. If we want to change colour placement in the next element, we would normally resort to the SLT/overhand tie as I did in this case. But, the following pictures show how we can avoid the SLT.

I took this opportunity to also show the other way to weave (Ninetta pointed it out in her comment). No right or wrong, it’s just how one prefers to work, as long as one is consistent. 
B1. After the SLT, the shuttles got switched and loom is made with green, 
and weaving is done with mustard.
Here, the weaving commences from left to right by going Over Warp2, Under Warp3.
 Move to left is Over, Under, Over (not shown) Continue weaving.

 B2. Tally is woven and shaped. The shuttle is on the left, and it is time to close.

 B3. To avoid colour blip, pass shuttle, back-to-front, through top loop….

 B4. … shuttle is through. Now close all loops.

 B5. This closure brings the weaving shuttle to the left and loom shuttle to the right.

So basically, 
the last pass determines whether the weaving shuttle will emerge on the right or the left.
If the last pass is to the right (as in A4), weaving shuttle will emerge on the right 
and loom shuttle on the left.
If last pass is to the left (as in B2), weaving shuttle will emerge on the left 
and loom shuttle on the right.

Where you park your shuttle, is where you will pick it up from – the left curb or the right curb. And in case you want it on the other side, then take a U-turn, i.e., weave one extra pass and you land on the curb of your choice!
Couldn’t resist a bit of frivolity ;-P 

It is what I followed in the Cluny Flower Motif pattern by Jennifer Williams. No SLTs. I chose to make the short chain between tallies in maroon, but could just as easily have made them in pink by choosing where to leave the weaving on the last pass.
In Anchor size 20 : Rnd1 - 1¼” ; Rnd2 - >2"
One can see my tallies get a wee bit better as I go along. One of the pink tallies is actually shorter than the others. I keep losing track of the count when weaving ;-(
Further, I didn’t RW to join to the center ring, opting for a lock join instead. This meant I could tat the entire Cluny round clockwise from the front.


We’ve taken the first steps towards colour Cluny tatting. From the next post on, we start with the tallies that have more than one colour in their weave! I found that a bit more exciting (my tallies came out better, too), though one does need to manage the extra threads. Hope you stay tuned...


I’d like to thank Jane McLellan with all my heart.
Appreciate her indulgence and help as we tried to figure out a suitable name 
for this transitional basic to multi-colour Cluny tatting.

…to be continued