Pin It now!
If you tat only for beautiful lace, this post might not be for you, though it does showcase some lovely effects. My approach to tatting is different and I enjoy all aspects, including delving a bit deeper and finding commonalities or differences. And there was one discovery here that really got me excited!
Another post in my
Common Threads series, a consequence of my research, tatting, and editing for 'Six T's of Shuttle Tatting' by Net Best. Sharing my thoughts and observations and short explanation of concepts.
PADDED DOUBLE STITCH (pds) or padding the stitch (as different from padded tatting) has been around for several decades, with
Rhoda Auld's (1974) 'self-padded double stitch' followed by the balanced DS and double DS. You can read the detailed and comparative post, along with a pictorial and notations, here -
https://tipsaroundthehome.blogspot.com/2015/11/pds-padded-double-stitch.html .
TIP: Due to the wraps, it is essential to suspend the shuttle at intervals so that the thread regains its balance.
LINE is a generic term used by Anne Dyer to refer to the different ways rings and chains can be 'knotted' - basically the different stitches we can use to achieve a certain look and effect. Some may require auxiliary threads and shuttles; some might apply only to one type of element; some may be better expressed through use of contrasting colours; and so on. We can all name multiple techniques starting with regular double stitches to pearl tatting, Victorian sets to lock chains, ....
💧💧💧💧💧
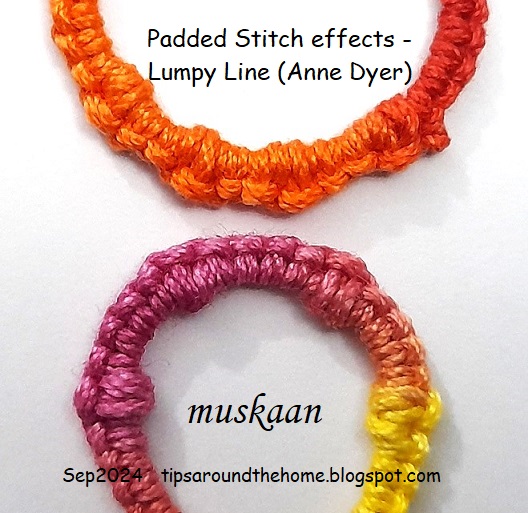
LUMPY LINE - another term and effect by
Anne Dyer (1993) where she uses a padded stitch after every 3 or 4 double stitches creating a lumpiness to an otherwise smooth line. Here both halves of the padded stitch have three wraps giving it more body or bulk. The lump can become more pronounced if not tensioned too tightly.
Notation for Lumpy Line (the lower model) -
Ring or Chain: [4, 1pds(3,3)]x4, 4. In the top red/orange model, I did not space the pds enough, leaving only 2 DS between.
💧💧💧💧💧
The following two effects of variable padded stitch threw up a very exciting observation!!!! It is the reason I took stepwise pics despite the existence of excellent resources, so that you can compare yourself!
SPIRAL KNOT STITCH - a term coined by
Jennifer Williams (2012) along with a pictorial here -
https://www.cariad-tatting.com/techniques . It is a textured effect made with a single padded half-stitch flanked by normal DS. An example of variable PDS.
1. Following a DS, tat a 2nd half-stitch (SHS) but do not snug. Instead pass your shuttle back to front thrice
through the open leg as we would normally do for any PDS.
TIP: There are 3 ways to make the wraps, but once transferred, the result is identical. Follow whichever method you prefer.
2. The 3 wraps are now being snugged ...
3. Notice how the wraps or spirals coil around the Core thread.
They are, after all, the additional 'legs' of the stitch.
4. Continue with 1DS.
Repeat from steps 1 to 4 for desired length.
5. A ring and a chain with spiral knot stitch or variable padding.
Notation example for Spiral Knot Stitch (no FHS in the PDS) -
Ring or Chain: 4, [1pds(-,3), 1]x4, 4.
💧💧💧💧💧
VAPOUR STTICH - by Ninetta Caruso (2011) (https://www.flickr.com/photos/ninettacaruso/5660263485/in/album-72157625550124777) more popularly known as the Vapor Picot. This can also be considered a variable PDS, but with a notable difference in the initial step itself.
UPDATE: This stitch was used in a ring by Rhoda Auld in her 1974 book but constructed a bit differently. More about it in a future post.
1. Make the first half-stitch (FHS) but do not snug. Pass the shuttle from front to back through the loop but BEHIND the open leg. The crochet hook shows how the shuttle would need to move.
2. Here the shuttle is following the path outlined above.
3. Repeat the step twice more, thus making three wraps behind the leg (they are now around the leg). The thread tends to twist.
4. Now transfer the wraps to the ball thread and gradually allow the wraps/spirals to move down snugly. Notice how the wraps are stacked one above the other vertically - the complete opposite of spiral knot stitch. (Compare pic #3 of spiral knot stitch with pic #4 of vapour stitch)
5. Tat second half-stitch to complete the vapour stitch.
6. Vapour stitches on ring and chain. In the ring, they are contiguous. In the chain, 1 DS separates 1st and last vapour stitch from the 3-stitch cluster in the center.
Notation example for Vapour Stitch (wrapping behind leg of FHS) -
Ring : 7pds(3,0).
Chain : 8, 1pds(3,0), 1, 3pds(3,0), 1, 1pds(3,0), 8.
Both effects together. I have limited my samples to the very basics. It is interesting to play with the number of wraps especially as shown by Ninetta. When you increase the number of wraps, we get a curved coil.
💧💧💧💧💧
Now this next effect is not strictly a padded double stitch but I found it so interesting when I had tatted my first sample as Anita and I worked through the book (or started to but never finished!) last year. (https://tipsaroundthehome.blogspot.com/2023/06/bigger-flower.html).
KNOBBLY LINE - Anne Dyer (1993). The way this is worked is completely new to me, but very easy. I do hope to use the effect in some project. Applicable to both rings and chains.
We work 2 DS, but leave a very small picot space between them without snugging. Start the 3rd DS but move the ball thread loop over the open space before tensioning the half-stitch. Follow this by a normal SHS. This is seen in the right sample above. She says to make 'sure the twist is on the top and not at the back'. I found this a wee bit fiddly this time and had to manually coax the thread into the desired twist.
The sample on the left is made similarly, but I let the loop slide and sit 'naturally' following its normal grain or twist. Thus the 'bar' faced back. The difference in look is evident and I kind of prefer my variation, LOL.
The same samples as seen from the back are also interesting.
So, while this knobbly line does not strictly conform to PDS or variable PDS, there is a tiny bit of 'padding' since a half-stitch is tightened over previous work. And I like the effect!
💧💧💧💧💧
If you have managed to read this far, I commend your patience and passion! And I'd like to stress that this is not a comprehensive listing of variable padded stitch effects. It is probably the tip of the proverbial ice berg. Why not create your own?
💧💧💧💧💧
Many thanks to all mentioned above - they enrich our world of tatted lace!


Very interesting effects. And it’s good to see the comparisons. Enjoy your experimenting.
ReplyDeleteThanks, Jane 💕 There is only so much I can share/blog, however it is certainly keeping me happily busy ;-D
DeleteInteresting! Now I'm thinking where to tat these effects 🤔
ReplyDeleteKeep thinking, Marja, I'm sure you will apply them nicely 💕 Will keep an eye out for them on your blog :-)
DeleteThanks for the information. Interesting effects and variations.
ReplyDeleteGlad you like them, Phyllis 💕 Always nice to revisit and refresh one's memory :-)
DeleteThank you very much, nice to see them all in one post, very instructive 🥰
ReplyDelete😁💗😍 Thanks, NIn
DeleteSuper. Fajne
ReplyDeleteDziękuję
Kazia M.
Thank you so much, Kazia 😍
Delete