Sunday 30 August 2020

one is here

Pin It now!
Remember this? Well, the Summer 2020 IOLI issue has arrived and I am so excited to hold the magazine in my hand! The previous (Spring) issue is obviously lost, though editor-in-chief Prabha has generously assured me they will send in another copy. 

Hubby was so excited to see the article, co-authored by my prodding pardner, Anita Barry, that he has now urged me to reveal my real name and use/include it in future. So, meet Meenakshi Jain, popularly known in the tatting community as muskaan ;-)  Most correspondents already know my name and Georgia Seitz gave me one of the best compliments when I told her the meaning of this Sanskrit term,  'eyes shaped like a fish'. She said, I was 'meant to tat! Rings are often called oeillets and shuttle is called fish (because of it's shape) in certain languages.'

Back to the publication. It is the last article in the bulletin, and the only exclusively tatting article. But there are so many interesting articles to go through and the images have already inspired me to convert those laces into tatting patterns!

Bookmark adapted into a Mat - WIP

One of the distractions a couple of weeks back was test-tatting a bookmark pattern for Ruth Perry. I liked the central round rings made with balanced double stitches and decided to work it as a square mat instead. It is still a work in progress and can be worked in one pass - several magic pathways are possible! However, I ran out of threads and have shifted attention to completing the hanky edging.

In Anchor size 20, this is just over 7" long. The thread is probably 20 years old and considering the deceptively large amount used up in just this, it might be sufficient to complete the entire mat. Have some ideas in mind to introduce another colour...

This is a multi-purpose pattern. Work it as a single square motif or a beautiful bracelet with ribbon woven through the rings! Or with multiple rows, as a mat! 

Download Bookmark-8-2020 pattern here. She has several more patterns, including a beautiful new Celtic Knot Tatted Square, that I am resisting for now.


Friday 28 August 2020

locked in a rope

Pin It now!

Part 3 - final post of the chain maille pictorials, based on Ninetta Caruso's posts. You can find my previous pictorials here - Part 1 ; Part 2.

So far, we have seen 3 methods/variations (and more listed) of the Interlocking Split Rings that create a 3D chain maille effect. The chain or braid so made, whether with 1, 2, or 4 shuttles, remains linear with clearly distinguishable rings. Ninetta has cleverly twisted the chain into a rope that spirals on itself! Let's see how ....


D. Interlocking Split Rings - Rope Chain

ref : Ninetta Caruso's gold rope chain pictorial
(interlocking split rings - chain maille variation of Kathy Niklewicz's method)

The only difference from the pictorial shared in Part 2 (C), is that instead of pulling a loop through the previous ring, in order to make the next ring, the loop is pulled through the last TWO rings. This collapses the rings, bringing them closer and also creates a gradual twist.

Red is shuttle 1 with cream thread ; yellow is shuttle 2 with variegated thread.
All split rings are 10/10 (since the thread is thick)

 
D-1 : 3 interlocking split rings have been made as in C here. Insert hook from the back through previous 2 rings....
D-2 : ... and hook the shuttle 1 thread ...

 
D-3 : ... pulling it to the back.
D-4 : Pull the loop long enough to wrap around the hand to make the next split ring.

 
D-5 : As in previous pictorial, leave some bare thread before starting the 1st side. 10ds made. Ensure shuttle2 thread is inside the loop.
D-6 : Leave bare thread and work the 10 unflipped stitches for 2nd side.

NOTE : I was so focused on the steps and photographing every detail, that I missed the larger picture! Leave More bare thread I  order for each ring to twist more into a rope-like weave.

 
D-7 : Close ring.
D-8 : Repeat steps to work as many interlocked split rings as desired. As the rope grows longer, it starts to twist - hence the term rope chain. The rope looks superb from the side!

D-9 : This is how the rope looks from the shuttle 1 side.


E. Interlocking Split Rings - Beaded Rope Chain  
ref : Ninetta's Rope Chain bracelet in black and silver with red beads

A short pictorial that follows the previous (D), but with a bead added before each ring. Of course, more seed beads can be added along the edges, etc.

 
E-1 : String beads on shuttle 1.
E-2 : Before starting 2nd ring, move bead to the base. In image, a bead is moved before starting 3rd ring. Insert hook through 2nd ring to pull back a loop for the 3rd ring. These will form a chain maille as in Part 2 (C).

 
E-3 : 3rd ring made. Now we start the rope chain variation. Move bead to base of previous ring (not shown in pic), insert hook through rings 3 AND 2 ...
E-4 : and pull back the loop for 4th ring. 
TIP : Try to be consistent in the position of the threads throughout. I kept the bare thread and loop 'behind' the bead always.

 
E-5 : 4th ring complete and bead brought forward before next ring. Notice how the rings are now very close together, with greater overlap. The chain maille interlocking effect seems to get lost.
E-6 : Insert hook through rings 4 AND 3 to pull back loop for next ring.

 
E-7 : Repeat steps from E-3 to desired length.
E-8 : As seen from the side.

This rope can be quite addictive! I stopped only on running out of thread. Notice the twist?

To finish, beads are strung through the leftover tails, ending with a 6-bead ring/flower, and hiding the ends within a few beads. Add a clasp to the starting ring for a bracelet or a necklace.

There is a tendency for a horizontal thread to show up across the side of each ring. It could be the shuttle1 thread across the 1st side of ring, or shuttle2 thread across the 2nd side (as in my first trials in previous post). 
TIP : To Avoid Visible Bare Thread : By keeping the bare thread at the start of each side of split ring short, this horizontal bar can be avoided. While the bare thread is important to create a play and twist, keeping it as short as possible eliminates its visibility.
Ninetta's TIP : Another possible way is if we use 4 shuttles instead of 2, as in Ruth Perry's models. Or one can use a thread colour and size where it is not immediately visible.

This is it for the present, although I will some day come back to try out other methods (see complete listing here - https://tipsaroundthehome.blogspot.com/p/tatting-resources.html), as well as a couple of project ideas I have applying these effects. I did intend to tat with metallic, but time is at a premium and I need to get back to completing the hanky edging as the deadline quickly approaches.


Longtime readers of my blog may have noticed that I rarely create pictorials of something that is already in public domain, preferring to cite links, unless I have something different or something more to offer. Or, as in this case, when a tatter specifically requests. Hence I cannot thank Ninetta enough for her gracious permission to upload these pictorials, and her willingness to provide valuable feedback and insight. 

And by extension, my thanks to all tatters, teachers, designers mentioned in these 3 posts, who were instrumental in adding a valuable link to our ever-growing Tatting chain!

Thursday 27 August 2020

locked in play

Pin It now!

Continuing from my previous post where 2 methods of Interlocking split rings (chain maille style) were uploaded. Again, I follow Ninetta's post to share the 3rd method based on Kathy Niklewicz's method and then its further application in the tatted rope chain.

I first tried Kathy's single-shuttle IR method (along with other methods) in 2014 here. Ninetta took it a step further by using it to create a truly 3D effect. This variation is photographed stepwise below.

C. Interlocking Split Rings - Chain Maille

ref : Kathy Niklewicz's Interlocking Rings and Ninetta's Method 3 variation

Red is shuttle 1 with cream thread ; yellow is shuttle 2 with variegated thread.
All split rings are 8/8.

 
C-1 : Unlike the earlier methods (refer previous post), in this case we can safely close the split ring. 
C-2 : Through the closed ring, insert a hook from the back and hook it to shuttle1 thread.

 
C-3 : Pull a loop front to back through the ring, as seen.
C-4 : Pull out enough of the loop and note the position of each thread(s). 

 
C-5 : Wrap the loop around your hand just as in the earlier methods. The static end of loop is is to the left (where stitches will start) and the moving shuttle part goes around, emerging toward the right.
C-6 : Leave some bare thread (indicated by hook) and start tatting the stitches for 1st side of SR.

 
C-7 : Wrap loop around hand for 2nd side of SR; leave some bare thread (notice the yellow segment) and begin unflipped stitches. Note that the 2nd shuttle thread is within the loop.
C-8 : Stitches complete on both sides.

 
C-9 : Close split ring. 
C-10 : Repeat steps to make as many interlocked split rings as desired.

The advantage of this method is that one does not have to remember to insert the shuttle before closing ring. The disadvantage is that bare thread can be visible from some angles.
A very small variation of this method is used to create the rope chain.

Jane McLellan has used the same method to create a chain maille with a single shuttle and regular rings.
Ruth Perry probably pioneered the modern technique and has created beautiful effects using only chains or 4 shuttles where the bare thread can be eliminated. Teri Dusenbury has instructions for the same using 2 steps and finger tatting here.
This method of pulling a loop through a previous element to tat a ring has also been demonstrated by Patty Dowden to make wonderful rings on picots
And don't miss this recent video by Edda Guastella who creates a variation of the chain maille using single shuttle.


Unfortunately, this series will run into a 3rd post dealing with the rope chain, to avoid an avalanche of pics. Instead let me show you my very first chain maille trials.

Above are my Day 1 trials, in Anchor size 20 threads. On the left sampler are my trials of the 3 methods and variations. 
Can you spot the rings that do not look interlocked? Although I do not fully understand why that happened, I think the following TIP might help avoid such mistakes, because there is a tendency for the loop to get stuck at the base of the previous ring -

TIP : 1. After completing 1st side, tug at the core thread that is on the lower right (where you would start the 2nd side stitches). You will notice that the 1st side moves towards the right under the previous ring. 
2. In the 2nd image, the 1st stitch of 1st side, is visible on the right. So you are now sure that your ring is interlocked correctly, and can continue to tat the 2nd side.

3. Tat the 2nd side of split ring and continue with the chain maille method you are using.

Part 3 will be the final post for the present. Of course there will be more projects in the future when I try out the several methods and effects listed above.

Wednesday 26 August 2020

locked in study

Pin It now!

A gentle generous tatter asked for help with Ninetta's lovely gold rope chain. Hmmm, time to study interlocking split rings - chain maille (or mail) style! This post was my starting point, but stumbled at the very first step. The video was confusing, despite my intuition that it is basically similar to the Interlaced Split Ring braids I did earlier. For my own future peace of mind and reference, I undertook a systematic study and am uploading my pictorials, although Ninetta's collages are fairly clear. This is Part 1 of 2.


Interlocked Split Rings - chain maille style creates interlinked split rings that are perpendicular to the previous. 

A. Interlocking Split Rings - Chain Maille 

ref: Karen Cabrera's Lesson 78 video and Ninetta's Method 1 instructions.

Red is Shuttle 1; yellow is Shuttle 2.  
I started with a simple split ring in 2 colours. Each split ring is 8/8.

 
A-1 : Tat split ring (SR) but do not close. Post (or pass) shuttle1 back to front through the open ring.
A-2 : The shuttle is now in front.

 
A-3 : The loop (indicated by hook) will start the next ring. To close the SR, tug on the left side thread of the hooked loop - it is the core thread.
A-4 : SR is closed and thread for next SR is locked in.

 
A-5 : Loop the earlier hooked part around your hand to start next SR. The 'joined' part is to the left, and the running part which goes through the previous ring, is on the right.
A-6 : Without leaving any space, tat 8ds for 1st side of SR.

 
A-7 : Before starting the 2nd side of SR, make sure shuttle2 thread is in the position shown (inside the loop). If it is not (as seen in A-5 & A-6), then first post shuttle2 front to back through open loop.
A-8 : Wrap loop around hand in split ring position and start the 2nd side without leaving any space.

 
A-9 : 2nd side also complete.
A-10 : Repeat the steps, starting with posting shuttle1 back to front through open SR.

 
A-11 : Time to start the next interlocked SR. Notice that shuttle2 thread is already within the open loop (as in A-7).
A-12 : 5 interlocked split rings completed and ready to start another.


B. Interlocking Split Rings - Chain Maille 

ref:  Ninetta's Method 1 variation.

This is basically the same as the previous method except for one difference - there is bare thread space left before starting the next SR. This bare thread allows for more play between rings. But sometimes a bit of bare thread is visible between rings.

 
B-1 : Follow all steps from A-1 to A-5. Leave shuttle1 bare thread between previous ring and first stitch, as indicated by hook. 1st side of SR is complete.
B-2 : Similarly, leave shuttle2 bare thread between previous SR and first stitch of 2nd side of SR as indicated by hook. Make 8 unflipped stitches.

 
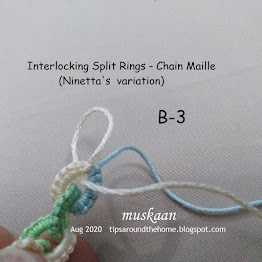
B-3 : Before closing SR, pass shuttle 1 back to front and start next interlocked SR.
B-4 : 4 interlocked split rings completed using Ninetta's variation.

Above is a visual comparison of both methods. Please read Ninetta's post for front and back pics and more information. 
Method 2 in Ninetta's post is the same as above, except that the indicated loop in A-3 is wrapped around the hand and Then the previous ring is closed. It is a matter of what the tatter is comfortable with. 

Part 2 will show Method 3 from Ninetta's post and continue to make the rope chain including with beads.