A gentle generous tatter asked for help with Ninetta's lovely gold rope chain. Hmmm, time to study interlocking split rings - chain maille (or mail) style! This post was my starting point, but stumbled at the very first step. The video was confusing, despite my intuition that it is basically similar to the Interlaced Split Ring braids I did earlier. For my own future peace of mind and reference, I undertook a systematic study and am uploading my pictorials, although Ninetta's collages are fairly clear. This is Part 1 of 2.
A. Interlocking Split Rings - Chain Maille
ref: Karen Cabrera's Lesson 78 video and Ninetta's Method 1 instructions.
Red is Shuttle 1; yellow is Shuttle 2.A-1 : Tat split ring (SR) but do not close. Post (or pass) shuttle1 back to front through the open ring.
A-3 : The loop (indicated by hook) will start the next ring. To close the SR, tug on the left side thread of the hooked loop - it is the core thread.
A-5 : Loop the earlier hooked part around your hand to start next SR. The 'joined' part is to the left, and the running part which goes through the previous ring, is on the right.
A-7 : Before starting the 2nd side of SR, make sure shuttle2 thread is in the position shown (inside the loop). If it is not (as seen in A-5 & A-6), then first post shuttle2 front to back through open loop.
A-11 : Time to start the next interlocked SR. Notice that shuttle2 thread is already within the open loop (as in A-7).
B. Interlocking Split Rings - Chain Maille
ref: Ninetta's Method 1 variation.
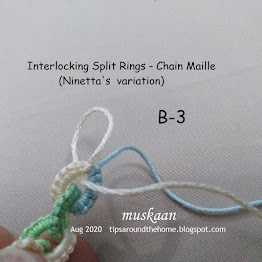
This is basically the same as the previous method except for one difference - there is bare thread space left before starting the next SR. This bare thread allows for more play between rings. But sometimes a bit of bare thread is visible between rings.B-1 : Follow all steps from A-1 to A-5. Leave shuttle1 bare thread between previous ring and first stitch, as indicated by hook. 1st side of SR is complete.


Great step-by-step picture. Everyone has their own way to learn, it's always helpful to find the same technique explained by different tatters. Also, your posts are always very detailed and clear. Thank you.
ReplyDeleteYou are very sweet, Nin 😍💗🌹 I got an excited email from her, within a couple of hours of this post, saying she got it!!! So, success.
DeleteI tatted chain maille for my 25 motif challenge. That was a while ago, I'd probably need a refresher course!
ReplyDeleteI had followed your link in Ninetta's post, Jane - you had made it with a single shuttle and regular rings!!! It is on my list of to-try later .... there are so many effects possible.
DeleteFabulous lesson!! :) Great tatted chain! ;)
ReplyDeleteThank yoiu, Sue :-))) My friend is happy and practicing, so I'm happy ;-D
DeleteAnother interesting post, the last one gave me some ideas for a design I am thinking about that cam to me a few nights ago, I will have to come back to re read this interesting post
ReplyDeleteSplendid, Margaret!! Eager to see what you come up with this time :-)
DeleteFantastyczny łańcuszek :)
ReplyDeleteMoże przyjdzie czas, że go wykonam.
Dziękuję za instrukcję. :)
Pozdrawiam ciepło.
I'm sure you will make good use of it, splocik :-)))
Delete