Showing posts with label common threads. Show all posts

Monday, 14 April 2025

playful tatting

Pin It now!

I had started tatting these cute balloon dog doodles couple of days before ITD and realised that there were a couple of elements left to tat, which started off my 'shagun tatting' for the day! Of course, I later found the time to tat the heart, too! Actually my list had contained a different heart which I still haven't gotten around to tatting. Some other day, soon, perhaps. 

Sarah Nielson shared two versions of her Balloon Dog Doodles - 2D & 3D. You can download the pdf from her blog here - https://laceandbees.blogspot.com/2025/03/balloon-dog-doodle.html
Quick to tat with lots of split ring practice. And one doesn't have to hide ends! Simply tie an overhand knot and snip close for the nose or 'balloon' end. 
I chose this tinted colourway for the added fun factor. Size 20.

The model starts at the tail end. 
My piece doesn't much resemble a dog here, does it? Is it how the shades spread themselves out ... how the darker shade pooled at the lower half? Or is it my tatting tension?

Now this 3D version I like. It does look like a dog frolicking in the park or flying high! Very happy indeed.

Technically, the highlight of this 3D doodle is the Folded Split Ring

Overall, I am happy with these doodles - fun and quick and excellent doodles to embellish cards, etc. Some time in the future I will paint some background to give them a context, a story ;-D

Many many thanks to Sarah for these innovative and fun doodles!

Related Posts -
https://tipsaroundthehome.blogspot.com/2025/04/shagun-tatting.html
https://tipsaroundthehome.blogspot.com/2017/02/in-fold.html

Saturday, 28 September 2024

variably padded lines

Pin It now!

If you tat only for beautiful lace, this post might not be for you, though it does showcase some lovely effects. My approach to tatting is different and I enjoy all aspects, including delving a bit deeper and finding commonalities or differences. And there was one discovery here that really got me excited!

Another post in my Common Threads series, a consequence of my research, tatting, and editing for 'Six T's of Shuttle Tatting' by Net Best. Sharing my thoughts and observations and short explanation of concepts. 

PADDED DOUBLE STITCH (pds) or padding the stitch (as different from padded tatting) has been around for several decades, with Rhoda Auld's (1974) 'self-padded double stitch' followed by the balanced DS and double DS. You can read the detailed and comparative post, along with a pictorial and notations, here - https://tipsaroundthehome.blogspot.com/2015/11/pds-padded-double-stitch.html .

VARIABLE  PADDED  STITCH - In this 2014 post,  https://tipsaroundthehome.blogspot.com/2014/05/tatting-experimenting-with-stitch.html , I showed a few possibilities of padding only one half-stitch as in spiral tatting; of having more than 2 or 3 wraps; and more importantly of making a variable/uneven number of wraps in the half-stitches. This can be applied to both rings and chains.

TIP: Due to the wraps, it is essential to suspend the shuttle at intervals so that the thread regains its balance. 

LINE is a generic term used by Anne Dyer to refer to the different ways rings and chains can be 'knotted' - basically the different stitches we can use to achieve a certain look and effect. Some may require auxiliary threads and shuttles; some might apply only to one type of element; some may be better expressed through use of contrasting colours; and so on. We can all name multiple techniques starting with regular double stitches to pearl tatting, Victorian sets to lock chains, ....
💧💧💧💧💧

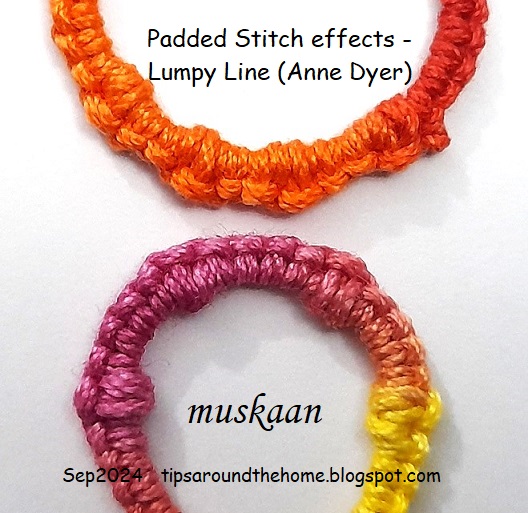
LUMPY LINE - another term and effect by Anne Dyer (1993) where she uses a padded stitch after every 3 or 4 double stitches creating a lumpiness to an otherwise smooth line. Here both halves of the padded stitch have three wraps giving it more body or bulk. The lump can become more pronounced if not tensioned too tightly.
Notation for Lumpy Line (the lower model) - 
Ring or Chain: [4, 1pds(3,3)]x4, 4. 
In the top red/orange model, I did not space the pds enough, leaving only 2 DS between.
💧💧💧💧💧

The following two effects of variable padded stitch threw up a very exciting observation!!!! It is the reason I took stepwise pics despite the existence of excellent resources, so that you can compare yourself!

SPIRAL  KNOT  STITCH - a term coined by Jennifer Williams (2012) along with a pictorial here - https://www.cariad-tatting.com/techniques . It is a textured effect made with a single padded half-stitch flanked by normal DS. An example of variable PDS.

1. Following a DS, tat a 2nd half-stitch (SHS) but do not snug. Instead pass your shuttle back to front thrice through the open leg as we would normally do for any PDS. 
TIP: There are 3 ways to make the wraps, but once transferred, the result is identical. Follow whichever method you prefer.
2. The 3 wraps are now being snugged ...
3. Notice how the wraps or spirals coil around the Core thread. 
They are, after all, the additional 'legs' of the stitch.
4. Continue with 1DS.
Repeat from steps 1 to 4 for desired length.

5. A ring and a chain with spiral knot stitch or variable padding.
Notation example for Spiral Knot Stitch (no FHS in the PDS) - 
Ring or Chain: 4, [1pds(-,3), 1]x4, 4.

💧💧💧💧💧

VAPOUR STTICH - by Ninetta Caruso (2011)    (https://www.flickr.com/photos/ninettacaruso/5660263485/in/album-72157625550124777) more popularly known as the Vapor Picot. This can also be considered a variable PDS, but with a notable difference in the initial step itself. 

UPDATE: This stitch was used in a ring by Rhoda Auld in her 1974 book but constructed a bit differently. More about it in a future post.

1. Make the first half-stitch (FHS) but do not snug. Pass the shuttle from front to back through the loop but BEHIND the open leg. The crochet hook shows how the shuttle would need to move.
2. Here the shuttle is following the path outlined above.
3. Repeat the step twice more, thus making three wraps behind the leg (they are now around the leg). The thread tends to twist.
4. Now transfer the wraps to the ball thread and gradually allow the wraps/spirals to move down snugly. Notice how the wraps are stacked one above the other vertically - the complete opposite of spiral knot stitch. (Compare pic #3 of spiral knot stitch with pic #4 of vapour stitch)  
5. Tat second half-stitch to complete the vapour stitch.
6. Vapour stitches on ring and chain. In the ring, they are contiguous. In the chain, 1 DS separates 1st and last vapour stitch from the 3-stitch cluster in the center.
Notation example for Vapour Stitch (wrapping behind leg of FHS) - 
Ring : 7pds(3,0).
Chain : 8, 1pds(3,0), 1, 3pds(3,0), 1, 1pds(3,0), 8.
 
Both effects together. I have limited my samples to the very basics. It is interesting to play with the number of wraps especially as shown by Ninetta. When you increase the number of wraps, we get a curved coil. 

When I told Ninetta of my discovery, she remembered that Karen Cabrera had also made the same observation, having consecutively shot videos for both stitches! Watch her demos in Lessons 131 and 132 (http://entrelanzaderas.blogspot.com/2010/10/clases-de-frivolite-tatting-lessons.html)

💧💧💧💧💧

Now this next effect is not strictly a padded double stitch but I found it so interesting when I had tatted my first sample as Anita and I worked through the book (or started to but never finished!) last year. (https://tipsaroundthehome.blogspot.com/2023/06/bigger-flower.html).

KNOBBLY  LINE - Anne Dyer (1993). The way this is worked is completely new to me, but very easy. I do hope to use the effect in some project. Applicable to both rings and chains.

We work 2 DS, but leave a very small picot space between them without snugging. Start the 3rd DS but move the ball thread loop over the open space before tensioning the half-stitch. Follow this by a normal SHS. This is seen in the right sample above. She says to make 'sure the twist is on the top and not at the back'. I found this a wee bit fiddly this time and had to manually coax the thread into the desired twist.
The sample on the left is made similarly, but I let the loop slide and sit 'naturally' following its normal grain or twist. Thus the 'bar' faced back. The difference in look is evident and I kind of prefer my variation, LOL. 
The same samples as seen from the back are also interesting.

So, while this knobbly line does not strictly conform to PDS or variable PDS, there is a tiny bit of 'padding' since a half-stitch is tightened over previous work. And I like the effect!
💧💧💧💧💧

If you have managed to read this far, I commend your patience and passion! And I'd like to stress that this is not a comprehensive listing of variable padded stitch effects. It is probably the tip of the proverbial ice berg. Why not create your own?

💧💧💧💧💧

Many thanks to all mentioned above - they enrich our world of tatted lace!

Saturday, 13 January 2024

association

Pin It now!

 When we come across a new tatting term/technique, always try to place it within the larger set of techniques you already know. You will be surprised to find that you might already know the technique or at least parts of it. And then learning becomes easier, smoother, and associative.

One of the first messages waiting for me yesterday morning was about the Loop Tatted Ring (LTR) in the Christmas Star pattern by Krystyna Mura, an E31 adaptation. [pdf: https://drive.google.com/file/d/1fz0Hd9jgGnS_qWKayw4UX2Ikr-mp-npb/view]. It starts with a LTR over a bead. 

Despite the video and pictorial links suggested in the pdf itself, Ulrike found it difficult to grasp. I, too, watched a few videos, consulted a few tutorials and found that it could indeed be difficult to grasp, despite the resources themselves being good.  For one, they were all about a LTR on a ring which meant there are too many loops to consider, keep track of, and can become confusing.

That got me thinking and here's how I went about it. Deconstruct the LTR and you will find the basic concept, or at least some steps, is something you might've done before.

Step 1. Can you finger-tat?

Step 2. Have you tatted a single shuttle split ring (SSSR) Mathew Takeda style?

If the answer to both these questions is YES, then you are well on your way to tatting a Loop Tatted Ring! 

Very soon, she came back with her SSSR braid , having consulted a few resources listed in my Resources page [https://tipsaroundthehome.blogspot.com/p/tatting-resources.html]

Step 3. Now tat an entire ring using only the finger-tatting method. After all finger tatting with a loop employed for part of the segment of a SSSR is exactly what you do in LTR, but for the entire ring! 

And by jove, she got it! All within a few hours.

Step 4. Now we can tat the LTR over a bead easily as shown in several tutorials. 

I had written the entire post yesterday but then thought a limited/specific pictorial would help other tatters facing a similar issue, to work this lovely Star pattern too. Hence today I created a stepwise how-to for Rounds 1 & 2 of the pattern. I also took the time to read Miranda's post and pictorial again after several years and discovered the similarities of association! She also gives a nice history of this technique. I apologise for the unintentional repetition. Unfortunately Sabina Madden's site is down though she is trying to find another server to reinstall paradisetreasures.com.


LOOP TATTED RING for E31 STAR - pictorial pdf - https://drive.google.com/file/d/19q6JKdOyACqh8oz-Z0vzHgh-YCIZ5xBd/view

Now a Loop Tatted Ring or LTR is not limited to a LTR on Ring (LTROR). It can be used in several different ways, including on a chain as a thrown ring [https://tipsaroundthehome.blogspot.com/2021/08/thrown-floating-and-8-rings.html pages 7-8 in the pdf] or after a chain. 

Here it is used as a central ring. We could've used a normal ring or a mock ring. But with both methods, we would not have been able to seamlessly add the bead through both threads to resemble the bead on a picot. LTR allows us the freedom to work continuously with the bead. In a lot of circumstances LTR allows us to tat something that would normally require a 2nd shuttle.


Related Posts
-
https://tipsaroundthehome.blogspot.com/2016/07/refresher.html

Sunday, 10 December 2023

about Helix Tatting and more

Pin It now!

In late October, while working on the Dictionary part of ‘The Six Ts of Shuttle Tatting’, Anita introduced me to the term Helix Tatting and the developer of the technique, Richard Embrey. We worked on a definition or description to include in the dictionary and I also tried my hand at a quick trial to get a feel for it.
My very first trial (with mistakes) without shuttles

While I don’t want to reveal the definition, I will certainly do a sort of comparison to put things in perspective. Richard came up with this technique in 2019 while trying to make an I-cord in tatting when he couldn’t find a tatted equivalent. It started out as a tatted tube or cord but has since evolved and diversified into many more shapes, including a coronation cord and a fish! As always, it is our imagination that gets us soaring into new skies.

UPDATEhttps://tipsaroundthehome.blogspot.com/2024/01/helix-tatting-pictorials.html  -- Includes PDF OF HELIX TATTING Pictorials 

Let me list down the major characteristics of Helix tatting (HT) as well as include links to visually similar techniques. Please note that a lot of these are my own thoughts and notes. Feel free to critique or suggest.

1. It is basically a 3D hollow cord or structure, made solely of chains, using multiple shuttles (4 or more). The outward appearance is like a spiral, especially visible when different colours are used.

2. Each shuttle alternately and sequentially acts as an active shuttle to become the core thread, and then  as a ball thread to form the stitches.

3. It is NOT bauble tatting, though it can be considered to be a variation. No separate ‘ribs’ are added for a scaffolding. Instead, each shuttle, in turn, acts as a core thread and provides the necessary stability to the structure. It also 'locks in' the previous segment when shuttles are switched.

4. It is NOT a continuous spiraling chain since short segments are made with a sequential change of shuttles. Each segment can consist of merely 1 stitch or as many stitches as one desires to create a broader shape. Two or more stitches give a more distinctive spiraling of the colours. The spiral is directional and there are ways to determine beforehand which direction one wants the spiral to run.

For instance this 3D Pond Reed prototype I had made back in 2014 using 2 shuttles– it is a continuous chain spiraling around itself, where I used the slope and roll joins to hold the shape. Clearly it is very different from HT.

5. It is NOT block tatting, though chain segments are apparently ‘stacked’ over each other. No lock joins are used. However the outward appearance can be confused with tatted ropes, with or without beads. Ninetta has done a wonderful study of various ways in which these 3D tatted ropes can be made, with links to respective tutorials. A couple of them even create a spiral effect! https://ninettacaruso.blogspot.com/search/label/stacking

6. HT is not limited to merely spiraling chains. With so many shuttles in play, it is easy to throw off rings and chains, use beads, add picots, and so on. Versatile.

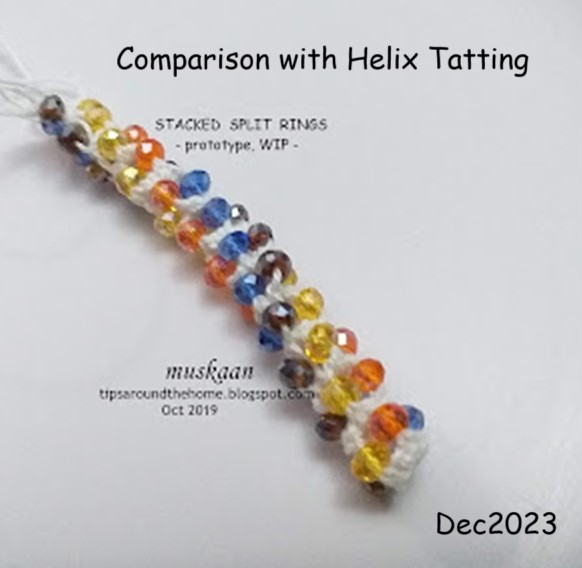
7. There is another tatted tube example where we use stacked or layered split rings. No chains involved, only rings. And if the picots are shortened, the stacking will be that much closer. Clearly this is not HT in any sense of the term, except that it is also a form of continuous tatting for a 3D hollow tube.

tatted beaded rope made with stacked or layered split rings https://tipsaroundthehome.blogspot.com/2019/10/tat-beaded-rope.html

See Ninetta's version of a spiraling tatted rope made with interlocking rings - https://ninettacaruso.blogspot.com/2020/08/gold-rope-chain.html 

8. BUT, there is something that definitely follows the same principle and concept as HT, and also gives a directional spiral! It is called Mac-Tatting (MT) and was first developed by Usha Kota in an attempt to imitate a crochet braid in tatting – it was a flat braid, worked too and fro. However, when I understood what HT was, it immediately crossed my mind that MT could be similar if worked continuously. And YES, it is the same, except that we work with unflipped or reverse stitches rather than flipped or double stitches! And you get a spiral, though the stitches face down while in progress. 

Helix tatting & Mac-tatting trials, together
In my first attempts, I found it easier to work the Mac-tatting version - I had a better control of the threads and there was no tension issue. Helix tatting is fine once you get into a rhythm, but it requires more finesse. And managing all those shuttles can of course be an issue.


A couple of weeks back, Richard was invited to TOTC as a guest teacher to demonstrate the Helix Tatting technique. You can watch the video here - https://youtube.com/live/DXO9Pm0fq1U
Bonnie Swank shared her notes on how to do HT with needles. Richard also shared a practice pattern called Watermelon Dreams, with the class. https://www.theonlinetattingclass.com/patterns
Creative members have already shared a couple of clever ways to organize their shuttles to avoid tangling. I simply laid them down spread-eagled, on my bed. I did find that it is better to leave a longish length of thread to avoid frequent winding/unwinding; and since it is only 1 or 2 stitches each, the long length is not a bother. 

I am test-tatting a pattern for Richard for his upcoming book. It is called Watermelon Dreams Beaded Helix Embellished Earrings
It took me a few hours to find and empty all my shuttles, glue the numbers (I did it on both sides, LOL), string beads and wind the shuttles. 
In progress.
I've completed Round 7. My version is a Caps In spiral where the double stitch faces inside the cord and tatting progresses in a clockwise circle. 

That’s it from me for now ….. Welcome your thoughts.

Many thanks to Richard, Anita, and all the creative minds mentioned above! 

Sunday, 29 August 2021

thrown, floating and 8 rings

Pin It now!

Please note that the post and pdf have been updated on 30th August 2021. In case you already downloaded the pdf, kindly click on the link to refresh the document.

Tatting with an international community throws up interesting facts and ideas. All patterns in Endrucks' (1920) book use 2 shuttles and has plenty of rings made by switching the shuttle in hand - you guessed it - thrown rings! However, as Ninetta pointed out, a lot of Italian tatters have mastered the art of tatting with a single shuttle and ball, and adapting any pattern to suit this. It got me thinking about all the various ways in which we throw off a ring and here is the result of that exploration/stream of thought.

Thrown Ring Methods - a Ready Reckoner. click this link to download the complete document - https://drive.google.com/file/d/1PhXhtq9K-WiUbys0dwwZuOIat10hGlB0/view which contains pictorials for each method as well as patterns to practice. Included at the end is a list of Needle tatting resources. 

For several of the patterns, despite having a pdf, I had to give the link to the blog post because the pdf link just wouldn't work the moment I converted this doc into a pdf. Probably some formatting glitch.

 
Following is a limited glimpse into each method. 

Gapsosis - A frequently asked question is how to avoid any bare thread/gap between the chain and the thrown ring. Above is an old pictorial I had done in response to this very question, where we have a trefoil instead of a single ring thrown off the chain - https://tipsaroundthehome.blogspot.com/2017/05/squirreling-away-gapsosis.html

1. Using 2 shuttles. I prefer this method except when I want to create a point in the chain where the ring is.

A thrown ring does not necessarily have to be floating above a chain or ring! It can lie above a join, between 2 chains, and can also face inwards.....
While this 8-ring appearance may not use the term thrown ring, the blue ring is made exactly according to any of the TR methods (in above case, with 2nd shuttle). 
Several other effects can be seen in the above model. Can you identify the thrown ring(s) in each?

NOTE: Although not shown in the pictorials, the pink ring need not be alone. We can have 2,3,or more rings below, with 1 or more TRs above!

All the rest of the methods are made with one shuttle and ball. Compare the colour of the TR and the chain curvature between each method. It is very important that chain stitches are snugged properly before attempting the TR.
2.A. Flipped-Up ring is simply a normal ring that is turned upwards before continuing with the chain.
2.B. Since I didn't like the way it sat, I tweaked it by stabilising and centering the TR with on overhand tie and keeping the ball in front of the work.
3. Loop Tatted Ring can be used to throw off a ring as well.
4. We all know that the Self-Closing Mock Ring is often used to deliberately create a pointed chain - whether it is a 1ds SCMR or a larger thrown ring.

Direct Tatting. In certain cases, it is easy direct tat a chain and throw off a ring, using single shuttle and ball. Tatting will move from right to left, but the shuttle will be in position to make a thrown ring.
Even if the shuttle is not in position, it can be brought to where we need it, by the following 2 methods -
5.A. Twist Work - I start by making an unflipped half-stitch but instead of snugging. I pull the shuttle upwards (or downwards, if required) such that the threads now switch position and I have the shuttle where I need it. I had explained it here to switch threads after a lock join - 
 https://drive.google.com/file/d/1nRj_48VHK2LjhcxdQnirXBVweKO6h2ow/view 
5.B. Shoe Lace Trick - we all know this, but I avoid it and prefer other repositioning methods, including twist work. Jon Yusoff has explained this method very nicely here (wish I could get my SLT to behave so well!) - https://tatsaway.blogspot.com/2010/05/sometimes-you-dont-need-two-shuttles.html  

6. Changing Course - When another row/round follows the one with thrown rings, one can choose to shift the rings to the next row/round and make them normal rings. Obviously the direction of the rings will change, and sometimes it may cause ruffling/cupping/distortion. However, it worked fine in the above version - those purple rings were supposed to be thrown rings from the previous round, but I wanted this colour here, hence.... https://tipsaroundthehome.blogspot.com/2019/06/valley-of-flowers.html 

I tatted this twice! My intention was merely to showcase the different effects when using each of the methods (lower scroll). But then somebody asked whether I had a tutorial actually showing how to do a thrown SCMR. So, I started over, taking stepwise pics for each method. 

And now I'm calling it a Ready Reckoner (RR), because as far as possible, I have included everything we'd want to know about Thrown or Floating Rings. I would love to get your feedback on this format and exercise. I already have another RR on the way that was started in July in response to a friend's request for help. 


Friday, 17 July 2020

lock join plus

Pin It now!
Many months back, in response to some curiosity and confusion among several tatters, I decided to illustrate the simple progression and functional similarity between a few techniques. Here the underlying common factor is the ubiquitous Lock Join. Add one extra step to the LJ, and it opens up the canvas to change colours, shuttles, and even direction of chains.
I took stepwise pics for each of the combinations back then, but preparing a proper stream-lined article has taken way more time than intended. I am immensely grateful to Anita Barry, Master Tatter, for her proofing and editing.


In order to make the document manageable, it is uploaded as a series of 5 pdfs, each a stand-alone (click on each title to download) –
PLEASE NOTE - Most of these are also Reposition Methods which can be used even without a lock join to change direction, create points or curves, etc.

  1. Lock Join Plus – Executive Summary and practice Patterns for further exploration. (3 pages)
 
How one extra movement after a lock join can open up the canvas to change colours, shuttles, and even direction of chains. 

For starters, a simple 2-colour motif is used where all chains face the same direction. But for further exploration, more patterns are listed. 

  1. LJ Plus - Lock Join (LJ) pictorial (1 page)
 
How to make the lock join using both up and down loops. 

Notice how the colour blips in the 2 right joins are larger than the remaining 3. If the down loop LJ is followed by a 2nd half-stitch, the blip is almost hidden completely.
Links to undo a LJ and variations that include making a LJ with 2nd shuttle.
See also Lock Join in Mock Rings


  1. LJ Plus – Reposition pictorial (1 page)
 
A laissez-faire crossing of threads. Simple, quick, vintage. Compare how chain segments change colour and the slight overlap at the start of each chain.

  1. LJ Plus - Shoe Lace Trick (SLT) pictorial (1 page)
 
Tying a half knot outside the LJ – overhand tie or SLT. Again chain colours get switched. SLT also allows us to switch the core thread in instances when the shuttle is running low on thread.

  1. LJ Plus – Reverse Join (RJ) pictorial (2 pages)
 
Encapsulating or entrapping the other thread within the LJ. Created by Elaine P Gan (tattingbox). 

Pics showing an up loop and a down loop. The latter 
minimises the colour blip in a RJ as well.

Functionally the same as crossing and SLT after LJ, but more elegant and efficient – a smooth transition.


After each or either of these, if we turn work, reverse work, switch shuttle, and/or direct tat (unflipped stitches) the next chain, we add another dimension – changing the direction of the chain! Along with colour. Our choices multiply! And we might even be able to work throughout with just one shuttle and ball. To explore these choices, some practice patterns are listed in the main pdf. Besides block tatting, think also of filet tatting, especially in 2 colours, where these can be used effectively. I forgot to mention the role of lock join plus in mock rings and mock onion rings, but you get the idea, right? Wherever you have 1 or more chains joined below, play with LJ Plus!
I used all the above 4 in this vintage edging from Priscilla Tatting Book3 Fig 29 where the chains move to and fro. We can turn work after each chain or we can work every alternate chain directly (reverse stitch - unflipped). I started with LJ, then tried reposition, SLT, and RJ after every 3rd chain. Shuttle in hand changes depending on our choices.

So I'm sure there is no need to spell out why I presented this article/pdfs in the way I did? There is lot of scope to play and design because each method has it's own pluses and minuses!
Do you see a butterfly in the above arrangement? Time to pick up my shuttles again and work out a pattern ;-D
Before that you might get fed one more lesson, so stay locked in ;-P

UPDATE 1: (2021) When working with only one shuttle and ball, changing the direction of chain using direct tatting - https://tipsaroundthehome.blogspot.com/2021/06/2nd-shuttle-or-ball.html 
UPDATE 2: (2021) Carrying on with functional movements, see pictorial Twist Work (TwW) -
UPDATE 3: (2026) The Catherine Wheel Join pictorial accompanied by diagrams by Ninetta Caruso- https://drive.google.com/file/d/1UmmjBqNwwQYIb9Ms9_-T5K6dPnZENCwl/view  
UPDATE 4: (2026) Beaded Lock Join (based on Vicki Clarke's suggestion) - https://drive.google.com/file/d/1rL7ZLsSUwKqmkZy210yqP03RgVAsUOxN/view