Showing posts with label SSSR. Show all posts

Saturday, 13 January 2024

association

Pin It now!

 When we come across a new tatting term/technique, always try to place it within the larger set of techniques you already know. You will be surprised to find that you might already know the technique or at least parts of it. And then learning becomes easier, smoother, and associative.

One of the first messages waiting for me yesterday morning was about the Loop Tatted Ring (LTR) in the Christmas Star pattern by Krystyna Mura, an E31 adaptation. [pdf: https://drive.google.com/file/d/1fz0Hd9jgGnS_qWKayw4UX2Ikr-mp-npb/view]. It starts with a LTR over a bead. 

Despite the video and pictorial links suggested in the pdf itself, Ulrike found it difficult to grasp. I, too, watched a few videos, consulted a few tutorials and found that it could indeed be difficult to grasp, despite the resources themselves being good.  For one, they were all about a LTR on a ring which meant there are too many loops to consider, keep track of, and can become confusing.

That got me thinking and here's how I went about it. Deconstruct the LTR and you will find the basic concept, or at least some steps, is something you might've done before.

Step 1. Can you finger-tat?

Step 2. Have you tatted a single shuttle split ring (SSSR) Mathew Takeda style?

If the answer to both these questions is YES, then you are well on your way to tatting a Loop Tatted Ring! 

Very soon, she came back with her SSSR braid , having consulted a few resources listed in my Resources page [https://tipsaroundthehome.blogspot.com/p/tatting-resources.html]

Step 3. Now tat an entire ring using only the finger-tatting method. After all finger tatting with a loop employed for part of the segment of a SSSR is exactly what you do in LTR, but for the entire ring! 

And by jove, she got it! All within a few hours.

Step 4. Now we can tat the LTR over a bead easily as shown in several tutorials. 

I had written the entire post yesterday but then thought a limited/specific pictorial would help other tatters facing a similar issue, to work this lovely Star pattern too. Hence today I created a stepwise how-to for Rounds 1 & 2 of the pattern. I also took the time to read Miranda's post and pictorial again after several years and discovered the similarities of association! She also gives a nice history of this technique. I apologise for the unintentional repetition. Unfortunately Sabina Madden's site is down though she is trying to find another server to reinstall paradisetreasures.com.


LOOP TATTED RING for E31 STAR - pictorial pdf - https://drive.google.com/file/d/19q6JKdOyACqh8oz-Z0vzHgh-YCIZ5xBd/view

Now a Loop Tatted Ring or LTR is not limited to a LTR on Ring (LTROR). It can be used in several different ways, including on a chain as a thrown ring [https://tipsaroundthehome.blogspot.com/2021/08/thrown-floating-and-8-rings.html pages 7-8 in the pdf] or after a chain. 

Here it is used as a central ring. We could've used a normal ring or a mock ring. But with both methods, we would not have been able to seamlessly add the bead through both threads to resemble the bead on a picot. LTR allows us the freedom to work continuously with the bead. In a lot of circumstances LTR allows us to tat something that would normally require a 2nd shuttle.


Related Posts
-
https://tipsaroundthehome.blogspot.com/2016/07/refresher.html

Monday, 24 August 2020

hybrid tatting

Pin It now!

my musings.....

This is somewhat of a personal deliberation, contemplation - musings if you may. I haven't done a thorough exploration. So jump in with your comments, input, counter, reference, etc.

We know that any tool we use for tatting lace has it's advantages and limitations. Ingenious tatters have found ways to use the strengths of each tool Together!

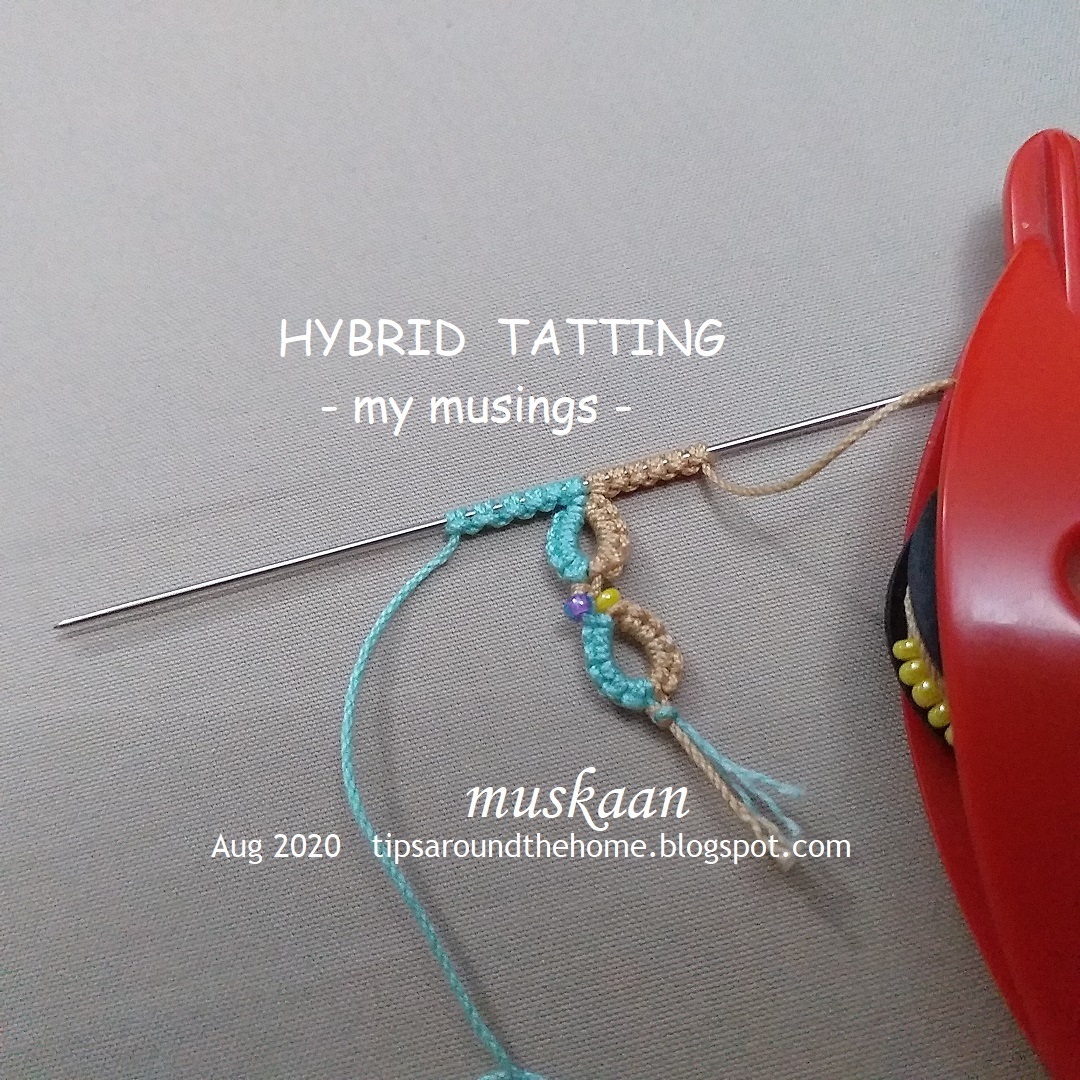
Hybrid Tatting is a tatting method that uses both needle and shuttle to work an element. It started with using them together in a split ring as seen in the image above. The term was coined by Wally Esther Sosa, for this method by Rosario Ruiz Moreno. They taught it at Palmetto Tat Days in 2017. Wally narrated the genesis -

I first came across this term and clever adaptation last year when Sharon Fawns blogged about it here

Recently, someone shared a video on facebook, that clearly showed how to do the split ring in hybrid tatting. It was dated 2015! It is by ChariFriv and can be accessed through this link - https://www.facebook.com/charifriv/videos/1602794246605932. Another example of how tatters independently came up with the same technique, method, or effect!

UPDATE (Nov 2022) - Wally tells me that ChariFriv is Rosario Ruiz Moreno

Anyway, this got me thinking. 

Should the term hybrid tatting be limited to the use of 2 tools for the same element or can it include the use in separate elements or rows within the same lace? 

A pattern that comes to mind is Frivolé's Rose and Crown motif. It has interlocking rings as the central round and several shuttle tatters use a needle to tat only this round.

And what about the SSSR (single shuttle split ring) where we use shuttle to tat 1st side and finger to tat the other?! 2 tools in same element.

Going further back in time, when the chain as we know it, had not been invented in tatting. Tatters left bare thread between rings or ring clusters. 

 
This bare thread was later covered in several different ways. Elgiva Nicholls calls this the 'False Chain' where the bare thread was covered in numerous ways using a tapestry, netting, or sewing needle (Tatting Technique and History, 1962). I am selecting only 2 where the stitch clearly imitates the half stitch(s) as we see in today's tatted lace.

Larks Head Knot (LHK) - 
  
The bare thread being covered by mock ds or LHK. The unflipped over-under movement for half-stitch is underway (left pic). The unflipped under-over half-stitch being made (right pic).


3 mock chains completed with picots.

Buttonhole Stitch - 


Those with a preference for embroidery might have used the buttonhole stitch to cover the bare thread.
Turn work (or work back to the start) and cover the bare thread with buttonhole stitches. These resemble a repetition of half-stitches as in a Josephine chain.

These are merely a small window into the use of 2 tools specifically for tatting the same element, separate elements or rows in the very same tatted lace. I deliberately omitted several other ways we use a crochet hook, a needle, or a cro-tatting tool, focusing only on how a false/mock stitch can be made with 2 tools such that once the lace is completed, the difference in tools is not apparent or discernible.

So, what are your thoughts? Where, and how would you use 2 tools to ease your tatting; and which 2 or more tools?

Tuesday, 16 June 2020

whimsical interlacing

Pin It now!
INTERLACED  RINGS  using 2 shuttles
(SSSR – single shuttle split ring method)  


When I first experimented here by reducing the number of shuttles, I thought this was a do-able but whimsical technique with very limited application. 
However, a couple of interested tatters, including a request, led me to post this pictorial. And as I went about it, a few designs cropped up in my head. I will try to tat 1 or 2 motifs for practice patterns later.

Skill required : how to make SSSR, Mathew Takeda style. Several resources, including Sabina’s pdf, are listed here (scroll down to RINGS -> SSSR).

This pictorial covers only front to back (over-under) movement in detail. The same concept applies to back to front movement as shown in my earlier posts here and here.

For practice, wind 2 shuttles with thick threads in different colours. Join them. I made a short picoted S-chain.
Each ring is : SSSR: 5-5/10.
The starting pair of rings is closed a wee bit differently than the rest of the braid.
For 1st pair of rings :
1. Leave a bit of bare thread at the base, before starting ring.
Using shuttle1, start Ring 1: 5-5

2. Pull up a long loop from the shuttle

 3. and finger-tat 10 ds to complete the ring.


 4. Partially close the ring leaving just enough space for shuttle to pass through.


 5. Pass shuttle2 front to back through the open ring and tat 5-5


 6. Again post shuttle2 front to back through the same open ring


 7. This is how the 2 rings will look. Ring1 is still open, and interlaced Ring2 is partially tatted.


 8. Now start closing Ring1 by pulling the core thread part of the loop


 9. Ensure the loop is at the back of work, hence pass it through Ring2


 10. Then pass the starting tail through this loop in order to anchor the thread (otherwise the ring will unravel)


 11. and completely close the ring. Pull out a loop of shuttle2


 12. and finger tat the 2nd side of the ring.


 13. Tug on the loop to close ring


 14. Pass tail through this loop to anchor


15. and pull shuttle2 thread to remove all slack from the loop.
The starting SSSRs are interlaced and complete.

For 2nd and all subsequent pair of rings :
Leave a tiny bit of bare thread before starting each ring.
 16. With shuttle1, tat Ring3 just like Ring1, closing it only partially.


 17. Interlace shuttle2 ring and tat the first half.


 18. Close Ring3 but leave the finger loop open.


 19. Complete tatting Ring4 and close it, leaving the finger loop open. Notice the loops from each shuttle at base of respective rings.


 20. Now, pass the tail through BOTH loops simultaneously, to anchor the rings,


21. and tug the respective shuttle threads to remove all slack from the loops.
Second pair of interlaced SSSRs completed.
Repeat steps 16 to 21 for desired length.

The next 2 pairs shown in the above pic are interlaced back to front. All steps remain same (from #16 onwards), except for posting shuttle2 back to front twice.

Interlacing with SSSR - My Thoughts and Comparison :
  1. Fewer shuttles required. But this also limits the number of colours that can be used.
  2. Basic interlacing movement and effect remains same as for split rings.
  3. Each pair of SSSRs is brought together at the base (due to the anchoring loops) unlike the linear path/separation for SRs. This is a visual effect, too.
  4. When using interlaced SSSR in a motif, the pair has to remain unattached to previous elements in order for the anchoring loops to pass through unhindered. Some patterns may get around this dilemma, but the range becomes limited.

I had also wondered whether Dora Young’s knotless rings can be used in such interlacing. As I thought over it more, I realise it will be very cumbersome, if at all, to accomplish the interlacing. One will have to go back and forth to tat a pair of rings completely. I’m not in a mood to try it ;-P


Monday, 1 October 2018

scrappy doily and scmr

Pin It now!
For the last few days I hadn’t picked up a shuttle. Housework was partly to blame, leaving me too tired to continue with my Blossoms motifs (I was on a whirlwind spree and the count is now up to 20 - halfway mark reached!!!). So, I took up sewing the edging on the saree – somebody (meaning me) has to do it!

Last evening, I didn’t even have the concentration to sew. But Madhur Dadlani's Unending Doily had been at the back of my mind as a wonderful way to empty shuttles and use up all the scraps! Picked up a shuttle and started.
My rings are ( 4-3-3-4 ). I started with 3 normal rings (white), then switched to SCMR.
Why? With scmr, I can use up almost every last bit of scrap thread, since they will only form the stitches. Can you see where I have a part purple part blue ring? Easily possible with scmr.

And I can have a continuous core thread throughout, not having to refill the shuttle every time.
To secure the scmr, I made an unflipped half stitch at the base.

I had first thought of making it rectangular, but I think with random colours, it is best to go circular. Although, here I am aiming for an oval and will decide on how to fill the center later. Hope the shape will hold.
It’s still scappy, fresh off my shuttle, with no blocking.

So far these are Anchor size 20 scraps, and the 2 rounds measure 2”x1½”.
Do you see this turning into an Ice Drop?! A future project :-D


SCMR - self closing mock ring -
And on the topic of SCMRs, a Japanese tatter (kukka tatting) has been applying the scmr to small medallions and so far she has reached a count of 91 lovely medallions/motifs using scmr!!! I've been following her journey from the start, but it's a pity that I can't leave any comment on her blog. Do check it out. 91 scmr motifs !

Split SCMR
And Tim Kaylor has worked out a way to split the scmr in regular tatting (ie. when working with only 2 threads!). Randy Houtz’ split/scmr uses 3 threads. Tim has put up a video too. Now to try it out…
(added later in the day...
After some thought, this is the realisation I’ve come to –
Tim pulls open the scmr, exposing the core thread, then uses a split chain to cover and bridge the core thread.
Which is similar to what Dora Young did in her KM Ring (Knotless Method Ring). And Rachael Mohler did a slight modification by not closing the ring completely, then covering the open core thread with the knotless method (i.e., a split chain in modern terms).  
So it is basically the modified Dora Young’s Knotless Method Ring (a mock ring worked in 2 parts by anchoring with a lock join & doable with a single shuttle) on a SCMR! 
Clever, nevertheless, and opens up vast possibilities.

Tuesday, 13 June 2017

undulating with one shuttle

Pin It now!
single shuttle medallions with tatting pattern

Thought I’d take a mini break from the project I’m working on (forgot to ask permission for sharing, so we’ll have to wait a while longer) to keep my blog alive ;-D
These were done earlier in the month, continuing with the theme of single shuttle medallions.
Undulating !
single  shuttle  medallions
There are 2 versions, with more to come – there is so much scope in the basic idea. What I showcase as Version 2 was really tatted first, but the pink one is pretty generic with huge potential, as seen in the montage below ....

version 1  prototype
This is a simple braid of half closed or half rings (HR), each of 15 stitches.
In size 20 thread, I used a picot gauge of ⅜ inch for bare thread space of half-closed rings.
Reverse work (RW) after each half ring so that alternate rings face in opposite directions.

8 half rings can be joined back into a square.
10 half rings can be joined back into a star or flower.
… and so on.
Add picots for securing the inner rings, and decorative picots on outer rings.
A pearl in the center of each half ring would look pretty for jewelry.

version 2  prototype
This is made in 2 continuous rounds, with a rosette center and half rings (HR) around. A single shuttle split ring (SSSR) is used to climb out.

Leave a tail at the start in order to secure the last SSSR*.

Rosette (worked in clockwise direction from front)
Ring1  : 3 – 5 – 5 – 5 – 5 – 3 DNRW
Ring2  : 3 + 5 – 5 – 5 – 5 – 3 DNRW
Ring3  : 3 + 5 – 5 – 5 – 5 – 3 DNRW
SSSR4 : 3 + 5 – 5 / 5 – 5 + 3 . Pass tail through the loop before closing ring. DNRW

Outer round of half rings (worked clockwise from front)
[HR1 : 15 RW    (⅜ inch bare thread space in each half ring)
HR2 : 15 LJ , RW] x 4

* The last SSSR has to be joined to first ring, and I chose to do it Takeda-style, passing the starting tail through the SSSR loop before closing it finally. 
Tug on tail and then sew it under caps of ring to hide. 
One can use Dora Young’s split ring technique, too. Some SSSR tutorial links are listed here.

Add decorative picots or beads as desired. These can probably make nice pendants & earrings ?


I was hoping to make many more variations of the above, and more versions. But all that is taking a backseat.


Okay I’ve had my rest, unwinded a bit, and some of the blocked pieces must’ve long dried. Back to my secret project, then…

More from single shuttle medallion challenge - PART 1 ; PART 2

Happy Tatting !