Showing posts with label star. Show all posts

Sunday, 21 January 2024

what a killing

Pin It now!

I actually could've said 'killing two birds with one stone' but its not an idiom I like when birds are so cute. In this case I have made a killing in more than two ways. Read on ...

There are always tons of inspiring allurements and distractions in Tat Land. But I do my best to avoid or choose only those I can weave into my own jam-packed life. This year, I came across two such almost non-structured games which I should be able to manage through the year. 

And this is my submission to both games simultaneously - the E37 Flower Flake and Star derived and adapted from Frau Endrucks' pattern #37 from her 1920 book, ‘Die Schiffchen-Spitzen’ and the modern reworking of E37 Square Diamond Motif. I had shared the prototype flower flake pattern, but it did not lay flat (https://tipsaroundthehome.blogspot.com/2023/10/wanna-multiply.html).

I killed my wide picots, sadly, with untidy stitches beneath the arch. I have now learned the correct method and will share in a future post. The twist in some picots is merely because I drove the pin in too deep when blocking, LOL, and didn't bother to correct it. The patterns will be shared, too. after I make an ice drop version with nicer wide picots.

Splocik announced a new game for 2024 'Small Decorations' wherein we can tat any kind of decoration per month. Easy enough. This snowflake and star are my decorations for January.
Details can be found here (scroll to end of post) - https://splocik2.blogspot.com/2024/01/mae-dekoracje-galeria-grudniowa.html 


Simultaneously, I started with Natalie Roger's (Tat Your Own Adventure) PICOT Bingo. You can download the game here - https://www.patreon.com/posts/picot-bingo-95729145?. Uh-oh, I seem to have missed a crucial point! I thought this one bingo card would last for the year. Looks like it is only for the month. If so, I won't get any bingo this time. Must confirm with Natalie.
UPDATE (22 Jan 2024) - Phew, Natalie tells me the card remains same for the entire year. However if we complete it, we can request for a new card.

The above is for 'Tat A Snowflake'. For 'Tat Flora' I am submitting the E15 Ear of Maize Doodle I posted here - https://tipsaroundthehome.blogspot.com/2024/01/barely-in-time.html 


I am also entering this for the 'Graduated Picots' box. See what a killing I'm making here?!!!
Hey, I can add earring findings and enter them in the 'Tat Earrings' box as well, hehehe. Oh my, I'm devious! That's 3 in a column; the 4th can be done quickly enough, but the doily has me stymied I believe. Time will kill me this time!

Many thanks for hosting these exciting games, Natalie and splocik! See you again next month 💕

Saturday, 13 January 2024

association

Pin It now!

 When we come across a new tatting term/technique, always try to place it within the larger set of techniques you already know. You will be surprised to find that you might already know the technique or at least parts of it. And then learning becomes easier, smoother, and associative.

One of the first messages waiting for me yesterday morning was about the Loop Tatted Ring (LTR) in the Christmas Star pattern by Krystyna Mura, an E31 adaptation. [pdf: https://drive.google.com/file/d/1fz0Hd9jgGnS_qWKayw4UX2Ikr-mp-npb/view]. It starts with a LTR over a bead. 

Despite the video and pictorial links suggested in the pdf itself, Ulrike found it difficult to grasp. I, too, watched a few videos, consulted a few tutorials and found that it could indeed be difficult to grasp, despite the resources themselves being good.  For one, they were all about a LTR on a ring which meant there are too many loops to consider, keep track of, and can become confusing.

That got me thinking and here's how I went about it. Deconstruct the LTR and you will find the basic concept, or at least some steps, is something you might've done before.

Step 1. Can you finger-tat?

Step 2. Have you tatted a single shuttle split ring (SSSR) Mathew Takeda style?

If the answer to both these questions is YES, then you are well on your way to tatting a Loop Tatted Ring! 

Very soon, she came back with her SSSR braid , having consulted a few resources listed in my Resources page [https://tipsaroundthehome.blogspot.com/p/tatting-resources.html]

Step 3. Now tat an entire ring using only the finger-tatting method. After all finger tatting with a loop employed for part of the segment of a SSSR is exactly what you do in LTR, but for the entire ring! 

And by jove, she got it! All within a few hours.

Step 4. Now we can tat the LTR over a bead easily as shown in several tutorials. 

I had written the entire post yesterday but then thought a limited/specific pictorial would help other tatters facing a similar issue, to work this lovely Star pattern too. Hence today I created a stepwise how-to for Rounds 1 & 2 of the pattern. I also took the time to read Miranda's post and pictorial again after several years and discovered the similarities of association! She also gives a nice history of this technique. I apologise for the unintentional repetition. Unfortunately Sabina Madden's site is down though she is trying to find another server to reinstall paradisetreasures.com.


LOOP TATTED RING for E31 STAR - pictorial pdf - https://drive.google.com/file/d/19q6JKdOyACqh8oz-Z0vzHgh-YCIZ5xBd/view

Now a Loop Tatted Ring or LTR is not limited to a LTR on Ring (LTROR). It can be used in several different ways, including on a chain as a thrown ring [https://tipsaroundthehome.blogspot.com/2021/08/thrown-floating-and-8-rings.html pages 7-8 in the pdf] or after a chain. 

Here it is used as a central ring. We could've used a normal ring or a mock ring. But with both methods, we would not have been able to seamlessly add the bead through both threads to resemble the bead on a picot. LTR allows us the freedom to work continuously with the bead. In a lot of circumstances LTR allows us to tat something that would normally require a 2nd shuttle.


Related Posts
-
https://tipsaroundthehome.blogspot.com/2016/07/refresher.html

Monday, 4 December 2023

the power of 15

Pin It now!

 Technically, the power of a single motif extracted from Endrucks' pattern #15 (E15). Over time several patterns from her book have created a vast range of derivatives, eg., E1, E3, E12, E17, E31, E37, to name a few. E15 falls under the same category!

I've been having tremendous fun tatting up small doodles over the past few weeks. While it means I have side-lined my book editing (which I will take up in earnest again in 2024), I can't feel guilty over the brimming ideas and my largely neglected shuttles trying to give them form. Some pattern pdfs have already been shared with our FB group for the Dec game; others are in the works.

It all started when I spotted a ready-made tree motif in Endrucks' pattern #15 which Ninetta has updated with diagram and written pattern - https://drive.google.com/file/d/1hl1EuK-E7tChkL4OsohWjtGLafhp7hcY/view

I quickly tatted up a prototype with size 10 thread and as you can see there isn't much room for change, right! 
Model #2 in metallic cotton size 20. I had started this just like in the prototype, from the lower side ring on the right. This is an easier pathway to tat since the two sides remain unattached till you reach the trunk part. Later I strung beads to brighten it up.
Model #3 - Here I wanted to avoid hiding ends and also make it a tree ornament. Hence started at the top inner ring and ended with a split ring at the tip.
The same with a star to showcase an idea.
E15 TREE DOODLE Pattern PDF : https://drive.google.com/file/d/1oq9kkuSN2e0Qnh0N1fUr00MT8HrZ7-cz/view

Hubby saw a bell in the tree! So out came more thread (size 10) and this stylised bell pendant or ornament was born.
The same but this time in metallic thread size 40.

A comparison of the sizes. Hubby wanted an inward curve at the bottom for a more realistic look. Another version for a future project ....

E15  BELL  DOODLE Pattern PDF : 
https://drive.google.com/file/d/17m9gxw2vG1oS_mrawfmZI27PpLZ9xFhK/view

Inverted, the bell looked like the bodice of a lady's gown or the torso of an angel. Rough sketch to tackle in the future.
If the sides were brought closer together, the motif would work as a flame!
 
Tatted with one shuttle and the two threads combined.

Flame needs a candle (or a diya), and these were my first trials

E15 Candle version 1 using block tatting. Can be done with ball and shuttle.
It was Ninetta's idea to add a little base ring to the flame.

E15 CANDLE. MOTIF pattern PDF :

Version 2 of the candle is worked alternately with treble stitch chains and double stitch chains. This is still incomplete as I got sidetracked with other motifs 😁

My objective was to create a slight slant in the block tatted chains, but I couldn't achieve it. It will take more experience than I have to get the chains to tilt.
However, my 3rd version is going to use Helix tatting - not only will I get the spiraling effect, it will also be 3D!

Meanwhile, leaves cropped up, too! This is the first model with a mock chain acting as the central vein, and ending with a Josephine chain stalk. 
This is how it looked fresh off the shuttles. However, it flattened after blocking and has stayed flat, although I like the 3D option.
E15 Leaf Doodle #2 using two types of twisted picots - one for the tip and one for the stalk.
The 3rd model started off with a different idea but midways I let my shuttles take over and ended with this. Lock chains make up the vein and stalk. I don't like the picots here!
All 3 together, and I still have so many ideas I'd like to tat!

What are leaves without a flower and its the season for Poinsettias - a no-brainer.
After the first layer of 3 petals, I continued with a lower layer of slightly larger petals. This is still a WIP where I need to add the yellow center, etc. 
QUESTION: Are 6 petals enough or should I add one more large petal below? I don't want it to look too symmetrical and adding another petal will move them slightly. 
I value your opinion.
After tatting the first 2 petals of the poinsettia, they looked like a great idea to tweak into a Butterfly or wings for an angel!

TIP: In all models I have deliberately used a self-closing mock ring (SCMR) at the tip for 2 reasons - 
1. in most cases the doodle or motif can be worked without the need for a 2nd shuttle;
2. more importantly, I find it sits much better than a thrown ring would have without anchoring picots at its sides.
I made a hitch (unflipped half-stitch) after closing the SCMR.

Meanwhile, one of our prolific members created a Star with the same motif! Ninetta and I quickly compiled a pattern pdf for it and included it in our Dec game. There are several more patterns to choose from in our game this month. Hopefully you will join us. All links in the side panel of my blog at the very top.

I will try to share the pattern for these remaining models, too.

Friday, 22 September 2023

happy Endrucks 2

Pin It now!

 Continuing from my previous post (https://tipsaroundthehome.blogspot.com/2023/09/happy-endrucks-1.html), here is the second batch of models all derived, designed, and tatted by Krystyna Mura, from Endrucks' pattern #31! 

Words fall short hence sit back and enjoy the beauty!

3D  BELL

3D  HEART

BIG  CHRISTMAS  BALL

SMALL  CHRISTMAS  BALL

STAR

RED  LILA  HEART

BEADED  HEART

GARNET  HEART

TINY  HEARTS

 LITTLE  LEAVES

BEADED  LEAF

GINGKO  LEAF

CHRISTMAS  WREATH

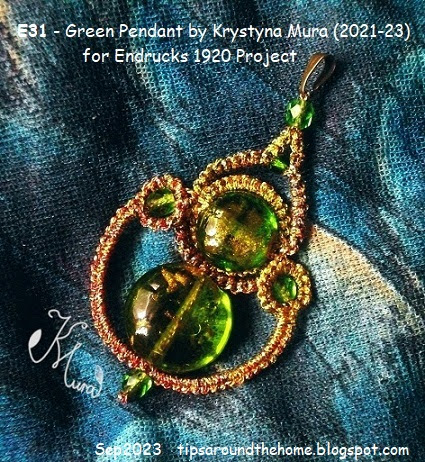
GREEN  PENDANT

While Krystyna hasn't yet shared individual patterns of these derivatives, one can identify the motif from the E31 Doily of Modest Hearts and figure out the stitch count and tatting sequence. Over time, she will share several patterns! 

And these are not all!!!! Stay tuned for the final batch and continue to be amazed. 

..... to be continued .....

Saturday, 23 April 2022

show-stopper or show-topper

Pin It now!

Lady with a Sunshade (3D)
Krystyna Mura has rolled out such a vast and enticing range of patterns from just ONE pattern that I cannot stop wondering whether this is a show-stopper or a show topper! And the following pics are only a glimpse of what more is in the pdf itself; not to mention some of the prototypes she sent in!

This is the original pattern #12 from Endrucks --- 
Sampler of Endrucks' n.12
She has provided samplers and diagrams for her modified versions, too. Her beaded version looks pretty as a cuff bracelet.

She extracted part of the motif to create a Bracelet with Coin Beads, a single repeat of which gives us this medallion ---
Medallion

The lower part of the original pattern/edging is quite a common motif used to make the skirts and gowns of Crinoline ladies and angels. I wonder who was the original designer? Any ideas? Or was it Frau Endrucks?
Anyways, Krystyna has used the same motif to design so many girls, ladies, and angels (and also one boy!) - both 2D and 3D, that it will take a while for them to walk down the ramp! Here are 2 of them (besides the lead pic) --- 
Girl in Shades of Blue
Christmas Angel (3D)
 
Speaking of Christmas, she has also derived numerous motifs, stars, ice drop, and a miniature tree, all worked in one pass and ideal for cards and decoration ---
Christmas-time Stars

And then there's music in geometry! Check out her sets starting from a Terzet through to 3 types of Sextets ---
Flowery Sextet

The world of animals and insects hasn't been forgotten be it the Bat and Butterfly in 2D, and a Peacock and Bird in 3D ---
Bat

Butterfly
Butterflies need nectar, hence flowers cannot be far behind! She shares the pattern for a Garden Cosmos (2D). In her gallery she showcases a 3D Pumpkin along with the following beauties --- 
Daffodil (3D)

Poppy (3D)

The amazing part is that most of her adaptations, whether flat or dimensional, are worked in one pass unless you want a speck of colour to highlight something. A case in point is this gorgeous doily below ---
Ball at the Royal Court Doily
She displays 2 more doilies, tatted in one pass. And she has promised me that she will be sharing the patterns! Can't wait to get started on them!

You can download the pdf here - Endrucks pattern #12 reworked and adapted by Krystyna Mura - https://drive.google.com/file/d/1E26K3FFgHygdkEKUvVHn-f0MFlENDsqA/view

Diagrams are colour-coded, self-explanatory and clear, depicting the count and sequence. What I love is how she boxed in the repeat sequence. You know how the starting (and/or final) motif in an edging is often different from the subsequent or middle repeats due to joins, etc. Her diagram highlights this without the need for text.
Personally, this is all I need – a good pic of the tatted model alongside these excellent diagrams – and no written pattern!
Krystyna also adds in a few effect/technique pics and tips/notes to explain her method of working.
The pdf is like a perfect booklet to keep us busy and happily engaged for a long time.

LEAFLIKE RING
Did you notice the little leaf in the daffodil and the Bat ears? An odd and unique shape, don't you think?
Well, this is Krystyna's adaptation of a dimple ring which she calls 'leaflike ring'.
Although she explains it in the pattern pdf, on my request she graciously prepared a separate tutorial pdf. 
Click on the link for Leaflike Rings tutorial pdf -


Tremendously Incredible work by this enormously talented and generous lady! I have still to detect how and where she extracted a few of the motifs for her ginormous adaptations! And she promises to share more of the patterns for her adaptations!

Scroll through the pattern #12 pdf and tell us which model you like best.


Find all pattern pdfs in the Endrucks 1920 Project document here - https://docs.google.com/document/d/17LEVftXweztBIOWh4sL4BB7bX65ssoOsOn4oXIgCepY/view
And if you tat any pattern from this Endrucks' collection, we welcome you to join our Facebook group!

                                      Many many thanks, Krystyna ....                                       
words fail me for all the wonderful effort you have put in!