Showing posts with label tree ornament. Show all posts

Saturday, 30 November 2024

SOUP catcher

Pin It now!


I haven't touched my shuttles for almost 3 weeks now, but I needed a small decoration for splocik's monthly game. So, I did a quick search in my stash and found motifs I had tatted in September. I hastily put these together to create some kind of ornament. It resembles a dreamcatcher somewhat, but could just as well be a suncatcher, a window decoration or a tree ornament. And overall, it could've been better! This will have to do for now since only a few hours remain of November.

Being made of pieces in my stash and with no clear identity, I was tempted to call it my SOUP* catcher! Remember what SOUP stands for? - Sewing On / Using Pieces of tatting. However a few of my friends say it does look like a dreamcatcher. And these are the component pieces ....

Motif #1 Mituko Ikuta's 1994 book 'Shuttle Lace: Tatting and Beads 1' has several picot effects which became popular as 'Ikuta Picots' through Georgia Seitz's tribute to the designer. The above motif is from Ikuta Picots Diagrams 1  by Georgia Seitz (https://www.theonlinetattingclass.com/technique-tools). Worked in Lizbeth size 20.

Motif #2 And this is from Diagram 2 same link as above. In the first motif the long picots appear like adjoining or continuous picots, being joined at the same distance. These are double picots and the two threads can be arranged to better resemble them - I did not. Worked in Anchor Pearl Cotton size 8.
In this 2nd motif the very long picots are joined to adjoining elements (rings here) and form overlapping layers with careful interweaving.
This time I pinned the long picots in 2nd motif while blocking in order to achieve the points. I like this better since it opened up the picots - what about you?
My pictorials for her overlapping picots effect - https://tipsaroundthehome.blogspot.com/search?q=Ikuta+picots
Motif #3 I was inspired by Corina Meyfeldt's beautiful Sakura pattern (https://cmhandmade.blogspot.com/2014/11/pattern-sakura.html). I had started out to tat the sakura, but pre-stringing the beaded picots (notice I put 3 yellow beads at the tips?) was quite time-consuming so I went freeform with only 5 stamens. Worked in Anchor Pearl Cotton size 8.

There's a backstory to this. When I did the post about Tatted Fringe (https://tipsaroundthehome.blogspot.com/2024/08/on-fringes.html) Stephanie W told me about her beaded fringe which she made using Nina Libin's 'single file beaded picot' and even sent me a pic! It reminded me of Corina's Sakura which had been taught in Georgia's class. The method is exactly the same, though for a fringe the picots would likely be longer.
Motif #4 The large mustard 4-petalled motif in the center of the bangle is an adaptation of Eliz Davis' motif (https://tatknot.blogspot.com/2016/05/mock-ring-by-joining-chain-back-to.html) which I made before in blue (https://tipsaroundthehome.blogspot.com/2016/05/of-long-chains-large-rings.html). After everything was assembled, I realised I hadn't taken a pic of the motif separately. Worked in Anchor size 20 (¬size 10).

Motif #5 There was a prominent negative space in the 4th motif so I sewed in the Fringe Star 

I wanted to take a short video of the SOUP dreamcatcher but it wasn't to be. 

How fast this year has slipped by! Only one more month left, one last submission left. Do check out the range of October entries in splocik's 'Small Decorations' game - https://splocik2.blogspot.com/2024/11/male-dekoracje-2024-galeria.html

Many many thanks to all mentioned in this post!  

Monday, 26 August 2024

starburst fringe

Pin It now!

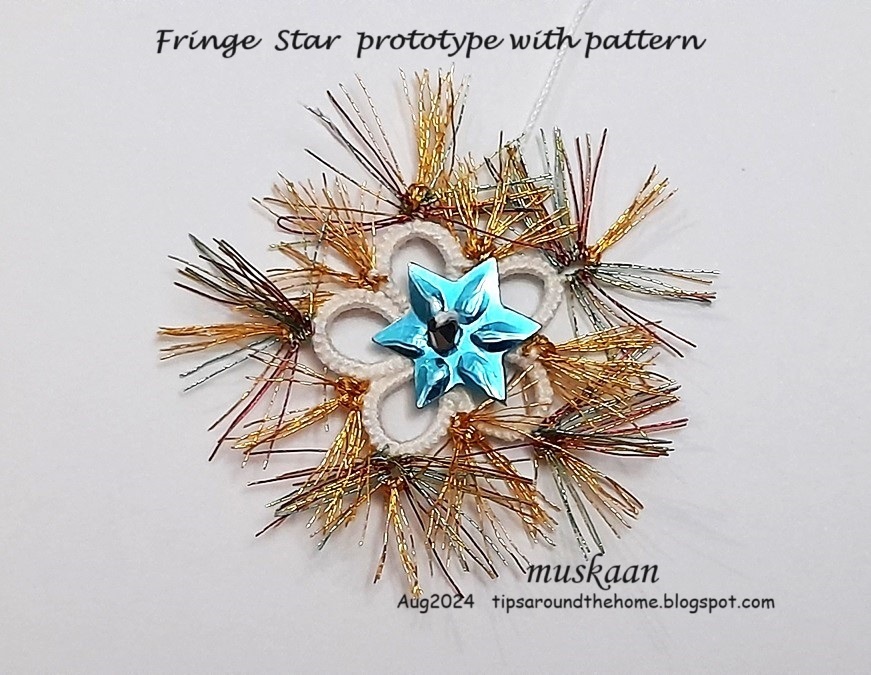
In my last post I had shared several adaptations of Corina Meyfeldt's Tatted Fringe. Lots of ideas swirled in my head to try out a quick practice pattern, applying all three adaptations viz., tatted fringe, spot/luggage tag fringe, and tatted fringe picot. While I am not fully satisfied with the outcome (it looks especially messy in photographs), there is a lot of scope to play and try something better and different.

This is the Fringe Star - a kind of practice pattern with a lot of possibilities. 
I got so involved that I forgot to take some process pics.

I started by tying the white (Anchor size 40) shuttle thread with metallic Madeira (Astro 2, No.40) and tatting a chain with measured adjoining picots. This took longer than I bargained for coz the metallic thread is really really fine. However the colourway is beautiful with a range of shades.

Now since the thread was so thin, I feared the picot might turn out to be too small. Hence, after snipping off the tips and dividing them into 5 clusters (eyeballed, not counted!) I divided each further and added a luggage tag in the center of each using Sanbest #34. 
And I wanted a small cluster in the joining picot as well. So, I direct tatted 3 adjoining long picots at the start and between the 5 clusters. 
Future Idea 1 - My original idea was to make layered rings with graduated fringe picots. But somewhere along the way, I decided to simply add the fringe between rings for now.
  
With all the prep work finished, I pushed the clusters further into the shuttle and started tatting. The star body is a simple rosette of 5 rings (6 - 8 - 8 - 6)x5 joining to adjoining ring(s).

However, before starting the ring, bring forth the fringes (Fr) into the loop for the ring.
    For first ring tat 6ds, Fr, 8ds, FrPicot, 8ds, Fr, 6ds. 
    For next 4 rings, tat 6ds +(join to ring: push the Fr towards the top of the picot and join below it), 8ds, FrPicot, 8ds, Fr, 6ds.
    Join last ring to first.

Insert sequin and bead and sew down with the tail and hide the tail end or use it to suspend the star. Trim the fringes.
I wanted a starburst kind of shining aura, hence the long fringe. It is very sparkly when seen in person.
I repeat, it looks especially messy in pics, but there is always room for improvement. 
Future Idea 2 - Use a circle of tatted fringe for the base of a rakhi!!! Or how about fireworks?!

OBSERVATIONS - I'd like to point out that each adaptation has its advantages and this little pattern will help you realize this. 
  • For a fringe picot it is advisable to tat the chain as in Corina's original. 
  • But for spot treatment or to sprinkle a different colour randomly, luggage tags are preferable. 
  • Now if you need fringes on both rings and chains in FS/BS tatting, then you will have to decide and plan beforehand. Decide the number of fringes needed. Then tat the chain in segments of DS and RODS (reverse order DS). 

Future Idea 3 - Tat a motif with spot fringes in rainbow colours! 

Wednesday, 31 July 2024

sing little birdie

Pin It now!

 The Ring of Tatters (Spring 2024, #88) newsletter I received couple of months back (https://tipsaroundthehome.blogspot.com/2024/05/reading-is-cool.html) has such lovely patterns and I hope to tat them all. I started with a little bird motif in order to submit it for the PICOT Bingo, striking off the Tat Fauna box (https://www.patreon.com/posts/picot-bingo-95729145?).

Just like it's pattern, the motif has a simple name - Bird. Made only of scrolls - rings and chains, it takes on the shape of a bird and can be tatted with a ball and shuttle. It is designed by Hannah Crowle. Worked in Anchor pearl cotton size 8, it comes to almost the exact size as the printed model.

There was a time when I kind of looked down upon simple ring/chain designs. They felt too easy and I was striving to learn so much more! And yet, getting the motif to lay fat, yet be visually identifiable and elegant, is a huge achievement and I am still not at that stage. Which is why I truly appreciate all kinds of designs.

I haven't changed anything and it was a joy to tat! Although an bead eye would look good, right? I remembered too late that I had some nice soft variegated embroidery threads (skeins) which would've looked nice instead of this solid colour. All my other variegates in tatting threads just didn't seem to cut the mark. 

This bird can be suspended or be perched on a tree and thus be eligible for the Small Decorations game I am participating in, I have already started something else for that. Stay tuned .....

Many thanks to Hannah for her cute little birdie 

Thursday, 18 July 2024

inflate me roundup

Pin It now!

 Our May event saw few participants but the models are so special, highlighting their creative visualization and execution! Without much ado, alphabetically .....

Inflate Me Endrucks May2024 (#InflateMeEndrucks) in Endrucks 1920 Project FB group.

All patterns are from the book ‘Die Schiffchen-Spitzen’,1920, by Frau Eleonore Endrucks-Leichtenstern, reworked in the Endrucks 1920 Project, 2020.

For all updates and important EP linkshttps://docs.google.com/document/d/1w1TZBg-HIzseGEUoJ-rko7tNbtSgZY5A18Oy2Y9Hh0Y/view . Check out the Directories for respective patterns (uninflated).

1. Anna Bonelli - is adept with both needle and shuttle. However, since there is a shuttle in the pic, it is safe to assume this beautiful decoration or pendant is done with shuttle. 

E10 - Zinnia Flower inflated 

2. Brookie Heightsmen - Always one to think divergently, she adapted two E41 motifs to create this cute beaded hot air balloon equipped with the tiny basket (probably from E44). "...up up and away in my beautiful balloon".
E41 - Motif inflated to Hot Air Balloon

3. Lella Loops - is an accomplished needle tatter. Here's what she says - "My small entry for #InflateMeEndrucks game, from pattern E28. It naturally tends to cup so I thought it was perfect. I insert a little organza pouch with dry lavender flowers. Liz metallic, needle 7."

E28 - Center motif inflated to Lavender Pouch

4. Manju Talekar - Manju joined us in late April and has already participated with such enthusiasm and talent in all our games since. She sent us 3 models and though they do not strictly conform to the rules of the game, we are most happy to showcase her beautiful works, all from E12.
E12 - Sky Blue Angel inflated
"From original Endrucks pattern #12, Angel in white, I modified the skirt with a lace pattern in round and more flare. In the Wings added some small picots in between the large ones. I found it difficult to take a picture showing three dimensional pattern."

E12 - Sky Blue Angel inflated to 3D Bell
"My submission, a bell, Based on Endruck’s pattern #12 & adaptations by Krystyna Mura, tatted in round with little modification in stitch count for rings."

E12 - Sky Blue Angel inflated to 3D Earrings
"Endrucks Pattern #12 & adaptation with diagram by Krystyna Mura. Just a concept..an Ear Dangling, still working on the second one. I think it needs some more refinement, got some ideas while making...
Deliberately made in flag colours, it shows how easily it can be adapted to other colours.

5. Margaret Davies - is a real trooper! Despite life getting solidly in the way, she adamantly whipped out this cute 3D butterfly from E32. Notice how the minimal joins give it an open and relaxed appearance.
E32 - Life is Bliss butterfly inflated
"At last I manage to make another butterfly, this is a 3D butterfly of Life is Bliss butterfly,
Originally I put a bead in the middle of the onion ring, somewhere the bead did not like the middle, it might have been too big, this time I tried again the photo is not easy to take, so I hope you can see it is 3D I put two butterflies together next time I am going to try some beads.
"

6. Muskaan - I've already said all I had to in my respective posts (links under each pic). This inflation became so addictive that my entries inflated to 3! And the third one (tree) has 3 motifs instead of 2.
E38 - Light Aircraft or 3D Lobster inflated

E15 - Leaf Doodle version 1 inflated


7. Ninetta Caruso - quickly tatted a model for our game before it was announced so that we had a range of possible ideas to inspire participants! A master of miniature, later she tatted the cutest little coin purse.
E30 - Square inflated to Biscornu Pin Cushion

Her work in progress. Gives us an idea of how tiny her pin cushion is! And its all handmade!

Keeping the E30 Square pattern intact, she merely added a ring at each corner to span the puffed pin cushion. This modification is inked in the above image.

E10 - Motif inflated to Coin Purse

E10 - Coin Purse with coin inside 
With the flap closed, can you see the owl I see?

E10 - Coin Purse open.

8. Ulrike Klauser - joined us from Switzerland a few months back and has demonstrated some beautifully tatted pieces nicely displayed. You can see her lovely tatting (including some Endrucksian) in her new multilingual site - https://schiffchenspitze.ch/en/home
She chose the Slim angel from the E7 pair of Slim and Chubby Angels for this game. She inserted organza inside and placed it on a postcard for a beautiful backdrop! 

E7 - The Slim Angels

E7 - The Slim Angel inflated 
Doesn't it appear as if the angel is having a blast flying across the lit sky! It's also a good idea for a Flying Kite.


To sum up, we had 8 participants submitting 13 models. And the range is quite wonderful!

Our hearts are inflated with joy and satisfaction at seeing these amazing models! Hope these re-interpretations inspire in future, too.  Many thanks from Ninetta and me.💗

Saturday, 22 June 2024

oh for cool breeze

Pin It now!

 After a long severe winter spell we are in the throes of a long hot summer spell since the start of May. The maximum temperature hovers between 40C to 45+C and now the minimum is up to 33-34C as well. And so a reminder of the cool climes in the land of firs, pines, and spruces! Christmas in June.

This was my 3rd submission for the May game - Inflate Me Endrucks.

A 3D Christmas tree assembled using 3 motifs instead of 2.

I already had the first two E15 tree doodle motifs in my stash and I just needed to tat one! These are such quick tats, done in a single sitting. Pattern: https://drive.google.com/file/d/1oq9kkuSN2e0Qnh0N1fUr00MT8HrZ7-cz/view
Again I followed Pitsibaa's tutorial - https://www.youtube.com/watch?v=X0MInK7b65Q to sew and stiffen the motifs. I left the base of the trunk and part of one side open for stuffing, while sewing down the rest. 
TIP: This time I sewed through the stitch caps rather than picots, thus leaving free picots along the sides for a more natural tree-like feel.
A large bead was inserted in the trunk. 
Then a sequin base was glued to cover the open trunk base and keep the bead inside. This was tricky coz the sequin wouldn't adhere.
TIP: Use a tiny piece of double-sided tape or a piece of tissue with glue on both sides. This insertion allows the sequin to stick and stay.
The 3D tree from 3 different angles ....
On two motifs I sewed faceted tear drop crystals to cover the open space.
Gluing the two star sequins at the tip was tricky, too. I used the above described tip to join the two sequins with a deliberate shift to get more spokes.
Another angle showing the fairy light beaded strings.

This tree is free-standing. Since one of old motifs had a loop to hang as a tree ornament, I let it be. Thus this motif has both options - to dangle or to stand!
 🌲🎄🌲🎄🌲🎄🌲🎄🌲🎄🌲🎄🌲🎄🌲🎄🌲🎄🌲🎄🌲🎄🌲🎄🌲🎄🌲🎄

 This tree ornament is also my submission for Small Decorations game by splocik. Check out the May submissions by the talented participants here - https://splocik2.blogspot.com/2024/06/male-dekoracje-2024-galeria-majowa.html. It's Christmas in June, splocik :-)

 🌲🎄🌲🎄🌲🎄🌲🎄🌲🎄🌲🎄🌲🎄🌲🎄🌲🎄🌲🎄🌲🎄🌲🎄🌲🎄🌲🎄

I apologise for not responding to emails or leaving comments in blogs, though I do try to read everything - will catch up soon, promise. Part of the reason is the weather-induced sluggishness and partly because my head is back into editing (book as well as helping out with a couple of pattern presentations). I do make quick FB forays, though. In fact even this post was delayed because I just couldn't focus on the little details that needed to be shared. Yesterday and today the temperature slid down a bit but with increased humidity, and the prediction is for rise in temps again. World over these freaky extremes are getting more and more common. We need trees, lots and lots and lots of trees!!!

 🌲🎄🌲🎄🌲🎄🌲🎄🌲🎄🌲🎄🌲🎄🌲🎄🌲🎄🌲🎄🌲🎄🌲🎄🌲🎄🌲🎄

Related Posts

Monday, 4 December 2023

the power of 15

Pin It now!

 Technically, the power of a single motif extracted from Endrucks' pattern #15 (E15). Over time several patterns from her book have created a vast range of derivatives, eg., E1, E3, E12, E17, E31, E37, to name a few. E15 falls under the same category!

I've been having tremendous fun tatting up small doodles over the past few weeks. While it means I have side-lined my book editing (which I will take up in earnest again in 2024), I can't feel guilty over the brimming ideas and my largely neglected shuttles trying to give them form. Some pattern pdfs have already been shared with our FB group for the Dec game; others are in the works.

It all started when I spotted a ready-made tree motif in Endrucks' pattern #15 which Ninetta has updated with diagram and written pattern - https://drive.google.com/file/d/1hl1EuK-E7tChkL4OsohWjtGLafhp7hcY/view

I quickly tatted up a prototype with size 10 thread and as you can see there isn't much room for change, right! 
Model #2 in metallic cotton size 20. I had started this just like in the prototype, from the lower side ring on the right. This is an easier pathway to tat since the two sides remain unattached till you reach the trunk part. Later I strung beads to brighten it up.
Model #3 - Here I wanted to avoid hiding ends and also make it a tree ornament. Hence started at the top inner ring and ended with a split ring at the tip.
The same with a star to showcase an idea.
E15 TREE DOODLE Pattern PDF : https://drive.google.com/file/d/1oq9kkuSN2e0Qnh0N1fUr00MT8HrZ7-cz/view

Hubby saw a bell in the tree! So out came more thread (size 10) and this stylised bell pendant or ornament was born.
The same but this time in metallic thread size 40.

A comparison of the sizes. Hubby wanted an inward curve at the bottom for a more realistic look. Another version for a future project ....

E15  BELL  DOODLE Pattern PDF 
https://drive.google.com/file/d/17m9gxw2vG1oS_mrawfmZI27PpLZ9xFhK/view

Inverted, the bell looked like the bodice of a lady's gown or the torso of an angel. Rough sketch to tackle in the future.
If the sides were brought closer together, the motif would work as a flame!
 
Tatted with one shuttle and the two threads combined.

Flame needs a candle (or a diya), and these were my first trials

E15 Candle version 1 using block tatting. Can be done with ball and shuttle.
It was Ninetta's idea to add a little base ring to the flame.

E15 CANDLE. MOTIF pattern PDF :

Version 2 of the candle is worked alternately with treble stitch chains and double stitch chains. This is still incomplete as I got sidetracked with other motifs 😁

My objective was to create a slight slant in the block tatted chains, but I couldn't achieve it. It will take more experience than I have to get the chains to tilt.
However, my 3rd version is going to use Helix tatting - not only will I get the spiraling effect, it will also be 3D!

Meanwhile, leaves cropped up, too! This is the first model with a mock chain acting as the central vein, and ending with a Josephine chain stalk. 
This is how it looked fresh off the shuttles. However, it flattened after blocking and has stayed flat, although I like the 3D option.
E15 Leaf Doodle #2 using two types of twisted picots - one for the tip and one for the stalk.
The 3rd model started off with a different idea but midways I let my shuttles take over and ended with this. Lock chains make up the vein and stalk. I don't like the picots here!
All 3 together, and I still have so many ideas I'd like to tat!

What are leaves without a flower and its the season for Poinsettias - a no-brainer.
After the first layer of 3 petals, I continued with a lower layer of slightly larger petals. This is still a WIP where I need to add the yellow center, etc. 
QUESTION: Are 6 petals enough or should I add one more large petal below? I don't want it to look too symmetrical and adding another petal will move them slightly. 
I value your opinion.
After tatting the first 2 petals of the poinsettia, they looked like a great idea to tweak into a Butterfly or wings for an angel!

TIP: In all models I have deliberately used a self-closing mock ring (SCMR) at the tip for 2 reasons - 
1. in most cases the doodle or motif can be worked without the need for a 2nd shuttle;
2. more importantly, I find it sits much better than a thrown ring would have without anchoring picots at its sides.
I made a hitch (unflipped half-stitch) after closing the SCMR.

Meanwhile, one of our prolific members created a Star with the same motif! Ninetta and I quickly compiled a pattern pdf for it and included it in our Dec game. There are several more patterns to choose from in our game this month. Hopefully you will join us. All links in the side panel of my blog at the very top.

I will try to share the pattern for these remaining models, too.