Showing posts with label Corina M. Show all posts

Thursday, 9 January 2025

updates

Pin It now!

I have often updated a post (highlighted as 'UPDATE') without any separate notification. This time I thought a special post would be good for those interested since there are quite a few. Yet as I list them, I find some should be accompanied with a photo. Hence while I rectify that omission, here is part 1 of the updates in no particular order ....

DAL Celtic Snowflake challenge. Pattern (diagram) for Padma Mandayam's adaptation of Mariola Siwek's version is now uploaded to this Google doc - https://docs.google.com/document/d/1pVqM6S5Ng49xk6erSsDyRm3y7SdV2tCIUOCgltze4lM/view for you to enjoy. 
Original post -https://tipsaroundthehome.blogspot.com/2024/12/and-more.html 

🌹🌹🌹🌹🌹


I was very impressed with the way Ninetta had started her ring seamlessly without making any 'join' by using the same joining loop as a ring loop. Well, forgetful brain did not put two and two together especially considering I have used this method before. It is basically the Ring on Picot technique which Patty Dowden demonstrated in this video -https://m.youtube.com/watch?v=LmMxIBrDpRI 

Original post -  https://tipsaroundthehome.blogspot.com/2023/10/awakened.html

🌹🌹🌹🌹🌹 
 

When I wrote about Fringe Tatting and the Tatted Fringe I did not highlight that beads could be used for the fringe, too. Eventually I made a beaded fringe inspired by and following Corina Meyfeldt's directions for Beaded Stem. Nina Libin called it Single File Beaded Picot.  The beads are pre-strung on the shuttle or ball thread depending on the pattern and each fringe or beaded picot is moved in place when needed. 
Original Posts - https://tipsaroundthehome.blogspot.com/2024/08/on-fringes.html
https://tipsaroundthehome.blogspot.com/2024/11/soup-catcher.html

Here's an old model from 2017 - https://tipsaroundthehome.blogspot.com/2017/05/rising-month-late.html
This method is fine for a limited number of fringe elements/picots with a limited number of beads on each or if all the beads are on the ball thread. 
One more method is the Floating Beads method but it has severe limitations -https://tipsaroundthehome.blogspot.com/2017/09/floating-beads-part-4.html

🌹🌹🌹🌹🌹

And finally splocik's Small Decorations 2024 since I won't be participating in her 2025 verion - December gallery (https://splocik2.blogspot.com/2024/12/male-dekoracje-2024-galeria-grudniowa.html ) and collages of entire year's works by some participants (https://splocik2.blogspot.com/2025/01/male-dekoracje-2024-podsumowanie-i-3.html) ... links added to my final post (https://tipsaroundthehome.blogspot.com/2024/12/a-no-glass-ceiling.html). I am happy to have been able to submit 13 decorations.

🌹🌹🌹🌹🌹

I had sent the vapour stitch bouquet pic for PICOT Bingo, but couldn't complete the game in the way I had intended and imagined. 5 boxes still left to cross out. Natalie, too, has uploaded a 2025 bingo card, but I won't be participating. See how disciplined I am being this year?! ;-D 

This is it for now. More updates will follow with some exciting revelations/discoveries!

And I still have to update some of the original posts with new links/details. Tomorrow. It's time for bed now.

Saturday, 30 November 2024

SOUP catcher

Pin It now!


I haven't touched my shuttles for almost 3 weeks now, but I needed a small decoration for splocik's monthly game. So, I did a quick search in my stash and found motifs I had tatted in September. I hastily put these together to create some kind of ornament. It resembles a dreamcatcher somewhat, but could just as well be a suncatcher, a window decoration or a tree ornament. And overall, it could've been better! This will have to do for now since only a few hours remain of November.

Being made of pieces in my stash and with no clear identity, I was tempted to call it my SOUP* catcher! Remember what SOUP stands for? - Sewing On / Using Pieces of tatting. However a few of my friends say it does look like a dreamcatcher. And these are the component pieces ....

Motif #1 Mituko Ikuta's 1994 book 'Shuttle Lace: Tatting and Beads 1' has several picot effects which became popular as 'Ikuta Picots' through Georgia Seitz's tribute to the designer. The above motif is from Ikuta Picots Diagrams 1  by Georgia Seitz (https://www.theonlinetattingclass.com/technique-tools). Worked in Lizbeth size 20.

Motif #2 And this is from Diagram 2 same link as above. In the first motif the long picots appear like adjoining or continuous picots, being joined at the same distance. These are double picots and the two threads can be arranged to better resemble them - I did not. Worked in Anchor Pearl Cotton size 8.
In this 2nd motif the very long picots are joined to adjoining elements (rings here) and form overlapping layers with careful interweaving.
This time I pinned the long picots in 2nd motif while blocking in order to achieve the points. I like this better since it opened up the picots - what about you?
My pictorials for her overlapping picots effect - https://tipsaroundthehome.blogspot.com/search?q=Ikuta+picots
Motif #3 I was inspired by Corina Meyfeldt's beautiful Sakura pattern (https://cmhandmade.blogspot.com/2014/11/pattern-sakura.html). I had started out to tat the sakura, but pre-stringing the beaded picots (notice I put 3 yellow beads at the tips?) was quite time-consuming so I went freeform with only 5 stamens. Worked in Anchor Pearl Cotton size 8.

There's a backstory to this. When I did the post about Tatted Fringe (https://tipsaroundthehome.blogspot.com/2024/08/on-fringes.html) Stephanie W told me about her beaded fringe which she made using Nina Libin's 'single file beaded picot' and even sent me a pic! It reminded me of Corina's Sakura which had been taught in Georgia's class. The method is exactly the same, though for a fringe the picots would likely be longer.
Motif #4 The large mustard 4-petalled motif in the center of the bangle is an adaptation of Eliz Davis' motif (https://tatknot.blogspot.com/2016/05/mock-ring-by-joining-chain-back-to.html) which I made before in blue (https://tipsaroundthehome.blogspot.com/2016/05/of-long-chains-large-rings.html). After everything was assembled, I realised I hadn't taken a pic of the motif separately. Worked in Anchor size 20 (¬size 10).

Motif #5 There was a prominent negative space in the 4th motif so I sewed in the Fringe Star 

I wanted to take a short video of the SOUP dreamcatcher but it wasn't to be. 

How fast this year has slipped by! Only one more month left, one last submission left. Do check out the range of October entries in splocik's 'Small Decorations' game - https://splocik2.blogspot.com/2024/11/male-dekoracje-2024-galeria.html

Many many thanks to all mentioned in this post!  

Saturday, 24 August 2024

on the fringes

Pin It now!

 Or not so much on the fringes? 

FRINGE(s) is a kind of decorative edge made of lots of hanging threads.  

FRINGE TATTING usually involves very long adjoining picots at the outermost edge of the piece, which are then cut and trimmed to size. These may be frayed if needed. (thanks to Anita Barry, who also shared a pic for the Glossary)


TATTED  FRINGE  AND  ADAPTATIONS -
Then came the Tatted Fringe shared by Corina Meyfeldt in November 2015 here - http://cmhandmade.blogspot.com/2015/11/fringe-sort-of.html . 
Unlike the former, the tatted fringe requires an auxiliary or spare thread.
She first tatted a chain with long adjoining picots on the main core thread; then snipped and trimmed the picots, spread them out and wound the shuttle to start the project. Snipping the picot tips separates the individual stitches.  Corina brought forth each fringe from the core thread as required. 

Tatted Fringe on Picot -
Notice that in the above WIP ring, I placed some of the fringes on the ring loop or left-hand thread while others remain on the shuttle thread. Thus we have the option of placing the fringe on the picot as well as on the core. Just like one would do for beads!

The above tatted fringe (made of metallic thread) is positioned on both the core as well as picot threads.
An extended application of Corina's method.
This can be done on rings as well as chains and gives a thicker fringe.

Spot Adaptation (using luggage tags) -
In December of the same year I shared my spot adaptation, with pictorial, here - https://tipsaroundthehome.blogspot.com/2015/12/fringe-benefits.html
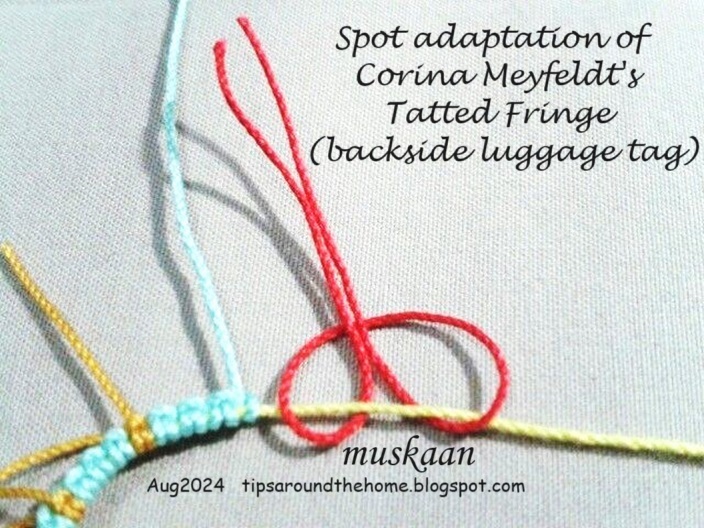
Instead of tatting a chain of long picots, I used luggage tag loops to make a lark's head knot on the core thread wherever and whenever required. These scraps can be tied frontside or backside (see next pic).
Besides, we have the freedom to include as many colours and threads as desired. Again, though not shown, the tag can be tied to the left-hand thread (on picot) or the core thread.

Seen together on a chain. Look closely and you will see that I brought the left-hand thread over and between the luggage tag, thus securing the fringe. 

NOTE: Since the tatted fringe makes a stitch on the core thread, care must be taken with the total stitch count in a pattern not written for a fringe. 

Tatted Fringe Picot! -
Now this is probably something new. Or at least I haven't come across it yet.
Since I had a few fringes left on the shuttle after tatting the first sample, I tatted a second ring but put all the fringes on the loop around the hand. And made a picot! 

UPDATE (Dec2024)
BEADED FRINGE - aka Beaded Stem (Corina Meyfeldt) and Single File Beaded Picot (Nina Libin)


So, that's all for now folks. Editing (and tatting samples for) the book Six T's of Shuttle Tatting, by Net Best, is taking me to the fringes of the tatting world and tatting literature! It is making me delve deep and wide and sometimes inspiration strikes and I go off on a short explorative excursion. Hope you enjoyed this short journey and can find some applications for these fringes. And if you have any new  technique or effect, please let me know so that it can be included in the Glossary. 

Friday, 19 April 2024

bracelet query

Pin It now!

Early this month I was approached by a lady, Beata S, to help with a bracelet pattern. She showed me a pic and I immediately thought of a single shuttle pattern. However, the rings were so clearly overlapping, that it created some confusion and I veered towards interlaced split rings. That I was seeing the image on a small screen didn't help either. I can't show that pic for obvious reasons,

I asked my PIC Ninetta for confirmation and she quickly came back with a couple of WIP pics and it was such a relief. 

This bracelet is almost as basic as they come, quick to tat up, and a great way to embellish or use as a lanyard, jewellery piece, etc. It has dimension, texture, and strength. 
The following pics are a very quick stepwise pictorial using thick thread and large pearl beads. The size of ring will depend on the size of the bead - let the ring be just a tad larger.

1. String beads onto to shuttle thread and tat a ring.
Slip the bead towards the ring just tatted.
    Each ring is 12 ds ; 4mm pearl beads ; size 3 thread.
 
2. Leaving just enough bare thread to span the distance between previous ring and bead, tat the next ring.

3. Pass a crochet hook through the top of the previous ring and pull up the new ring through it,  centering the bead in the previous ring.
4. Continue these steps for the desired length.
Many variations are possible, obviously, including more than one bead in the center, seed beads around the ring, etc. 
Check out Ninetta's numerous Russian-inspired versions here - https://ninettacaruso.blogspot.com/2019/08/russian-inspired-bracelets.html

5. This is how it looks from the back. Notice the bare thread between rings. It can be avoided by using seed beads to cover the bare thread, thus making the braid reversible with kind of a dual look.

I really wish I could have made a better version - intended but not executed. Perhaps in future. At present I am working in fits and starts.

As soon as I was satisfied, I typed out instructions to Beata, and told her I would send the pics in a bit. I had barely uploaded the pics when I received her beautiful version! She was not only quick, but so neat! 

It is always satisfying to answer a query and be of help. And we learn in the process, too. I have often had to delve deeper into a technique to answer a question, thus improving my own understanding. 

UPDATE: (19th April 2024) Beata Saifer just sent me this new image of her bracelet and graciously permitted me to share it here ---
Thank you, Beata! It's been nice corresponding and chatting with you!

UPDATE (May 2024): Corina Meyfeldt used a different method (Collar Rings) to achieve the same result. https://cmhandmade.blogspot.com/2014/07/hello-jaden.html

UPDATE (July 2024): Mad Jar Tatting had uploaded a video demonstrating how to tat this braid. While the outcome is the same, she tats a line of alternating rings and beads to desired length. Then she starts weaving the rings. https://www.youtube.com/watch?v=rIrGNrkWHJE - Ring with Beads in size 20

Thursday, 20 July 2023

luggage tag loop

Pin It now!

 Since Georgia Seitz's site is still in transition to the new site (https://www.theonlinetattingclass.com/) and not everything has been transferred, I needed a link to the luggage tag loop or lark's head knot. So I took a few pics from my Jan 3, 2023 post (https://tipsaroundthehome.blogspot.com/2023/01/measured-picot-on-core-thread.html), making it easy to share.

This loop or knot looks like a double stitch and in the same colour it can be an 'invisible' join/addition. Following are some of the ways and situations in which it can be used - 
  1. To add new thread. I have used it add green thread in the Blossoms Project. https://tipsaroundthehome.blogspot.com/search/label/blossoms%20project
  2. To add new thread in a ring. When running out of thread, new thread can be added before closing the last ring using a LHK. Credited to Judi Banashek (thanks, Gillian Buchanan). See Marilee Rockeley's video here - https://www.youtube.com/watch?v=w9pmL1kyirc
  3. Marilee uses the method to add the third (core) thread in pearl tatting in the above demo.
  4. To start on a paper clip - https://tipsaroundthehome.blogspot.com/2017/05/rising-month-late.html
  5. To hold space on the core thread for an inward picot or a starter picot on chain instead of using a pin or clip. https://tipsaroundthehome.blogspot.com/2023/06/bigger-flower.html
  6. To make measured mock picots and inward picots - https://tipsaroundthehome.blogspot.com/2023/01/measured-picot-on-core-thread.html
  7. To attach a tassel - https://tipsaroundthehome.blogspot.com/2015/01/tatting-away-x.html
  8. (UPDATE) To add a fringe - a spot adaptation of Corina Meyfeldt's method - https://tipsaroundthehome.blogspot.com/2015/12/fringe-benefits.html)
  9. (UPDATE) To tat short floating chains or to add a 3rd colour for a specific element - eg., the E3 Inside Out flower by Michelle F - https://tipsaroundthehome.blogspot.com/2024/01/what-heart.html and PDF link 

These are a few that I can recollect at the moment, but I am sure I'm missing something ;-P Perhaps the knot in my head will clear at a later date and I will update this post.

Wednesday, 6 September 2017

floating beads PART 4

Pin It now!
edited Sep 7, 2017
This floating beads (FB) method I’ve been boring you with, arose out of a specific situational and visual need.
I was working on a 3-row necklace tatted in one pass (Tat Days attendees will get to see it way before I can post it here!). And instead of a bead in the center of a ring attached at both ends, I wanted it to dangle freely from the base.
The Swarovski bead was 4.5mm and the ring was a thrown ring. At least 3 such beads were needed (perhaps even 5) in the very 1st row itself. And in later rows there were pre-strung seed beads with more tatting and teardrop beads too.

I tried out some established methods and had to reject them because -
pre-stringing – more than 1 bead and too large for a Pony shuttle – they jutted out.  
down picot (2fhs B 2shs) – if made at start or end of ring, bead would not lie in the centre. But more importantly, it also required pre-stringing.
beaded fringe – as in Corina’s beaded stem - again required loading on to shuttle!  OR
Nina’s single file beaded picot using a needled tip/thread. This could work since bead was loaded only when needed. But it required unwinding, loading bead (with stopper bead) & rewinding shuttle every time. Not only would I have to unwind an almost fully loaded shuttle, but there were pre-strung seed beads for other elements in the way.

These alternative methods increase our range of options and each has its benefits and limitations. Specifications of each project and of the individual can determine our choice.


Starting with Nina Libin’s recommended method –

Floating Beads - Beaded Fringe method
My adaptation of Nina Libin’s explanation
I have taken the liberty of using some of Nina’s own words here.
Materials – 2 shuttles, bead
Additional Materials – a stopper bead (tiny seed bead), white glue or clear nail enamel to make a “needled tip”.
Needled Tip/thread – the tail end is sliced diagonally and dipped in diluted white glue and twisted along the grain of thread. Keep repeating till the glue dries and a stiff, pointed tip emerges. This acts as a needle! 

 1. A thrown/floating ring large enough to accommodate bead is made off a chain.
 2. Unwind/unload the shuttle. This thread has a needled tip.
TIP: I use clear nail enamel for a needled tip since it dries much quicker. 
 3. String the large pearl bead and a smaller seed bead …
 4. and go back through the large bead. The green seed bead acts as a stopper.
 5. Move the 2 beads along the thread length, to the base of thrown ring, evenly tensioned.
 6. Rewind the shuttle and continue with the chain.
(Repeat the above procedure if more such thrown rings with floating bead are required).
7. Floating bead in thrown ring using the beaded fringe alternative


Bit of a hassle for the bigger necklace project, but great for small earrings, etc. or if the large bead is needed towards the end or is the last to be added. 
If core thread length is manageable, one can resort to finger tatting – no shuttle hassle.
Undoubtedly, despite reasonable limitations, the method works splendidly with any level of expertise!!!
ÿÿÿ

Adding a bead with CWJ in split ring
Ninetta Caruso
After seeing the bead under a chain, Ninetta sent me this link to the method she uses - a Catherine Wheel Join on the 2nd half of  split ring, after flipping it over.
Well, I had to try it ! See, one more option and this time in a split ring.
I need lots more practice, though. The last large ring is where I tried to dangle the bead lower – it doesn’t show clearly from this angle.
ÿÿÿ

Floating Beads - Sequins
If beads, why not sequins, right ?

Exactly the same method and steps – one with 3 sequins on chain and another with a star sequin inside a ring.
ÿÿÿ
Floating Beads – with Tatted Rings 

You know my preference for beadless tatting. I had been thinking about trying to ‘dangle’ tatted rings within rings. Would the substitution work? Before I could work on it, Ninetta again sent me some links.
This beautiful Berry Wreath pattern uses the same half hitch/overhand/half knot at base of Josephine rings as in Step 2 of the FB method ! This led me down memory lane – I had used the same half hitch to stabilize JR in this 2-colour edging a couple of years back.
In the blue-green one, the inside ring is a 4ds dot. In the larger heart ring, they are Josephines.
ÿÿÿ

Jane M suggested an idea when she did a quick trial of the FB method – would it work on her lovely Cascade earrings? I’ve been meaning to tat a couple of her earring patterns for ages. Time is ripe !
Started this morning, following her method to get a feel of it. I love it! (No pics yet, though I’m almost through).
The next one will use FB. As I worked it out I my head, the order of working the 9 rings will be completely reversed – instead of bottom to top, we’ll have to move from top to bottom, using SRs! Well, that’s my thought process – tomorrow will tell.

So yet another post (are you keeping count,  Nin ;-P) on FB but this time with earrings.

Many many thanks to all the generous and innovative tatters above
happy tatting as always :-)

Related Posts
(all links to previous posts & pictorials will be updated on the My Tutorials page)

Monday, 29 May 2017

rising a month late

Pin It now!
tatting on a paperclip - free pattern

Radiant Sun Paperclip
   
This little project was worked in 2 days flat – from ideation to execution to presentation – so that we could have a surprise paperclip pattern before end of April.

You know that I am not proficient with beads or their terminology, etc. So there were many senior moments here. Only later after pdf was made and sent (in record time for me! And this included a quick test tat and valuable feedback from Phyllis), I emailed Nina Libin for info and she graciously explained the correct terms along with links (which helped immensely during class). Georgia also shared links I didn’t know about, in class. I have used those terms & links in this post.

It all started when I saw a jewellery ad in the newspaper and wondered if I could get beads to stay positioned as free-floating rays using a shuttle.
I had an idea and quickly searched for similar projects & tutorials but as often happens, nothing came up close.
Pattern is a simple chain with beads radiating freely around .
To execute my idea I needed the end/stopper bead to be large.
Slip bugle bead and pearl bead on to a picot loop ;
Before tensioning the picot, loop it over the pearl snuggly like a noose (like we do for the SSSR or LTROR);
Pull back the extra length of loop, ensuring that the wrapped thread stays tightly noosed around the bead.
Continue with chain.
Pretty simple, easy, and no extra tools required.
Now to put it to the test, I started to tug at the pearls – 2 stayed in place, but one fell off.
One can use this method only if the piece is going to lie flat – glued or appliqued, and not worn/used.
Back to the drawing board. This time I used a beading needle to thread back through the bugle bead only. Of course it worked. But it has been around for ages – called the beaded fringe*


 pattern is so small, that it can quickly be finger-tatted . Or needle-tatted

A 'luggage tag loop' is used to start. It creates a complete double stitch. 
Care must be taken to keep the shuttle to the right.

I chose a blue clip for sky with the yellow sun emerging. 
For the right shade, I used 3 strands of Anchor embroidery thread.

If I leave tails on both ends, doesn’t it look like a headdress ?!

Many more ideas radiated from this, but the sun is setting for now :-)

* other terms : beaded stem (Corina Meyfeldt prestrings the beads and pulls into place when required) ; single file beaded picots (Nina Libin, Book #18)

this is not my first pattern with bugle beads on a paperclip - I made several trials of another pattern in February (remember, Ninetta? :-P), but have let the final tatting & presentation lapse. Should get back to it ....


Grateful thanks to Georgia, Nina, & Phyllis

hope you enjoy tatting this quick little pattern :-)


Friday, 4 December 2015

Fringe Benefits

Pin It now!
Fringe  Benefits

The day Corina posted her excellent idea/tut on adding a Fringe to tatting here, I was reworking my wreath ornament pattern (to be shared soon). Yes, you guessed it, I just Had to use that technique ! But my tatting path is always strewn with thorns & broken twigs :-(


Previously, on the vine I had tatted long picots that were cut to resemble thorns/twig ends (in adjoining pic). This time I loaded beads on to the shuttle to act as berries. Being freeform, I had no idea where & when I would want to add a fringe thorn & where the bead(s). So I could not preload the fringe on the shuttle thread like Corina had done. Here’s how I adapted Corina’s Fringe for spot addition.

It is a simple 2-step technique. However, I wanted to see the effects of slight tweaks, hence there are more pics than strictly required for the adaptation. You know me ;-P

This adaptation can come in handy if one runs short of fringes or if one decides to add a fringe, a whisker, antennae, etc. midways - anywhere, anytime - into the tatting process.
This method (whether preloading or spot addition) can be used for Frayed picots too !

Abbreviations & Threads Used :
DS – double stitch
fhs – 1st half stitch
shs – 2nd half stitch
SH - shuttle
RODS – reverse order ds
FS/BS – frontside/backside tatting
I used normal Anchor 6-ply crochet cotton thread in size 20 for the tutorial & different colours for easy identification & comparison.
Yellow is SH1 or core thread ; Turquoise is SH2 or ball or chain thread ;
Mustard, Red & Blue scraps are used for fringe.

Corina's Fringe 

(a spot adaptation)
1. Cut a length of thread to use for fringe (longer than intended; trim later)
2. Bring ends through loop, ensuring that the core thread (yellow) is encapsulated.
3. The macramé knot (larks head knot) which resembles a double stitch if formed, tensioned & snugged.
 4. NOTE : Position ball/SH2 thread BETWEEN the fringe threads (like in a 'V') ...
5.  ... and then make the 1st half stitch.
This step (#4) ensures that the fringe stays secure & stable, even if it is trimmed short.
 6. Complete the 2nd half stitch (shs) & continue.
 7. The Same fringe can be made by laying the thread loop in above manner. 
Compare with pic #1
8. Fringe as seen from the back. 
Notice how it is placed between 2 half stitches, when viewed from back.
So, when working RODS (FS/BS tatting), all one needs to do is reverse the initial placement ...
9. In RODS, a stitch starts with the shs (2nd hs), hence 'reverse order'. 
BEFORE starting it, place the fringe thread in above position & continue.
10. Make knot, tension & snug.
 11. Again, position ball/SH2 thread in the 'V' of the fringe & make RODS.
12. Here, same as above, But notice placement of fringe loop. 
AND this time I positioned the loop after 1 complete DS (instead of after fhs as in pic #9). 
The knot, however, comes out the same. Continue tatting.
13. Complete tatting the stitch. 
4 fringe elements made - 2 on DS segment & 2 on RODS segment. Compare the 2 sets. 
Closely study the chain stitches (turquoise) in comparison with the fringe insertion : 
the 1st 2 mustard & the last blue one are flanked on either side by complete ds ; 
red fringe is flanked by half stitches on either side. 
14. Viewing the same from the back, again notice the chain stitches that flank the fringe.
Pics #13 &14 help us decide which arrangement & effect is preferable for the project on hand.
15. The fringe threads have been trimmed short. But they won't slip off ;-)


Many thanks to Corina for her generous sharing of the Fringe technique
& graciously permitting me to share this adaptation.

 Here's hoping this technique will not remain on the fringes of tatting !

happy tatting :-)

Related Posts -