Showing posts with label ring on picot. Show all posts

Thursday, 9 January 2025

updates

Pin It now!

I have often updated a post (highlighted as 'UPDATE') without any separate notification. This time I thought a special post would be good for those interested since there are quite a few. Yet as I list them, I find some should be accompanied with a photo. Hence while I rectify that omission, here is part 1 of the updates in no particular order ....

DAL Celtic Snowflake challenge. Pattern (diagram) for Padma Mandayam's adaptation of Mariola Siwek's version is now uploaded to this Google doc - https://docs.google.com/document/d/1pVqM6S5Ng49xk6erSsDyRm3y7SdV2tCIUOCgltze4lM/view for you to enjoy. 
Original post -https://tipsaroundthehome.blogspot.com/2024/12/and-more.html 

🌹🌹🌹🌹🌹


I was very impressed with the way Ninetta had started her ring seamlessly without making any 'join' by using the same joining loop as a ring loop. Well, forgetful brain did not put two and two together especially considering I have used this method before. It is basically the Ring on Picot technique which Patty Dowden demonstrated in this video -https://m.youtube.com/watch?v=LmMxIBrDpRI 

Original post -  https://tipsaroundthehome.blogspot.com/2023/10/awakened.html

🌹🌹🌹🌹🌹 
 

When I wrote about Fringe Tatting and the Tatted Fringe I did not highlight that beads could be used for the fringe, too. Eventually I made a beaded fringe inspired by and following Corina Meyfeldt's directions for Beaded Stem. Nina Libin called it Single File Beaded Picot.  The beads are pre-strung on the shuttle or ball thread depending on the pattern and each fringe or beaded picot is moved in place when needed. 
Original Posts - https://tipsaroundthehome.blogspot.com/2024/08/on-fringes.html
https://tipsaroundthehome.blogspot.com/2024/11/soup-catcher.html

Here's an old model from 2017 - https://tipsaroundthehome.blogspot.com/2017/05/rising-month-late.html
This method is fine for a limited number of fringe elements/picots with a limited number of beads on each or if all the beads are on the ball thread. 
One more method is the Floating Beads method but it has severe limitations -https://tipsaroundthehome.blogspot.com/2017/09/floating-beads-part-4.html

🌹🌹🌹🌹🌹

And finally splocik's Small Decorations 2024 since I won't be participating in her 2025 verion - December gallery (https://splocik2.blogspot.com/2024/12/male-dekoracje-2024-galeria-grudniowa.html ) and collages of entire year's works by some participants (https://splocik2.blogspot.com/2025/01/male-dekoracje-2024-podsumowanie-i-3.html) ... links added to my final post (https://tipsaroundthehome.blogspot.com/2024/12/a-no-glass-ceiling.html). I am happy to have been able to submit 13 decorations.

🌹🌹🌹🌹🌹

I had sent the vapour stitch bouquet pic for PICOT Bingo, but couldn't complete the game in the way I had intended and imagined. 5 boxes still left to cross out. Natalie, too, has uploaded a 2025 bingo card, but I won't be participating. See how disciplined I am being this year?! ;-D 

This is it for now. More updates will follow with some exciting revelations/discoveries!

And I still have to update some of the original posts with new links/details. Tomorrow. It's time for bed now.

Sunday, 15 October 2023

awakened

Pin It now!

 The curious student, researcher, and teacher in me was awakened about 4 days back! My shuttles have been lying idle for several weeks, except perhaps a sampler here and there. But last month Ninetta posted a beautiful derivative pattern and some tatters were kind of stumped despite their best intentions and efforts. Some persevered, and some sailed through. Anyways, I was curious why some gave up, and loaded my shuttles for a stepwise pictorial after taking Ninetta's permission. The teacher in me beckoned!

This is Ninetta's Zinnia Flower derived from Endrucks' pattern #10 (from 'Die Schiffchen-Spitzen’,1920, by Frau Eleonore Endrucks-Leichtenstern).

I was privy to the development of this beautiful design back since April. There was cupping initially and through trials and tweaks, she finally had it laying flat. However I did not have any time to test tat.

Anna Tedesco stepped in and even created her own slightly tweaked version without dimpled rings (on the right)! It was Anna who suggested the name Zinnia.

Pattern (for both versions) of E10 Zinnia Flower by Ninetta Caruso ---

And as so often happens with Endrucks' derivatives, we have tertiary extracts or 'grandchildren' as Anna and Paola B like to joke! These are Anna's Zinnia Petals earrings.

Pattern for E10 Zinnia Petals earrings by Anna Tedesco ---

I worked my model in Red Rose size 20. The variegated was inspired by Lyn Clements' model; not as cheerful as her's, it was the closest I could find in this size. For pictorials, it is best to use thicker thread for clarity.

Pictorial for Ninetta Caruso's E10 Zinnia Flower by Muskaan ---

I love the way Ninetta joined the ring right at the beginning with a normal picot join! We would probably have made a lock join after the chain, RW, and then start the ring....
However, this method of joining is almost seamless and so smooth! However I fond it easier to do the join. remove slack, and then start the ring by pulling out the loop behind. 
I don't remember doing this before; always something to learn!
UPDATE (Dec2024): This is Patty Dowden's Ring on Picot method ... video- https://m.youtube.com/watch?v=LmMxIBrDpRI

The entire pattern is worked in one pass, moving inwards and outwards. Right up to the stage shown above, the work moves clockwise and remains free. Only this final 6th inner ring starts the process of joining the last repeat to the first.

Another view of my model. It measures 9.5 cms tip-wise and 5 cms as side of hexagon.

A collective of Anna's models worked in metallic threads. 

As Ninetta writes in her pdf, Zinnias symbolize friendship. This motif again reinforces the collaboration between friends and tatters which is the cornerstone of the Endrucks 1920 Project!

Many many thanks to Ninetta, Anna and our enthusiastic Endrucksians ... 
we inspire each other!

Sunday, 24 November 2019

3 wave patterns

Pin It now!
Snowflake #19 in Land of Laces’ 25 Snowflake Project

I wanted to share more of the process of the large snowflake, but sharing the patterns before I relegate the task to the pending tray.
The square is where it all started, leading to the small and large snowflakes. The small snowflake was easier to do after my failed trial here (top right in collage). It showcases the swirl/wave effect more than the large flake.

All 3 can be worked in one pass, continuously.
  
Abbreviations/Notations, in order of appearance –
ctm = continuous thread ; = picot ; vsp = very small picot ; SS = switch shutte ;
SR = split ring ; ch = chain ; lj = lock join ; rw = reverse work ;
–– = decorative picot ; rs = reverse/unflipped stitch (optional)

Square Wave motif
muskaan ©Jan, 2018

Worked in Anchor size 20 (equivalent to Lizbeth 10). It is a tiny motif, hence better worked in size 20 or 10.

2 shuttles, ctm
Round1
split ring: 6 – 3 vsp 6. SS
chain :   2 – 2, SS
Repeat 3 more times and join back to A.
Tie and cut, or climb out with a split chain : 2/2, mock picot
Round2
SR : 4 / 4. SS
ch : 6 lj, SS
SR : 4 / 4. SS
ch : picot, 7, lj, 8, lj
Repeat 3 more times around. Tie & cut.


Swirl Wave snowflake - small
muskaan ©Nov, 2019


In Lizbeth size 20, this measures 2”.
It can be repeated and joined as a motif for larger fabric, each side of the hexagon measuring 1”

2 shuttles, ctm

Round1
A-ring: 7 – 8 vsp 6. rw
B-ch: 1 – 4 –– 4 – 1, lj to vsp,
C-ch: 1rs vsp 1rs.
Alternate C-chain : rw after B, SS, chain: 1 – 1 , SS.
Repeat 5 more times, joining last B chain to first. 
Climb out with last C-chain as follows –
To climb out one can make the last C-chain a split chain (1 / 1). However, since it is only 1 stitch, using Patty Dowden’s Ring on Picot method is simpler :
Pull up a loop of Sh1 thread through the picot on C, pass shuttle through from back to front, and leaving just the tiniest bit of bare thread behind, start the split ring. Work the 2nd half of SR with Sh2, again leaving a bit of bare thread on the back (enough to span the 1ds) and complete the SR.
The bare threads are not visible on the back, and the front also looks similar to the rest.

I have taken stepwise pics of this process. If anybody is interested, let me know & I will post the pictorial.

Round2
D-SR : 5 / 5. SS
E-ch : picot, 5, lj to nearest picot on ring, SS
F-SR : 5 / 5. SS
G-ch : 6, lj, 8, lj, SS
Repeat from D 5 more times.
Tie and cut and hide ends.


Swirl Wave snowflake - large
muskaan ©Nov, 2019
In Lizbeth size 20, this measures 3”.

2 shuttles, ctm

Round1
A-ring: 6 – 3 – 5 vsp 6. rw
B-ch: 1 – 4 –– 4 – 1, lj to vsp,
C-ch: 1rs vsp 1rs.
Alternate C-chain : rw after B, SS, chain: 1 – 1 , SS.
Repeat 5 more times, joining last B chain to first and last C-chain to base of first ring with a lock join.
To climb out : split chain (1/1) or the ring on picot option explained above.
Round2
D-SR : 5 / 5. SS
E-ch : picot, 4, lj to nearest picot on ring, SS
F-SR : 8 / 3 + 8. small mock picot
G-SR : 6 / 6. small mock picot
H-ring: 5 –– 5. SS
I-ch : 7, lj, 9, lj, 6, lj. SS
Repeat from D 5 more times.
Tie and cut and hide ends.


In case of any error or doubts, please let me know. Hope you enjoy these patterns :-)

My 20th snowflake has dimpled rings (hearts) and is worked in bits and pieces but no ends to sew in. I’m still tweaking it …. I’m calling it Heartland snowflake!

Thursday, 23 August 2018

spiraling into distraction

Pin It now!
Sometimes one just Has to! No excuses.


My first trials of Lenka’s Spiral Rings (her blog has some exquisite tatting and jewellery). Based on the tutorial by Ninetta. And also an attempt to try it on treble tatting as seen here.

For the braid, after first 2 rings, instead of a lock join I used the Ring on Picot method, without any join. It like it – subsequent rings remain flush, no gaps.
Notice that my failure to post the shuttle before closing the 3rd ring caused a twist.

TIP : I think the ring should be not be closed too tight as we often do in regular tatting. However, unlike my initial belief, leaving some bare thread (as in half-closed rings) is not necessary either. There is, however a design element there. If we do not close completely, we get a larger spiral compared to a completely closed ring.


Tried the counter-spiral as per instructions for the first one (3rd last from top). Works nicely, but since the ring is twisted or turned, the back comes to the front. I wanted the stitches frontside. 
There are 2 ways to do it –
  1. tat the ring backside (RODS), then pull into a spiral as instructed, or
  2. turn work, tat the ring backside (RODS), then turn back to the front and pull into a spiral. (2nd last ring from top).
I was running out the scrap thread, so managed only one spiral ring with treble tatting. It was enough to give me the confidence to proceed. I’ve been ogling at that gorgeous happy piece!

So, here is the medallion of off-side spiral rings using the treble stitch (tds). Peering into Ninetta’s model, I counted off 8tds and the exit was from the 3rd tds.
Work progresses in counterclockwise direction ie. each new ring is to the left of the previous one.
Now here again I used Patty’s ring on picot after the 1st ring. But see how close the 2 rings come? (the 2 dark pink spirals at the bottom). It looks like an overlapping spiral chain. A good design that can be used in future. But for the original effect, for the rings to curve gracefully and the spirals to show distinctly, a lock join is preferable.

No more dead end or single shuttle split chain (SSSCh) to create curlicues! These rings are so much easier!!!


So much for my distraction and fun in learning something new. Back to my other projects …. Although I haven’t cut off the thread – hoping to continue with another round(s).

Many many thanks to Lenka for this spectacular effect
and to Ninetta for sharing how to do it.

Friday, 7 April 2017

yellow is the colour of spring

Pin It now!
3rd of 3 spring garlands.
the first 2 can be found here : Marigold toran and Jasmine gajra
UPDATE (April 10) : the complete Spring Garland

Spring Garland 3 –
The Mustard Fields !

Northwest India turns a bright yellow with advent of spring. It is the best time to take a drive down through the states of Punjab and around – bright yellow as far as the eye can see. Many communities make it a point to wear yellow on Basant Panchami to emulate and celebrate these yellow mustard flowers !

(UPDATE April 18, 2017: now that the entire spring garland is shared, I can show you the mustard fields in size 50 thread above)

This is a playful pattern where simple flowers create a fabric as broad and as long as we desire, and where we can romp carefree in any direction as in a field of yellow mustard !

The pictorial is lengthy, though pattern is simply one picoted ring, in order to show alternatives. 
It is quicker to tat than to explain/photograph :-)

Materials : 1 shuttle fully loaded with size 40 or 50 thread. (For the pictorial, I have used size 20 thread to better capture the steps)
Techniques : Ring on picot* , long picots , bare thread space , mock picot (optional) , lock join (optional) , beads (optional).
Measurement : ¾ inch wide in size 50 – between 3 to 4 flowers. Length as required.       

Please review :
*Patty Dowden’s video for How to work a ring on the picot of another ring
(I did not have to post the shuttle back before closing ring. Hence it is advisable to practice a few flowers with scrap thread before working the final piece)

Beads can be strung on shuttle thread or added on loop/picot, depending on effect desired.


Basic Pattern :

Ring : 1ds, (p, 1ds) 7 times.

The next ring is started at a distance equal to the picot.


In order to keep symmetry of first ring, one can use the tail to make a mock picot, and ...


... tat over the tail in next ring to hide end.


RING ON PICOT METHOD :
Start ring on a picot of previous ring using Patty's method. Pull up loop through any picot ...


pass shuttle from below to front, ...


and tat the ring.
Note : you may or may not need to post the shuttle back through the top before closing.

3 rings made.


LOCK JOIN METHOD :
Alternatively, one can lock join to any picot of previous ring and commence ring from that point :
pull up a loop through any picot and pass shuttle through it ...


... and tension it. Make certain there is some bare thread left under to span the distance between base of ring and picot.
Ring 4 made after the lock join.


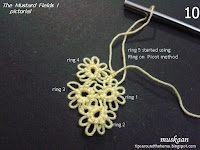
Ring 5 started using the Ring on Picot method. This is the preferred method I used for most of the rings.

Continue in this fashion, creating a broad fabric of 3-4 flowers along the width


A  ZIGZAG  MEANDERING  PATHWAY :
Sometimes, one can start a 'free' unattached flower at a distance (notice the bare thread at beginning of ring) ....


and then lock join to any picot of an earlier flower.
Notice the arrows showing sequence of flowers . The work progresses from left to right and back to left and so on....
With the lock join just made,
take the thread back from below and bring up a loop through any picot of a previous flower or even through the bare thread we left in pic #12, and start another flower using the ring on picot method
We are now moving back towards the left for another row of flowers !


FINAL NOTES :

  • The ring pattern remains constant, though it may be necessary to join to another ring to cover gaps. In that case, maintain a picot length for the join, resembling other picots.
  • Try to keep as many picots free in each ring as possible for textural effect.
  • The pathway/sequence is zigzag but freeform. Let your shuttle free !
  • The entire pattern is worked from the front, hence there may be bare threads spanning rings on the underside. Try to keep them as short as possible, making the rings close to each other.
  • The picots in this pictorial should've been longer to cover up any gaps.
  • Beads can be loaded on to shuttle and brought forward between rings, or loose beads can be inserted over a loop pulled between rings. 
This piece was tatted in size 20 for purposes of the pictorial only. It looks much better in smaller thread as seen in the collage (top left & prototype in center which used split rings & beads on picots initially, till I decided to go freeform) . The beads in above piece were chosen to represent spots of green foliage peeping through the lushness of flowers, and golden rays reflected back.  

This fabric can take any shape one wants - straight, curved, or circular !
It can even be used as a filler, adding a lacy texture. Or simply make a small posy of flowers (I used the ring on picot technique to make a 3D carnation).
With beads, this broad fabric can be used as a bracelet, necklace, anklets, sewed on to a belt or headband,....


I have one last post to reveal the final Spring Garland with all it's floral fragrances. Hope you join me again.

till then, happy tatting always :-)

This pattern shared with the Online Tatting Class in April, 2017


Friday, 20 January 2017

flaky flowers or flaky me ?!

Pin It now!

a 3D tatted flower and another from a snowflake perhaps

3D Carnation (a prototype)


My whimsical tatting which started out as a chrysanthemum (perhaps a marigold in different colours) and turned into a carnation !
Flower is worked in size 40 thread & foliage in size 20

The stem should’ve been longer of course – and it isn’t actually a stem – it was a trial of my pine needles idea turned and sewn around to act as a stem ;-P 
Techniques used : How to work a ring on the picot of another ring ; Pearl tatting with snipped picots


Twelfth Day of December Snowflake (partial)
Lene Björn

Here, I wanted to highlight the radiating rings. Started with single shuttle (white) leaving a long white tail to climb out .

TIP : For outward facing rings with bare thread space(BTS) : to keep the symmetry of the medallion, I do not hide the tail in the first ring. Instead, when the last ring is tatted and closed, I thread this tail and sew it inside the last ring. This gives an appearance of continuity in the center.
In this case, since split ring was used to climb out, the tail was already long and used for 2nd side of SR stitches, thus completing the inner bare thread circle.

Ball with variegated thread was joined in round 2.
Instead of thrown rings, I opted to make the rings in the next round and attach to tiny picots on the previous round chains.

And going by previous false memory, I increased the chain stitch count by 1 on either side. Turns out it wasn’t needed, ughh.
I continued.
However, the last round caused me further grief because I couldn’t get the 2 white ‘8’ rings to stay in a line. Maybe SLT would’ve helped. Moreover this variegation didn’t work out as well as I’d imagined, especially on the last round, with lots of picots – it looked to ‘heavy’. A subtler tint, perhaps ? Cut off the last round midways. Decided to leave it and tat a new one. It looks more like a flower, though, with those chains arching like petals.

In size 40 Anchor (white), & Lizbeth (purple splendour)
Rnd 1 - 1¼” ;  Rnd 2 - > 1½” ; Rnd 3 - 2¼”  ; Rnd 4 - ~ 3" ; Rnd 5 – not tatted
Techniques : SR to climb out, outward facing rings, shuttle and ball.

Future idea -- make All 4 or 5 radiating rings as mock rings, with inward picot on core.
I also see a 3D flower - morning glory in these colours ! 

As it turns out, I actually used my future idea, but you’ll have to wait a bit to see it, while I write out the post :-)

 ® Are the flowers flaky or is it just me ?!
 happy tatting ®