Showing posts with label Celtic interlacing. Show all posts

Monday, 27 July 2026

calling them done

Pin It now!

 Several pieces of my tatted lace over the past months are 'incomplete' if one considers the respective pattern. Yet, I am calling them done. And interestingly, most patterns here were gifted to me by kind and friendly tatters. In no particular order .....

Dora Young's Round Pinwheel doily - from All New Knotless Tatting Designs (1974).

Back in April I had wondered how to continue since I had run out of thread. And Jane McLellan commented 'to leave it as it is'. Sound advice 'coz I really like these arches better than the final circle it turns into. 
Against a different background where the grey shows up. 
In Anchor perle size 8. the diameter is 17.5cm. 
There is a slight overlap at the dips in the arches but that's fine - hardly even visible. And hubby is quite happy with this on his table!
Related Posts - 

💜💜💜

Centri Rotondo - from Il Lavaro Chiacchierino 7, Mani di Fata (1994)

A while back there was a post in a FB group which mentioned Cyprus tatting where continuous tatting involved simply leaving bare thread right up to the point in the next round where the next element starts. This is visible unlike Mlle Riego who kept the bare thread at the back of work. 
I used this doily pattern, leaving off all decorative picots, to show this spiralling climbing out.

Only 5 rounds tatted in Anchor size 40 measuring 10cm in diameter. Yet I had to snip off two rounds because there was cupping, but I re-tatted only one adding 2ds to the chains. I have come to the conclusion that my chains are more snug than normal.
The pattern was gifted to me, along with her hand-drawn sketch, by Anna Bertini.
Related Posts -

💜💜💜

April Fool's Rose Circle (2016) -

This is merely the center motif which gets repeated in a later round of the doily pattern. This single round in Red Rose perle size 8. measures 9cm in diameter. The full pattern was gifted to me by Erika Tashiro. Hopefully I will complete it some day, but with different threads. Not happy with this perle cotton as seen in the stitches and imagine my surprise when the dye ran!!!

This angle highlights the raised/3D effect where the rings of a running scroll are interlaced one over the other and joined to create Celtic Interlacing and a realistic-looking rose motif. The pattern has very clear colour-coded diagrams, yet I found it easier to refer to my own sketches to confirm how the rings were inserted into each other. 

And remember Lauretta Tondelli's Interlaced Onion Rings earring (2024)?
Notice how it uses the same technique to interlace the three rings in an onion ring. In this case, however, the rings get kind of squished resulting in different shapes. This is the only piece I tatted, but single earring is not a new phenomenon for me ;-P
Related Posts - 
💜💜💜

Its been a while since I crossed out another box in Natalie's PICOT Bingo 2026 Level 2. This time I am offering the above two models for Celtic Tatting box. (Details: https://www.patreon.com/posts/happy-new-year-147124370 )

💜💜💜

My heartiest thanks to all named in this post (and some who wish to remain anonymous)

Friday, 6 June 2025

bridge tatting

Pin It now!

 Like I said in my recent posts, expert and experienced tatters have graciously come to my aid whenever I asked for it. And some have gone a step further by sharing their work and/or discussing techniques and terminology even before I asked.  One such is Judith Connors who has been instrumental in guiding and inspiring me through this past decade. My presentations have been influenced by her despite not being a perfect student.

Early last month, Judith sent me her article on 'Building Bridges' along with a pic of her Fan motif (If you are a member, you can see her model in the Queensland Tatters 2025 group post here - https://craftree.com/forum/threadfs/40423?page=1#258577). We had discussed bridging some years back, too. I was in a state of tatting inertia when this motif instantly spurred me to wind my shuttles and tat since this decorative/functional bridge had been on my trial list since 2019 (https://craftree.com/forum/threads/39159), but never got down to actually applying it. I did do the Rose Motif from Priscilla Tatting Book No.3!   

Bridging Flower Motif - based and adapted from Judith Connors' Fan motif
sharing my process, pattern, and tips/tricks

How many rounds does this motif have? 
Do we cut after the inner 'rosette' round?
Were Celtic shuttles or needle used for the Celtic effect?
Or were 4 shuttles used for the interlaced/overlapping chains? 

Getting back to the present motif, it occurred to me that I could use the element to create overlapping or interlaced chains instead of single lines! So off went my shuttles to confirm. 

Now this post is only about the adapted motif - process, pattern, and tips/tricks. I have pics for a pictorial, along with the background and explanation, terminology and history. Part of it is already explained in the link above (https://tipsaroundthehome.blogspot.com/2022/01/bridging-gaps.html). The rest will be shared in a few days to avoid stepping on Judith's class despite her permission. For the curious, we know the technique as split chain, which is a misnomer and limiting, meant mainly for climbing out.  

My first attempt. I ran out of thread and also realised that if I continued around there would be cupping (I had increased the count in some parts). Moreover the thread had a tendency to unravel, even though it is Anchor mercerised cotton. Cut my losses and started over.

Design Tip starting with a magic circle: Since I wasn't sure how big the central ring should be, I preferred to use the  magic circle (the multiple threads are to make the picot large enough to join to later). Wrap the thread around the magic circle and start the first inner chain. End each chain with a lock join around the circle. 
TIP to keep last half-stitch flipped: The marker on the right - since each bridge is a long chain, by the time it was completed, the last half-stitch often unflipped and locked the core thread below. This temporary marker on the core thread prevents it from happening. 
After a few repeats, I pulled on the magic circle to see whether it was working well. Successful; no cupping or ruffling.

Bridging Flower Motif pattern
  1. Only 2 shuttles are used with continuous thread and the entire motif is worked in one pass. 
  2. 8 repeats and all chains in this prototype. No space for a central ring. In Anchor mercerised crochet cotton size 20 (equivalent to Lizbeth size 10), the motif measures 6.5cms in diameter.
  3. In the image above, I have split the sequencing (A to F) to indicate where there is a change of direction , shuttles, or element. 
  4. The entire motif is worked clockwise from the front.
  5. Chains C & E are bridging chains aka bridge, bar. 
  6. I used a 2cms folded picot gauge to measure the bare thread for bar/bridge before lock joining it to a picot on the previous element.  TIP:  I found that making a lock join by pulling the loop down instead of up through the picot makes a neater start to the bridge.
  7. These bars are covered with Dora Young's Knotless Method or tied stitches worked from left to right. I worked them all from the front, though there are several variations of the method. 
  8. NOTE: The arrows for bridges indicate where the thread from shuttle2 goes, not the direction of working the stitches. 
  9.  While making each subsequent bridge, keep it in FRONT of the previous chain so that the overlapping is synchronised.  
10. For the bridges on the last rosette chain, TWO each had to be made! The above image shows the first pair done and the 2nd pair is being bridged.
After working the first bridge exactly like ch-C, then one more bridge is made joining to the first rosette on the right, at the base of the very first bridge. The stitches are then worked using the Australian method. This, too, is worked from the front, but in the opposite direction (right to left). Repeat this for the 2nd pair of bridges. 
Important: To maintain overlap, pass the shuttle under and over the last bridge both times.

11. After the motif is finished, and both threads are in the center, I threaded them together and inserted the needle through the picots held open with the magic circle, and kept removing the threads from the circle. Final tie, cut, and hide ends.
Option: One can use metallic thread or colour-coordinated thread for the magic circle and leave it be after tightening the slip knot. Then hide all ends - from the motif as well as the circle.

 
Possible Variation: However one can use a central ring of 10 small picots separated by 1ds and make a 10-repeat motif. 
Future Idea: Can we use this bridging technique to work block tatting over or across an element?

I will try to write the pattern in a more lucid form when I share the pictorials and other details. Here I wanted to focus more on the process.

Technique Option: Also, instead of the bridges going from right to left, we can move forward. Thus from chain A we can work the 'bridge'  like a floating chain or single shuttle split chain, leaving a picot open with a paperclip to join to later. 

Bridge tatting or bridging encompasses a lot more, not all of which is outlined here. In this post and motif, the bridges are ornamental - a design element; they can be functional too. Hopefully I will be able to cover it all in the pictorials post. 

I cannot thank Judith enough for her valuable mentorship and guidance since we 'met' at InTatters a decade ago! We may not always agree but the discussions are always lively and passionate!

Thursday, 9 January 2025

updates

Pin It now!

I have often updated a post (highlighted as 'UPDATE') without any separate notification. This time I thought a special post would be good for those interested since there are quite a few. Yet as I list them, I find some should be accompanied with a photo. Hence while I rectify that omission, here is part 1 of the updates in no particular order ....

DAL Celtic Snowflake challenge. Pattern (diagram) for Padma Mandayam's adaptation of Mariola Siwek's version is now uploaded to this Google doc - https://docs.google.com/document/d/1pVqM6S5Ng49xk6erSsDyRm3y7SdV2tCIUOCgltze4lM/view for you to enjoy. 
Original post -https://tipsaroundthehome.blogspot.com/2024/12/and-more.html 

🌹🌹🌹🌹🌹


I was very impressed with the way Ninetta had started her ring seamlessly without making any 'join' by using the same joining loop as a ring loop. Well, forgetful brain did not put two and two together especially considering I have used this method before. It is basically the Ring on Picot technique which Patty Dowden demonstrated in this video -https://m.youtube.com/watch?v=LmMxIBrDpRI 

Original post -  https://tipsaroundthehome.blogspot.com/2023/10/awakened.html

🌹🌹🌹🌹🌹 
 

When I wrote about Fringe Tatting and the Tatted Fringe I did not highlight that beads could be used for the fringe, too. Eventually I made a beaded fringe inspired by and following Corina Meyfeldt's directions for Beaded Stem. Nina Libin called it Single File Beaded Picot.  The beads are pre-strung on the shuttle or ball thread depending on the pattern and each fringe or beaded picot is moved in place when needed. 
Original Posts - https://tipsaroundthehome.blogspot.com/2024/08/on-fringes.html
https://tipsaroundthehome.blogspot.com/2024/11/soup-catcher.html

Here's an old model from 2017 - https://tipsaroundthehome.blogspot.com/2017/05/rising-month-late.html
This method is fine for a limited number of fringe elements/picots with a limited number of beads on each or if all the beads are on the ball thread. 
One more method is the Floating Beads method but it has severe limitations -https://tipsaroundthehome.blogspot.com/2017/09/floating-beads-part-4.html

🌹🌹🌹🌹🌹

And finally splocik's Small Decorations 2024 since I won't be participating in her 2025 verion - December gallery (https://splocik2.blogspot.com/2024/12/male-dekoracje-2024-galeria-grudniowa.html ) and collages of entire year's works by some participants (https://splocik2.blogspot.com/2025/01/male-dekoracje-2024-podsumowanie-i-3.html) ... links added to my final post (https://tipsaroundthehome.blogspot.com/2024/12/a-no-glass-ceiling.html). I am happy to have been able to submit 13 decorations.

🌹🌹🌹🌹🌹

I had sent the vapour stitch bouquet pic for PICOT Bingo, but couldn't complete the game in the way I had intended and imagined. 5 boxes still left to cross out. Natalie, too, has uploaded a 2025 bingo card, but I won't be participating. See how disciplined I am being this year?! ;-D 

This is it for now. More updates will follow with some exciting revelations/discoveries!

And I still have to update some of the original posts with new links/details. Tomorrow. It's time for bed now.

Friday, 19 April 2024

bracelet query

Pin It now!

Early this month I was approached by a lady, Beata S, to help with a bracelet pattern. She showed me a pic and I immediately thought of a single shuttle pattern. However, the rings were so clearly overlapping, that it created some confusion and I veered towards interlaced split rings. That I was seeing the image on a small screen didn't help either. I can't show that pic for obvious reasons,

I asked my PIC Ninetta for confirmation and she quickly came back with a couple of WIP pics and it was such a relief. 

This bracelet is almost as basic as they come, quick to tat up, and a great way to embellish or use as a lanyard, jewellery piece, etc. It has dimension, texture, and strength. 
The following pics are a very quick stepwise pictorial using thick thread and large pearl beads. The size of ring will depend on the size of the bead - let the ring be just a tad larger.

1. String beads onto to shuttle thread and tat a ring.
Slip the bead towards the ring just tatted.
    Each ring is 12 ds ; 4mm pearl beads ; size 3 thread.
 
2. Leaving just enough bare thread to span the distance between previous ring and bead, tat the next ring.

3. Pass a crochet hook through the top of the previous ring and pull up the new ring through it,  centering the bead in the previous ring.
4. Continue these steps for the desired length.
Many variations are possible, obviously, including more than one bead in the center, seed beads around the ring, etc. 
Check out Ninetta's numerous Russian-inspired versions here - https://ninettacaruso.blogspot.com/2019/08/russian-inspired-bracelets.html

5. This is how it looks from the back. Notice the bare thread between rings. It can be avoided by using seed beads to cover the bare thread, thus making the braid reversible with kind of a dual look.

I really wish I could have made a better version - intended but not executed. Perhaps in future. At present I am working in fits and starts.

As soon as I was satisfied, I typed out instructions to Beata, and told her I would send the pics in a bit. I had barely uploaded the pics when I received her beautiful version! She was not only quick, but so neat! 

It is always satisfying to answer a query and be of help. And we learn in the process, too. I have often had to delve deeper into a technique to answer a question, thus improving my own understanding. 

UPDATE: (19th April 2024) Beata Saifer just sent me this new image of her bracelet and graciously permitted me to share it here ---
Thank you, Beata! It's been nice corresponding and chatting with you!

UPDATE (May 2024): Corina Meyfeldt used a different method (Collar Rings) to achieve the same result. https://cmhandmade.blogspot.com/2014/07/hello-jaden.html

UPDATE (July 2024): Mad Jar Tatting had uploaded a video demonstrating how to tat this braid. While the outcome is the same, she tats a line of alternating rings and beads to desired length. Then she starts weaving the rings. https://www.youtube.com/watch?v=rIrGNrkWHJE - Ring with Beads in size 20

Sunday, 28 May 2023

my DAL tadaaaa

Pin It now!

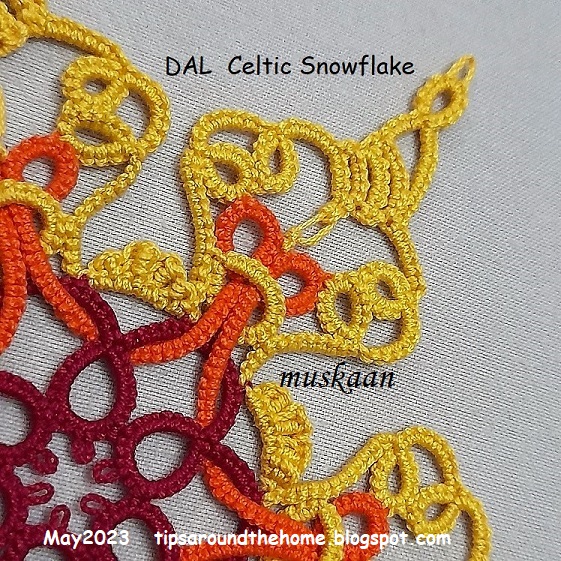
 And the reveal!!!! My version of the 3rd Round design-along for the DAL Celtic Snowflake. This is where I first posted the game - https://tipsaroundthehome.blogspot.com/2023/05/lets-design-round-3.html. My next two posts showed my own dilemma, course correction and solution trial (thanks to Anna Bonelli!). 


Several techniques, effects, stitches, and their modification have been used to achieve this result. 

I am very happy with the end result. I challenged myself and am quite satisfied.

Tatted in Red Rose size 20 threads (equivalent to Lizbeth size 10), the final size is 14cms.
Motif 1 = 4cms ; Motif 2 = 7cms.

I did away with the Josephine rings. For the tip I used a decorative picot; for the treble arches I used graduated treble tat stitches.

This is how it looks in toto. I would've loved to try Sam's visualization of the flake in blues and greens. Hopefully I will do another one in finer threads using the water effect.

To anchor the are thread in the center, after doing a lock join, I made a tied stitch (as in encapsulation) at the very base and then again at the tip. The bare thread is deliberately left uneven to give an open, free-style look.

This is the same, but from the back. After all Celtic interlacing creates a different overlap on the two sides.

Again from the back.


We now have a total of, I think, 15 models submitted or WIP, with 6 patterns (I have to write out mine to make it 7) and 2 more patterns promised. I have started compiling them in a Google Doc but it takes time to get it all done properly since time needs to be squeezed in, LOL.

Please mention the name of the designer and the pattern whenever you post.

Tuesday, 23 May 2023

solution

Pin It now!

 Remember my problem and the mood to give up on my own 3rd round design? Well turns out there were two possible solutions! Anna Bonelli suggested something in Italian which, though lost (on me) in translation actually threw up the first solution to my mind! After making the join I could leave some bare core thread, work and interlace the large ring, then go back and cover the bare thread with 'tied' stitches using the 2nd shuttle!

Anna then tatted a sampler to show what she meant, and that is the solution I adopted. Notice the ring is now horizontal instead of vertical, and I made it smaller too.
Meanwhile I had this idea to use block tatting at the tip. It caught my imagination and between these two elements I allowed my shuttles to do the work, starting with treble tatting arches.
 
I like how the block appears like a flame. 
In several places I hadn't made any picots. Used a finer crochet hook to clear enough space for a join.
To offset any denseness, I did the bare thread thing in the center. I could use dot picot strings, but wouldn't it be overkill?
Just like the Josephine Ring at the tip of the 'flame' is an overkill, right? Although I cannot decide on the JR above the treble tatting arch.
I was going to include decorative picots, but I like the clean lines here.

So what is your verdict? 
I am open to suggestions since I haven't yet started tatting. Oh and this time I'll be using a muted shade of yellow.

So far the design-along has roped in 12 tatters: 1 diagram only; 5 models only (1 WIP); 5 models with patterns; and 1 late starter. I will collect them all in a Google Doc with shareable link so feel free to join the game whenever you can .... 
My journey so far -
Many many thanks to Anna Bonelli for her wonderful solution that got me going!

Sunday, 21 May 2023

problem

Pin It now!

My previous post 'promised' a 3rd round and also invited you to join in. Good news and bad - my round hasn't quite worked out as I had imagined but the great news is that tatters have already sent in their Gorgeous 3rd (and in some cases even 4th) round. Most have shared their pattern as well. But let the suspense linger till the next post.

I wanted to include another interlacing in this round, this time with a ring. First part is fine but then came the logistics problem! Notice the arrow? If I lock join the chain at this picot, how do I get the large yellow ring to interlace?! See, one should always 'think through' - yeah, I'm no good at that!

I tried a couple of options to no avail especially since this is a very large ring. While at this stage, I can insert the shuttle through the space, it will become harder once more arms are joined. There is one more option I can try - floating or bridging chain, joined back into a mock ring. But with this 40 stitch ring, it will be too much work. Oh, or I could shift to needle instead of shuttle!
Moreover, I am not at all happy with the overall look including the last-minute decision to use black. I was going to use 2 small ring between the arms but then I might get accused of copying another pattern. And seeing the lovelies that have come in, I feel totally inadequate at designing as good a round. So, I might shelve mine for the present till inspiration strikes.

Speaking of inspiration -
It turns out the first 2 rounds/motifs are very similar to Jon Yusoff's beautiful 'Quantiesque' Snowflake'. (free pattern here - https://tatsaway.blogspot.com/2008/12/snowflake.html). During my quick online search for Celtic models/patterns, this one did not show up. The most common were motifs by Rosemarie Peel and Sue Hanson, besides a few others. In the mood to try my own, I thought to improvise with twin rings in the 2nd motif (all models used only a single small ring at the end of the long arms). 

Now both motifs are very basic, beginner level. 
Motif 1 is probably something every antique tatting book begins with after the edgings. Ditto for Motif 2. Nothing proprietary after over a century and half.  
All we do is change the look slightly when we change the count or picot placement, or what we do with it/them subsequently.

Further there are only a very limited ways in which you can interlace, right? Again interlacing dates back to Mlle Riego  if my memory is reliable.Yet, the first impression is very similar to Jon's first 2 motifs [her 2nd motif has twin rings but with a short chain between them; the length of the long arm chain is also shorter than mine]. 

Jon explained all this rationally so much better in response to a self-aggrieved third party complaint.

Another similar start was brought to my notice yesterday. Renulek's 'Plait tatting' motif (free pattern here - https://renulek.blogspot.com/2010/09/frywolitka-pleciuga.html). Was Jon's snowflake the inspiration for Renulek's start? 

I know one thing. In my attempt to Not be influenced by the models that came up in my search, I ended up doing something similar to Jon and Renulek - both exceptional designers! I am nowhere in their league, LOL, as evident in my botched attempt above.

Be ready to be inspired and wowed by the models and patterns coming in .... stay tuned and my 'lazy' friends, keep your shuttles at hand!

Thursday, 18 May 2023

lets design round 3

Pin It now!

 Been quite a while since we played Design Along (DAL). I needed a model to show Celtic tatting with regular shuttles and after searching online I decided to create my own pattern. The first two rounds are tatted and I am trying out the 3rd round joining the 2 interlaced motifs. However, it will be fun to see what design you come up with for the 3rd round! You can design a 4th round, too, if you wish! Come join the fun.

DAL Celtic Snowflake -

Working with Red Rose size 20 threads (equivalent to Lizbeth size 10).

Pattern for Motifs 1 and 2 ---- [schematic of one repeat in the image itself.]

motif 1 pattern and notes - 

  • Ball and shuttle motif, start with ring. 
  • Each ring is joined to previous ring and the last ring is joined back to the first. 
  • All joining picots are very small.
  • Cut and tie and hide ends.
motif 2 pattern and notes - 
  • Ball and shuttle motif, start with left ring. 
  • All picots are very small.
  • This motif tends to twist because of the long chains. Hence, be very careful when you make the final tie to the base of the 1st ring. Make sure all chains are laid our correctly. 
  • Cut and tie and hide ends
  • Block the motif for ease of interlacing.
interlacing motifs 1 & 2 - 
  • Interlace motifs 1 and 2 as seen in the image.
  • Now go ahead and design a Round 3 (and 4?) to link both motifs.
  • TIP: It is a good idea to pin the flake on a polar grid to hold the motifs in place while you sketch out your idea. Or scan your tatted piece and use it as the base for future ideas.
  • Please leave a comment in this post or contact me through Facebook, Instagram, or email with your finished design and model! [all links in right panel top].
Let's have some quick fun!


Monday, 15 August 2022

pretty me heart fun

Pin It now!

Now that all the main patterns from Endrucks' 1920 book are in modern format, barring 2, Ninetta and I decided to start holding occasional events in our FB group. The first such official event or Game of the Month is a simple heart that tatters need to embellish or use to embellish something. We also decided to open it up to our non-FB tatters, if you wish to participate.

pretty me aug 2022 - Endrucks 1920 Project Facebook group event

Do you remember this maroon heart I shared here (now updated with diagram and written pattern for alternate path) - https://tipsaroundthehome.blogspot.com/2022/06/to-and-fro-inspiration.html

We chose it for the event in our FB group and are throwing it open to all tatters. 
Download the one-page pattern pdf with diagram, model, and written pattern and begin decorating - https://drive.google.com/file/d/1t3DhpAeXUBi4oZegOty-q5Ux-zfntdYf/view

There are several paths one can take to tat the heart, including starting from a different point. While only the basic path is shared in the pdf (which should be easy for needle tatters and relative new shuttle tatters), I updated my blog post with diagram and written pattern for the path shown there initially. Check it out if you prefer to tat clockwise all from the front - https://tipsaroundthehome.blogspot.com/2022/06/to-and-fro-inspiration.html

This is my tricolour earring prettification. We are celebrating 75 years of Independence today and I see the Tiranga (our Tricolour) everywhere! 
Worked in Anchor Pearl cotton size 8.
I didn't have time (or the right size/colour beads) to decorate further.
A small ring 8ds was added in the topmost heart to hold the hook.
I used my Floating Beads method to attach the teardrop without stringing it on the shuttle.

UPDATE - The following explanatory para is added in response to a couple of queries - 
How to interlink the hearts - 
Each heart was interlaced in a very simple manner through the final chain. Start from the topmost heart, then work your way down. So, tat the 2nd heart till the very end but leave the last chain unattached. Cut off tails and then insert the 'free' chain through the 1st heart, join to the base of the starting rings, tie and cut and hide ends. 
Repeat the same when interlinking 3rd heart to the 2nd.
NOTE: For fs/bs tatters, start the 2nd heart with backside rings so that the final chain is on the right.


There were other ideas such as decreasing the heart sizes (hut didn't have colours in required sizes); joining at the tips (but I kind of preferred this free-style effect with a bit of twisting when worn)....

The heart is Eye Spy Heart from Endrucks' edging #3 which I spotted when tatting the square derived from the edging. 

Use beads, decorative picots, tatting effects or techniques, or colour-play to make the heart pretty or use it to make enhance the beauty of something else.

We have already received several variations of the heart pattern, besides beautification, and those patterns are also being shared! You can join our FB group with your version of the heart, or simply send the pic to either Ninetta (https://ninettacaruso.blogspot.com/ ) or to me, with your name and any project details you might wish to share. 

There is a special album (pretty me aug 2022) to collect all pics though at present it is missing a lot of the pics which members have shared on the Home page; and a hashtag for a focused search - #prettymeEndrucks.

So are you ready to participate? This is such a quick little pattern that needs very little thread! Come join the fun. Remember the butterfly beautification project where I received a thrilling response - https://tipsaroundthehome.blogspot.com/2018/04/make-me-pretty-please.html ? Can we expect a similar response this time, too? 

All patterns from Frau Endrucks (main and derived) can be found here - https://docs.google.com/document/d/17LEVftXweztBIOWh4sL4BB7bX65ssoOsOn4oXIgCepY/view


Thursday, 11 March 2021

blistering barnacles

Pin It now!

 I started with gusto, especially after seeing the fabulous versions being posted in the Italian facebook group - Chiacchierino: Filo, Amore e Fantasia. Through the ups and downs, I ended up with a slightly modified version.

La Presentosa designed and shared by the prolific and hugely talented Paola Bevilacqua. And her handwriting is so beautiful!

The above was actually my 2nd start, since I had to unravel the first (I will share a quick tip about that in another post) where the teardrop proved too big. Although I noticed that the Josephine Ring and surrounding beads are a bit large for the blue arch space, I persevered, but ended up with a knotted ring that refused to come undone. Scrapped and restarted.
The central heart is a mock dimpled ring (lock joined at base). The crystal and beaded ring use Floating Beads method. While the crystal is loose, the silver beads were pre-strung. 
Continued with white as core, but added blue thread on chain.
And this time the JR is substituted with picot ring.
I crystal flanked by a silver bead is loaded on blue thread above the picoted ring. 
Round 1 complete. I finished off with 3 silver beads on either side of teardrop crystal which was attached with FB method. 
I'm very happy with this, though not impeccable.
Started round 2 at a different picot from the instructions so that I could hide ends in 'new' elements.
Billions of bilious blue blistering barnacles !!!
I joined the final teal arch incorrectly. AND this was despite the fact that I kept tugging and pulling before joining wondering why it was being so difficult! Instead of the southernmost tip, the penultimate arch should've gone over to the other side where that empty picot lies. I honestly debated long and hard whether to leave it be since I saw this only when I was blocking it. But Mr Meticulous moved in this time, sigh!

Snipped and unraveled and added new thread. But I still had to add an extra teal arch because of which it looks a bit cramped. If I hadn't, the teardrop and beads would get hidden.

When tatting round 2 I had to unwind from shuttle to weave for overlapping arches. Used only 1 shuttle throughout. The blue and teal were scrap lengths. Seed beads were strung. 

Anchor Pearl cotton (size 8) is my best choice for colour & shade range and for stringing tiny beads. However, not so good for tiny rings, Josephines, etc. with the fibres and loose twist causing friction. Which is why I switched to picot flowers instead of the JR.
Working with Lizbeth for the snowflake (in previous post), brought out the comfort, ease and joy when tatting with Lizbeth. But I have to ration myself ;-P

My apologies to Paola. Despite all the time and fiddling demanded by beads, I enjoyed tatting it and am happy with it. Only wish I'd done a better job with this medallion.

Many many thanks, Paola, for creating and sharing this pattern and the inspiration you provide. 

All tutorial links can be found here - https://tipsaroundthehome.blogspot.com/p/tatting-resources.html