Showing posts with label block tatting. Show all posts

Tuesday, 26 December 2023

lighting up

Pin It now!


The 2nd candle motif is complete, with pattern. As mentioned here (https://tipsaroundthehome.blogspot.com/2023/12/the-power-of-15.html) I used treble tatting stitch chains alternating with regular double stitch chains to block tat this textured candle. 

While I wasn't successful in obtaining the intended spiral effect, I have since found a solution and even tried out a very quick trial. I believe it should work. No pics yet.

E15 Candle Motif version 2 pattern pdf - https://drive.google.com/file/d/1r3SXvBp6bTwrHxU0Y6veyl2M5lnqA1uv/view

The flame is slightly different from version 1, both derived and adapted from a motif of pattern #15 from Endrucks' ‘Die Schiffchen-Spitzen’,1920.

The flame is tatted separately first. When we start the candle body, the first ring is joined to the final ring of the flame in onion ring style/join.

And the base or candle stand is also different. 

I'm not at all happy with my tatting, especially the stand. I need a change of glasses to see more clearly! And working under a magnifier limits the fun. Hmmm, come to think of it, I could easily have re-tatted the stand from scratch! Perhaps I will.

If you tat it, please do share your improved versions! May these candles brighten up the new year as well. Happy tatting! 

Sunday, 28 May 2023

my DAL tadaaaa

Pin It now!

 And the reveal!!!! My version of the 3rd Round design-along for the DAL Celtic Snowflake. This is where I first posted the game - https://tipsaroundthehome.blogspot.com/2023/05/lets-design-round-3.html. My next two posts showed my own dilemma, course correction and solution trial (thanks to Anna Bonelli!). 


Several techniques, effects, stitches, and their modification have been used to achieve this result. 

I am very happy with the end result. I challenged myself and am quite satisfied.

Tatted in Red Rose size 20 threads (equivalent to Lizbeth size 10), the final size is 14cms.
Motif 1 = 4cms ; Motif 2 = 7cms.

I did away with the Josephine rings. For the tip I used a decorative picot; for the treble arches I used graduated treble tat stitches.

This is how it looks in toto. I would've loved to try Sam's visualization of the flake in blues and greens. Hopefully I will do another one in finer threads using the water effect.

To anchor the are thread in the center, after doing a lock join, I made a tied stitch (as in encapsulation) at the very base and then again at the tip. The bare thread is deliberately left uneven to give an open, free-style look.

This is the same, but from the back. After all Celtic interlacing creates a different overlap on the two sides.

Again from the back.


We now have a total of, I think, 15 models submitted or WIP, with 6 patterns (I have to write out mine to make it 7) and 2 more patterns promised. I have started compiling them in a Google Doc but it takes time to get it all done properly since time needs to be squeezed in, LOL.

Tuesday, 23 May 2023

solution

Pin It now!

 Remember my problem and the mood to give up on my own 3rd round design? Well turns out there were two possible solutions! Anna Bonelli suggested something in Italian which, though lost (on me) in translation actually threw up the first solution to my mind! After making the join I could leave some bare core thread, work and interlace the large ring, then go back and cover the bare thread with 'tied' stitches using the 2nd shuttle!

Anna then tatted a sampler to show what she meant, and that is the solution I adopted. Notice the ring is now horizontal instead of vertical, and I made it smaller too.
Meanwhile I had this idea to use block tatting at the tip. It caught my imagination and between these two elements I allowed my shuttles to do the work, starting with treble tatting arches.
 
I like how the block appears like a flame. 
In several places I hadn't made any picots. Used a finer crochet hook to clear enough space for a join.
To offset any denseness, I did the bare thread thing in the center. I could use dot picot strings, but wouldn't it be overkill?
Just like the Josephine Ring at the tip of the 'flame' is an overkill, right? Although I cannot decide on the JR above the treble tatting arch.
I was going to include decorative picots, but I like the clean lines here.

So what is your verdict? 
I am open to suggestions since I haven't yet started tatting. Oh and this time I'll be using a muted shade of yellow.

So far the design-along has roped in 12 tatters: 1 diagram only; 5 models only (1 WIP); 5 models with patterns; and 1 late starter. I will collect them all in a Google Doc with shareable link so feel free to join the game whenever you can .... 
My journey so far -
Many many thanks to Anna Bonelli for her wonderful solution that got me going!

Thursday, 11 August 2022

saTATisfaction

Pin It now!


Another productive day of tatting, foregoing my exercises and the newspapers, shhhh ;-P

The Ashoka Chakra in the center of our flag actually has 24 spokes. Using Anchor Pearl Cotton size 8, I was happy to get 12 in cabochon tatting. After all my tatted flag is an artistic symbolism, though proportions are maintained.

Started the morning by working on the 3rd wave and completed it by afternoon, despite all chores. Since I had the pattern jotted down, it was easy and quick to tat.

All 3 waves together.
In the evening, the waves as well as the leaves were all blocked. 

And this is how they will be arranged, with some overlap. Difficult to capture in a photograph.

And this is how I did worked tatting around the coin. A spilt ring braid.
SR1: 3 - 6 - 3 / 3 - 6 - 3.
All subsequent split rings -
SR2: 3 + 6 - 3 / 3 + 6 - 3. 
The final ring I worked as a regular ring, joining back to the first SR.

Has this been done before? I seem to have lost track of so many things.

UPDATE: I've been told that Edda Guastalla published this SR braid method of encapsulation in a book. She did it on an large gem (like in ice drops). 

And here is how I finished off the coin to get a smooth edge https://tipsaroundthehome.blogspot.com/2022/08/har-ghar-tiranga.html


I have revealed each step of design and progress over the last several days. Now we'll all have to wait and see how they come together finally!

However, before that, there is a fun game you are all invited to .... I will post about it tomorrow.

***************

Those who subscribe to my blog via email, have you been receiving the email notifications for each post? The last one I received was the July 24th post!

waves of satisfaction

Pin It now!

 As I said, the day was a washout in terms of tatting. I barely tatted a few chains. However yesterday (which I will call Day 8) made up for it in some ways.

I finished the 2nd wave and started on the 3rd.

This 2nd wave has a long flat trough and a slightly flattened crest.
When I placed the 2 wave lengths on the flag, there was a larger gap to cover.
As you can see, I did not bother with hiding ends neatly since the tails can be hidden under while gluing ;-P
Hence in the 3rd wave the lower segments are all 6ds instead of 4ds.
I kept getting so many ideas for variations - too many to ever try out! 

These are the 3 waves together for comparison.
One of my friends on FB shared sketches/graphics of waves and boy so many possibilities! Do I even have the skill to translate a few into tatting? Can't say, but it would certainly be an interesting challenge.

Today I will complete the 3rd wave and might have time to start with the coin. Assembling (gluing) will take an entire day if not more. And then to fill in any gaps with respective tatting. Guess I'm well on my way to completing it by 15th, phew.

Tuesday, 9 August 2022

alternate

Pin It now!


 Day 7 was pretty productive tatting-wise. I completed this entire strip of a symbolic wave. And even wrote down the pattern.
The crests are a bit flattened compared to the trial piece in the previous post.

However, the troughs are too angular. I'll use this strip, but am trying to lengthen the troughs. And this time no rings - only chains. Let's see how that tat's up. I managed only a few chains today. So Day 8 is a washout tatting-wise.

Meanwhile I do have a question. 

This is the 75 year old coin from both sides which will be used for the center of the flag.

 Should I clean it to a sparkle or leave it as is? Is there anything to keep in mind while cleaning?

I also want to apologise for not answering the comments in my recent posts. I will do it soon. Thanks for your support 💕

Monday, 8 August 2022

wave trial Endrucks style

Pin It now!
WHITE - stands for peace in our Indian flag and to me water and waves symbolize peace and serenity.
This is the first motif of Day 7 but more have been accomplished and I hope to do one more before lights out. No pics, yet.
If time was on my side I would've tried to change the straight lock join line to a curve reflecting the crest. For another day.
This was my trial last night (Day 6) and I adopted Endrucks' style of block tatting.  The crest is too pointed here, which I smoothened a bit in the final version above. Besides this, only 2 minor counts were altered.
Doesn't this look like a crown though? The portion from ring to ring. All it needs is some embellishments.

Off to tat! Waving tata ....

Thursday, 31 March 2022

a happy day flower

Pin It now!
After the 
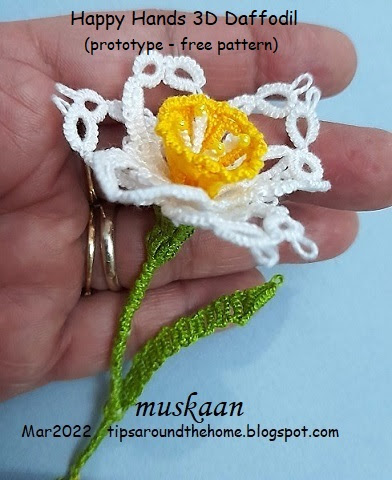
grumpiness last time, this flower seems to have settled down for now as a daffodil, which happens to be the flower of the month! She understands that there is a lot of improvement as well as diversity possible, but this is my little gift to all tatters on the eve of International Tat Day, 2022

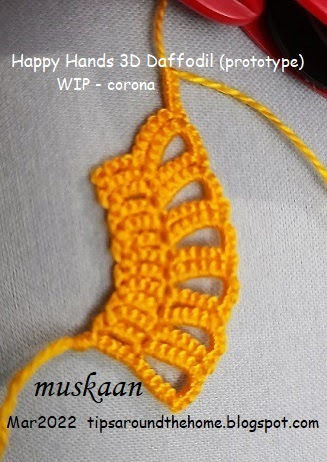
Happy Hands 3D Daffodil  (prototype pattern continued)
adaptation of Endrucks' edging #1
The odd one out, but continuing the pattern for this prototype .....
After the first 3 petal fiasco, I chanced upon a superb daffodil pic posted by Coretta L where 3 petals were curved and the other 3 were pointed. This is the reason I chose to go with daffodil and after a bit of Googling, it turned out that it was the flower for March-born, besides having more meanings. Timely, huh!

Some abbreviations : ch = chain; LJ = lock join; fhs = 1st half-stitch; shs = 2nd half-stitch

Corona : Use your preferred method of block tatting. I have followed Endrucks' style, using 2 shuttles, turn work (tw) and switch shuttle (SS). I simply knotted the threads, leaving the tails to add to the stalk.
ch-1: 1 - 4 - 6, tw SS
ch-2: - 4 - 6 LJ 4 LJ, tw SS 
ch-3: [ 1 - 4 LJ 6 LJ, tw SS
ch-4: 4 - 6 LJ 4 LJ, tw SS ]x6

Make one last chain and remember to join it to BOTH the 1st and previous chain at 2 points respectively. This creates a conical structure, with both threads emerging along the top edge. Continue ... 
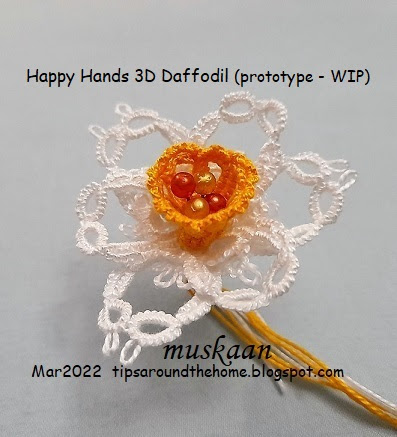
Corona Frill : is made with a row of Node stitch or Victorian Set chains, lock joined to the picot below. You can choose a different colour. 
Victorian Set Chain: [ 3fhs 3shs 3fhs 3shs, LJ ]x7

This is how it looks after the corona and frill is finished. I simply put in a few pearl head pins in the center. All tails have been inserted through the center space of the petals, and before snipping off, join the base of corona to the base of petals. If desired, we can use one of the tails to sew and anchor it.

TIP: We can add a 2nd row for a wider and more pronounced frill. This could be with sets of 4 or 5 half stitches each.
Anthers : Each is made separately with a bead at the tip of a lock chain. Use leftover thread, short lengths are sufficient, and single shuttle. String bead and work the lock chain below it. You can decide the length of each stamen. I varied the lengths using between 6 to 9 lock stitches, for 4 stamens.

Again, insert the tails through the center space and cut off, leaving a few inches of tail. After inserting the last stamen, make an overhead knot at the base, encapsulating all the tails.

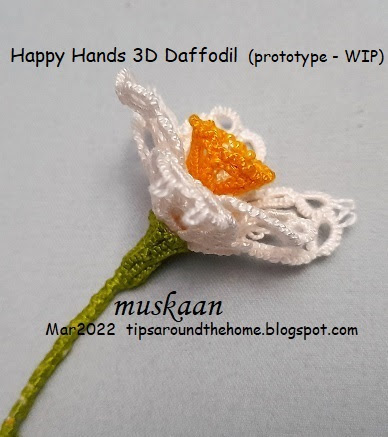
Calyx : Block tatting. Start with a paper clip to hold picot or a lock stitch (without paperclip, which is what I did here). 2 shuttles, ctm. 
TIP: You can make a join to the base of a petal midways through the calyx 
ch-1: - 6 - 4, tw SS
ch-2: - 2 - 4 LJ 6 LJ, tw SS
ch-3: 1 half-stitch - 6 LJ 4 LJ, tw SS
ch-4: 2 - 4 LJ 6 LJ, tw SS   
ch-5: 1 half-stitch - 6 LJ 4 LJ, tw SS 
ch-6: - 2 - 4 LJ, tw SS   
ch-7: 4 LJ, tw SS
These are the 7 chains seen in the image above.
Repeat chains 2 & 3 twice. Wrap the open calyx around all the tails at the base of the petals. Make one last chain joining to BOTH 1st and last chain at both joining points so that we have a cone.
I used a drop of fabric glue to keep the tails and the calyx in place since I had not anchored the calyx. At the base, I made 2 overhand ties, keeping all tails within the knot.
Do not cut threads. Continue for stalk and leaf.
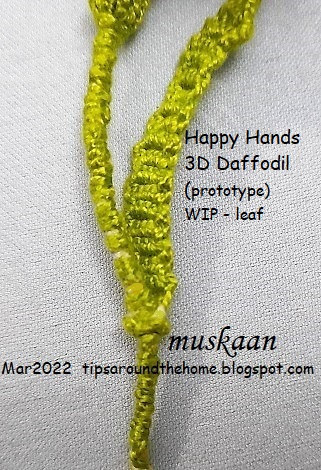
Stalk : Here we are encapsulating all the tails while covering it with unflipped stitches. You can choose to do a Josephine chain or simple direct tatting. I used an odd method to make a Lock Chain for a straight stalk. 
Lock Chain encapsulation : Always keep the tail ends encapsulated while making each half-stitch. Make unflipped shs, slightly rotate the stalk towards you, make a manoeuvred fhs, rotate stalk back to original position, and repeat this process for the desired length.

TIP: We make a manoeuvred half-stitch in Twist Work, as follows : https://drive.google.com/file/d/1To6YwZSkh2ffQH3XBcKZ-Ed3l4myW34c/view 

Stalk worked to the point where I now want to start a leaf. Continue without cutting threads.
Leaf : is made with ring (forming a node), followed by a kind of phase-shift block tatting, ending in a folded ring.
ring: 4 - 6. Before closing, pull all tails through this ring and adjust the position.
ch-1: [ 1 - 3 LJ(to ring) 1, tw SS
ch-2: 1 - 4 LJ, tw SS ]x10-12
folded ring: 8 - 2fhs 8 2shs. 
You can either cut and hide ends, or whip stitch them back to the base of the leaf if you wish to continue with the stalk. I ran out of thread despite keeping the shorter length as core thread for the final chain, otherwise I would've liked the leaf to be a wee bit longer.
Having run out of thread, I joined new thread at the base of the leaf....... and continued the stalk for a short length. Then I tied and snipped off all tails and put a drop of glue to hold them together.
The stalk is semi-stiff and when held at the base of the leaf, it can hold the flower up. I have not done any kind of finishing here. This entire flower is as it is when it came off my shuttles.
I wanted more of a slant in the block chains for the leaf, but not quite successful. Will require more trials and testing.
A side view with displaced leaf. Yes, as I said in the beginning, this is a prototype and I have made several mistakes besides not being as neat as I would've liked. But hubby really likes it and I am happy for now. 
If there is sufficient interest, some day I will draw diagrams and create a pdf presentation.
Worked entirely with Anchor Pearl Cotton size 8. The flower spans 5cms, and the complete sprig is 8cms high; leaf is 4.5cms high.
Beware, some of the elements can be a bit fiddly, being small and 3D. Satisfying result, nevertheless.

Wishing you a very happy, chatty, chocolatey Tatting Day tomorrow. 
I have received such a wonderful gift and will share it as soon as I take pics!

All patterns from the Endrucks 1920 Project can be found here as pdfs - https://docs.google.com/document/d/17LEVftXweztBIOWh4sL4BB7bX65ssoOsOn4oXIgCepY/view