Showing posts with label Indian flag. Show all posts

Friday, 15 August 2025

independence day tatting

Pin It now!

 Well, I managed to finish it, almost. Chain for the necklace remains to be attached, but this will give a fair idea of how the Lotus Motif Necklace looks. 

My necklace with the Indian flag colours for #HarGharTiranga2025 using tatted motifs of our national flower - the lotus. Proud to celebrate our 79th Independence Day today.

Two motifs layered to give a lotus with more petals and layers. On top is the motif from my previous post (Anchor Pearl cotton size 8) while the larger one behind is with a thread I'd remembered buying and thinking it fit for ANKARS.

Kankri thread (in cones) that I'd bought back in April and boy, was it smooth sailing! No issues with either tatting or closing the large rings. It was super fun to tat. This is an artificial silk thread. However, the difference in the motif sizes is quite visible.

I made no changes to the orange petals - pattern shared here - https://tipsaroundthehome.blogspot.com/2025/08/lotus-tatting.html
However I did tweak the green rings as follows -  (from right to left, clockwise) 
ringF: 12 - 4 - 9. 
ringG: {lies above F}  9 +(F) 6 - 6 - 9.
ringH: {lies behind G} 9 +(G) 4 - 12. 

Another visual comparison of size. The larger motifs measure about 4.5cms across and 4cms high.

Another arrangement of the three motifs.
 
And joined into a necklace or a bracelet if you prefer. At present the length is 7.5 inches - just right for a bracelet.
I tatted a pair of white rings (Anchor Pearl cotton size 8) attached to adjacent motifs with a blue bead in the center. So all colours in my flag are included!
TIP: The center pairs are (8+8) while the end pairs are (6+6) with a bicone crystal between them. 
Instead of tatting over the first ring tail, I slipped it through the bead after closing the ring, and then tatted over it in the 2nd ring. And the 2nd ring tail was again slipped through the bead to the other side and sewed in. This way I have 3 threads through the bead, making it quite stable.

Its difficult to capture the effect and colours here unless I take time out to try out different backgrounds and brightness .... Hubby approves, so you have his word that it looks quite spectacular.
I haven't even blocked or processed the motifs.

The motifs tat up so quickly (when the thread is right, LOL) that I'd love to make a little scenery with them.


Wednesday, 13 August 2025

lotus tatting

Pin It now!

 Every year I try to tat something for our Independence Day celebrations.... if not a dedicated project, then using the tricolour in whatever I may be working on at the time. This year I felt it was much more vital given the international and more importantly our domestic situation where the parties who are in the opposition at the center keep peddling falsehoods and agenda-driven false narratives in order to show the world that Indian democracy is on shaky ground, the election process is flawed and manipulated, etc. They do not hesitate to bad-mouth the country and its institutions in their hatred towards the democratically elected Prime Minister. They cannot even digest our superiority in our  retaliation (Operation Sindoor) to the terror attack on Indian tourists by nationals from the neighbouring country! 

Lotus is our national flower and this is my prototype. 
Now you may ask where is the third colour?! Good question.
I had started by using this motif as a charm for a bracelet with a white tatted band/braid, sprinkled with some blue. Every colour has its symbolic value which I have explained in previous years.
Now I wonder whether I will have sufficient time.
Another idea is to tat a few more motifs and glue to a greeting card, with tatted blue/white chains representing water. 
Which do you prefer?
I chose ANKARS style stacked rings or ring on ring technique. Though incidental, I like the fact that this technique came from Russia. I've read more Russian literature than American!

LOTUS  MOTIF 
(prototype) Pattern by Muskaan © Aug2025  
Single shuttle. Starting from the left orange ring ....
NOTE - since this is a prototype, there are a few count changes made along the way for the petals. I am happy with the flower count but the green rings can be stacked a bit more. Hence some tweaking of count will be needed. 
Start ring by leaving a small loop and tail over tails. This loop is later used to make a shepherd's crook join at the end. https://tipsaroundthehome.blogspot.com/search?q=shepherd+crook
ringA: 19 - 4 - 15. dnrw
ringB: {lies above A} 15 +(to A) 5 - 5 - 15. dnrw
ringC: {lies above B} 15 +(to B) 6 - 6 - 15. dnrw
ringD: {lies under C} 15 +(to C) 5 - 5 - 15. dnrw
ringE: {lies under D} 15 +(to D) 4 - 19. dnrw
Attach green thread and cut and hide orange tail. [UPDATE: See updated pattern here - https://tipsaroundthehome.blogspot.com/2025/08/independence-day-tatting.html]
ringF: 10 - 4 - 6. dnrw
ringG: {lies above F} 6 +(to F) 6 - 6 - 6. dnrw
ringH: {lies under G} 6 +(to G) 4 - 10. 
Join to starting loop at base of ringA and cut and hide tail.
TIP: I will join rings F & H or make the segments longer than 6ds in order to make the overlap more visible.

I don't know how original this motif is - it seems pretty basic to me. If you have seen anything similar, do please let me know so that we can acknowledge the designer.

In Anchor pearl cotton size 8 (equivalent to Lizbeth size 20) the motif is 3.5cms wide and 3cms high.

I had trouble with closing the large rings with this thread and am thankful it did not break. It did flip the last half-stitch and I had to rectify it each time despite care and precaution while closing. After the first two rings I remembered Patty Dowden's Working with Large Rings tips and closed the ring in two phases (like in the dimpled yorkie) - https://tipsaroundthehome.blogspot.com/2015/03/experimenting-with-colours.html

Let's see what tomorrow brings - hopefully plenty of time to decide, tat, and complete for 15th August to celebrate #HarGharTiranga!

Wednesday, 7 August 2024

smiling together

Pin It now!

Ninetta recently surprised me with a thoughtful and gorgeous gift on my birthday. She sent me the pattern for her cute little flowers which she named after my moniker Muskaan which means Smile! What an honour! This sweet Hiding Lady knows how to impress and she shared the Smiling Flowers (rose) pattern here -- https://ninettacaruso.blogspot.com/2024/07/smiling-flowers.html 

This is my adapted application into a rakhi/bracelet choosing to represent our tricolour (tiranga) Indian flag. This month we celebrate our Independence Day and Raksha Bandhan just days apart.
Saffron Marigold impression - Marigolds are considered pure and auspicious flowers and you will find them during any Hindu festival or ceremony.
It largely follows Ninetta's instructions except for the petals on the 2nd row where I used graduated treble tatting with 4 wraps. 
 
White Lotus impression - Lotus is our national flower and also symbolizes purity and peace. 
Although not very clear in the pics, the 2nd round petals have distinctly graduated tds with a pointed tip. Instead of 5tds, there are 7 tds with 1tds(1,3), 1tds(1,4), 1tds(1,5), 1tds(2,6), and ditto on the other side with 5, 4, 3 wraps.   
Blue Center - Clear blue bicone faceted crystals at the center for the Ashok Chakra in the center of our flag. I didn't have any blue bead larger than this.

Tempted to tat one more round of petals for the marigold but I desisted for two reasons - one, I ran out of thread; two, how can a marigold be larger than a lotus, LOL.
( Find treble tatting tutorial/video links here - https://ninettacaruso.blogspot.com/p/blog-page_95.html and on my Tatting Resources page.)

Green Leaves - The third colour of our tricolour is green which symbolizes prosperity, vitality.
Ninetta used the tds rings as calyx for her flowers. I used it to make leaves with more tds and some graduation.
Tatted continuously with a single shuttle, the leaf clusters are connected with a ring braid with pulled loop joins (leave bare thread at the back of the ring and make a lock join to the picot). This will act like a frame to secure the flowers.

Assembled together and attached to a doubled string of beads (12 on one side, 14 on the other for that 'gap'). All sewn in.
The beads are actually silver - like silver lining clouds against a blue sky.

So this is my Rakhi/Bracelet 2024 from Ninetta's beautiful pattern! Over the years, I have often used the tricolour to celebrate August 15th (including Har Ghar Tiranga with the 75 year old coin), and have also shared some of my tatted rakhis. 

And making short work, I am submitting this for Natalie Rogers' PICOT Bingo game, crossing off three boxes --- Treble Tatting Stitch , Add Beads , and Tat a Bracelet

Oh, and I used Anchor Pearl Cotton, size 8, throughout. 
I find the treble tatting stitch quite addictive! I honestly didn't want to stop tatting. If it weren't for the thread and time running out, I would've continued!
In my haste, though I forgot to add a clasp to the beaded ends!

Small 3D flowers always remind me of Carollyn Brown who had made it her personal goal to tat one floral sprig every month for a year! She always managed to amaze me. You can find her blog here - https://tennbrown.blogspot.com/2020/11/

And adding to the all-encompassing nature of this post, this rakhi/bracelet in flag colours is my August submission to splocik's Small Decorations game. Please do head over to the July gallery to check out the talented and diverse submissions compiled there - https://splocik2.blogspot.com/2024/08/male-dekoracje-2024-galeria-lipcowa.html

Thank you my dear partner in crime, Ninetta, for the honour and friendship you bestowed on me. It is precious! Keep smiling, always :-))) 

Saturday, 13 August 2022

har ghar tiranga

Pin It now!

 Celebrating 75 years of Independence (August 15th) with a tatted version of my flag.

Har Ghar Tiranga campaign is about flying a flag in each home. I chose to tat a flag around a 1947 coin.
It's so good to look out the balcony or window and see flags flying merrily in the monsoon breeze. 

I've been sharing my tatting progress this entire August. Now it was time to assemble. 
 
Saffron - I used marigolds to symbolise sacrifice and auspiciousness. My original intention was to have the 'petals' raised up. Couldn't accomplish it since these flowers are so tiny.

White - waves in water symbolise peacefulness, serenity, peaceful coexistence.
Glued in overlapping layers.

Green - I used leaves to symbolise prosperity though it denotes faith and chivalry.

As expected there are gaps in the green rectangle, which were later filled with single or double leaves, as required.
For the pole, I tatted an onion ring using metallic silver thread, size 20. Then I couched over doubled up strands. The pole could've been thicker, but oh well ....

Ashok Chakra - the emblem represents the eternal wheel of law. I used the 1947 coin from hubby's old collection. It was the discovery of this coin that flagged off my idea early this year.

Flag tatted in Anchor Pearl Crochet Cotton, size 8, measures 13.5cms x 9cms.
saffron - 00316 ; white ; green - 00245 ; blue - 00133

This is how the edge of the coin looked after the split ring braid was wrapped around it. I had wanted to outline the coin, but without adding bulk. Since I didn't know how to go about it, I had left it as is.

Then inspiration struck! Wound my shuttle and threaded a long tail through a needle. This tail acted as the core thread and I worked chains between rings using reverse stitch (direct tatting). The needle came in handy to slip under each ring.

And this is how it looks with a chain passing through the SRs.

A close-up of the simply encircled coin.
There should be 24 spokes on the wheel which could easily be sewed in with finer thread, but I left it open so that the coin face and date is clearly visible.

I was pleasantly surprised that gluing everything together was accomplished in a single day! Today I merely filled in the gaps with extra leaves and flowers, and worked the pole.
And I sewed down the coin instead of gluing it, to keep my options open.

The Aida cloth is mounted on an embroidery hoop (25.5 cms diameter along the inner edge).
So this is it. My artistic Indian flag in tatting. 
Hope you enjoyed my 10 day journey as I join my country in celebrating Azadi ka Amrit Mahotsav!


Related Posts -

Thursday, 11 August 2022

waves of satisfaction

Pin It now!

 As I said, the day was a washout in terms of tatting. I barely tatted a few chains. However yesterday (which I will call Day 8) made up for it in some ways.

I finished the 2nd wave and started on the 3rd.

This 2nd wave has a long flat trough and a slightly flattened crest.
When I placed the 2 wave lengths on the flag, there was a larger gap to cover.
As you can see, I did not bother with hiding ends neatly since the tails can be hidden under while gluing ;-P
Hence in the 3rd wave the lower segments are all 6ds instead of 4ds.
I kept getting so many ideas for variations - too many to ever try out! 

These are the 3 waves together for comparison.
One of my friends on FB shared sketches/graphics of waves and boy so many possibilities! Do I even have the skill to translate a few into tatting? Can't say, but it would certainly be an interesting challenge.

Today I will complete the 3rd wave and might have time to start with the coin. Assembling (gluing) will take an entire day if not more. And then to fill in any gaps with respective tatting. Guess I'm well on my way to completing it by 15th, phew.

Tuesday, 9 August 2022

alternate

Pin It now!


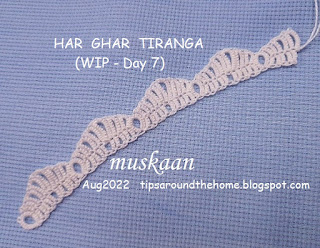
 Day 7 was pretty productive tatting-wise. I completed this entire strip of a symbolic wave. And even wrote down the pattern.
The crests are a bit flattened compared to the trial piece in the previous post.

However, the troughs are too angular. I'll use this strip, but am trying to lengthen the troughs. And this time no rings - only chains. Let's see how that tat's up. I managed only a few chains today. So Day 8 is a washout tatting-wise.

Meanwhile I do have a question. 

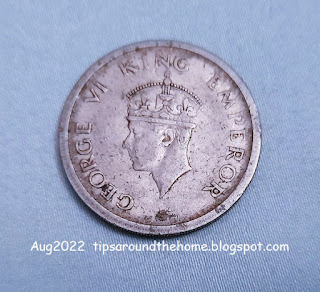
This is the 75 year old coin from both sides which will be used for the center of the flag.

 Should I clean it to a sparkle or leave it as is? Is there anything to keep in mind while cleaning?

I also want to apologise for not answering the comments in my recent posts. I will do it soon. Thanks for your support 💕

Monday, 8 August 2022

wave trial Endrucks style

Pin It now!
WHITE - stands for peace in our Indian flag and to me water and waves symbolize peace and serenity.
This is the first motif of Day 7 but more have been accomplished and I hope to do one more before lights out. No pics, yet.
If time was on my side I would've tried to change the straight lock join line to a curve reflecting the crest. For another day.
This was my trial last night (Day 6) and I adopted Endrucks' style of block tatting.  The crest is too pointed here, which I smoothened a bit in the final version above. Besides this, only 2 minor counts were altered.
Doesn't this look like a crown though? The portion from ring to ring. All it needs is some embellishments.

Off to tat! Waving tata ....

Sunday, 7 August 2022

mirroring

Pin It now!

 Only 8 more days to go and my heart is beating fast ....

My messy heart after 6 days 💗

This is how I intend to place the leaves. In the background is the sketch for reference. The center is an outline of the coin. And there's one extra leaf but who knows it might come in handy once I start gluing.

Some of the initial leaves are shorter 'coz I added 2 extra leaflets along the way.
I have a shuttle filled with scrap lengths. Once glued, the empty spaces will be filled with the required number of leaflets.
This is the Laurel Leaf pattern (on page 7 of this pdf - https://drive.google.com/file/d/0B5MqI5ByadI4cjRaV3h3Qjgyajg/view?resourcekey=0-OQ9HULLWS0raSHIL0dR4Tg) In case it does not open, send the automated request.

TWoT Notes: Notice how the 4 leaves on left side face left while the 5 on the right side are bent towards the right? I followed the exercise set out in the pdf. Instead of starting the first ring frontside, simply start it backside (RODS or reverse order of double stitch ie., 2nd half st, then 1st half st.) and continue with the pattern working fs/bs tatting throughout. The leaf will curve in opposite direction.
No need to work out the mirror-image in the pattern!!!

Tonight I will try out the white pattern before working it for real. I've diagrammed it, but need to confirm stitch count, size, etc.