Showing posts with label Ankars. Show all posts

Friday, 15 August 2025

independence day tatting

Pin It now!

 Well, I managed to finish it, almost. Chain for the necklace remains to be attached, but this will give a fair idea of how the Lotus Motif Necklace looks. 

My necklace with the Indian flag colours for #HarGharTiranga2025 using tatted motifs of our national flower - the lotus. Proud to celebrate our 79th Independence Day today.

Two motifs layered to give a lotus with more petals and layers. On top is the motif from my previous post (Anchor Pearl cotton size 8) while the larger one behind is with a thread I'd remembered buying and thinking it fit for ANKARS.

Kankri thread (in cones) that I'd bought back in April and boy, was it smooth sailing! No issues with either tatting or closing the large rings. It was super fun to tat. This is an artificial silk thread. However, the difference in the motif sizes is quite visible.

I made no changes to the orange petals - pattern shared here - https://tipsaroundthehome.blogspot.com/2025/08/lotus-tatting.html
However I did tweak the green rings as follows -  (from right to left, clockwise) 
ringF: 12 - 4 - 9. 
ringG: {lies above F}  9 +(F) 6 - 6 - 9.
ringH: {lies behind G} 9 +(G) 4 - 12. 

Another visual comparison of size. The larger motifs measure about 4.5cms across and 4cms high.

Another arrangement of the three motifs.
 
And joined into a necklace or a bracelet if you prefer. At present the length is 7.5 inches - just right for a bracelet.
I tatted a pair of white rings (Anchor Pearl cotton size 8) attached to adjacent motifs with a blue bead in the center. So all colours in my flag are included!
TIP: The center pairs are (8+8) while the end pairs are (6+6) with a bicone crystal between them. 
Instead of tatting over the first ring tail, I slipped it through the bead after closing the ring, and then tatted over it in the 2nd ring. And the 2nd ring tail was again slipped through the bead to the other side and sewed in. This way I have 3 threads through the bead, making it quite stable.

Its difficult to capture the effect and colours here unless I take time out to try out different backgrounds and brightness .... Hubby approves, so you have his word that it looks quite spectacular.
I haven't even blocked or processed the motifs.

The motifs tat up so quickly (when the thread is right, LOL) that I'd love to make a little scenery with them.


Wednesday, 13 August 2025

lotus tatting

Pin It now!

 Every year I try to tat something for our Independence Day celebrations.... if not a dedicated project, then using the tricolour in whatever I may be working on at the time. This year I felt it was much more vital given the international and more importantly our domestic situation where the parties who are in the opposition at the center keep peddling falsehoods and agenda-driven false narratives in order to show the world that Indian democracy is on shaky ground, the election process is flawed and manipulated, etc. They do not hesitate to bad-mouth the country and its institutions in their hatred towards the democratically elected Prime Minister. They cannot even digest our superiority in our  retaliation (Operation Sindoor) to the terror attack on Indian tourists by nationals from the neighbouring country! 

Lotus is our national flower and this is my prototype. 
Now you may ask where is the third colour?! Good question.
I had started by using this motif as a charm for a bracelet with a white tatted band/braid, sprinkled with some blue. Every colour has its symbolic value which I have explained in previous years.
Now I wonder whether I will have sufficient time.
Another idea is to tat a few more motifs and glue to a greeting card, with tatted blue/white chains representing water. 
Which do you prefer?
I chose ANKARS style stacked rings or ring on ring technique. Though incidental, I like the fact that this technique came from Russia. I've read more Russian literature than American!

LOTUS  MOTIF 
(prototype) Pattern by Muskaan © Aug2025  
Single shuttle. Starting from the left orange ring ....
NOTE - since this is a prototype, there are a few count changes made along the way for the petals. I am happy with the flower count but the green rings can be stacked a bit more. Hence some tweaking of count will be needed. 
Start ring by leaving a small loop and tail over tails. This loop is later used to make a shepherd's crook join at the end. https://tipsaroundthehome.blogspot.com/search?q=shepherd+crook
ringA: 19 - 4 - 15. dnrw
ringB: {lies above A} 15 +(to A) 5 - 5 - 15. dnrw
ringC: {lies above B} 15 +(to B) 6 - 6 - 15. dnrw
ringD: {lies under C} 15 +(to C) 5 - 5 - 15. dnrw
ringE: {lies under D} 15 +(to D) 4 - 19. dnrw
Attach green thread and cut and hide orange tail. [UPDATE: See updated pattern here - https://tipsaroundthehome.blogspot.com/2025/08/independence-day-tatting.html]
ringF: 10 - 4 - 6. dnrw
ringG: {lies above F} 6 +(to F) 6 - 6 - 6. dnrw
ringH: {lies under G} 6 +(to G) 4 - 10. 
Join to starting loop at base of ringA and cut and hide tail.
TIP: I will join rings F & H or make the segments longer than 6ds in order to make the overlap more visible.

I don't know how original this motif is - it seems pretty basic to me. If you have seen anything similar, do please let me know so that we can acknowledge the designer.

In Anchor pearl cotton size 8 (equivalent to Lizbeth size 20) the motif is 3.5cms wide and 3cms high.

I had trouble with closing the large rings with this thread and am thankful it did not break. It did flip the last half-stitch and I had to rectify it each time despite care and precaution while closing. After the first two rings I remembered Patty Dowden's Working with Large Rings tips and closed the ring in two phases (like in the dimpled yorkie) - https://tipsaroundthehome.blogspot.com/2015/03/experimenting-with-colours.html

Let's see what tomorrow brings - hopefully plenty of time to decide, tat, and complete for 15th August to celebrate #HarGharTiranga!

Thursday, 22 May 2025

bead tatting

Pin It now!

Over the past couple of years I have approached many experienced and expert or domain tatters for some explanation or confirmation and feedback, or even to ask for a pic of their work ... all in the cause of the book/glossary. Not only have I learned a lot, but everybody has been very cooperative!

Late last year I had approached Nina Libin regarding her BEANILe tatting and if she would share a pic of one of her models for the book (I didn't like any of the beaded models I had tatted till then). Despite her ailment, she willingly obliged with both an explanation and a pic. However, she was adamant on one point - do NOT call it Beanile or BEANILe lace! Shocked, I asked her why and she said it was merely her 'arrogance' for wanting her name associated with the term. She told me in no uncertain terms to call it Bead Tatting instead. 

Bead Tatting (formerly known as Beanile lace) is tatted lace decorated with lots of beads that are incorporated during the tatting process itself. Earlier the beads used to be strung on the ball thread so that they would embellish the picots. Nina was instrumental in stringing the beads in the shuttle thread as well, in order to position them in beautiful arrangements. 

I am uncertain about beads being used in single shuttle tatting before the introduction of chains (or 2nd thread). Did they use beads to cover bare thread between rings? Do you have any idea?

Nina differentiated this from Beaded Tatting, where beads are sewn into finished lace, as in ANKARS. 

Tatting with Beads is another common term. This would mean that beads are used in lace either during tatting, pre-strung or free, or stitched in later .... any which way(s). Thus this term encompasses both Bead and Beaded tatting and any other method (for instance pinning down beads on a foam ornament covered with tatted lace).

It would be great if you leave a comment with  your thoughts on the matter or any other input you may have. 

Now despite what Nina says and wishes, it will be difficult to erase the term Beanile lace from our tatting lexicon! And the terms above are not airtight categories! We all use them interchangeably.

Some of my recent bead tatting samples ... all are my own designs applied in different situations or techniques. See if you can guess them!  Since these are all prototypes, mostly tatted on the go, there are minor errors or untidiness. 
1 - Beads On / Over Picot
UPDATE (June2025): Fan Palm Motif/Pendant patternhttps://drive.google.com/file/d/16amEUnVT7ERSySRJqbMsj0af0Xu_MFsP/view

2

3

4

5 - 4-shuttle Interwoven SR braid Barbara Arango's variation -
UPDATE (July 2025): Muskaan's Interwoven Beaded Bracelet pattern.


At a future date I will try to share more details about each model, and a pattern wherever possible. At present I'm just relieved to write this post which has been pending for so long.

I have tried to keep in touch with Nina, as she requested, sending out an email every 4 to 6 weeks. However, I haven't heard back from her for several months now. Sending her my best wishes for good, manageable health. 
Read her interview here - http://www.beadsky.com/nina_libin.php

Many many thanks to Nina Libin for her continued help and support through the past 10 years and the inspiration her work continues to provide ! 

Friday, 21 February 2025

overlapping interests

Pin It now!

Barbara Arango first caught my attention on FB several years back when she tried to recreate a design at the back of a hand mirror into a tatted motif! Since then she has successfully recreated more fabric prints into tatted lace. And in order to get the desired effect, she comes up with her own solutions. Some of these are clever adaptations or applications of existing techniques, though they evolve from her own trials and errors, the fruit of her own labours, without realising prior existence.

My recent post showing a tatted ring made with her overlapping split rings generated quite some interest and a couple of requests to show the steps. With Barbara's permission, I am sharing my pictorials along with pics of a few projects where she used them ... see for yourself how wonderfully they can be applied. Some quick practice patterns are also included but let your imagination take you places! All you need to know is how to tat split rings!!!

In the end, for immediate comparison, I have also included my own 2016 effect where I first coined the term. Links to a snowflake using the effect are also listed at the very end.

💦💦💦💦💦💦💦

Abbreviations used: Sh=shuttle in hand; CTM=continuous thread method; SR=split ring; vsp=very small picot; ds=double stitch; Ch=chain; - = picot; + = join to; LJ=lock join to.

There is no need to reverse work. The motifs are worked from the front continuously in clockwise direction or from left to right.

A]  Overlapping  Split  Ring  Braid, Barbara Arango style (2019)

2 shuttles (CTM if working in single colour). For pictorial I used two colours - Sh1: pink, Sh2:cream - Anchor knitting cotton size 10.
1. SR1: 8 vsp 5 vsp 8 / vsp 5.
NOTE: While the first ring can be worked as a normal ring, I prefer to start with a SR here so that the shape of all rings remains the same.  
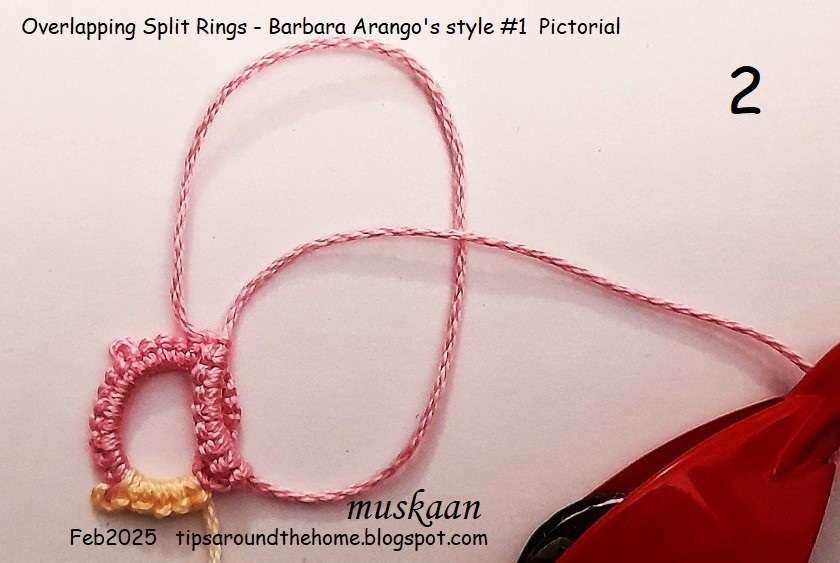
2. Start SR2 leaving a very small false picot.
SR2: 8 +(SR1) 5 vsp 8 / 5.
3. 2nd split ring tatted and is being closed.
4. Two split rings made and you can see the overlap between them.

5. Repeat SR2 for desired length, joining to previous ring as you go.

Practice Pattern for ring, bracelet or choker
6. Above is the braid I had shared in the post, using the same count. This can be started CTM as a normal ring, too.
After tatting a few more rings, I joined the last ring to the first, keeping the overlap consistent. Think of this as an ANKARS joining, positioning one ring above the other before joining. 
Pre-string beads to embellish as desired and use as jewellery.

I like the rectangular shape created by the rings with the above count. Got to thinking how even SRs would overlap. 
So, here I used 8ds between each vsp. Rings are rounder, but the overlap is consistent. To get them to overlap more, the overlapping segments need to be longer.

And here are Barbara's projects (2019-2022) using the braid style -

Notice how the rings get smaller?

The applique and embroidered designs on the left inspired her to recreate it in tatted lace and she used the overlapping SR braid effectively.

And to remind you of the practice pattern I shared in my previous post: 
💦💦💦💦💦💦💦

B]  Overlapping  Split  Rings , Barbara Arango style #2 (2021)

The same technique as above but used in a kind of onion ring formation, in one pass. Here Sh1 has cream and Sh2 has pink thread.  If working with single colour, use continuous thread.

1. SR1: 5 vsp 10 / vsp 5.

2. Leave a very small false picot and start 2nd split ring.
SR2: 10 +(SR1) 5 / 5. Switch shuttle
3. With Sh2 in hand, continue for chain...
Ch: vsp 10 - 10 LJ(SR1) 10 - 10 LJ(SR2). Switch shuttle
4. One motif of overlapping split rings made, all worked from the front.
5. Start 2nd motif with Sh1 in hand, leaving a very small false picot.
SR3: 5 vsp 10 / 5.
6. Repeat from SR2 onwards for desired length. 
TIP: Instead of a lock join  through the false picot, one can make an under-over or alligator join from the 2nd motif onwards.

Wouldn't this make a lovely bracelet or choker when embellished with a few choice beads!

And here's how Barbara applied it in a doily (2021) -
This is the doily inspired by a design behind a hand mirror. And to get the effect, she cleverly used this formation of the overlapping split rings! Since then she has created several more designs which you can view in the Just-Tatting FB group.
💦💦💦💦💦💦💦

 Overlapping Split Rings , Muskaan (2016)
It was back in 2016 that I first shared my nascent trial and coined the term Overlapping Split Rings. As you can see from the pic below, my method involves a braid of uneven split rings which are folded and joined back to create an overlap in the center. The SRs remain free in the center creating a distinct 3D and faux Celtic effect. 
SR-A: 9 / vsp 12.
SR-B: 4-1-1-4 / 12.
SR-C: 9 / 12.
Lock join to vsp of A.
One motif created. 

I used this motif to design a snowflake. Despite the immediate help of my trusted test-tatters, I haven't published the pattern here. I called it the Mutant Snowflake. Following are respective posts - 
We can also increase the number of rings to get polygonal shapes and interesting overlaps!

I realise this is a long post. However, if I didn't post now it would further get delayed. Thanks for your patience in reading this and hope you try and experiment with some of them.
💦💦💦💦💦💦💦

In case you wish to use leftover threads for trials, here are a couple of pictorials that will help you start knotless with a split ring without CTM
How to start a split ring with a picot - PDF: https://drive.google.com/file/d/1OS_9VdZSoWVSsOtQYT8UVb4nV6exmf2p/view
💦💦💦💦💦💦💦

Many thanks to Barbara for extending the boundaries! All in the eye of the beholder!

Friday, 24 November 2023

game antics

Pin It now!

 The saga continues from my previous post (https://tipsaroundthehome.blogspot.com/2023/11/flaky-antics.html). 

We chose the Antiks Snowflake pattern for our November 2023 game in our Endrucks FB group - Snowflake Me Endrucks. This name was chosen to indicate that we can try to adapt a pattern into a snowflake. We've derived snowflakes with E17, E3, E37, E31, E12, (see Snowflakes and Stars Directory)  but not as a game. We wanted to open the possibility of repeating the game in future with a different pattern.

Antiks Snowflake pattern (an E42 adaptation and extension by Muskaan) - https://drive.google.com/file/d/1U5J5sjuAA7D0qGPOGnK9RJ83MKdNkWSZ/view

We have a wide spectrum of skill levels in our FB group be it tatting or linguistic. Hence visuals become important. This flake has a few tricks. Ninetta offered to take stepwise pics! Hence we prepared an entire Supplement which has the detailed pictorial as well as a lot of other info, options, and links. 
  
Ninetta's version in Lizbeth 10, colour 686. Hmmm, I wonder how her fingers, used to dainty threads, worked on this large thread, LOL.

Ninetta also uploaded a video demonstrating how to make the Split Chain!
She had actually done a couple more videos but this was the best. This is the kind of backroom activity we are engaged in to provide a wholesome experience!

Like I said before, we are beginning to use this as a platform for learning and bridging any gaps in tatting knowledge, while making it easy and accessible to all levels of tatters.
The Antiks snowflake uses Split Chains to climb out, and we already have some tatters who learned to make them for this pattern after watching Ninetta's video!
However, in case a tatter does not wish nor have the time, there are a few optional paths one can employ to climb out to the next round.....
 
Three such options are explained in the Supplement and each of these can be worked with a ball and shuttle, just like for split chains : 
How to Avoid Split Chains -
1. Bare thread space with a double lock join - an extension of what Mlle Riego did in her Bunch of Grapes (1850) single shuttle pattern.   (yellow model)
2. Shadow Chains - Frau Endrucks (1920) method   (purple model)
3. A continuous spiral - this one is more visually organic. (green model)
Pattern for this Rose Motif is also included for practice.

The main pattern pdf as well as the Supplement has more tips and links, including to the original ANKARS site (https://ankars-club.ru/). It is worth reading, given the common misconceptions about this technique.

Coincidentally, in November, The Online Tatting Class (TOTC) also did a few classes on ANKARS. You can access their articles and patterns here - https://www.theonlinetattingclass.com/ankars-patterns. Their YouTube site - https://www.youtube.com/c/TheOnlineTattingClass

Many many thanks to Ninetta for all her contributions!

Thursday, 23 November 2023

flaky antics

Pin It now!

 This time I have a snowflake pattern to share. It is a mix of the old with the new; partly derived and partly original; and I thoroughly enjoyed putting it together, though it got entangled in some flakiness midways. 

I call it the Antiks Snowflake which is a play on words and techniques; a combo of antique, ANKARS, and the antics involved in getting it just right! At the center is a 6-point adaptation of Endrucks' pattern #42 but the outermost round is all mine.

My first trial and prototype combined. Blogged about it here - https://tipsaroundthehome.blogspot.com/2023/03/antics.html. I was so out of practice with split chains! By this point in the final round, I had decided on which tweaks to keep and was happy that it would lay flat. Ran out of thread but it had done its job.  

After a couple of weeks I returned to tat a proper model along with the pattern presentation. Notice anything? Sigh, yes, there are 8 repeats as in the original Endrucks' pattern #42! I had kept wondering why the arms were so squished in and after wasting my precious Lizbeth white, I stopped. Foggy head leads to a flaky flake.

And since I had sent the same pattern to Anita Barry for test tatting, she too, worked an 8-point flake! She used this to decorate a purse and it looks gorgeous against a deep blue background. She displayed it at  the IOLI Convention this year.

I chose a different Lizbeth size 20 and went to work again, this time making sure the pattern was for 6 repeats. 

Tatted one more, this time in Olympus size 40 to consolidate the pattern and presentation.

And I didn't expect her to, but Anita actually tatted a second model with 6 arms in Lizbeth metallic! Now that's commitment.
Her help was also valuable in arranging the written pattern more systematically and clearly. 

I sent an article with this pattern to the IOLI Bulletin for their Summer issue. However, since they ran out of space, it was published in the fall issue above - IOLI Bulletin, Fall 2023 edition (Oct 2023, Vol 44, N.1).
It is a very nicely laid out presentation and Liz, the editor is always very diligent and helpful.

Their back cover carries a pic of the flake, too!

Interestingly, both Lizbeth 20 and Olympus 40 work out to the same size!

Now, now, don't go too far. Thought I'm flaky enough to forget sharing the pattern link?! Ah, see, the saga continues and I will share the link in my next post. 
... to be continued...

Many many thanks to Anita and Liz!  Excellent collaboration.