Showing posts with label overlapping SR. Show all posts

Friday, 21 February 2025

overlapping interests

Pin It now!

Barbara Arango first caught my attention on FB several years back when she tried to recreate a design at the back of a hand mirror into a tatted motif! Since then she has successfully recreated more fabric prints into tatted lace. And in order to get the desired effect, she comes up with her own solutions. Some of these are clever adaptations or applications of existing techniques, though they evolve from her own trials and errors, the fruit of her own labours, without realising prior existence.

My recent post showing a tatted ring made with her overlapping split rings generated quite some interest and a couple of requests to show the steps. With Barbara's permission, I am sharing my pictorials along with pics of a few projects where she used them ... see for yourself how wonderfully they can be applied. Some quick practice patterns are also included but let your imagination take you places! All you need to know is how to tat split rings!!!

In the end, for immediate comparison, I have also included my own 2016 effect where I first coined the term. Links to a snowflake using the effect are also listed at the very end.

💦💦💦💦💦💦💦

Abbreviations used: Sh=shuttle in hand; CTM=continuous thread method; SR=split ring; vsp=very small picot; ds=double stitch; Ch=chain; - = picot; + = join to; LJ=lock join to.

There is no need to reverse work. The motifs are worked from the front continuously in clockwise direction or from left to right.

A]  Overlapping  Split  Ring  Braid, Barbara Arango style (2019)

2 shuttles (CTM if working in single colour). For pictorial I used two colours - Sh1: pink, Sh2:cream - Anchor knitting cotton size 10.
1. SR1: 8 vsp 5 vsp 8 / vsp 5.
NOTE: While the first ring can be worked as a normal ring, I prefer to start with a SR here so that the shape of all rings remains the same.  
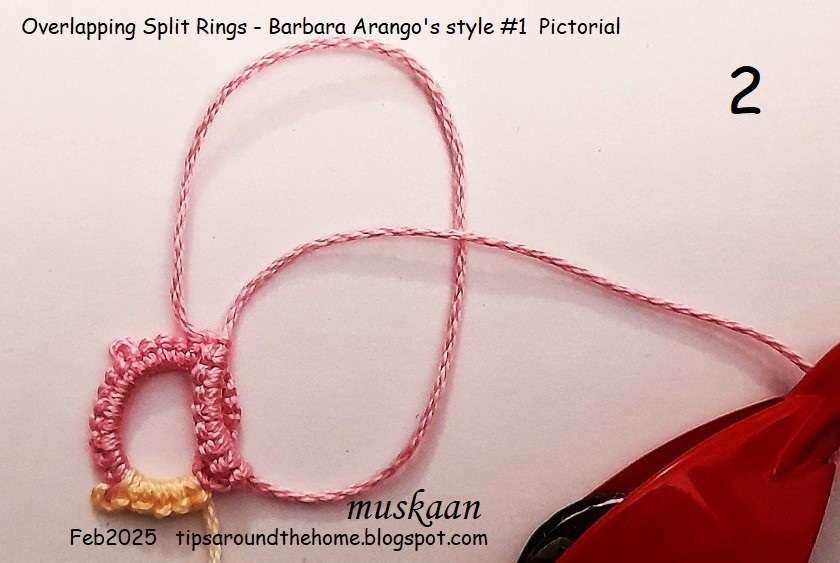
2. Start SR2 leaving a very small false picot.
SR2: 8 +(SR1) 5 vsp 8 / 5.
3. 2nd split ring tatted and is being closed.
4. Two split rings made and you can see the overlap between them.

5. Repeat SR2 for desired length, joining to previous ring as you go.

Practice Pattern for ring, bracelet or choker
6. Above is the braid I had shared in the post, using the same count. This can be started CTM as a normal ring, too.
After tatting a few more rings, I joined the last ring to the first, keeping the overlap consistent. Think of this as an ANKARS joining, positioning one ring above the other before joining. 
Pre-string beads to embellish as desired and use as jewellery.

I like the rectangular shape created by the rings with the above count. Got to thinking how even SRs would overlap. 
So, here I used 8ds between each vsp. Rings are rounder, but the overlap is consistent. To get them to overlap more, the overlapping segments need to be longer.

And here are Barbara's projects (2019-2022) using the braid style -

Notice how the rings get smaller?

The applique and embroidered designs on the left inspired her to recreate it in tatted lace and she used the overlapping SR braid effectively.

And to remind you of the practice pattern I shared in my previous post: 
💦💦💦💦💦💦💦

B]  Overlapping  Split  Rings , Barbara Arango style #2 (2021)

The same technique as above but used in a kind of onion ring formation, in one pass. Here Sh1 has cream and Sh2 has pink thread.  If working with single colour, use continuous thread.

1. SR1: 5 vsp 10 / vsp 5.

2. Leave a very small false picot and start 2nd split ring.
SR2: 10 +(SR1) 5 / 5. Switch shuttle
3. With Sh2 in hand, continue for chain...
Ch: vsp 10 - 10 LJ(SR1) 10 - 10 LJ(SR2). Switch shuttle
4. One motif of overlapping split rings made, all worked from the front.
5. Start 2nd motif with Sh1 in hand, leaving a very small false picot.
SR3: 5 vsp 10 / 5.
6. Repeat from SR2 onwards for desired length. 
TIP: Instead of a lock join  through the false picot, one can make an under-over or alligator join from the 2nd motif onwards.

Wouldn't this make a lovely bracelet or choker when embellished with a few choice beads!

And here's how Barbara applied it in a doily (2021) -
This is the doily inspired by a design behind a hand mirror. And to get the effect, she cleverly used this formation of the overlapping split rings! Since then she has created several more designs which you can view in the Just-Tatting FB group.
💦💦💦💦💦💦💦

 Overlapping Split Rings , Muskaan (2016)
It was back in 2016 that I first shared my nascent trial and coined the term Overlapping Split Rings. As you can see from the pic below, my method involves a braid of uneven split rings which are folded and joined back to create an overlap in the center. The SRs remain free in the center creating a distinct 3D and faux Celtic effect. 
SR-A: 9 / vsp 12.
SR-B: 4-1-1-4 / 12.
SR-C: 9 / 12.
Lock join to vsp of A.
One motif created. 

I used this motif to design a snowflake. Despite the immediate help of my trusted test-tatters, I haven't published the pattern here. I called it the Mutant Snowflake. Following are respective posts - 
We can also increase the number of rings to get polygonal shapes and interesting overlaps!

I realise this is a long post. However, if I didn't post now it would further get delayed. Thanks for your patience in reading this and hope you try and experiment with some of them.
💦💦💦💦💦💦💦

In case you wish to use leftover threads for trials, here are a couple of pictorials that will help you start knotless with a split ring without CTM
How to start a split ring with a picot - PDF: https://drive.google.com/file/d/1OS_9VdZSoWVSsOtQYT8UVb4nV6exmf2p/view
💦💦💦💦💦💦💦

Many thanks to Barbara for extending the boundaries! All in the eye of the beholder!

Friday, 14 February 2025

Vee bit late

Pin It now!

This little flower was tatted several days back and I was going to  post the pattern along with a pictorial for overlapping split rings. But that's going to take a couple more days to write the post and ink the pics. So this prototype pattern is for you to play with on Valentine's Day. A little late, but flowers are the flavour year round! 

Tatted in Anchor size 20 (similar to Lizbeth 10), the flower itself is only about 1.5cms high and 2cms wide. The rest is stem with leaves.

The idea came to me while preparing a pictorial for Barbara's overlapping split rings. These form the petals, joining each petal to the previous one and the last to the first. It is a simple picot join just like when you do stacked rings in ANKARS keeping one ring above the other.
If you don't want to knot the two threads at the start, these resources might be handy - 

Little 3D Flower
a prototype pattern by Muskaan © Feb2025

Abbreviations: SR=split ring ; vsp=very small picot; fhs=1st half-stitch; -=picot; shs=2nd half-stitch.

Start with two colours wound in two shuttles. Shuttle 1 - petal colour; Shuttle 2 - green colour.
With shuttle 1 in hand or as the active shuttle, start the first split ring ... (refer image above)

SR1: 9 vsp 3, 4fhs - 4shs, 3 vsp 9 / vsp 3.
SR2: 9 +(to SR1) 3, 4fhs - 4shs, 3 - 9 / 3.
Repeat SR2 two more times.
SR5: 9 +(to SR4) 3, 4fhs - 4shs, 3 +(to SR1) 10 / 3.

NOTE: I made 5 petals (5th not seen in above WIP image) but in the 5th one, I increased the stitch from 9 to 10 in latter half so that it overlapped better. Adjust to ensure the overlap remains consistent. Join 5th petal to the 1st one, arranging the overlap consistently.

FYI: (4fhs, p, 4shs) is the node stitch which creates a dimple in the ring.

Do not cut threads, continue for stem. You can string or join a bead to the center of the flower using any one the threads. 

Stem is a Josephine or spiral chain. Use whichever half-stitch you wish.
NOTE: For leaves I used the Petal Ring by Maimai Kaito (2016) Instagram, YouTube, following Lesson #178 by Karen Cabrera Unfortunately it was difficult to photograph the curvature and sharp tip of the leaf though it is visible in some pics.
Choose your own stitch count for the leaves. The upper leaf is slightly smaller than the lower one.
Continue the stem for desired length.

I see a lot of scope for improvement but that, too, will have to wait for another day. Feel free to tweak and improve and show me what you come up with! I went with tinted pink for a rose or cherry blossom. Which colour and flower would you choose to tat with?

Related Posts -

Thursday, 30 January 2025

gratitude

Pin It now!

 Over the past year or more I have been in touch with several tatters be they domain experts, designers, originators, tatting teachers/mentors. They have helped to explain nuances or clarify concepts, particular techniques, which in turn has aided me in hopefully improving the presentation and authenticity of information in the Glossary (and an occasional chapter item) for the book, 'Six T's of Shuttle Tatting' by Net Best which I have the pleasure of editing (I will write a separate post giving more details about the book). 

I will tender a formal thanks with each name when the book is complete (including in the book itself). Yet stepping into this new year it just feels right to acknowledge their general contribution and gracious and prompt help. To date not a single person refused to share their knowledge and understanding and each of them has been prompt in responding. Some have graciously sent me pic(s) of their work which is now included in the book. 

There are a few who I have pestered more frequently, though. Obviously my dear friends Ninetta Caruso and Anita Barry but also Judith Connors whose expert guidance is always welcome.

Angela Edwards is the late author's friend who is doing all the formatting, proofing, and compiling the master copy for the book. She has been a constant and enthusiastic companion in this journey, even acting as a sounding board and converting my UK English, LOL. Without her help it would've become too overwhelming.  

💖💖💖

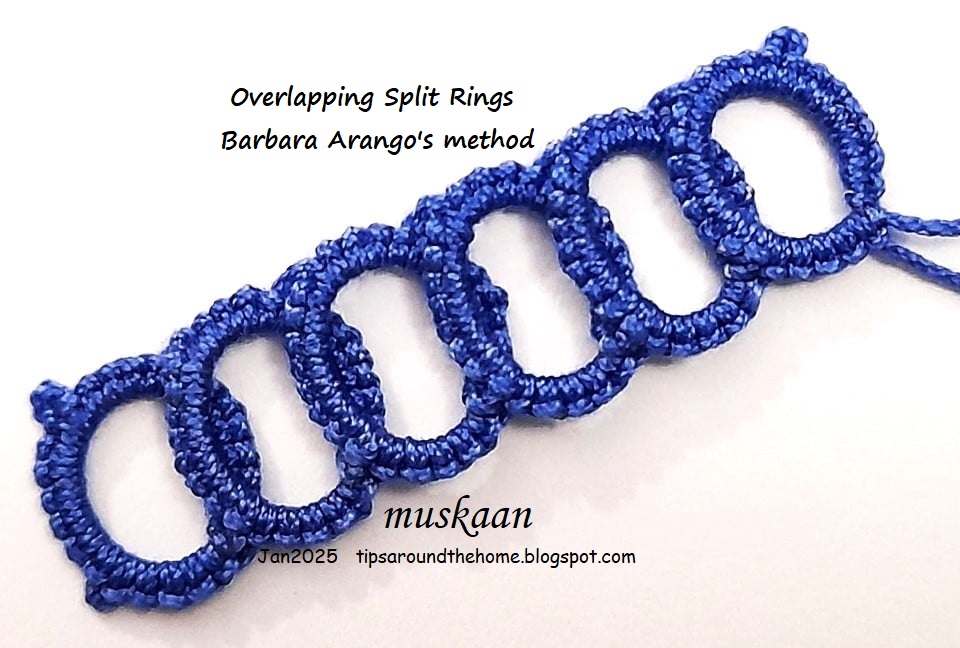
Bit of a visual treat before I proceed ... above is Barbara Arango's method of making Overlapping Split Rings. She tends to join them (where I had left them unattached ; and a snowflake) and has used them beautifully in several of her designs. Look for her in the FB group, Just-Tatting. 

Above left was my first trial and I enjoyed it so much that I kept going till I got this ring, joining back to the first. I want to add some beads but haven't been able to yet .... will post again when I finish.

💖💖💖

Laurel McFarlane noticed that several links in my past posts no longer worked, especially from Georgia's classes. She volunteered to send me the correct links, often delving into the wayback machine, etc., and diligently compiled them over several months! I am ashamed to say that except for a few I haven't been able to update them all yet. So in the interim, if you come across any, please ask. 

Of course Ninetta has been a huge support with the Endrucks 1920 Project and words fail to express how much I can rely on her and her friendship. I had the good fortune to make several new friends through this project even during 2024.

💖💖💖

During the year, I was also humbled by several gifts during the year, some of which I blogged about, but some slipped by. These included tatted coasters from Bandini, books from Ninetta & Lilas Lace, newsletters/bulletins from Ring of Tatters, IOLI, and a surprise from Judith - their last printed newsletter, another surprise pattern gifted by Edda Guastalla, and threads from Madhur. 

All these goodies do not diminish the joy (and some trials) from learning 'new' tatting techniques, comparing and contrasting them, sharing pictorials, and taking up challenges. In fact my next two posts include my pictorials and explorations. Stay tuned .... what is a blog without readers, huh?!

💖💖💖

A Huge Thanks to all! 

Sunday, 29 September 2019

the jinx of 13

Pin It now!

I don’t much care for the supposed jinx of this being the 13th flake ;-P But this back from the old snowflake/star has me stumped for a weird reason. It uses my Overlapping Split Rings effect. More effects here, including a square arrangement.
MUTANT  SNOWFLAKE - 
design evolution
Here’s some history –
1. This was a trial prototype from 2016 in Anchor 20. At 5 points/arms, it lays flat.

2. Elaborating on the idea, I converted it into a 6-point flake using Anchor Pearl cotton size 8. There was some cupping. I left it in my tatting box overnight and in the morning, it was pretty flat, and more so after some quick blocking.

I went back to my Jottings about cupping/ruffling and worked in the corrections in next trial... 
Basically cupping occurs when outer round is tight. To avoid it, decrease inner round or increase outer round.

3. Wondering how it would look in a single colour, I chose Anchor 20, but the center rings are 1 stitch short (to reduce the center and tackle cupping). Major cupping which did settle after tugging and blocking!
The split rings have 1 extra stitch and this translated into a slightly different more roundish overlap.

4. Fell back on the maroon pattern using Lizbeth 20 threads. And guess what, I had to make 8 repeats for the flake to lie flat by itself!

Pearl cotton differs in it’s looser twist when compared to Lizbeth, but they tat up to the same final measurements. So what just happened?!!

I was ready to share the 8-armed snowflake which is part of the reason it is called Mutant. Seems like the thread and picot characteristics can lead to anywhere from 5 to 8 arms ;-D
It is a mutant in terms of it’s faux Celtic effect. Not true Irish, a bit of a freak ;-P

The online tatting world has blessed me with some excellent friends. Jane McLellan came to my rescue recently; this time is was Ninetta Caruso & Anita Barry.

They sent me possible reasons, solutions, options and enthusiastically volunteered to tat the flake, too. They were ready to count from the image, but I managed to quickly type them some shorthand notations. They will be doing it today.

Would you like to read what these experienced designers/teachers have to say? It is a design bonanza - insightful designing tips, and if you are interested, I’ll share in my next post.

So, what do you think – would you like to tat this 8-armed snowflake or are you a stickler for 6 dendrites?!

UPDATE (Oct 2025) - Unfortunately I haven't yet been able to put together a post about our joint experience, observations, and the final pattern. However, Ninetta had shared a pic of her lovely, vibrant version here - https://ninettacaruso.blogspot.com/2019/10/distractions.html 

Wednesday, 28 February 2018

I love tatting 3D

Pin It now!
This month’s task was laid out by Renata – my favourite kind of tatting – 3D !!! She has listed some very inspiring projects and I wanted to tat them all !!! Participants have already sent in quite a few completed projects. My apologies for not being able to comment on each blog. I’ll wait to catch up in the round-up.

As soon as I read the task, my mind started building up ideas – it was getting difficult to choose! Time (the 4thD?) always sprints many paces ahead of me. This month it went even faster ;-P 
I have ended up with a medley of past, but as yet unshared, projects.

I Love Tatting / Kocham frywolitke – February 2018
3-Dimension 


While rummaging for this star flower medallion (bottom right), I came across an old edging. It is actually the center of Renulek's 2014 Spring doily. After 7 rings, I switched direction and repeated thus getting 4 alternating segments (see collage below). At the time I was trying to create an edging but it went awry ;-P

3D Carnation
It coiled easily into a possible flower, though as in the one against black background. Intending to make that 'rose' shape, I needled green thread through all the picots. When pulling tight, I liked the carnation-style shape much better! Worked a 3-sepal calyx (tubular), then carried on down encapsulating the thick threads, with a spiral chain and added floating twisted picots for leaves. For the bottom pair I twisted 2 threads together, then hiding one again.


3D Lavender trial
Next is the overlapping onion rings trial. many of you may recognise my inspiration - a pin from ameba.jp on pinterest.
I think it came out okay, considering it the only trial I did. Need to make time to practice and make more.

3D Star Flower trial/prototype
Remember my overlapping split ring effect I shared here? This is a 5-sided medallion that emerged from that motif.
The later repeats have the right stitch count to show a balance between overlap and negative space. 
Obviously need to change the colours used. But I also want to try it with 2 thread sizes. Would a thinner thread show a better effect? This looks too bulky.


3D Kayak trials
This was a request from a kayaking enthusiast (some of you may be able to identify who ;-P). I started it in early 2015! 
Again, to create a 3D effect, I used overlapping split rings. Notice the single curled ring on the right ? And a twisted picot for the pointed end. I wanted to come back with a straight line to show depth, once the body was completed.
Thinking I had a good idea of the process, I started afresh with the tinted blue. This time I used 4 overlapping split rings for the broadest center and also flipped the overlapping SR. 
Unfortunately this is as far as it sailed ;-( Haven't had time to pick it up again.
I still think the overlapping SRs have quite a potential to create any geometric shape with faux Celtic effect.


Hope these will be accepted by the talented Renata & Justyna. I do love 3D tatting - all my early patterns are 3D freeform! 
And the book from from which this pic was taken .....


happy tatting everybody J