Showing posts with label Bandini. Show all posts

Friday, 14 March 2025

lets go clubbing

Pin It now!

 aha, don't get the wrong idea! The reference is to clubbing of laces to create a new version! And being Holi, it's an excuse to play and party with friends today.

So, Bandini approached me with her pattern to do the presentation and also share with the community through my blog and I couldn't say no. She very cleverly joined two edgings on either side of a central braid giving rise to a broad tatted lace that looks quite different from its individual constituents. 

Lace Club Border by Bandini Maisheri (2025) -https://drive.google.com/file/d/1aVWxNtGBoRlK9Hmx3UScuKHMvillA-4o/view

This is my small WIP sampler in size 40 showing the central SR braid and one edging joined to it. 
The same edging is also joined on the other side of the braid in the border.
Except for the SR braid which requires two shuttles, the edgings can be worked with a shuttle and ball.

And here the 3rd edging is attached to the 2nd one for a medium-sized border.
Again this is done on the other side as well.
But you get the idea! You can pick and choose as many or as few edgings for the desired width.
Play with tatting in more colours and beads and this widens the canvas even further! More in tune with colourful Holi ;-D
You can even change the sequence of working each row to suit your preference. I chose a sequence which was simplest to present as a diagram and text.
 
She tells me that her mother has already tatted 9 meters of this border, no doubt for a saree!
And I like the term she used - 'clubbing'!

Another fun aspect is that each can be a standalone edging, too! So we get a LOT more in this pattern than a single broad border!

All details are in the PDF (click to download) - Lace Club Border by Bandini Maisheri (2025) - https://drive.google.com/file/d/1aVWxNtGBoRlK9Hmx3UScuKHMvillA-4o/view
Hope you enjoy playing with it!

Many many thanks to Bandini for graciously sharing her cleverly clubbed pattern !

Thursday, 30 January 2025

gratitude

Pin It now!

 Over the past year or more I have been in touch with several tatters be they domain experts, designers, originators, tatting teachers/mentors. They have helped to explain nuances or clarify concepts, particular techniques, which in turn has aided me in hopefully improving the presentation and authenticity of information in the Glossary (and an occasional chapter item) for the book, 'Six T's of Shuttle Tatting' by Net Best which I have the pleasure of editing (I will write a separate post giving more details about the book). 

I will tender a formal thanks with each name when the book is complete (including in the book itself). Yet stepping into this new year it just feels right to acknowledge their general contribution and gracious and prompt help. To date not a single person refused to share their knowledge and understanding and each of them has been prompt in responding. Some have graciously sent me pic(s) of their work which is now included in the book. 

There are a few who I have pestered more frequently, though. Obviously my dear friends Ninetta Caruso and Anita Barry but also Judith Connors whose expert guidance is always welcome.

Angela Edwards is the late author's friend who is doing all the formatting, proofing, and compiling the master copy for the book. She has been a constant and enthusiastic companion in this journey, even acting as a sounding board and converting my UK English, LOL. Without her help it would've become too overwhelming.  

💖💖💖

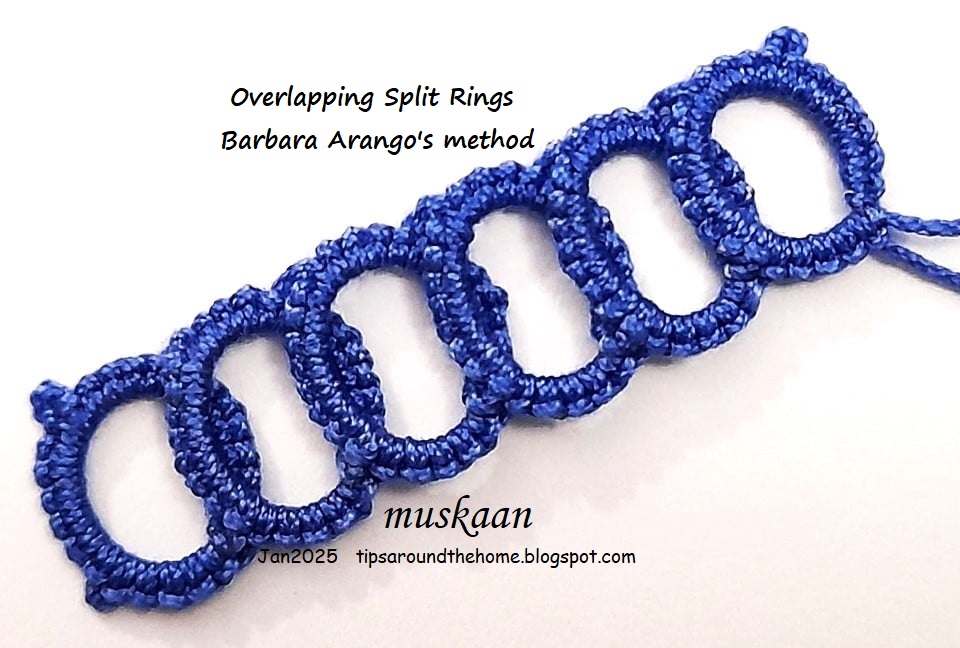
Bit of a visual treat before I proceed ... above is Barbara Arango's method of making Overlapping Split Rings. She tends to join them (where I had left them unattached ; and a snowflake) and has used them beautifully in several of her designs. Look for her in the FB group, Just-Tatting. 

Above left was my first trial and I enjoyed it so much that I kept going till I got this ring, joining back to the first. I want to add some beads but haven't been able to yet .... will post again when I finish.

💖💖💖

Laurel McFarlane noticed that several links in my past posts no longer worked, especially from Georgia's classes. She volunteered to send me the correct links, often delving into the wayback machine, etc., and diligently compiled them over several months! I am ashamed to say that except for a few I haven't been able to update them all yet. So in the interim, if you come across any, please ask. 

Of course Ninetta has been a huge support with the Endrucks 1920 Project and words fail to express how much I can rely on her and her friendship. I had the good fortune to make several new friends through this project even during 2024.

💖💖💖

During the year, I was also humbled by several gifts during the year, some of which I blogged about, but some slipped by. These included tatted coasters from Bandini, books from Ninetta & Lilas Lace, newsletters/bulletins from Ring of Tatters, IOLI, and a surprise from Judith - their last printed newsletter, another surprise pattern gifted by Edda Guastalla, and threads from Madhur. 

All these goodies do not diminish the joy (and some trials) from learning 'new' tatting techniques, comparing and contrasting them, sharing pictorials, and taking up challenges. In fact my next two posts include my pictorials and explorations. Stay tuned .... what is a blog without readers, huh?!

💖💖💖

A Huge Thanks to all! 

Thursday, 18 January 2024

neovintage beauties

Pin It now!

A few days back this beautiful gift arrived from Bandini Maisheri who I've known for a few years through FB and our collaboration on the Bandhan Butterfly pattern. Her mother, Harsha, is the main tatter (Harsha's Creations). You might've come across her extensive works in some of the FB groups and on Instagram. 

Like these doilies above, her USP is combining and arranging vintage patterns into new beauties. And doing what is necessary to fit the purpose, eg. adding a corner for an edging or mat, and so on. The gift was a commemoration of 40 years of Harsha's tatting journey and an appreciation of some little help I might've provided to them whenever approached. I love the coasters and they immediately made their way to my dining table!

Now I think these coasters are unique. We've all seen tatted lace around or encased within acrylic sheets for coasters, key chains, etc, like the one I received from Anita. This set, however, is customized acrylic with a tatted doily covering only the top surface. The doily fits snugly and can be removed, washed, or replaced. 

Curious, I asked my friendly group - Anita Barry and Ninetta Caruso for an international perspective, and Madhur Dadlani for an Indian perspective. Madhur admins a WhatsApp group of talented Indian tatters who also sell their creations and she said she'd ask them if anyone has made something similar. Neither of the three have come across something quite like this and do consider it to be truly unique!

What about you? Have you come across tatted lace covers for acrylic mats? Or something along the same lines? Do tell.

There's a ton more tatted stuff they do and sell, including complete table linen sets, saree and blouse laces, bags, scarves, etc. etc. Mind you I am not mentioning Harsha's Creations for any kind of returns. It was a way to satisfy my curiousity and appreciate the immense work Harsha has done. Wishing her several more decades of happy tatting and spreading beauty from old to new.

Many many thanks, Bandini and Harsha, for this wonderfully unique handmade gift, and to my friends who responded promptly with their thoughts and observations.

Tuesday, 27 October 2020

more than a butterfly

Pin It now!

I have finally completed the pattern for Butterfly Bandhan in pdf. But it is so much more than a butterfly as you shall see, scrolling down .... 

Butterfly Bandhan 

jointly designed by  muskaan  &  Harsha Creations


Butterfly Bandhan Pattern pdf
- click to download

Pattern is for a single colour, one-pass pattern. Hence there is a bit of mindfulness required, especially for first try. I tried to break the pattern into blocks with respective diagrams, to make it easy to follow. Not too happy with my diagrams (hand-sketched), but will have to do for now. I was going to get it test-tatted, but life got in the way and instead of delaying further, I went on a roll working non-stop since yesterday. 

This is the 2-colour model by Bandini, worked in separate pieces. A much easier option if you don't mind hiding tails, or find the one-pass method confusing. With this method, one can make all 4 rings a different colour!

Above is yet another working alternative. This 2-colour version is worked in one-pass, using 2 shuttles. It uses lots of Lock Join Plus techniques (SLT, reposition/TwW, RJ, etc) to position colour as desired.
This was one of my trials, hence not exact.

If the instructions are followed, threads/shuttles will be in the correct position for next element. However, tatter is free to choose their own method and techniques.
As detailed in this post, the butterfly would have remained cocooned as a potential idea if Bandini of Harsha Creations hadn't taken it upon herself to start with the early trials of converting 4 separate motifs into a proper butterfly! I cannot thank her enough <3

Future Ideas !
So how is this motif more than merely a butterfly? 
Check out how well these motifs work, creating different shapes, depending on where adjacent motifs are joined.

A broad Straight Border or edging if top wings are joined at 2 picots.

A Bookmark when adjacent butterflies are joined at single picot between top wing of one and bottom wing of other.

A Circular Collar or Doily when top wing and bottom wing of adjacent motifs are joined at single picot.

A Square Motif or Coaster when 2 picots of bottom wings are joined. Of course, we need a fourth butterfly to complete the square, but notice the interesting negative design it will create in the center? A few smaller motifs can fill in any spaces for a larger square and fabric.
 
  • Adaptation into a Maple Leaf - in the earlier post Linda Reiff saw a possible leaf and this is my first trial adding a motif in the center of the same purple butterfly. (the green is merely playing around with the photo effects ;-D)
Although it all lays flat, I feel the 3 chains are incongruent with the 4-chain 'wings'. I received some valuable feedback from experienced friends, and will try it again with 5 chains.
Meanwhile Bandini tells me she will be finishing her leaf version in a couple of days - eager to see what she does again!
  • Adaptation into a Peacock - When viewed from this side, does it not look like it could become a dancing peacock?! Of course, a lot more work is required, including shortening the 'legs'.
  • A Tree - And with a tiny bit of adjustment, the antennae could become the trunk of a tree, obviously in the right colours!!!
  • Angel Wings! - Grace Tan noticed these.

Butterfly Bandhan Pattern pdf - click to download
I invite you to work the butterfly alone, or to make any of the ideas displayed here. Please don't forget to show me what you've done - I could add your model as part of the pattern instead of working them all myself ;-P

Saturday, 10 October 2020

bonding with butterflies

Pin It now!

Together, we tamed the butterfly - Bandini and I !!!

The story goes back to July when I posted the Lock Join Plus series... 

We spotted a potential butterfly in the 4 individual motifs and Bandini Maisheri on FB took up the challenge to create a proper tatting model/pattern. She and her mother both tat and sell their wonderful work under the name Harsha Creation. Do check out the range of their tatted lace appliqued on purses, tableware, hankies, etc. - some are spectacular, some are elegant.

These are the 4 models she tatted, tweaking and improving with each as is clearly visible.


Each of the models has 4 white filler rings in the wings tatted separately and then the body and wings were worked around. The lovely antennae are tatted and joined later. 
This makes the pattern easier to tat, using up scraps (in multiple colours, if desired) for the individual rings, but more tails to hide.
I can't thank her enough for all the work she did in breathing life into the butterfly! If it wasn't for her initiative and perseverance, this project would've remained in the ever-growing to-do-someday pile. 

We finally agreed on her 3rd version and she sent me the count for testing. I've taken a break from the doily to test this (it's been waiting for over a week!) and it was quite an enjoyable experience tweaking and improving the models further. Hubby weighed in with his ‘expert’ comments, too! We are all now pretty happy with this. 

I started with the 2-colour version, working with 2 shuttles following the exact counts Bandini sent. It can be a good practice pattern for the various Lock Join Plus techniques
All 4 methods (LJ, Reposition, SLT, Reverse Join) were used judiciously to get the colours in place, yet work it all continuously.
collar, necklace, or doily anybody?!

Next came the pink model with certain tweaks and finally the purple one to everybody's satisfaction. That does not mean there aren't more tweak/decorative variants running through my head ;-D But everything will have to wait.

Named it Butterfly Bandhan aka Butterfly Bonding. 'bandhan'  means bonding in Hindi and it not only reflects the bonds that got this butterfly flitting, but also sounds similar to my co-designer's name. And if you are interested, we call butterfly 'titli' with soft sounds (a soft 't' sound does not exist in English).

Pattern for the purple one will be shared as soon as I complete the presentation. Will you be interested in tatting it? Please leave a 'Yes' otherwise I can spend that time on other projects ;-P
Love to hear your thoughts, which model(s) you prefer, etc. .....