Showing posts with label Edda Guastalla. Show all posts

Thursday, 30 January 2025

gratitude

Pin It now!

 Over the past year or more I have been in touch with several tatters be they domain experts, designers, originators, tatting teachers/mentors. They have helped to explain nuances or clarify concepts, particular techniques, which in turn has aided me in hopefully improving the presentation and authenticity of information in the Glossary (and an occasional chapter item) for the book, 'Six T's of Shuttle Tatting' by Net Best which I have the pleasure of editing (I will write a separate post giving more details about the book). 

I will tender a formal thanks with each name when the book is complete (including in the book itself). Yet stepping into this new year it just feels right to acknowledge their general contribution and gracious and prompt help. To date not a single person refused to share their knowledge and understanding and each of them has been prompt in responding. Some have graciously sent me pic(s) of their work which is now included in the book. 

There are a few who I have pestered more frequently, though. Obviously my dear friends Ninetta Caruso and Anita Barry but also Judith Connors whose expert guidance is always welcome.

Angela Edwards is the late author's friend who is doing all the formatting, proofing, and compiling the master copy for the book. She has been a constant and enthusiastic companion in this journey, even acting as a sounding board and converting my UK English, LOL. Without her help it would've become too overwhelming.  

💖💖💖

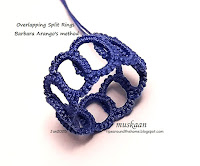
Bit of a visual treat before I proceed ... above is Barbara Arango's method of making Overlapping Split Rings. She tends to join them (where I had left them unattached ; and a snowflake) and has used them beautifully in several of her designs. Look for her in the FB group, Just-Tatting. 

Above left was my first trial and I enjoyed it so much that I kept going till I got this ring, joining back to the first. I want to add some beads but haven't been able to yet .... will post again when I finish.

💖💖💖

Laurel McFarlane noticed that several links in my past posts no longer worked, especially from Georgia's classes. She volunteered to send me the correct links, often delving into the wayback machine, etc., and diligently compiled them over several months! I am ashamed to say that except for a few I haven't been able to update them all yet. So in the interim, if you come across any, please ask. 

Of course Ninetta has been a huge support with the Endrucks 1920 Project and words fail to express how much I can rely on her and her friendship. I had the good fortune to make several new friends through this project even during 2024.

💖💖💖

During the year, I was also humbled by several gifts during the year, some of which I blogged about, but some slipped by. These included tatted coasters from Bandini, books from Ninetta & Lilas Lace, newsletters/bulletins from Ring of Tatters, IOLI, and a surprise from Judith - their last printed newsletter, another surprise pattern gifted by Edda Guastalla, and threads from Madhur. 

All these goodies do not diminish the joy (and some trials) from learning 'new' tatting techniques, comparing and contrasting them, sharing pictorials, and taking up challenges. In fact my next two posts include my pictorials and explorations. Stay tuned .... what is a blog without readers, huh?!

💖💖💖

A Huge Thanks to all! 

Thursday, 11 August 2022

saTATisfaction

Pin It now!


Another productive day of tatting, foregoing my exercises and the newspapers, shhhh ;-P

The Ashoka Chakra in the center of our flag actually has 24 spokes. Using Anchor Pearl Cotton size 8, I was happy to get 12 in cabochon tatting. After all my tatted flag is an artistic symbolism, though proportions are maintained.

Started the morning by working on the 3rd wave and completed it by afternoon, despite all chores. Since I had the pattern jotted down, it was easy and quick to tat.

All 3 waves together.
In the evening, the waves as well as the leaves were all blocked. 

And this is how they will be arranged, with some overlap. Difficult to capture in a photograph.

And this is how I did worked tatting around the coin. A spilt ring braid.
SR1: 3 - 6 - 3 / 3 - 6 - 3.
All subsequent split rings -
SR2: 3 + 6 - 3 / 3 + 6 - 3. 
The final ring I worked as a regular ring, joining back to the first SR.

Has this been done before? I seem to have lost track of so many things.

UPDATE: I've been told that Edda Guastalla published this SR braid method of encapsulation in a book. She did it on an large gem (like in ice drops). 

And here is how I finished off the coin to get a smooth edge https://tipsaroundthehome.blogspot.com/2022/08/har-ghar-tiranga.html


I have revealed each step of design and progress over the last several days. Now we'll all have to wait and see how they come together finally!

However, before that, there is a fun game you are all invited to .... I will post about it tomorrow.

***************

Those who subscribe to my blog via email, have you been receiving the email notifications for each post? The last one I received was the July 24th post!

Friday, 4 September 2020

two clever

Pin It now!
Too clever by half! Definitely not. They are truly two very clever tatters, teachers, designers and keep inspiring us with their creativity - Ninetta Caruso and Edda Guastalla!

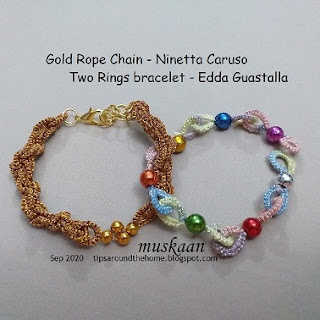
Ninetta Caruso's Gold Rope Chain - my Rose Gold version

For my interlocking split ring and rope chain pictorials, I had used thick thread. Further, in order to avoid a bare thread spanning the side of each ring, I left the bare thread space shorter than required. Both factors created a gentle spiral, not the rope chain effect in Ninetta's original. I Had to satisfy my scientific curiosity, hence a quick tat with metallic thread.

TIP : The length of bare threads between successive rings determines the amount of twist; and the visible effect can range from a gentle wave to a tight woven rope.

Stringing beads on 3 strands of Anchor metallic embroidery thread that kept splitting was taking too much time. Hence no seed beads.
Much happier with the twisted effect, though could've been better. These are certainly addictive and I stopped only when the shuttles ran out. My fear about the thread were unfounded - the rings closed easily - and only 1 or 2 strands could have worked smoothly as well.

Edda Guastalla's Two Rings (Interlocking) Bracelet/Chain (catenella 2 anelli)
I was very impressed with Edda Guastalla's easy interlocking rings! Such fun, too, besides being practical....
  • no need to string beads, except the one (or more between the twin rings).
  • can use up leftover thread lengths to empty shuttles
  • no need to hide tail ends
  • only one shuttle required
  • easy travel or 'handbag' tatting project
  • several variations possible - colour, size, symmetry, etc. 
  • TIP : eg. One can create a diamond shape instead of simple straight chain. Start with twin rings, then make 2 sets of twin rings within the same (these could have an asymmetric stitch count to move the edges further apart), and a 4th set within both 2nd & 3rd sets to bring them together again.
Red Rose metallic thread size 20. Used up several leftovers that were at least up to 25" long.

TIP
: These twin rings can be used effectively as connectors! Remember these curled ring connectors (CRCs) which are essentially the same twin rings curled around motifs to link them? Instead of curling the rings, one can simply insert thread to make the twin rings.

Two lovely addictive interlocking rings! Vastly different in execution and skills, yet brilliant in conception and creativity. Many many thank to both ladies.


The rope chain reminded me of the double helix structure (closer to the quaternary structure) which led me to these books ...

A team that revolutionised the scientific and medical world comprised James Watson and Francis Crick when they unraveled the DNA structure based on Maurice Wilkins' results. Of the 3, the former 2 are more commonly credited.


Francis Crick. Discoverer of the Genetic Code by Matt Ridley
This paperback is a 2008 Harper Perennial edition of the original 2006. It is a rare insight into the life, work and thoughts of Crick. An engaging read, as are most of Ridley's books.

A Passion for DNA. Genes, Genome, and Society by James D Watson
2000, Oxford University Press. This paperback, with high quality paper, is a collection of Watson's lectures, essays, commentaries on diverse topics and the wider impact and implications of the discovery. 
Having already read Craig Venter's autobiography, it was interesting to compare notes from both perspectives. 

I found Watson was the more conventional and conservative one compared to Crick, though I admired the latter's principles and highly intelligent mind.

Rummaging for all these books brings bittersweet memories - the happy hours spent reading and discussing (hubby & I love Genetics!), but the sadness that I cannot now recall all details. A poor memory that needs huge refreshers ;-D

Thursday, 27 August 2020

locked in play

Pin It now!

Continuing from my previous post where 2 methods of Interlocking split rings (chain maille style) were uploaded. Again, I follow Ninetta's post to share the 3rd method based on Kathy Niklewicz's method and then its further application in the tatted rope chain.

I first tried Kathy's single-shuttle IR method (along with other methods) in 2014 here. Ninetta took it a step further by using it to create a truly 3D effect. This variation is photographed stepwise below.

C. Interlocking Split Rings - Chain Maille

ref : Kathy Niklewicz's Interlocking Rings and Ninetta's Method 3 variation

Red is shuttle 1 with cream thread ; yellow is shuttle 2 with variegated thread.
All split rings are 8/8.

 
C-1 : Unlike the earlier methods (refer previous post), in this case we can safely close the split ring. 
C-2 : Through the closed ring, insert a hook from the back and hook it to shuttle1 thread.

 
C-3 : Pull a loop front to back through the ring, as seen.
C-4 : Pull out enough of the loop and note the position of each thread(s). 

 
C-5 : Wrap the loop around your hand just as in the earlier methods. The static end of loop is is to the left (where stitches will start) and the moving shuttle part goes around, emerging toward the right.
C-6 : Leave some bare thread (indicated by hook) and start tatting the stitches for 1st side of SR.

 
C-7 : Wrap loop around hand for 2nd side of SR; leave some bare thread (notice the yellow segment) and begin unflipped stitches. Note that the 2nd shuttle thread is within the loop.
C-8 : Stitches complete on both sides.

 
C-9 : Close split ring. 
C-10 : Repeat steps to make as many interlocked split rings as desired.

The advantage of this method is that one does not have to remember to insert the shuttle before closing ring. The disadvantage is that bare thread can be visible from some angles.
A very small variation of this method is used to create the rope chain.

Jane McLellan has used the same method to create a chain maille with a single shuttle and regular rings.
Ruth Perry probably pioneered the modern technique and has created beautiful effects using only chains or 4 shuttles where the bare thread can be eliminated. Teri Dusenbury has instructions for the same using 2 steps and finger tatting here.
This method of pulling a loop through a previous element to tat a ring has also been demonstrated by Patty Dowden to make wonderful rings on picots
And don't miss this recent video by Edda Guastella who creates a variation of the chain maille using single shuttle.


Unfortunately, this series will run into a 3rd post dealing with the rope chain, to avoid an avalanche of pics. Instead let me show you my very first chain maille trials.

Above are my Day 1 trials, in Anchor size 20 threads. On the left sampler are my trials of the 3 methods and variations. 
Can you spot the rings that do not look interlocked? Although I do not fully understand why that happened, I think the following TIP might help avoid such mistakes, because there is a tendency for the loop to get stuck at the base of the previous ring -

TIP : 1. After completing 1st side, tug at the core thread that is on the lower right (where you would start the 2nd side stitches). You will notice that the 1st side moves towards the right under the previous ring. 
2. In the 2nd image, the 1st stitch of 1st side, is visible on the right. So you are now sure that your ring is interlocked correctly, and can continue to tat the 2nd side.

3. Tat the 2nd side of split ring and continue with the chain maille method you are using.

Part 3 will be the final post for the present. Of course there will be more projects in the future when I try out the several methods and effects listed above.

Friday, 3 May 2019

golden arches

Pin It now!
For the last several weeks I would see this Italian Tatting event announcement almost every time I logged in to facebook. (Lenore’s awareness ribbon is another part of it). Here, a vintage pattern was shared by Edda Gustalla and the only ‘rule’ was to keep the basic shape recognisable. She aptly calls it “A thread that unites”!

And I finally succumbed just for kicks. No, I am not entering it in the competition – horrors, it is hardly competition material! But it was a fun journey albeit slow due to all those beads!

Golden Arches Necklace
adaptation of Edda Gustalla’s vintage edging
‘a thread that unites’

1st  arch : a 2-repeat trial run with size 40 thread, no beads. (forgot to take a pic)

2nd arch : Red Rose size 20 metallic thread with beads. Trying to decide the colour of teardrops, etc. I used this method to make the onion rings in order to keep track of beads in each shuttle.

3rd arch : A bit of stitch count tweak, and using red teardrops with the larger garnet, all of which were attached using Floating Beads method.

4th arch : Finishing up. Sewed on gold beads to cover the open space under clovers. Added a ‘reflection’ above the teardrops, too.
Then strung more seed beads to make the chains on either side and add findings.
After this, I made 2 more short chains to complement the arch above and give the pendant a fuller look. However, these arches curve contrary to what I had in mind L 
Interestingly, the double-beaded chains took much longer to tat, having to pull out a bead from both shuttle and chain threads after each stitch. It was stop and go stop and go. Is there an easier way to do them?

I have written down the pattern (for my own notes) but will share only if somebody is truly interested. Pattern writing takes up way too much time and effort and currently I am employed in updating and reorganising the Tatting Resources page – another huge task.

So what would you change in this pendant/necklace to improve it?

Tuesday, 20 December 2016

drop by drop

Pin It now!

tatted ornament/jewelry/cabochon using large glass beads, mirrors, etc.
edited Dec 21, 2016

I caved. What do you expect, when Diane keeps dropping off these gorgeous little beauties daily on her blog?! Instead of working on my planned projects, the mood got to me. I gathered all the materials, strung the beads, wound the shuttle, refreshed Diane’s excellent stepwise pictorial, and went to play, basking in the warm winter sun.

 Ice Drops
Diane (lace-lovin’ librarian) Cademartori

 Magnified !
 
A while back, some 3D movie promo scheme had sent in a pair of glasses with magnifying lens. Don’t know why I kept it, except that the lenses looked very cute. Tore off the paper specs & got to work with the lens.
The lens is a bit flat for this ornament, but had to make do for now.
It is a bit over 1”, hence strung beads for 8 repeats; 7 repeats sufficed.
Unfortunately the transparent beads don’t show up clearly in the pic, but the ice drop looks Fantastic – DH was impressed and considered it a pendant. He guessed right for a change, coz I wanted to keep my options open & didn’t tie any ribbon, string or tatted braid.
TIP : I used a Fujito Join slope and roll join for the second round. The Lock Join didn’t seem to come out right for me. So instead, I pulled out a loop with the ball thread & passed the shuttle through. That’s all.
There are a few mistakes in round 2, which I noticed later – a bit of twist in a ring & a chain.
Here's how it looks from the 'back' ...

Mirrored ! 
My second Ice drop is made with 2 mirrors glued back to back. This idea had been on my mind ever since the pattern was shared. I checked the edges & they were smooth. A tad less than 1” across.
Everything went very smoothly. A vintage size 20 thread, which is slightly thinner than the newer one I used above.

TIP : For directional tatting (frontside/backside) :
Round 1 (the back of the bead) – tat rings frontside, RW, and chains frontside as well.
Round 2 (front of bead) – tat rings frontside, RW, chains backside.
Finished off with a beaded loop. Absolutely reversible.

I can vouch for their "addictiveness" ! Wanted to keep making them – they are so quick to tat up and look oh so pretty in real, even though I didn’t have the specific materials. The only downside (always) was stringing beads. Should stick to larger pearls ;-)


many thanks to Diane & Edda Guastalla
for such a delightful addiction !

happy tatting always :-)