Showing posts with label tatted rope. Show all posts

Sunday, 10 December 2023

about Helix Tatting and more

Pin It now!

In late October, while working on the Dictionary part of ‘The Six Ts of Shuttle Tatting’, Anita introduced me to the term Helix Tatting and the developer of the technique, Richard Embrey. We worked on a definition or description to include in the dictionary and I also tried my hand at a quick trial to get a feel for it.
My very first trial (with mistakes) without shuttles

While I don’t want to reveal the definition, I will certainly do a sort of comparison to put things in perspective. Richard came up with this technique in 2019 while trying to make an I-cord in tatting when he couldn’t find a tatted equivalent. It started out as a tatted tube or cord but has since evolved and diversified into many more shapes, including a coronation cord and a fish! As always, it is our imagination that gets us soaring into new skies.

UPDATEhttps://tipsaroundthehome.blogspot.com/2024/01/helix-tatting-pictorials.html  -- Includes PDF OF HELIX TATTING Pictorials 

Let me list down the major characteristics of Helix tatting (HT) as well as include links to visually similar techniques. Please note that a lot of these are my own thoughts and notes. Feel free to critique or suggest.

1. It is basically a 3D hollow cord or structure, made solely of chains, using multiple shuttles (4 or more). The outward appearance is like a spiral, especially visible when different colours are used.

2. Each shuttle alternately and sequentially acts as an active shuttle to become the core thread, and then  as a ball thread to form the stitches.

3. It is NOT bauble tatting, though it can be considered to be a variation. No separate ‘ribs’ are added for a scaffolding. Instead, each shuttle, in turn, acts as a core thread and provides the necessary stability to the structure. It also 'locks in' the previous segment when shuttles are switched.

4. It is NOT a continuous spiraling chain since short segments are made with a sequential change of shuttles. Each segment can consist of merely 1 stitch or as many stitches as one desires to create a broader shape. Two or more stitches give a more distinctive spiraling of the colours. The spiral is directional and there are ways to determine beforehand which direction one wants the spiral to run.

For instance this 3D Pond Reed prototype I had made back in 2014 using 2 shuttles– it is a continuous chain spiraling around itself, where I used the slope and roll joins to hold the shape. Clearly it is very different from HT.

5. It is NOT block tatting, though chain segments are apparently ‘stacked’ over each other. No lock joins are used. However the outward appearance can be confused with tatted ropes, with or without beads. Ninetta has done a wonderful study of various ways in which these 3D tatted ropes can be made, with links to respective tutorials. A couple of them even create a spiral effect! https://ninettacaruso.blogspot.com/search/label/stacking

6. HT is not limited to merely spiraling chains. With so many shuttles in play, it is easy to throw off rings and chains, use beads, add picots, and so on. Versatile.

7. There is another tatted tube example where we use stacked or layered split rings. No chains involved, only rings. And if the picots are shortened, the stacking will be that much closer. Clearly this is not HT in any sense of the term, except that it is also a form of continuous tatting for a 3D hollow tube.

tatted beaded rope made with stacked or layered split rings https://tipsaroundthehome.blogspot.com/2019/10/tat-beaded-rope.html

See Ninetta's version of a spiraling tatted rope made with interlocking rings - https://ninettacaruso.blogspot.com/2020/08/gold-rope-chain.html 

8. BUT, there is something that definitely follows the same principle and concept as HT, and also gives a directional spiral! It is called Mac-Tatting (MT) and was first developed by Usha Kota in an attempt to imitate a crochet braid in tatting – it was a flat braid, worked too and fro. However, when I understood what HT was, it immediately crossed my mind that MT could be similar if worked continuously. And YES, it is the same, except that we work with unflipped or reverse stitches rather than flipped or double stitches! And you get a spiral, though the stitches face down while in progress. 

Helix tatting & Mac-tatting trials, together
In my first attempts, I found it easier to work the Mac-tatting version - I had a better control of the threads and there was no tension issue. Helix tatting is fine once you get into a rhythm, but it requires more finesse. And managing all those shuttles can of course be an issue.


A couple of weeks back, Richard was invited to TOTC as a guest teacher to demonstrate the Helix Tatting technique. You can watch the video here - https://youtube.com/live/DXO9Pm0fq1U
Bonnie Swank shared her notes on how to do HT with needles. Richard also shared a practice pattern called Watermelon Dreams, with the class. https://www.theonlinetattingclass.com/patterns
Creative members have already shared a couple of clever ways to organize their shuttles to avoid tangling. I simply laid them down spread-eagled, on my bed. I did find that it is better to leave a longish length of thread to avoid frequent winding/unwinding; and since it is only 1 or 2 stitches each, the long length is not a bother. 

I am test-tatting a pattern for Richard for his upcoming book. It is called Watermelon Dreams Beaded Helix Embellished Earrings
It took me a few hours to find and empty all my shuttles, glue the numbers (I did it on both sides, LOL), string beads and wind the shuttles. 
In progress.
I've completed Round 7. My version is a Caps In spiral where the double stitch faces inside the cord and tatting progresses in a clockwise circle. 

That’s it from me for now ….. Welcome your thoughts.

Many thanks to Richard, Anita, and all the creative minds mentioned above! 

Friday, 4 September 2020

two clever

Pin It now!
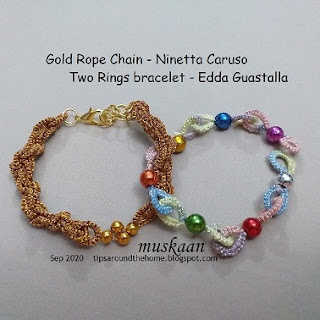
Too clever by half! Definitely not. They are truly two very clever tatters, teachers, designers and keep inspiring us with their creativity - Ninetta Caruso and Edda Guastalla!

Ninetta Caruso's Gold Rope Chain - my Rose Gold version

For my interlocking split ring and rope chain pictorials, I had used thick thread. Further, in order to avoid a bare thread spanning the side of each ring, I left the bare thread space shorter than required. Both factors created a gentle spiral, not the rope chain effect in Ninetta's original. I Had to satisfy my scientific curiosity, hence a quick tat with metallic thread.

TIP : The length of bare threads between successive rings determines the amount of twist; and the visible effect can range from a gentle wave to a tight woven rope.

Stringing beads on 3 strands of Anchor metallic embroidery thread that kept splitting was taking too much time. Hence no seed beads.
Much happier with the twisted effect, though could've been better. These are certainly addictive and I stopped only when the shuttles ran out. My fear about the thread were unfounded - the rings closed easily - and only 1 or 2 strands could have worked smoothly as well.

Edda Guastalla's Two Rings (Interlocking) Bracelet/Chain (catenella 2 anelli)
I was very impressed with Edda Guastalla's easy interlocking rings! Such fun, too, besides being practical....
  • no need to string beads, except the one (or more between the twin rings).
  • can use up leftover thread lengths to empty shuttles
  • no need to hide tail ends
  • only one shuttle required
  • easy travel or 'handbag' tatting project
  • several variations possible - colour, size, symmetry, etc. 
  • TIP : eg. One can create a diamond shape instead of simple straight chain. Start with twin rings, then make 2 sets of twin rings within the same (these could have an asymmetric stitch count to move the edges further apart), and a 4th set within both 2nd & 3rd sets to bring them together again.
Red Rose metallic thread size 20. Used up several leftovers that were at least up to 25" long.

TIP
: These twin rings can be used effectively as connectors! Remember these curled ring connectors (CRCs) which are essentially the same twin rings curled around motifs to link them? Instead of curling the rings, one can simply insert thread to make the twin rings.

Two lovely addictive interlocking rings! Vastly different in execution and skills, yet brilliant in conception and creativity. Many many thank to both ladies.


The rope chain reminded me of the double helix structure (closer to the quaternary structure) which led me to these books ...

A team that revolutionised the scientific and medical world comprised James Watson and Francis Crick when they unraveled the DNA structure based on Maurice Wilkins' results. Of the 3, the former 2 are more commonly credited.


Francis Crick. Discoverer of the Genetic Code by Matt Ridley
This paperback is a 2008 Harper Perennial edition of the original 2006. It is a rare insight into the life, work and thoughts of Crick. An engaging read, as are most of Ridley's books.

A Passion for DNA. Genes, Genome, and Society by James D Watson
2000, Oxford University Press. This paperback, with high quality paper, is a collection of Watson's lectures, essays, commentaries on diverse topics and the wider impact and implications of the discovery. 
Having already read Craig Venter's autobiography, it was interesting to compare notes from both perspectives. 

I found Watson was the more conventional and conservative one compared to Crick, though I admired the latter's principles and highly intelligent mind.

Rummaging for all these books brings bittersweet memories - the happy hours spent reading and discussing (hubby & I love Genetics!), but the sadness that I cannot now recall all details. A poor memory that needs huge refreshers ;-D

Friday, 28 August 2020

locked in a rope

Pin It now!

Part 3 - final post of the chain maille pictorials, based on Ninetta Caruso's posts. You can find my previous pictorials here - Part 1 ; Part 2.

So far, we have seen 3 methods/variations (and more listed) of the Interlocking Split Rings that create a 3D chain maille effect. The chain or braid so made, whether with 1, 2, or 4 shuttles, remains linear with clearly distinguishable rings. Ninetta has cleverly twisted the chain into a rope that spirals on itself! Let's see how ....


D. Interlocking Split Rings - Rope Chain

ref : Ninetta Caruso's gold rope chain pictorial
(interlocking split rings - chain maille variation of Kathy Niklewicz's method)

The only difference from the pictorial shared in Part 2 (C), is that instead of pulling a loop through the previous ring, in order to make the next ring, the loop is pulled through the last TWO rings. This collapses the rings, bringing them closer and also creates a gradual twist.

Red is shuttle 1 with cream thread ; yellow is shuttle 2 with variegated thread.
All split rings are 10/10 (since the thread is thick)

 
D-1 : 3 interlocking split rings have been made as in C here. Insert hook from the back through previous 2 rings....
D-2 : ... and hook the shuttle 1 thread ...

 
D-3 : ... pulling it to the back.
D-4 : Pull the loop long enough to wrap around the hand to make the next split ring.

 
D-5 : As in previous pictorial, leave some bare thread before starting the 1st side. 10ds made. Ensure shuttle2 thread is inside the loop.
D-6 : Leave bare thread and work the 10 unflipped stitches for 2nd side.

NOTE : I was so focused on the steps and photographing every detail, that I missed the larger picture! Leave More bare thread I  order for each ring to twist more into a rope-like weave.

 
D-7 : Close ring.
D-8 : Repeat steps to work as many interlocked split rings as desired. As the rope grows longer, it starts to twist - hence the term rope chain. The rope looks superb from the side!

D-9 : This is how the rope looks from the shuttle 1 side.


E. Interlocking Split Rings - Beaded Rope Chain  
ref : Ninetta's Rope Chain bracelet in black and silver with red beads

A short pictorial that follows the previous (D), but with a bead added before each ring. Of course, more seed beads can be added along the edges, etc.

 
E-1 : String beads on shuttle 1.
E-2 : Before starting 2nd ring, move bead to the base. In image, a bead is moved before starting 3rd ring. Insert hook through 2nd ring to pull back a loop for the 3rd ring. These will form a chain maille as in Part 2 (C).

 
E-3 : 3rd ring made. Now we start the rope chain variation. Move bead to base of previous ring (not shown in pic), insert hook through rings 3 AND 2 ...
E-4 : and pull back the loop for 4th ring. 
TIP : Try to be consistent in the position of the threads throughout. I kept the bare thread and loop 'behind' the bead always.

 
E-5 : 4th ring complete and bead brought forward before next ring. Notice how the rings are now very close together, with greater overlap. The chain maille interlocking effect seems to get lost.
E-6 : Insert hook through rings 4 AND 3 to pull back loop for next ring.

 
E-7 : Repeat steps from E-3 to desired length.
E-8 : As seen from the side.

This rope can be quite addictive! I stopped only on running out of thread. Notice the twist?

To finish, beads are strung through the leftover tails, ending with a 6-bead ring/flower, and hiding the ends within a few beads. Add a clasp to the starting ring for a bracelet or a necklace.

There is a tendency for a horizontal thread to show up across the side of each ring. It could be the shuttle1 thread across the 1st side of ring, or shuttle2 thread across the 2nd side (as in my first trials in previous post). 
TIP : To Avoid Visible Bare Thread : By keeping the bare thread at the start of each side of split ring short, this horizontal bar can be avoided. While the bare thread is important to create a play and twist, keeping it as short as possible eliminates its visibility.
Ninetta's TIP : Another possible way is if we use 4 shuttles instead of 2, as in Ruth Perry's models. Or one can use a thread colour and size where it is not immediately visible.

This is it for the present, although I will some day come back to try out other methods (see complete listing here - https://tipsaroundthehome.blogspot.com/p/tatting-resources.html), as well as a couple of project ideas I have applying these effects. I did intend to tat with metallic, but time is at a premium and I need to get back to completing the hanky edging as the deadline quickly approaches.


Longtime readers of my blog may have noticed that I rarely create pictorials of something that is already in public domain, preferring to cite links, unless I have something different or something more to offer. Or, as in this case, when a tatter specifically requests. Hence I cannot thank Ninetta enough for her gracious permission to upload these pictorials, and her willingness to provide valuable feedback and insight. 

And by extension, my thanks to all tatters, teachers, designers mentioned in these 3 posts, who were instrumental in adding a valuable link to our ever-growing Tatting chain!

Thursday, 27 August 2020

locked in play

Pin It now!

Continuing from my previous post where 2 methods of Interlocking split rings (chain maille style) were uploaded. Again, I follow Ninetta's post to share the 3rd method based on Kathy Niklewicz's method and then its further application in the tatted rope chain.

I first tried Kathy's single-shuttle IR method (along with other methods) in 2014 here. Ninetta took it a step further by using it to create a truly 3D effect. This variation is photographed stepwise below.

C. Interlocking Split Rings - Chain Maille

ref : Kathy Niklewicz's Interlocking Rings and Ninetta's Method 3 variation

Red is shuttle 1 with cream thread ; yellow is shuttle 2 with variegated thread.
All split rings are 8/8.

 
C-1 : Unlike the earlier methods (refer previous post), in this case we can safely close the split ring. 
C-2 : Through the closed ring, insert a hook from the back and hook it to shuttle1 thread.

 
C-3 : Pull a loop front to back through the ring, as seen.
C-4 : Pull out enough of the loop and note the position of each thread(s). 

 
C-5 : Wrap the loop around your hand just as in the earlier methods. The static end of loop is is to the left (where stitches will start) and the moving shuttle part goes around, emerging toward the right.
C-6 : Leave some bare thread (indicated by hook) and start tatting the stitches for 1st side of SR.

 
C-7 : Wrap loop around hand for 2nd side of SR; leave some bare thread (notice the yellow segment) and begin unflipped stitches. Note that the 2nd shuttle thread is within the loop.
C-8 : Stitches complete on both sides.

 
C-9 : Close split ring. 
C-10 : Repeat steps to make as many interlocked split rings as desired.

The advantage of this method is that one does not have to remember to insert the shuttle before closing ring. The disadvantage is that bare thread can be visible from some angles.
A very small variation of this method is used to create the rope chain.

Jane McLellan has used the same method to create a chain maille with a single shuttle and regular rings.
Ruth Perry probably pioneered the modern technique and has created beautiful effects using only chains or 4 shuttles where the bare thread can be eliminated. Teri Dusenbury has instructions for the same using 2 steps and finger tatting here.
This method of pulling a loop through a previous element to tat a ring has also been demonstrated by Patty Dowden to make wonderful rings on picots
And don't miss this recent video by Edda Guastella who creates a variation of the chain maille using single shuttle.


Unfortunately, this series will run into a 3rd post dealing with the rope chain, to avoid an avalanche of pics. Instead let me show you my very first chain maille trials.

Above are my Day 1 trials, in Anchor size 20 threads. On the left sampler are my trials of the 3 methods and variations. 
Can you spot the rings that do not look interlocked? Although I do not fully understand why that happened, I think the following TIP might help avoid such mistakes, because there is a tendency for the loop to get stuck at the base of the previous ring -

TIP : 1. After completing 1st side, tug at the core thread that is on the lower right (where you would start the 2nd side stitches). You will notice that the 1st side moves towards the right under the previous ring. 
2. In the 2nd image, the 1st stitch of 1st side, is visible on the right. So you are now sure that your ring is interlocked correctly, and can continue to tat the 2nd side.

3. Tat the 2nd side of split ring and continue with the chain maille method you are using.

Part 3 will be the final post for the present. Of course there will be more projects in the future when I try out the several methods and effects listed above.