Showing posts with label macrame-tatting. Show all posts

Sunday, 10 December 2023

about Helix Tatting and more

Pin It now!

In late October, while working on the Dictionary part of ‘The Six Ts of Shuttle Tatting’, Anita introduced me to the term Helix Tatting and the developer of the technique, Richard Embrey. We worked on a definition or description to include in the dictionary and I also tried my hand at a quick trial to get a feel for it.
My very first trial (with mistakes) without shuttles

While I don’t want to reveal the definition, I will certainly do a sort of comparison to put things in perspective. Richard came up with this technique in 2019 while trying to make an I-cord in tatting when he couldn’t find a tatted equivalent. It started out as a tatted tube or cord but has since evolved and diversified into many more shapes, including a coronation cord and a fish! As always, it is our imagination that gets us soaring into new skies.

UPDATEhttps://tipsaroundthehome.blogspot.com/2024/01/helix-tatting-pictorials.html  -- Includes PDF OF HELIX TATTING Pictorials 

Let me list down the major characteristics of Helix tatting (HT) as well as include links to visually similar techniques. Please note that a lot of these are my own thoughts and notes. Feel free to critique or suggest.

1. It is basically a 3D hollow cord or structure, made solely of chains, using multiple shuttles (4 or more). The outward appearance is like a spiral, especially visible when different colours are used.

2. Each shuttle alternately and sequentially acts as an active shuttle to become the core thread, and then  as a ball thread to form the stitches.

3. It is NOT bauble tatting, though it can be considered to be a variation. No separate ‘ribs’ are added for a scaffolding. Instead, each shuttle, in turn, acts as a core thread and provides the necessary stability to the structure. It also 'locks in' the previous segment when shuttles are switched.

4. It is NOT a continuous spiraling chain since short segments are made with a sequential change of shuttles. Each segment can consist of merely 1 stitch or as many stitches as one desires to create a broader shape. Two or more stitches give a more distinctive spiraling of the colours. The spiral is directional and there are ways to determine beforehand which direction one wants the spiral to run.

For instance this 3D Pond Reed prototype I had made back in 2014 using 2 shuttles– it is a continuous chain spiraling around itself, where I used the slope and roll joins to hold the shape. Clearly it is very different from HT.

5. It is NOT block tatting, though chain segments are apparently ‘stacked’ over each other. No lock joins are used. However the outward appearance can be confused with tatted ropes, with or without beads. Ninetta has done a wonderful study of various ways in which these 3D tatted ropes can be made, with links to respective tutorials. A couple of them even create a spiral effect! https://ninettacaruso.blogspot.com/search/label/stacking

6. HT is not limited to merely spiraling chains. With so many shuttles in play, it is easy to throw off rings and chains, use beads, add picots, and so on. Versatile.

7. There is another tatted tube example where we use stacked or layered split rings. No chains involved, only rings. And if the picots are shortened, the stacking will be that much closer. Clearly this is not HT in any sense of the term, except that it is also a form of continuous tatting for a 3D hollow tube.
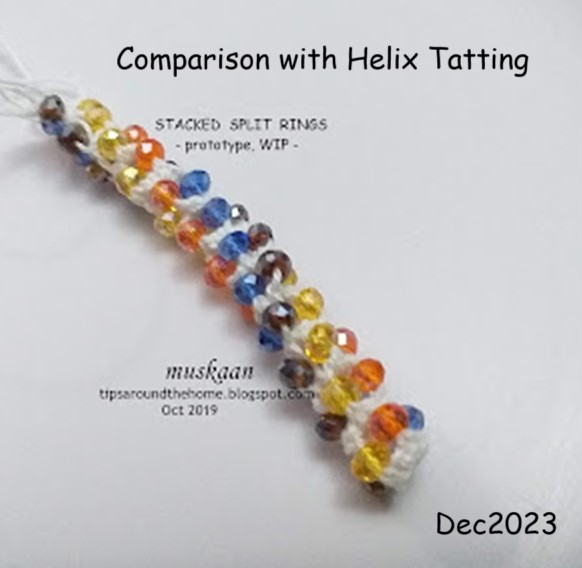
tatted beaded rope made with stacked or layered split rings https://tipsaroundthehome.blogspot.com/2019/10/tat-beaded-rope.html

See Ninetta's version of a spiraling tatted rope made with interlocking rings - https://ninettacaruso.blogspot.com/2020/08/gold-rope-chain.html 

8. BUT, there is something that definitely follows the same principle and concept as HT, and also gives a directional spiral! It is called Mac-Tatting (MT) and was first developed by Usha Kota in an attempt to imitate a crochet braid in tatting – it was a flat braid, worked too and fro. However, when I understood what HT was, it immediately crossed my mind that MT could be similar if worked continuously. And YES, it is the same, except that we work with unflipped or reverse stitches rather than flipped or double stitches! And you get a spiral, though the stitches face down while in progress. 

Helix tatting & Mac-tatting trials, together
In my first attempts, I found it easier to work the Mac-tatting version - I had a better control of the threads and there was no tension issue. Helix tatting is fine once you get into a rhythm, but it requires more finesse. And managing all those shuttles can of course be an issue.


A couple of weeks back, Richard was invited to TOTC as a guest teacher to demonstrate the Helix Tatting technique. You can watch the video here - https://youtube.com/live/DXO9Pm0fq1U
Bonnie Swank shared her notes on how to do HT with needles. Richard also shared a practice pattern called Watermelon Dreams, with the class. https://www.theonlinetattingclass.com/patterns
Creative members have already shared a couple of clever ways to organize their shuttles to avoid tangling. I simply laid them down spread-eagled, on my bed. I did find that it is better to leave a longish length of thread to avoid frequent winding/unwinding; and since it is only 1 or 2 stitches each, the long length is not a bother. 

I am test-tatting a pattern for Richard for his upcoming book. It is called Watermelon Dreams Beaded Helix Embellished Earrings
It took me a few hours to find and empty all my shuttles, glue the numbers (I did it on both sides, LOL), string beads and wind the shuttles. 
In progress.
I've completed Round 7. My version is a Caps In spiral where the double stitch faces inside the cord and tatting progresses in a clockwise circle. 

That’s it from me for now ….. Welcome your thoughts.

Many thanks to Richard, Anita, and all the creative minds mentioned above! 

Monday, 14 July 2014

Mac-Tatted Braid Pattern

Pin It now!
Macrame Pattern converted into a 6-shuttle Tatting pattern

Usha Kota has cleverly converted a macramé bracelet pattern into tatting and that too using 6 shuttles !!!
She was challenged to try something new with reverse stitch in the thread started by Judith Connors  in  InTatters, & when she came across this Football Bracelet video, all she could see were reverse stitches being made ! The experimenter in her got to work & we now have her wonderful transition of a macramé pattern into tatting.
My sincere thanks to Usha for kindly sharing her experiments & process. It has opened the doors to more inter-craft conversions/adaptations.  Changing the direction of reverse stitches to accomplish the macramé effect was brilliant !

Okay, initially, I got my brain all addled coz, with my rudimentary school-girl knowledge of macramé, I could see Both a macramé hitch knot as well as a hitch of rs. Then, I kept the video running & followed the macramé style. Once I got my head around the color sequence, I reverted to some of the instructions sent by Usha & it all fell into place easily. So my pictorial below is an interpretation & combo of the two. Only Usha can tell whether she followed the exact same method as outlined below, or did something a bit different … We’ll be waiting ;-))


6 shuttles required
Each Set / repeat measures about ¾ inch in length & less than ½ inch in width done in size 20 thread.
Threads Used
Anchor Mercer Crochet, 4054. Size 20
Yellow – 0289
Cadmium Orange – 0307
Mehandi Green – 0256
TIP : Best with size 10 thread or larger for the stitches & wave pattern to be highlighted …

Abbreviations Used:
rs / RS – reverse stitch
ds – double stitch
CTM – continuous thread method
Sh – Shuttle
USHS – Unflipped 2nd half stitch
UFHS – Unflipped 1st half stitch

A few words before the actual pattern :
  • Some of the images are a bit hazy. I just couldn’t get them aligned properly or sharp & clear :-(
  • It is best to view the images in sequence Along with tabulated instructions, so that if there is some ‘twisting/turning’ of the previous segment/stitches while photographing, it won’t matter.
  • The braid is pinned in some images only to photograph it better & make it easier to handle/lay flat.
  • It might be a good idea to view the Macrame School video for convergence of procedure.
  • I also recommend going through my detailed pictorial on how to twist work in reverse stitch before attempting this tatting.
  • I have tried to keep textual instructions at a minimum since the images, notations, & the tabulated data/sequence are self-explanatory. This might look like overkill with the pics and table. But there are all kinds of learners with different learning styles …. 
  • It is not as difficult or lengthy as it looks, once the 1st two subsets are under your belt. In fact, the weaving was such fun that I could just keep going – almost mesmerizing !


To Begin : 

Load 6 shuttles with 3 colors in 2 shuttles each. I wound them CTM, but this is optional.
Color 1 : Yellow in Sh1A & 1B ;
Color 2 : Green in Sh 2A & 2B ;
Color 3 : Orange in Sh 3A & 3B
   
As in the video, I did an encapsulated chain of 10 rs, using 
Color 3 over the other 5 threads. Then a square knot is tied at end to make ring. This step is optional, or can be changed as per requirements. Fig 1.
Make 2 rs of each color on it's own core thread (same color). All 6 threads with 2 rs ( 3                                                                  colors) will lie flat, side by side. Fig 2.

Figs 3-10 below, show the detailed process of making each half hitch of a rs ie. subset i) in table.
Starting from left side, move Sh1B under core Sh2A, then make over-under wrap for 1st hitch, ie. 1USHS. Fig 3.
Figs 3 - 6 show 2 rs in yellow made on one green core thread.
Figs 7-10 show next 2 rs in yellow made on other green core thread.

TIP : Whenever starting a new working thread, pass the shuttle Under the core thread (called TwW in rs); then commence the 1st half of rs ie. USHS.
This is an essential step in order also to Move the working thread from left to right (or right to left as case may be). Objective is to shift/move colors in relation to each other, in a sequence, And to keep the caps of all rs facing in one direction viz. downwards.


Subset i) of Set I has been completed. Yellow (Color 1) has moved from positions from left to right. 4rs of yellow made on green. 

Now to start working from right to left, in subset ii), using orange as working thread & yellow as core thread. Refer Figs. 11-15. Figs 11-14 show each half stitch being made of 2rs. I skipped photographing the next 2rs (3A on 1A & 3B on 1A) because they follow the exact same pattern as the previous 2 rs. Fig 15 shows the completed subset ii with 4 rs & shift in thread sequence.


Next, Figs 16, & 17 show the start of subset iii. Images of each step are not shown henceforth.
Fig 18 shows the first 3 subsets completed. 
Figs 19, 20, 21 show the next 3 competed subsets (iv, v, vi) & Fig 22 shows a close-up of repeats/Sets.
.


A Few Points to Remember

  • Always start with working thread Below/Under the core thread, when starting a new color. I prefer going under, since it seems to give a proper rs visually; the tiny bit of TwW thread remains hidden on wrong side.
  • All caps face ‘downwards’, always. Hence, when changing direction, TwW is important.
  • Black Arrows indicate direction of tatting. Left to right alternates with right to left between subsets.
  • Each rs needs to be snugged/tensioned tightly back on the core thread , as seen in the video.
  • In the table, the background color of rows indicates which color rs will be visible when working that subset.
  • Note that each core thread will have 2 rs - one from each shuttle of previous/adjacent color ; thus, finally, there will be 4 rs of one color on the 2 threads of adjacent color.
  • The color with which 4 rs are made (working thread), will be hidden in the next subset – it will become the core thread.
  • Complete repeat involves subsets i to vi & is termed Set I  (refer table). One can make as many repeats (Sets) as required for desired length.
  • Basically the Tatting technique involves a repetition of subsets i & ii : first moving from left to right to make 4 rs, then moving from right to left to make 4 more rs. Once you get familiar with the method involved in these, the rest of Set I is simply a matter of putting the sequence of colors in right order.

Table of Tatting Sequence for Mac-Tatted Braid/Bracelet


SET  I
4 rs made in each color Working thread on
core thread

Color
seen

Color
hidden

Direction of shuttle movement

Sequence of colors
Working Sh
Core Sh
At  Start
At End
i)  Y on G
Sequence of each rs


Color 1
on
Color 2
1B
2A

1

2

Left to Right

1, 2, 3

2 , 1 , 3
1A
2A
1B
2B
1A
2B
ii) O on Y


Color 3
on
Color 1
3A
1B

3

1

Right to Left

2 , 1 , 3


2 , 3 , 1
3B
1B
3A
1A
3B
1A
iii) G on O


Color 2
on
Color 3
2B
3A

2

3

Left to Right

2 , 3 , 1

3 , 2 , 1
2A
3A
2B
3B
2A
3B
iv) Y on G


Color 1
on
Color 2
1A
2B

1

2

Right to Left

3 , 2 , 1

3 , 1 , 2
1B
2B
1A
2A
1B
2A
v) O on Y


Color 3
on
Color 1
3B
1A

3

1

Left to Right

3 , 1 , 2

1 , 3 , 2
3A
1A
3B
1B
3A
1B
vi) G on O


Color 2
on
Color 3
2A
3B

2

3

Right to Left

1 , 3 , 2

1 , 2 , 3
2B
3B
2A
3A
2B
3A
Y – yellow (Color 1) on Sh 1A & 1B ;
G –  green (Color 2) on Sh 2A & 2B ;
O – orange (Color 3) on Sh 3A & 3B


While doing some research on macramé terminology, I came across a ‘Reverse Half Hitch Knot’ that is exactly like a reverse stitch !!! So, I guess, the only real contribution of this lengthy post is how one can convert it into tatting ??? Can you hear all this going down the drain ?! It pays to do one's research Beforehand ! 

Update : I just heard from Judith who has confirmed this : "Usha's applying these stitches to macramé, is like tatting reverting to its origin in knotting. :-) Both macramé and tatting use similar hitches, though in the early 19th century tatting was meant to resemble open lace by the use of fine threads.
She adds some historical trivia: The stitches early tatters used included 'reversed double stitch' which today equates to 'reverse order double stitch (rods)'. '
The Bath Tatting Book' (1865)
Anyways, I did it all in good faith & despite the time, effort, & repetitiveness, I kinda enjoyed the whole journey. I have Definitely learned something new & had tremendous fun weaving the braid, seeing the"waves" emerge, & then converting some more macrame patterns/stitches into tatting, including the Chevron stitch that i added towards the lower half of the bracelet. I even got better as the braid progressed ! The thread loops on either side, as well as all the stitches became more compact & neat.


Happy Mac-Tatting :-))


Motif #9 of 25 Motif Challenge