Showing posts with label Magic Square. Show all posts

Saturday, 8 August 2020

laying out the magic carpet

Pin It now!

A few months back, a call for free patterns was sent out for the IOLI Chapter Gift CD, which Anita forwarded to me. Long story short, instead of a single pattern, I sent in the magic square derivative ideas and patterns since this can make a good group project. I enjoyed collaborating with Shemene – she was prompt, accommodating, and enthusiastic.  

https://sites.google.com/internationalorganizationoflace.org/2020-ioli-convention/convention-info

Now that the CD is out, I am sharing the entire package with my dear readers. There are no new patterns, but some have been converted into pdfs, along with the Magic Square deconstruction series.

There are about 80 Charter Chapters in IOLI alone, besides the numerous local groups. With so many tatting groups active around the world, I hope some of you will enjoy the enormous opportunities and new perspective this activity can provide, and will take it up as a workshop or group project. But please send/leave me a line so that I can join in your creativity.

Here is the entire list of urls –

Magic in the Magic Square – complete article with loads of ideas and accompanying models  https://drive.google.com/file/d/1bynpB4cDMTkVBiKu16A_8qRL1Qn3K4yq/view?usp=sharing

Magic Heart - https://drive.google.com/file/d/1UFju_wctrzLeDMogxZ4Q3F5KH8ktIUOr/view?usp=sharing (this is a new diagram for the motif)

Bonds of Love Rakhi - https://drive.google.com/file/d/0B5MqI5ByadI4OHNGWndfMGVRaEU/view

Bonds of Love Bracelet - https://drive.google.com/file/d/0B5MqI5ByadI4Wm9LSDd1dURvaWM/view?usp=sharing (single-page version)

https://drive.google.com/file/d/0B5MqI5ByadI4cm96OXlPaEdEbDQ/view?usp=sharing (stepwise pictorial version)

Better Than Nothing bookmark - https://drive.google.com/file/d/14y2uVcHnD7P0bxxIZQjPsJWV8uxSOOJY/view?usp=sharing

Magic Square Cross - https://drive.google.com/file/d/1zpgW3TWP2P9aB2tKsKtoUPJqXNne1b-h/view?usp=sharing

I forgot to include the crosses in the above group pic! The bookmark and other models have all been gifted or used up. One of my favourite Asterix stories - Asterix and the Magic Carpet - partly because of it's India connection!

I have created a Google Docs file titled THIS  FROM  THAT wit ideas generated, extracted, or derived from existing patterns. All new ideas and their actual conversion to lace will be added to this file. Here's the link -  https://docs.google.com/document/d/1bQMr97vyWITzsnS44ZYaMDRhCLYI8eTvemZhq0QlO8o/edit?usp=sharing

Earlier this year, my work was published in 2 issues of the IOLI Bulletin. Anita had been pressuring me to send for a couple of years in order to promote tatting. I finally took courage and spent time to prepare the presentations. And as gratitude, it seemed fitting to share our joint hearts patterns.

Add new thread WITHIN a ring (in the Spring 2020 issue) –https://drive.google.com/file/d/1g5GJz1rdzdKqpfw51Cm8lGptsY5S73ca/view?usp=sharing  

Buddy Hearts co-author Anita Barry (in the Summer 2020 issue) – https://drive.google.com/file/d/1frJpMRiHu5fOEH9Zs3VANVGIURZA126_/view 

The heart patterns were already shared as a pdf, but a few small tweaks were made for the article. So I am not creating a new pdf.

Oh, and if you prefer a single page diagrams-only version, then here it is - https://drive.google.com/file/d/1DZFxEDvEwe-rPUv1evgPaxic1sbaEnHC/view

And this is how the cover looks scanned, courtesy Anita…. 

I was supposed to receive a complimentary copy of the magazine back in April. It did not arrive, probably got stuck in the lockdown situation. Sadly I have no physical nor digital copy to see or show. A few of my well-wishers enthusiastically let me know that they had seen/read them. The editor, Prabha, does not make a single change to the articles sent in and prepares beautiful layouts.

Although I have identified a few more things I would like to share, it is difficult to find the time to work diligently on them. Hence, I did not send in anything for the next issue.

A very special thanks to Anita for prodding me beyond my comfort zone and also for proofing the articles. And to the wonderful editors for accepting.

Wednesday, 22 April 2020

tricks without the trick

Pin It now!

Colour play without the shoe lace trick (SLT)!

Last week when I went digitally AWOL, I was compiling a pdf package for the IOLI Chapter Pattern/Gift CD, 2020. Instead of sending a single pattern, my recent crosses from the magic square spurred the idea of an entire project based off those sketches. It would make a wonderful design exploration for groups. I need to convert some pdfs into shareable links - will post later.
After sending them off, I couldn’t resist trying out the pinwheel sketch. So, here is the ‘simpler version’.

Pinwheel Coaster (or Tatted Quilt Block)
Adapted from the vintage Magic Square
To make it easier, I started with a black medallion of 4 rings. It should’ve been smaller (my mistake!) – you can see how the adjoining chains have a shallow dip.

The correct stitch count for each ring is : (3-3-3-3), joining to previous ring and to the first one at the end. 
Notice the numerous tails? Lots of scraps used in first 2 motifs. All knotless addition of threadtatting over tails in separate elements, and lots of False CTMs (and more here) in order to start the chain as if the thread is continuous and later add in new thread/colour. Remember to cross the new thread around the old one
These (and more below) ‘tricks’ kept the SLT away!!! 

All rings are 6-6, the first of each 4-ring cluster has a large central picot.
All chains are 6 or 6-6-6.
Each triangular motif is worked with one shuttle and ball.
I wound 2 Pony shuttles separately one with yellow and other with orange and these lasted for the entire coaster. Respective ball when needed. 

Core thread under 2-coloured outer chain and when joining to inner black ring, have the core of same colour as start of chain.
The corner chains show 2 colours. For this, the core thread remains the same as the first half eg. yellow chain with yellow core. Midways, orange chain thread is added over the yellow core. The yellow chain thread is snipped off and whip stitched back (since I like to hide under different elements)
Similarly, the inner chains that join to the black ring have the same core thread, but different stitch colours. While making the join, I pulled up a loop of the new colour ball, passed the shuttle through and worked the chain, hiding one tail. The other tail was whip-stitched back.

Work moves counter-clockwise and can be tatted all from the front using direct tatted chains.
For the adventurous, this square can work as one block in a larger tatted quilt! Imagine the riot of designs and colours and shapes.
Each side of this quilt block square is 9½ cms and 12½ cms diagonally in Anchor Pearl Cotton size 8.
A separate medallion in the center is the easier version. If one wants to tat exactly like the sketch above, the inner 2-coloured ring can be worked as a SCMR, adding the 2nd colour midways using this method of adding thread WITHIN a ring.  

I debated whether to add an edging. My sketched ideas looked good on paper, not in tatting - overkill! Ended up with a simple outline which hubby approved!

All chains are 6-6, lock join.
Corner chains are 2-2—2---2—2-2. (graduated picots)

Avoid shoe lace trick: Keeping the SLT away is a personal preference. In needle tatting, this knot is made after every ring and chain, yet the lace looks beautiful. So for those who do not mind the SLT, wind 2 shuttles, one with each colour, and make a SLT after each element to shoe the colour you want. There won't be so many ends to add and hide then.

The same holds true for tatting this coaster. My notes pertain to how I approached it. Every tatter is free to choose their comfort tactics.

I will also share how to keep the colour blip on the backside when working and joining a chain backside. I've used this before, but not in this situation and I truly love the trick!


Monday, 30 March 2020

magical patterns

Pin It now!
A few eager tatters had requested the diagram-only pdf which I sent privately and Usha Shah’s lovely rendition in metallic thread has already reached my inbox.

Finally, after a lot of self-editing over several evenings, the pattern is ready to be published.
Magic Square Cross pattern. Click to download the pdf.

I had started it in Anchor size 20, in single colour above. But it was turning out so large, hence stopped and switched to Anchor Pearl cotton size 8 in 2 colours and reduced the count as well.

Instead of the pattern in my deconstruction series, I used the concept shared by Halibut04. It eliminates the central picot and rings are linked on either side.
And using only 2 decorative picots for the inner chains – this idea is taken from this exquisite Japanese Tatting Square Doily.

Huguenot Cross Pendant

The square in the center kept looking like a emblem or insignia, except I didn’t know where to start my search without a term. Fortunately when I accepted someone’s fb request, there it was in bobbin lace – Huguenot CrossWhat a huge coincidence.

My intention was to have 2-coloured split rings all around. At the last moment I switched to a black chain edge so that the blue ring clusters look complete. This, unfortunately, decreased the indent. I do want to try the SR one later to highlight the Maltese Cross.

There are a lot of symbols within this cross (heart, fleur-de-lis, Maltese cross, 8 Beatitudes, dove), some of which are recreated in a stylised form. Since I don’t have any dove charm or sequin, a butterfly sequin is used at the base, and converted into a pendant. Hope there is no religious sentiment being hurt. 

The Josephines are 8 half-stitches and extra chains are 5 or 6ds.


A Tiger Face? Perhaps a butterfly!

Wondering how only chains would look, for a deeper notch, I started another in green/black. Midways, it started looking like a butterfly, and then like the face of a tiger (focus on the negative space enclosed by the black chains above - they look like eyes and the rest of the facial features magically emerge)! 

There were 2 green rings where the top picots are. I had to untat one, and snip off the other and reattach black thread to make it symmetrical. Want to see how it looks after I complete a long black chain outlining the top of the head.

So many possibilities! If you wish to play, check out the ideas in this series - Part 1, Part 2, Part 3! Derivative patterns that have already been shared include heart, bracelet, and bookmark.

Magic Square Cross pattern. Click to download the pdf.

Best wishes ....

Saturday, 21 March 2020

a new old cross

Pin It now!

UPDATE : Pattern posted - https://tipsaroundthehome.blogspot.com/2020/03/magical-patterns.html


A few days back this post emerged as top 5 of the week. On rare occasions I know why, such as currently this pictorial is trending due to a Sweedish group. It has been translated and pdf distributed among students, with permission). I have no idea why the magic square became 'popular', but it sparked my shuttles to finally tat the cross from it.
This is the sketch from 2014.
I decided to call it Magic Square Cross, not only because of the source from which it is derived, but also because there is a clearly demarcated square in the centre area in my tatted model.

The basic principle and body is the same, but I altered the stitch count and added a few decorative Josephine knots.
I would say this pattern calls for mindfulness and concentration. I will write/draw the pattern only if there is sufficient interest.

In Anchor Pearl cotton size 8 (= size 20 Lizbeth), it measures a bit more than 11.5 cms x 8.5 cms.

I am posting this from my tablet,  since computer is not connecting to the net - social isolation?! We think the operating system is the culprit, but no techie is available due to a 3-day moratorium on non-essential businesses, etc. My washing machine also blinked and is taking a spring break,  LOL. Right in the middle of my spring cleaning, no less! But I already have enough lemons in my refrigerator to make lemonade!!! ;-P


Wednesday, 2 January 2019

looking in looking out

Pin It now!
It’s that time of the year – a transition from the past year to the new! 
A time to look back but also to look forward through the glass of a windowpane, perhaps?

here’s wishing every person who steps in (leaving ‘thoughtprints’ below) or 
peeps in (a quick glance through the window) 
a very happy, creative, peaceful, and TATalizing 2019 !

I thank you for being a part of my blogging journey – 
happy memories of inspiring interaction, personal growth, and creative connection.
I hope you stay a bit to answer a few questions....

Q.1. What is the best thing you like about this blog?

Q.2. What is it you most dislike about this blog? 


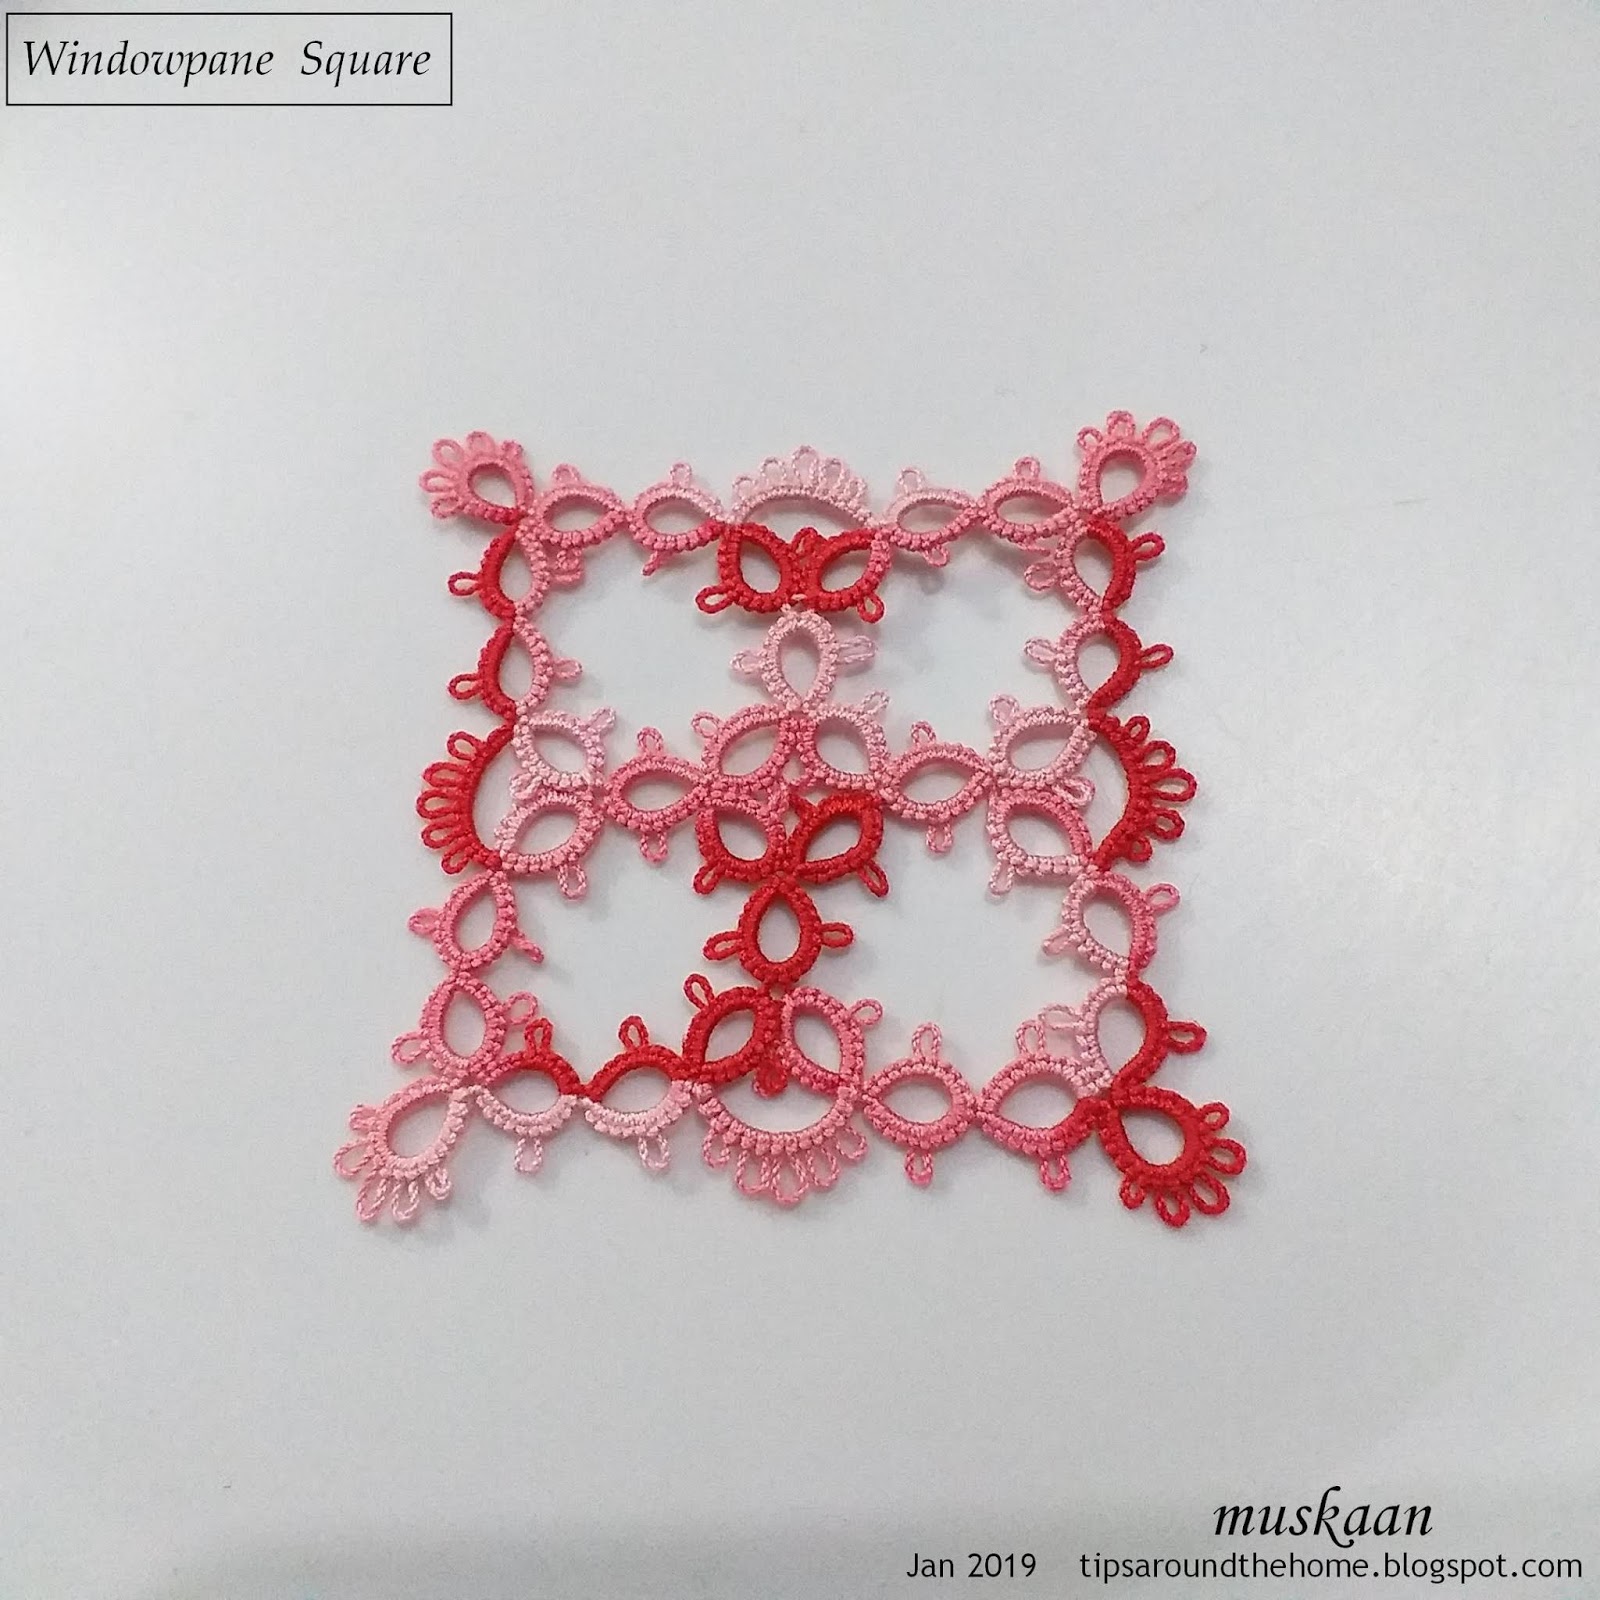
Windowpane Square is this new motif I’ve been working on sporadically. It started out as a kind of pointless exercise and that’s what I called it – a pointless square ;-P But you see the paradox there?!
As I went along, though, loads of ideas cropped up. The large negative space can be filled in completely or partially; cut out a square from cardstock and glue this as a frame …. Hey it’s a window frame with a windowpane !!! The accessories could be glued (mixed media) or tatted over the 'pane' or behind it depending on whether the viewer is in front of the window or behind it?

I was hoping to make at least one such new year’s card out of it, but my whole world slows down during winters.

In order for it to look more like a window, I tried using 2 colours. 
Each of these has a slight tweak. The bottom 2 don't have picots in the center.

All squares are worked in size 40 Anchor and measure about 5cms. 

Q.3. Does the square look better in single colour, variegated/tinted, or 2 colours? 

All 5 laid together. One can join motifs to make a large fabric. 
I think it might lend itself to a Magic Square, with the use of SCMRs, but am not certain yet. Robin?

Q.4. Of these 5 squares, which do you like best?

Your answers will help me improve both blog and motif presentations. 

And here’s another arrangement I am eager to tat – a bookmark or wide lace, with some overlap between corners. My first thought had been to interlink them. What do you think?

Friday, 20 April 2018

retreading the path

Pin It now!
magic squares, doilies and magic/infinite pathways - common threads VI.

This post is an exploration to satisfy the researcher in me. There is no absolute right or wrong – it is my perspective or thought experiment. Fair warning - walk away while you have the chance; or stay to humour me? ;-P A new thread in Craftree inspired me to retread the path.


So yes, the pathways in this earlier post were all just that – pathways – a sequence of working and joining motifs continuously without having to tie and cut after every motif. And for this we can use bridging elements or tweak the design to allow us access to next motif.
The magic pathways moved straight along column/row or moved in a concentric spiral. Therein lies one of the major difference with the magic square.

Ia.  Magic Square

I explained the magic square concept in my 2014 post hereAll the magic squares till then had been based on the original Ann Orr triangular corner design. Someone found that one could work continuously from one triangle to the next to create an ever-increasing square – hence the term ‘magic square’.

Last year new interest was generated with the incredible series of new magic square patterns that Robin has spawned, including the reverse/inverted squares. She adapted an existing square into a magic square by ‘breaking’ the square into triangles for a workable continuum. 
She shared her deconstruction of the concept and process in detail, inspiring others to join in with their own magic squares (eg., Jane McLellan and Ninetta Caruso). These also followed the original style of working and the original triangular pathway.

Thus the magic square, characteristically, is made of repeatable square motifs that work as “…building blocks… (Robin) and follow a diagonal path (triangulation) resulting in as large a square as one desires. The square will get “…opened out just by turning the direction of tatting (Grace Tan), not by the application of bridging elements.


Ib.  Open-ended Motif or Transitioning Elements in Magic Square

There is one aspect that needs to be highlighted before I begin the next segment – the slight ‘asymmetry’ of each motif within the fabric. While working, one corner remains ‘open-ended’/different in order to change direction and continue to next segment. 

For instance, in the old magic square motifs, while 3 corners have chains, the 4th corner is made with rings in order to continue to the next section. Only the final fabric will have all 4 corners completed/identical (chains, in this case).  
Similarly the new squares needed some slight adaptation to transition into a continuous working path as in Konior's original square motif, and the Onion Ring magic squares.  

The reason this happens is clarified in Robin’s own words : You start with a formula (triangular pathway for magic square, or up and down columns for the table runner) and make the design work for that path. A one round square can be redesigned into a magic square, and now I’ve found a bookmark can be redesigned into a table runner.
(Notice that the bookmark is essentially a rectangle. It doesn't strictly adhere to the magic square definition since it follows the straight column/row magic pathway, and well, it is not a square to begin with). 

These transitioning elements are not merely functional, but visually appealing and create lovely patterns to break the monotony.

TIP : Incidentally, Jane’s magic square can be worked as a magic pathway, with each motif intact. Robin’s 2nd Onion Ring magic square can also work along a magic pathway with complete & symmetrical motifs because of the single outward ring which can be worked as a split ring. Clearly, a ring in the corner is an asset!


IIa.  Magic or Infinite Pathways 

During my Quatrefoil polygons, I discovered other pathways which would allow the tessellation to continue uninterrupted and create large fabrics in the same shape as the original motif. Thus I could trace paths for a triangle, square, pentagon, hexagon; and recently the Fortuna Square, by climbing out/in using split rings.

With so many shapes, Magic ‘Square’ seemed like a limiting term to me, hence I used the term Magic Pathways - there is magic in figuring out an infinite route :-)
At the end of the day, though, it is just continuous or one-pass tatting which can go on forever (hence Robin uses the term ‘Infinite Pathways’). During the writing/researching of this post and some recent discoveries, perhaps ‘Infinite Pathways’ is a better term than Magic Pathways. Yet I’d like to spell it out …

IIb.  Rationale for the term Magic Pathways : 

When we have shapes other than a square as a building block; use bridging techniques (climbing out/climbing in); and follow paths other than along the diagonal, then I like to call this one-pass or continuous tatting a “Magic” Pathway, because ….

1. it creates an immediate association to the essence of a magic square – that a large fabric can be worked continuously from the same repeatable pattern

2. it is magical that a simple substitution (eg. 2nd shuttle instead of ball, split ring/chain instead of regular ring/chain, perhaps simply switching shuttles, etc.) can allow us to tat infinitely

3. the straight/zigzag and/or spiral pathway is not limited to a square – depending on the pattern of the motif any geometrical shape/polygon can be tessellated into a large lace fabric. eg. the quatrefoil triangle, pentagon, hexagon and Robin’s mat and hexagon from Dillmont’s triangle. 
  
4. it is magic to puzzle over and trace out a continuous sequence keeping the original motif intact - without changing, tweaking, or redesigning an original motif or creating any transitioning motif.

Future idea : 2 different motifs tessellated alternately/side-by-side through a magic pathway. Note that the transitioning part of the magic Squares tend to automatically create a different motif in the center of 4 motifs.

I hear you ask - If a magic pathway is simply one-pass tatting then wouldn’t a doily worked in one pass also qualify? Hmmm….

IIIa.  Is the magic pathway different from a One-pass doily?

We frequently use climbing out techniques (split rings, split chains) when working on a doily, even if not specifically designed. So if we can complete a multi-round doily in one pass, does it become a magic pathway? After all we are moving in a spiral pathway whether the doily is circular or angular.

I don’t have a clear-cut answer for this. But my guess is ‘not exactly’?

To me, part of the difference lies in tessellation : motif v/s medallion. Each row of a doily comprises of repeatable motifs while the magic pathway is for medallions that we use as motifs. Medallions are standalone complete designs, and the magic pathway allows us to join them continuously and repeatedly to create a large fabric in the same shape as the original medallion and the same pattern as the constituent.

Further, even if we use the same motif in All rounds, we may have to change the stitchcount to prevent cupping or ruffling especially in a round/oval doily. In magic pathways, there is absolutely no change in stitches.

Future idea : It will be interesting to convert a circular medallion into a magic pathway.

IIIb.  What about more elaborate one-pass doilies?

Remember these doilies that are specifically designed to be worked in one pass such as Iris Niebach's TIAS doily and tattingweed's Crinoline Doily?
These take a long serpentine and circuitous route through multiple ‘tiers’ with each repeat, to complete the tatting in one pass. German tatters such as Endrucks designed elaborate one-pass doilies. These do appear magical to even design, let alone tat! 

But these are logistically and practically limiting. Inevitably, there comes a full stop. It cannot go on or be tessellated infinitely. So while magical in itself, it does not conform to the above concept. Or perhaps it is a 'magic' pathway, but not an 'infinite' pathway !!!  


To conclude :

  • Magic Squares and Magic/Infinite Pathways allow us to tessellate infinitely to form larger and larger lace fabric working continuously without snipping off.
  • Almost any square medallion can be modified/redesigned into a magic square, but not all medallions will allow a magic/infinite pathway.
  • In the magic square, one first selects the formulaic diagonal path and ‘fits’ a square medallion to tessellate infinitely; in magic pathway, one selects a polygonal medallion and then figures out a continuous pathway. 

I was amused to read Robin’s comment here. How far she's travelled, now leading the way :-) And only a few days back I rediscovered her Dillmont inspired mat & hexagon where she has already outlined the pathways that I spoke of during the Quatrefoil series and diagrammed in the Fortuna Square!

If you have, thanks for reading. It validates my effort ;-)
I invite you to share your views.


All paths lead to Tatting !

Friday, 13 April 2018

magic pathways for fortuna square

Pin It now!
On seeing the Fortuna Squares tessellated into a coaster/mat, I was asked whether it could be worked as a magic square. Always up for a challenge especially puzzling out a maze!

Yes, it can be worked continuously and infinitely using only split rings! You can make it as large as you want. And you can choose between two easy pathways, neither of them diagonal! Moreover, the square motif is completed before moving to the next one, making it easy to keep track.

 Magic Pathways for Fortuna Square
Pattern is Fortuna Square by Henna J Hwang for Tat a Brussels Monument in Pink.

   If you want a pdf download of this notated pic, please let me know
Disclaimer: Since I haven't actually tatted the lace fabric, despite spending hours mentally figuring it out, you might find a mistake or surprise - please do share your feedback with everybody. 

  • Notice that the very first square (red) starts with 2 back to back inner rings and has a single SR to climb out.
  • All subsequent squares will have 3 split rings and are basically worked like the 2nd square (blue) .
  • This numbering sequence (red/blue) follows directional (fs/bs) tatting where the inner rings are worked backside. I chose this because I find it easier to work & keep track of such patterns when worked clockwise. Note that here the motif itself is worked clockwise.
  • The numbers in orange & yellow are for traditional tatting. Notice that tatting is counterclockwise for first motif and when we climb out, the next squares and pathway will follow suit.
But we need we need to decide which path to take after climbing out of the 1st square.

Pathway #1 : Along a Straight Line (pink arrows)
This pathway is ideal for a large rectangle. 
Fig 1
Fig 2
We can continue upwards along a column/side to desired length, then move to the right, tat a square, and move down, joining to the motifs in the previous column. (Fig 1)
Eg. the red/blue numbering with backside rings in fs/bs tatting. 
Instead of up, if we work the 2nd square to the left of the 1st one and continue down this side, then we will be adding new motifs along a row. At the end of row, make a motif to the right and move back down the row. (Fig 2)
Eg. the orange/yellow numbering in traditional tatting.

Thus we can move up & down in columns and new motifs will be added to the right; or we can move across in rows and the fabric will increase downwards.

TWoT Notes : If the first square motif is worked in clockwise direction, then the column pathway will move from left to right. If it is worked in counterclockwise direction then the pathway will move from right to left.
Opposite is true for the row pathways.

And here’s an interesting observation : After completing one pair of columns/rows, we will need to switch the way we do the elements for the next pair of columns/rows. So if we started with shuttle1 as the dominant shuttle for 1st & 2nd columns/rows, when we turn back for the 3rd column/row, shuttle2 will become the default in next pair; and back to shuttle1 for next two .... 

Pathway #2 : Along a Spiral (green arrows)
This pathway is ideal for a large square.
Fig 3
Fig 4
Here we tat squares 1 & 2 (red/blue) as notated in the main image, then instead of moving along upwards, we move to the right to work the 3rd square, and again to the right to work the 4th square, joining back to 1st square. We now have a larger square made with 4 motifs! (Fig 3)

Continue on to the right of 4th motif and then around the four squares as shown in the grid. The next round will have 16 motifs, and this can continue infinitely in an ever-increasing spiral.

For the orange/yellow squares, the spiraling movement will be counterclockwise. (Fig 4)

TWoT Notes : If the first square motif is worked in clockwise direction, then the spiral will also move clockwise. If it is worked in counterclockwise direction then the pathway will move counterclockwise.

Here is a trial of the Quatrefoil Square magic pathway (scroll down to end of post) using this spiral method. 
Note that each individual square motif is worked in clockwise direction, and so the larger 4-square fabric also follows that clockwise spiral, starting from bottom right. 


Now the question arises - Are the above fabrics magic squares or simply pathways? I will discuss this in my next post, and after that there's an edging/necklace pattern that I'm working on.
till then, happy tatting always :-)

Related Posts :