Showing posts with label tattingweed. Show all posts

Friday, 20 April 2018

retreading the path

Pin It now!
magic squares, doilies and magic/infinite pathways - common threads VI.

This post is an exploration to satisfy the researcher in me. There is no absolute right or wrong – it is my perspective or thought experiment. Fair warning - walk away while you have the chance; or stay to humour me? ;-P A new thread in Craftree inspired me to retread the path.


So yes, the pathways in this earlier post were all just that – pathways – a sequence of working and joining motifs continuously without having to tie and cut after every motif. And for this we can use bridging elements or tweak the design to allow us access to next motif.
The magic pathways moved straight along column/row or moved in a concentric spiral. Therein lies one of the major difference with the magic square.

Ia.  Magic Square

I explained the magic square concept in my 2014 post hereAll the magic squares till then had been based on the original Ann Orr triangular corner design. Someone found that one could work continuously from one triangle to the next to create an ever-increasing square – hence the term ‘magic square’.

Last year new interest was generated with the incredible series of new magic square patterns that Robin has spawned, including the reverse/inverted squares. She adapted an existing square into a magic square by ‘breaking’ the square into triangles for a workable continuum. 
She shared her deconstruction of the concept and process in detail, inspiring others to join in with their own magic squares (eg., Jane McLellan and Ninetta Caruso). These also followed the original style of working and the original triangular pathway.

Thus the magic square, characteristically, is made of repeatable square motifs that work as “…building blocks… (Robin) and follow a diagonal path (triangulation) resulting in as large a square as one desires. The square will get “…opened out just by turning the direction of tatting (Grace Tan), not by the application of bridging elements.


Ib.  Open-ended Motif or Transitioning Elements in Magic Square

There is one aspect that needs to be highlighted before I begin the next segment – the slight ‘asymmetry’ of each motif within the fabric. While working, one corner remains ‘open-ended’/different in order to change direction and continue to next segment. 

For instance, in the old magic square motifs, while 3 corners have chains, the 4th corner is made with rings in order to continue to the next section. Only the final fabric will have all 4 corners completed/identical (chains, in this case).  
Similarly the new squares needed some slight adaptation to transition into a continuous working path as in Konior's original square motif, and the Onion Ring magic squares.  

The reason this happens is clarified in Robin’s own words : You start with a formula (triangular pathway for magic square, or up and down columns for the table runner) and make the design work for that path. A one round square can be redesigned into a magic square, and now I’ve found a bookmark can be redesigned into a table runner.
(Notice that the bookmark is essentially a rectangle. It doesn't strictly adhere to the magic square definition since it follows the straight column/row magic pathway, and well, it is not a square to begin with). 

These transitioning elements are not merely functional, but visually appealing and create lovely patterns to break the monotony.

TIP : Incidentally, Jane’s magic square can be worked as a magic pathway, with each motif intact. Robin’s 2nd Onion Ring magic square can also work along a magic pathway with complete & symmetrical motifs because of the single outward ring which can be worked as a split ring. Clearly, a ring in the corner is an asset!


IIa.  Magic or Infinite Pathways 

During my Quatrefoil polygons, I discovered other pathways which would allow the tessellation to continue uninterrupted and create large fabrics in the same shape as the original motif. Thus I could trace paths for a triangle, square, pentagon, hexagon; and recently the Fortuna Square, by climbing out/in using split rings.

With so many shapes, Magic ‘Square’ seemed like a limiting term to me, hence I used the term Magic Pathways - there is magic in figuring out an infinite route :-)
At the end of the day, though, it is just continuous or one-pass tatting which can go on forever (hence Robin uses the term ‘Infinite Pathways’). During the writing/researching of this post and some recent discoveries, perhaps ‘Infinite Pathways’ is a better term than Magic Pathways. Yet I’d like to spell it out …

IIb.  Rationale for the term Magic Pathways : 

When we have shapes other than a square as a building block; use bridging techniques (climbing out/climbing in); and follow paths other than along the diagonal, then I like to call this one-pass or continuous tatting a “Magic” Pathway, because ….

1. it creates an immediate association to the essence of a magic square – that a large fabric can be worked continuously from the same repeatable pattern

2. it is magical that a simple substitution (eg. 2nd shuttle instead of ball, split ring/chain instead of regular ring/chain, perhaps simply switching shuttles, etc.) can allow us to tat infinitely

3. the straight/zigzag and/or spiral pathway is not limited to a square – depending on the pattern of the motif any geometrical shape/polygon can be tessellated into a large lace fabric. eg. the quatrefoil triangle, pentagon, hexagon and Robin’s mat and hexagon from Dillmont’s triangle. 
  
4. it is magic to puzzle over and trace out a continuous sequence keeping the original motif intact - without changing, tweaking, or redesigning an original motif or creating any transitioning motif.

Future idea : 2 different motifs tessellated alternately/side-by-side through a magic pathway. Note that the transitioning part of the magic Squares tend to automatically create a different motif in the center of 4 motifs.

I hear you ask - If a magic pathway is simply one-pass tatting then wouldn’t a doily worked in one pass also qualify? Hmmm….

IIIa.  Is the magic pathway different from a One-pass doily?

We frequently use climbing out techniques (split rings, split chains) when working on a doily, even if not specifically designed. So if we can complete a multi-round doily in one pass, does it become a magic pathway? After all we are moving in a spiral pathway whether the doily is circular or angular.

I don’t have a clear-cut answer for this. But my guess is ‘not exactly’?

To me, part of the difference lies in tessellation : motif v/s medallion. Each row of a doily comprises of repeatable motifs while the magic pathway is for medallions that we use as motifs. Medallions are standalone complete designs, and the magic pathway allows us to join them continuously and repeatedly to create a large fabric in the same shape as the original medallion and the same pattern as the constituent.

Further, even if we use the same motif in All rounds, we may have to change the stitchcount to prevent cupping or ruffling especially in a round/oval doily. In magic pathways, there is absolutely no change in stitches.

Future idea : It will be interesting to convert a circular medallion into a magic pathway.

IIIb.  What about more elaborate one-pass doilies?

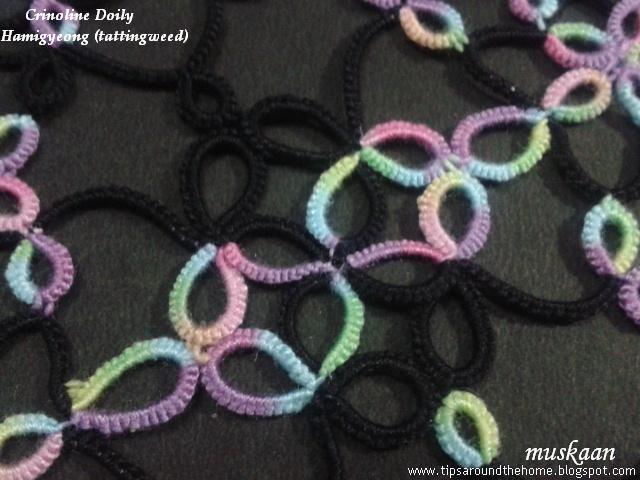
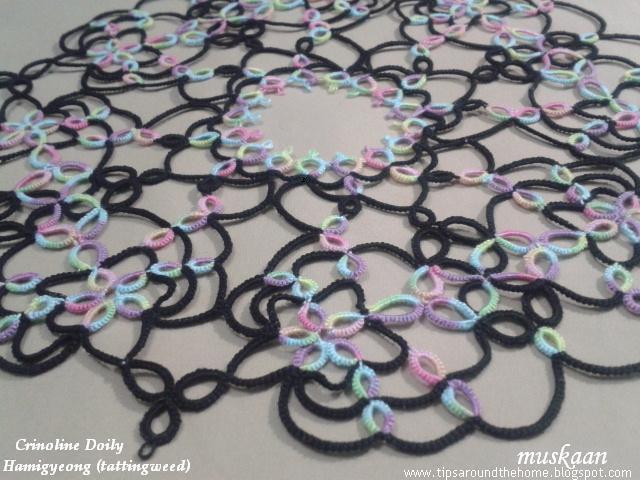
Remember these doilies that are specifically designed to be worked in one pass such as Iris Niebach's TIAS doily and tattingweed's Crinoline Doily?
These take a long serpentine and circuitous route through multiple ‘tiers’ with each repeat, to complete the tatting in one pass. German tatters such as Endrucks designed elaborate one-pass doilies. These do appear magical to even design, let alone tat! 

But these are logistically and practically limiting. Inevitably, there comes a full stop. It cannot go on or be tessellated infinitely. So while magical in itself, it does not conform to the above concept. Or perhaps it is a 'magic' pathway, but not an 'infinite' pathway !!!  


To conclude :

  • Magic Squares and Magic/Infinite Pathways allow us to tessellate infinitely to form larger and larger lace fabric working continuously without snipping off.
  • Almost any square medallion can be modified/redesigned into a magic square, but not all medallions will allow a magic/infinite pathway.
  • In the magic square, one first selects the formulaic diagonal path and ‘fits’ a square medallion to tessellate infinitely; in magic pathway, one selects a polygonal medallion and then figures out a continuous pathway. 

I was amused to read Robin’s comment here. How far she's travelled, now leading the way :-) And only a few days back I rediscovered her Dillmont inspired mat & hexagon where she has already outlined the pathways that I spoke of during the Quatrefoil series and diagrammed in the Fortuna Square!

If you have, thanks for reading. It validates my effort ;-)
I invite you to share your views.


All paths lead to Tatting !

Saturday, 22 October 2016

fluorescent candy

Pin It now!

For all sweet-tooth tatters, my serving of a neon-isc candy treat. Hope you enjoy the slow release of flavors ;-p

Hamigyeong (tattingweed)

Most of the details have already been accounted for in the previous post, including graphics of how the work progresses, a few tips, and my working notes. Keeping my promise of few words ....
Love the multiple patterns and shapes that jump out ….

This is the same pic, with swirling wheel effect, as the lead in previous post, against a black background.

Finished size – 7½”. From clover point to point - 7¾” ALL IN ONE PASS !!!
Threads - Anchor crochet cotton size 50 black; Anchor Embroidery 4615 – 1335 2 strands.

Techniques I used : 2 shuttle tatting, directional tatting, reverse stitch, split rings, self-closing mock rings, thrown/floating rings, folded chain, reverse join, up & down picot joins, split ring join.
Personalized colour placement required some additional callisthenic  

If the graphics in my previous post scared anybody, Hamigyeong shares a simpler and smaller Little Butterflycoaster/doily with the pattern inked here. It is like a precursor to the larger and more complex Crinoline, both conforming to the same basic principles.
I don’t particularly like too much open space in a doily, preferring them a bit dense. And if the chains were shorter in this one, it might have been that much simpler to work with. But I enjoyed Every Single Moment of it. And I absolutely love the clean lines without picots ! 
How simple rings and chains can be meshed together ! Brilliant designing !!! Of course, one needs one’s wits around while working this. It is not your everyday relax-and-tat pattern, thus making it so much more special. It does, however, follow a logical sequence and stitch-count which becomes easier at the 3rd quadrant stage (for me).
I hadn’t realized that Hamigyeong (aka tattingweed) is the author of the currently popular book “Tatting Lace With Your Life” ! Check out her beautiful work on Instagram . She also goes by the name of  Fireweed Plains. This is her gorgeous working of the Crinoline doily that got me ‘shuttled’ immediately. (I didn’t have this link earlier). Of course the timing was just right - it has helped me further in my TWoT series.

 Many many thanks to Hamigyeong for sharing her brilliant design !

happy tatting :-)


Thursday, 20 October 2016

truly serpentine

Pin It now!
I had written this post some days back, while still less than halfway through the doily. Didn’t get a chance to either take pics or to notate them and post. Meanwhile, I completed tatting the entire doily a couple of days back. Life is a bit in the way, and that has forced me to break the presentation into 2 posts. Here, I will share my working notes (the Boring stew), giving me time to complete the presentation of the finished doily (the yummy candy).

My Working Notes
for
There is quite a bit of interest in this beautiful doily. Before I start to forget, I’d like to share my working and thoughts ….The doily is not blocked, so please excuse the pics

Abbreviations used (in order of appearance):
SCMR – self closing mock ring
DS – double stitch
RODS – reverse order DS
SLT – shoe lace trick/overhand tie
p – picot
shs – 2nd half stitch
fhs – 1st half stitch
RS – reverse stitch (unflipped)
RW – reverse work

1. Worked completely in one pass !!! Divided into 4 quadrants ; each further divided into 2 mirrored halves (thus we get 8 sectors or pizza slices). Each quadrant (made of 2 sectors) forms one complete repeat.

At this stage it looks like a bull’s head !!!!
2. When considered for the doily as a whole, the overall direction of work is counterclockwise. However, within each sector, we work in many different directions, including ‘up and down’, ‘in and out’. It’s serpentine movement reminds me of the magic square and Iris Niebach’s doilies. 


3. The pattern as such is simple, worked with two shuttles : Rings and chains with reverse work. 4 SCMRs, few split rings, and a few rings made with 2nd shuttle. That’s about it! What makes this doily an arguably advanced or skilled pattern is the movement of the elements and segments – not easy to memorize.

4. If one is doing directional (frontside/backside) tatting, then we encounter ‘blocks’ or segments that act as a “unit” – thus we start with a segment where rings are DS & chains are RODS; then switch to the next segment where rings are RODS and chains DS. Those who have tatted Mary Konior’s Spinning Wheel Glass Mat in directional tatting (or in 2 colours) will understand how one half of the wheel ‘spoke’ works as a unit/block/segment.

5. Exception to #4 : There are also what I consider ‘thrown’ rings (even though they may not strictly be on a chain) ie. rings made with the other/auxiliary/second shuttle. They, of course, will follow the order of the ‘chain’ (RODS or DS)
6. I did add some complexity of my own (yes, I can’t seem to leave well enough alone !) by customizing the placement of colour using Reverse Join or simply laying one thread over the other (instead of SLT. See, I’m not much of a stickler for rules, nor a lover of SLT ;-) ).

7. To turn direction, I used ‘folded chains’ ie., (p, 2shs) or (p, 2fhs). These were included in the stitchcount of the chain (1DS). The folded chain also helps to keep the colour of chain constant.

TIP : In order to fold the chain, I made a picot and continued with the Same half stitch twice, as the last half stitch ; thus there are 3 same half-stitches in a row.
Note that in directional tatting the order switches after folding, because the chain has turned back over itself!
Thus, when folding a DS chain : (p,2shs) , continue next chain with RODS
Conversely, when folding a RODS chain : (p,2fhs) , continue with DS

8. I love the way tattingweed has sketched & notated over the scanned doily with little red arrows showing the direction of tatting – very clear. While tatting, though, I did miss the numbering on rings. Hence, halfway through the 3rd sector, I took another printout & inked the ring sequence. It really helped ! I also added the stitch count for the mirrored Sector 2. in the first printout.

9. There are some rings that need picots, while other elements join there. Due to changes in direction, it was sometimes difficult to tell which ring came first and had the picot. I made a black line on that ring, in the printout. But with the rings numbered in 2nd printout, it was easy.

10. Using Reverse Stitch for chains is another way to keep track of the pattern. RS helps us tat from the front, reducing RW to a minimum. This makes it easier to read the printed sketch. However, if a segment has many ‘thrown’ rings, then RS is not such a convenient option (unless one uses Reverse Rings or Rings in RS!)
As it turned out, I didn’t use the RS much for various reasons. It did come to the rescue in the very last segment, when joining back to the first sector. Here, one has to work inwards, and it became too confusing. When I switched to RS, I could accomplish the tatting and joining all from the front.


Spot treatment

There were a few mistakes where I had to retro-tat the element. But one mistake was discovered very late and a lot of tatting would have to be cut – I had joined a ring to the wrong picot! This called for some minimally invasive localized surgery.
Here’s what I did :
Cleared some space in the ring by moving the stitches and snipped the stitch thread - Not the core thread ; Not the entire ring.
Logic : It would give me plenty of thread at either end when the ring was unraveled.  Luckily it was a large ring and I had more than enough length to sew in the ends to adjoining elements.
Pull the core thread to unravel all the stitches.

Add new thread and tat the ring.
This was also completely knotless method of hiding ends – tatting over tails and sewing in opposite directions to adjoining elements
As I write this, I realize an easier way – I could’ve done a Mock Ring using the core of snipped ring! Waaaaah :-(  Or may be I had already closed the ring and it didn’t seem worth the trouble to unravel it. Memory evades; but nevertheless a solution to keep in mind for future.

As a reward to those who have diligently read through all this, I’ll keep my mouth shut for the most part of the grand reveal in next post, letting pics do the talking. Ummm, at least I’ll try my best ;-p

happy tatting till then :-)

Friday, 7 October 2016

a mixed bowl

Pin It now!
First things first…
I was going to post some of these along with the answers to my Set I questions. But This Way or Tat? (see all related posts at end for all links) has been lapped up by Georgia Seitz for her Online Tatting Class on Oct 10th (wait for the official announcement, though, just in case!) :-P  Thanks Georgia! Makes no sense in giving out answers at this stage. Plus, it struck me, why should I give answers ? It is the interested reader who should be sending in the answers if they wish, right ?! However, I will share some of the links later next week.
And now, ladling out …..

a mixed bowl of  tattiness :-P

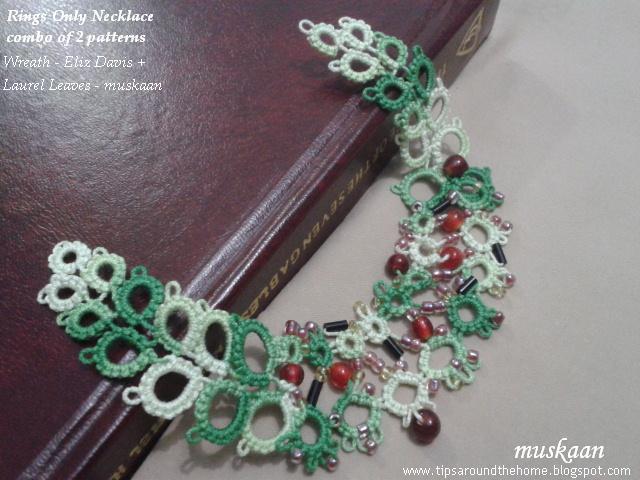
Eliz Davis’ Ring Only Wreath – beads in the soup !

Decided to make the wreath  more Christmasy with beads for bling and ‘red cherries’ for a crunchy topping. Strung all these beads (and more) while thread was still on the ball, and then realized it was a short leftover thread :-( Restarted. 
Wound the beaded part on to shuttle but left thread attached to ball (the dark green on left side). It was a good decision coz I ran out of thread midways and could continue from the ball end, by stringing in more beads.
With beads adding some nice weight, it looked like a potential paazeb (broad anklets here) . (this video is of a Hindi movie song. It is a very decent song - don't get all excited by the first glimpse! I added this link because the song is all about the paazeb as a metaphor and as a bond between the 2 lovers. They are the Romeo-Juliet couple of Indian folklore). Of course, it would need a few ghungroos too!
Instead, wary of bead-stringing, I took the easier route – sewed in the two laurel leaves from previous post (mirror images).
Can be used as a necklace/choker with some stiffening & the right materials, and a chain added. Or as a frame around an oval daguerreotype.

My Butterfly Liberated - can't escape now, booked for a serving !
Wherefore did this daguerreotype emerge ?  The House of the Seven Gables – that’s where.
I’d read this long back, but picked it up again by mistake, and decided to read again. I love these leatherbound editions (although there are always some typos) with their attached satin ribbon bookmarks. However, the ribbon is short & tends to fray. It s also difficult to actually find the page coz there's no long ribbon end to hold on to. Here’s my instant solution (and expect many more such for all my other books in this publication)
My butterfly prototype with ribbon inserted & glued. Added just the right weight & stability, too.
TIP : My idea is also to try to string a few more butterflies & flowers along the entire length…..must rummage through my stash of old motifs !

Rachael Mohler’s Hen n Chick Square Motif – a mini coaster to set the bowl !
Intending it for a mini coaster, I used thick thread – a size 7 perhaps.
My first time trying out the Dora Young Knotless Method (DYK) on a Ring ! Loved it! Opens up more possibilities. UPDATE: video link - https://www.youtube.com/watch?v=4SoGklhCqL0
Unsure how the DYK rings would turn out, I had started with leftover threads. Hence the numerous tails.
TIP : Adding new thread to a bare thread pattern : Leave about 4-5" tail of previous ring. Start new ring with new thread by grabbing the old tail within the new thread loop, and tatting over the new tail for few stitches. This takes care of one tail. Later, sew in the old tail in this new ring. No Knots !!!

And I misspelled Rachael's name in the Set I pdf . So I took the plunge into Doc Hubs and figured out how to edit it, YAY! New downloads will have the correction, but those who have already printed it out, please make the correction.
It was also my very first Hens n Chicks working.

But my MIL had made several handkerchief edgings using this pattern back in the 90s for gifting, etc.. Sorry about the blur - the original pics were small.


Together we fly butterfly – it’s all in the mix !
A small butterfly project on Craftree. Unknown designer, stitch count & prototype by Claudia & diagram by me. Many others have shown interest in test-tatting. That’s why I called mine ‘Together We Fly”. The diagram is not finalized – waiting for more feedback. This is my working. All in one pass. Can easily be made in 2 colours, using single shuttle and ball. Will share more details eventually. It’s such a pretty butterfly.


tattingweed’s Crinoline Doily – keep stirring in all directions !
This gorgeous doily pattern by the talented Korean, Hamigyeong, was added to the Craftree database yesterday. And the moment I saw the pattern, I just Had to give it a go. See all the directional changes it incorporates ? Wow ! Started in size 40, aiming for a glass window effect . This has given me so much more thought for the TWoT series. Will share working details later; this is just a quick peek ….

I enjoyed this multi-project bowl tremendously ! Hope you enjoyed my serving :-)


happy tatting always :-)

Related Links :
This Way or Tat? (TWoT) Series - Preface (Quo vadis) ; Introduction ; Set I - Rings Only
Eliz's left v/s right hand tatting effect on direction