Showing posts with label Rachael Mohler. Show all posts

Wednesday, 10 April 2019

tassel tips n tricks

Pin It now!
Over the years I’ve assimilated a few tips and tricks for making the perfect tassel – umm, aspiring to. I was simply going to share the link to this latest trick, except that the link does not open now without membership to the Japanese site/platform. Despite a fairly thorough search I couldn’t find a single video or pin where this trick was used, hence I made a quick collage.

With tassel earrings raking up quite a storm, it is a simple and neat trick to have in one's kitty. 
  1. Cut a length of paper and roll it over the tassel. The length of the paper cylinder should be the desired length of tassel.
  2. It is important that the cylinder is snugged up to the base of the tassel if one wants identical lengths as in earrings.
  3. Then snip close to and along the lower edge of paper. Remove paper, and voilà, we have a neatly trimmed, perfect tassel each and every time!
  4. This tip was shown in stepwise detail, by sekiraralace here to make red tassel earrings. 

Some more tassel-making links and tips


  • Silk thread tassel earrings using fork – uppunutihome’s video 
  • Midway through the above video, notice how the threads curl and spread when she puts the scissors inside the tassel and cuts? Judith Connors had once highlighted this point in Craftree (sorry, don’t have a link) – Always cut across, never through the threads. This keeps the threads together and it really works.

There are loads more youtube videos, all pretty similar.


UPDATE (Apr 24, 2019): Patricia Lynn-Cobb has an excellent tutorial for a Great Tassel. Download the pdf from this post.


Do you have a tassel tip or trick or tutorial to share? I would love to add it to this list which will be on the Tatting Resources tab above. Waiting eagerly to hear from you …

Monday, 1 October 2018

scrappy doily and scmr

Pin It now!
For the last few days I hadn’t picked up a shuttle. Housework was partly to blame, leaving me too tired to continue with my Blossoms motifs (I was on a whirlwind spree and the count is now up to 20 - halfway mark reached!!!). So, I took up sewing the edging on the saree – somebody (meaning me) has to do it!

Last evening, I didn’t even have the concentration to sew. But Madhur Dadlani's Unending Doily had been at the back of my mind as a wonderful way to empty shuttles and use up all the scraps! Picked up a shuttle and started.
My rings are ( 4-3-3-4 ). I started with 3 normal rings (white), then switched to SCMR.
Why? With scmr, I can use up almost every last bit of scrap thread, since they will only form the stitches. Can you see where I have a part purple part blue ring? Easily possible with scmr.

And I can have a continuous core thread throughout, not having to refill the shuttle every time.
To secure the scmr, I made an unflipped half stitch at the base.

I had first thought of making it rectangular, but I think with random colours, it is best to go circular. Although, here I am aiming for an oval and will decide on how to fill the center later. Hope the shape will hold.
It’s still scappy, fresh off my shuttle, with no blocking.

So far these are Anchor size 20 scraps, and the 2 rounds measure 2”x1½”.
Do you see this turning into an Ice Drop?! A future project :-D


SCMR - self closing mock ring -
And on the topic of SCMRs, a Japanese tatter (kukka tatting) has been applying the scmr to small medallions and so far she has reached a count of 91 lovely medallions/motifs using scmr!!! I've been following her journey from the start, but it's a pity that I can't leave any comment on her blog. Do check it out. 91 scmr motifs !

Split SCMR
And Tim Kaylor has worked out a way to split the scmr in regular tatting (ie. when working with only 2 threads!). Randy Houtz’ split/scmr uses 3 threads. Tim has put up a video too. Now to try it out…
(added later in the day...
After some thought, this is the realisation I’ve come to –
Tim pulls open the scmr, exposing the core thread, then uses a split chain to cover and bridge the core thread.
Which is similar to what Dora Young did in her KM Ring (Knotless Method Ring). And Rachael Mohler did a slight modification by not closing the ring completely, then covering the open core thread with the knotless method (i.e., a split chain in modern terms).  
So it is basically the modified Dora Young’s Knotless Method Ring (a mock ring worked in 2 parts by anchoring with a lock join & doable with a single shuttle) on a SCMR! 
Clever, nevertheless, and opens up vast possibilities.

Friday, 7 October 2016

a mixed bowl

Pin It now!
First things first…
I was going to post some of these along with the answers to my Set I questions. But This Way or Tat? (see all related posts at end for all links) has been lapped up by Georgia Seitz for her Online Tatting Class on Oct 10th (wait for the official announcement, though, just in case!) :-P  Thanks Georgia! Makes no sense in giving out answers at this stage. Plus, it struck me, why should I give answers ? It is the interested reader who should be sending in the answers if they wish, right ?! However, I will share some of the links later next week.
And now, ladling out …..

a mixed bowl of  tattiness :-P

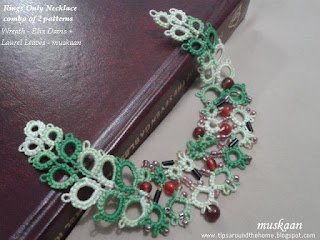
Eliz Davis’ Ring Only Wreath – beads in the soup !

Decided to make the wreath  more Christmasy with beads for bling and ‘red cherries’ for a crunchy topping. Strung all these beads (and more) while thread was still on the ball, and then realized it was a short leftover thread :-( Restarted. 
Wound the beaded part on to shuttle but left thread attached to ball (the dark green on left side). It was a good decision coz I ran out of thread midways and could continue from the ball end, by stringing in more beads.
With beads adding some nice weight, it looked like a potential paazeb (broad anklets here) . (this video is of a Hindi movie song. It is a very decent song - don't get all excited by the first glimpse! I added this link because the song is all about the paazeb as a metaphor and as a bond between the 2 lovers. They are the Romeo-Juliet couple of Indian folklore). Of course, it would need a few ghungroos too!
Instead, wary of bead-stringing, I took the easier route – sewed in the two laurel leaves from previous post (mirror images).
Can be used as a necklace/choker with some stiffening & the right materials, and a chain added. Or as a frame around an oval daguerreotype.

My Butterfly Liberated - can't escape now, booked for a serving !
Wherefore did this daguerreotype emerge ?  The House of the Seven Gables – that’s where.
I’d read this long back, but picked it up again by mistake, and decided to read again. I love these leatherbound editions (although there are always some typos) with their attached satin ribbon bookmarks. However, the ribbon is short & tends to fray. It s also difficult to actually find the page coz there's no long ribbon end to hold on to. Here’s my instant solution (and expect many more such for all my other books in this publication)
My butterfly prototype with ribbon inserted & glued. Added just the right weight & stability, too.
TIP : My idea is also to try to string a few more butterflies & flowers along the entire length…..must rummage through my stash of old motifs !

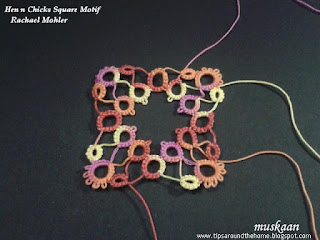
Rachael Mohler’s Hen n Chick Square Motif – a mini coaster to set the bowl !
Intending it for a mini coaster, I used thick thread – a size 7 perhaps.
My first time trying out the Dora Young Knotless Method (DYK) on a Ring ! Loved it! Opens up more possibilities. UPDATE: video link - https://www.youtube.com/watch?v=4SoGklhCqL0
Unsure how the DYK rings would turn out, I had started with leftover threads. Hence the numerous tails.
TIP : Adding new thread to a bare thread pattern : Leave about 4-5" tail of previous ring. Start new ring with new thread by grabbing the old tail within the new thread loop, and tatting over the new tail for few stitches. This takes care of one tail. Later, sew in the old tail in this new ring. No Knots !!!

And I misspelled Rachael's name in the Set I pdf . So I took the plunge into Doc Hubs and figured out how to edit it, YAY! New downloads will have the correction, but those who have already printed it out, please make the correction.
It was also my very first Hens n Chicks working.

But my MIL had made several handkerchief edgings using this pattern back in the 90s for gifting, etc.. Sorry about the blur - the original pics were small.


Together we fly butterfly – it’s all in the mix !
A small butterfly project on Craftree. Unknown designer, stitch count & prototype by Claudia & diagram by me. Many others have shown interest in test-tatting. That’s why I called mine ‘Together We Fly”. The diagram is not finalized – waiting for more feedback. This is my working. All in one pass. Can easily be made in 2 colours, using single shuttle and ball. Will share more details eventually. It’s such a pretty butterfly.


tattingweed’s Crinoline Doily – keep stirring in all directions !
This gorgeous doily pattern by the talented Korean, Hamigyeong, was added to the Craftree database yesterday. And the moment I saw the pattern, I just Had to give it a go. See all the directional changes it incorporates ? Wow ! Started in size 40, aiming for a glass window effect . This has given me so much more thought for the TWoT series. Will share working details later; this is just a quick peek ….

I enjoyed this multi-project bowl tremendously ! Hope you enjoyed my serving :-)


happy tatting always :-)

Related Links :
This Way or Tat? (TWoT) Series - Preface (Quo vadis) ; Introduction ; Set I - Rings Only
Eliz's left v/s right hand tatting effect on direction

Tuesday, 4 October 2016

TWoT 2 : Back to Basics !

Pin It now!
That’s exactly how it felt ! I don’t remember tatting many rings-only patterns when I first learned, especially not with bare thread space. This time it was different – it felt like I was starting from the basics of tatting design.  I have learned (and am still learning) a lot while working on this series.

The This Way or Tat? series starred with a Preface – Quo vadis ;
then an Introduction with practice patterns (pdf here)
Continuing from where we left off in the Introduction, here is the first set - diagrams for Rings Only scenarios.

UPDATE (Oct 15, 2016) : In case the link does not work, here is an updated, revised pdf with new link --- TWoT? Set I Rings Only updated
This part consists of a guide to read the diagrams ; many small but graded (difficulty level) patterns for practice and exercise ; and questions scattered throughout the document.
Answers will be shared in the next post.

I am grateful to Rachael Mohler & Eliz Davis for graciously & enthusiastically sharing their patterns, 
and to Renata who equally enthusiastically permits me to share her doily links for this series.

I hope you have tremendous fun playing with the patterns, while keeping a close eye on the whats and whys.
I will share my own thoughts, pics and working of the wreath and square motif patterns in next post, along with some links and answers.

My own practice patterns are pretty basic, while incorporating some application of the diagrams.
These 3 patterns constitute this collage-in-the-making called …
Ring In The Bouquet !

The bouquet comprises of rings-only patterns worked with a single shuttle in size 20 thread.…
Wiggly Flowers
Forgot to join the picots in the 5-petalled yellow flower, making it fidgety. Noticed only when I started to work on the pics at my desktop. Hence the name. Maroon flower is the prototype.

Butterfly Liberated
I have struggled to design a simple butterfly. This time, it wasn’t that difficult! Hence this name.
The maroon one in topmost pic was the prototype where I deliberately left out picots.

Laurel Leaf
 Shape of this leaf had always appealed to me....
 but I joined the leaflets a bit differently, to create that mesh-like effect.

I can’t believe these or similar ones haven’t been done before; even so, I created them from scratch. 
Wiggly Flowers were easy. 
Butterfly Liberated took 1 trial. 
Laurel Leaf took 3 trials. 
When I started to design and tatted a prototype of leaf and butterfly, I searched Google, Craftree & Pinterest. The way I worked them is a bit different from the ones I found. I will willingly give credit to any designer if you can guide me....


These patterns are deliberately shared only as diagrams in this file. However, I will upload all patterns to My Patterns page, properly formatted, with written notations. These are all free to use, even if one does not want to follow the exercise.


pdf for pattern only : Ring in the Bouquet

All feedback and criticism is appreciated and welcome – it will help me improve on the next diagram sets.

Inchies 

While comparing the Set diagrams to practice patterns, I wondered if I could design a square using outward facing rings. These 2 Inchies (yes they are exactly 1” squares!) are the result of a quick tat. The right (pink) one was made first, then the beige one. These are prototypes, and I need to better them … but I like the potential of these simple airy square medallions that can be joined into a larger fabric. 


Meanwhile, I am thrilled to see at least 3 tatters working this series (3, or at least 2 More than I had anticipated,since Eliz had committed to it :-D !) 
Read Eliz’s excellent observations and applications of the previous exercise and how Ninetta has applied the exercise to her current doily project with curled rings !!! Mama Martin left a nice comment here, on how it helped her.

Set II comprises of Chains Only diagrams. But I doubt there will be these many practice patterns ;-) Hope to share it in about 10 days ...

happy tatting always, whichever direction you take :-) 


Related Posts : Preface – Quo vadis

UPDATE (April 2021): While I try to find the time and focus to complete this series, please check out these links:
Practice patterns
Rings & Chains: Minarets in the Sky; Aspiration snowflake; Hidden Rose Snowflake (rings & chains) - 
Mark Myer's Luster Snowflake  Paths/choices when climbing out with a split ring . pictorial pdf.
Lock Join Plus series - several methods that can result in change of direction, colour, etc. including when climbing out. https://tipsaroundthehome.blogspot.com/2020/07/lock-join-plus.html