Showing posts with label tatted square. Show all posts

Saturday, 5 November 2022

what a fold can do

Pin It now!
Barbara Arango's Square Motif is one of the coasters I use for my mug.
https://tipsaroundthehome.blogspot.com/2019/06/back-and-forth.html

This is how the original looks -

The other day I noticed one of the single thrown rings had folded inwards. Hmmm, I tried it with the other 3 and look, we have a new variation! 

It kind of changes the entire look - 
- compact and contained, with a bit of texture.

What do you think?

Monday, 16 May 2022

enthusiasm interrupted

Pin It now!

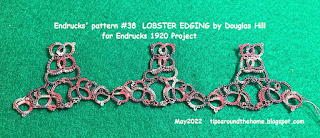
Reworked patterns from Frau Eleonore Endrucks-Leichtenstern’s ‘Die Schiffchen-Spitzen’, 1920, for Endrucks 1920 Project

Did Frau Endrucks enjoy a plate of lobsters or perhaps watching them frolic in the water? Is it what inspired her edging #38? Are they holding claws for a dance or to avoid the traps?! Douglas Hill spotted lobsters, too, and named it the Lobster Edging

Lobster Edging (#38) pattern pdf:
https://drive.google.com/file/d/1EiWX78pK8oY8shFVGBFjdJIO0a4Y7fLh/view

I think it will be a good idea to include a diagram eventually.

This colourway does full justice to the arthropod. One could easily add a few beads and tweaks to strengthen the lobster motif. Great for applique and cards or perhaps a charm. Or how about a brooch, earrings, or pendant?

Incidentally, he preferred to tat it with a ball and shuttle rather than 2 shuttles, as seen in this WIP model. And to get the shuttle in position, a lot of shoe lace tricks (SLTs) were used.
Will this should make it easier for a needle tatter to follow the pattern?

He presented this pattern at the Finger Lakes Tatting Group mini-conference in September 2021, thus spreading the word about our Project.
When the lobsters are flipped, as in the above image, they give a very different look!

In 2020, Douglas had also chosen pattern #41 where he visualized the paired chains as a long row of short and long candles with the end rings acting as flames.

In order to get the long chains to stand straight, he wrote the pattern using balanced double stitch (BDS) in late 2021, but by the 3rd repeat in above sampler, he decided that the BDS did not work.

He was ‘frustrated… at not getting the pattern to work or look right…Ninetta and I tried to help with our joint review notes and possible options. However, he could ‘no longer boost his long exhausted enthusiasm’ and left this pattern as well as our Facebook group in Dec 2021.

The above is his working of pattern #7 which he chose in mid-2021. Again, not happy with his tatting, he forfeited the pattern.

Douglas is quite accomplished with the crochet hook, tatting shuttle, knitting needles and lace bobbins, including designing some spectacular crochet coats. Although he is not a regular blogger, do check out some of his works here - https://queerqrafter.com/ or on Facebook.
 
🦞🦞🦞🦞🦞🦞

AlenAlea Rako joined our Facebook group by adapting the pattern #3 edging into 2 square motifs that can be tessellated into a larger fabric if desired. She also graciously shared the pattern.

Two Squares (from #3) pattern pdf: 
https://drive.google.com/file/d/1eBwjp7wtMie1k2GeqrSUOerMH87uuu4A/view

In Square #1, she turned the corner inwards along the original sewing edge. This retains the beautiful lotus-shaped motif, with minimal changes to the original pattern.

Unhappy with the open space in the center of the square, she added an insert option for those who prefer denser lace. The insert is especially useful for larger lace fabric, providing additional sturdiness and durability.

It is always fun to ask ‘what if ….?’, and explore options! Hence this time, she turned the corner along the opposite edge resulting in an in-built denser flowery center. She shows us where we need to join motifs for tiling in her diagrams.

Unfortunately, Lea abandoned the pattern presentation maintaining absolute silence despite our private and public calls over the past several months. I have cleaned up the presentation (most of which she had approved earlier) and it is now available for all of us to enjoy.

Lea, too, is an accomplished tatting designer and hand dyes her threads creating beautiful colourways.

▦▩▦▩▦▩▦▩▦▩▦

Despite our best intentions life can get in the way of our commitments. Delays happen. Sometimes enthusiasm sags. Yet communication is key. As volunteering adults we should all be able to speak freely about any changes in commitment.

We thank both Douglas and AlenAlea for their contribution and hard work.

With best wishes and gratitude
muskaan and Ninetta 
💦💧💦💧💦💧💦💧💦

Related Posts
https://tipsaroundthehome.blogspot.com/2021/11/the-foster-child.html - pattern #7
https://tipsaroundthehome.blogspot.com/2021/11/willing-non-volunteer.html - pattern #7 adaptation
https://tipsaroundthehome.blogspot.com/2021/09/700-and-promises-still-to-keep.html - pattern #3
https://tipsaroundthehome.blogspot.com/2022/01/more-multiples.html - Square #3 using 2 colours
https://tipsaroundthehome.blogspot.com/2022/01/who-knew.html - Fruit Bowl from #3
https://tipsaroundthehome.blogspot.com/2022/03/bowled-over.html - Fruit Bowl pattern from #3

*********************
Endrucks 1920 Project is a community project, where patterns from Endrucks’ German book of 1920 were converted to modern-style presentations and pdfs. We welcome you to join our Facebook group “Endrucks 1920 Project” (please read the group’s description and rules before joining : https://www.facebook.com/groups/1235560633606162) where the fun continues with derivative tatting, new variations, activities, etc. all within the gamut of Endrucks’ patterns.

Using the hashtag #Endrucks1920Project when posting in FB or Instagram, ensures that your pic will show up in a search.

If you enjoy sharing and experimenting, or even test-tatting, the group is waiting for you! All info and links to patterns (original and modern), including model images, are in the Endrucks 1920 Project Document, here https://docs.google.com/document/d/17LEVftXweztBIOWh4sL4BB7bX65ssoOsOn4oXIgCepY/view There is still a lot to explore and extract, derive and apply and scrolling through this document will give you an idea of the possibilities and beyond.

*********************

Monday, 23 August 2021

more reflections

Pin It now!

Clearly I'm not done with that motif yet! This is the snowflake version from pattern #17 I mentioned here. With this snowflake, we will now have earrings/pendant; 2 square frames/lace (one by Reiko Akamatsu - see below); edging/insertion/etc.; and a hexagonal motif (round 1 of snowflake); all adapted or derived from the same pattern! And yet, it continues to entice me, though I will be holding off for now in order to concentrate on completing the main pattern pdfs for those on my list (there seems to be no end to the admin work on this project) so that we can see the 'completion' of Endrucks 1920 Project in November.

I continue with the name given to the edging by Ninetta - Reflections. Above is both a trial culminating in a prototype for the snowflake adaptation. The 3 arms on the left of the tail ends are the final count. Pattern will be shared for free later.

The snowflake is worked continuously in 2 rounds. Above is the first round and it creates a standalone hexagonal motif! With the right beads, it could be a beautiful pendant.
In Anchor Pearl cotton size 8, each side is 3cms; and across it is 5½ cms.

Techniques used: 2 shuttles, thrown/floating rings, large mock rings, downard/inward facing picots, lock join.

TIP: In order to get the beautifully domed arch as in the topmost arm, it is important to keep the joining picot between chain and end thrown rings longer than usual. This avoids any pull on the chain when the joining picot is small. This same tip works for the earrings, edging, etc.

Unlike the edging, I had deliberately avoided decorative picots in this pattern to gauge the bare look. The picots in the center were there only in case a central ring was needed. So I folded and sewed in the decorative picots in the center. 
Now that's a bit too bare, right?! Looks better with those picots around the central space.

Ninetta suggested onion rings for the large empty space - she drew over the pic I sent - and suggested we could have 2 versions with and without the onion rings.

And here are 2 trials on the same flake. I like the one on the right better. 2 picots create an interesting feature, don't you think? 

So, what do you think of this snowflake without decorative picots? Should there be more picots as in the Reflections edging here. And what do you think of the onion rings?

💚💙💚
Since I did not post her pic earlier when I shared my Superimposed Squares adaptation, here's how Reiko Akamatsu tweaked the straight lace into a square, adding some points to the originally curved portions and downplaying the smaller points (direct link to her pdf - https://drive.google.com/file/d/1JANNY3JWRJb-4BgLV5XEB4unDrrFhNQ7/view). The block chains create a denser curvilinear garland within!
And check out our gratitude post for a few more pics (and links) of this incredible artist from Japan.
 
Okay, here is my simple adaptation for comparison. Notice the tweaks she made and the effect has has created?

For all updates and details, scroll through the patterns & arrangements in the Endrucks 1920 Project

Friday, 23 July 2021

superimposed excitement

Pin It now!

 I couldn't wait to share what I've been tatting with all my wonderful readers (thank you all for your kind thoughts 💝). Although my pace was slow, I finished this square edged frame today and am excited for you to see it, too.

Recognise the motifs from my recent posts - the block tatting question and the extracted earrings

I chose the easy path following Frau Endrucks' practicality and working the blocks on either side 'normally' with no mind to directional symmetry.

Here you can see the adaptation to turn a 90° corner, which inspired those earrings. Removing a few elements and joining at the base, brought the 2 enr together.

Continuing Row 1 working with 2 shuttles, CTM. There are a couple of inward picots that I used a paper clip to hold till joining.

Row 1 complete. I like how this looks! Each side is a single repeat; by adding more repeats along opposite sides it can become a rectangle or a larger square.
In Anchor size 40 (shade 00352), this row is 3½ broad and 13 cms length of side.

After continuing to the next round (all tatted in one pass, and both rounds move clockwise), this is how the final frame/edging looks. I think the inner edge makes an elegant statement, too.
The side now measures 17 cms at the extremities.

Don't these look like 2 different squares superimposed and well-synced? Eyes seem to be drawn first to one square and then to the other. 
The only change I made to this round was adding a few decorative picots, including above a lock join.

Laid over this truffle box which is my current project box with all essentials inside. It makes a nice tatted frame ...

UPDATE: the pattern is included in the main pdf here - (click for pattern)  https://drive.google.com/file/d/1sStHg5IQmuwizC7QcKRaX951CvVoURbn/view

If you visit the Endrucks 1920 Project doc here, you will see the talented Reiko Akamatsu has already made another square adaptation from this same edging. She has introduced more changes and it will be an interesting study to compare these 2 versions.

One very interesting feature of this pattern (and most of Frau Endrucks' patterns) is that the entire pattern is worked with 3ds or 6ds between picots or between joins. The only exception is the 1ds she uses to rise to next level of each block. 

I will share this pattern in due course and hope you like it enough to give it a try. 
In fact I have 2 more narrower edgings in mind but tatting might have to wait. But I am willing to share a diagram if anybody wishes to give it a go. 


Wednesday, 22 April 2020

tricks without the trick

Pin It now!

Colour play without the shoe lace trick (SLT)!

Last week when I went digitally AWOL, I was compiling a pdf package for the IOLI Chapter Pattern/Gift CD, 2020. Instead of sending a single pattern, my recent crosses from the magic square spurred the idea of an entire project based off those sketches. It would make a wonderful design exploration for groups. I need to convert some pdfs into shareable links - will post later.
After sending them off, I couldn’t resist trying out the pinwheel sketch. So, here is the ‘simpler version’.

Pinwheel Coaster (or Tatted Quilt Block)
Adapted from the vintage Magic Square
To make it easier, I started with a black medallion of 4 rings. It should’ve been smaller (my mistake!) – you can see how the adjoining chains have a shallow dip.

The correct stitch count for each ring is : (3-3-3-3), joining to previous ring and to the first one at the end. 
Notice the numerous tails? Lots of scraps used in first 2 motifs. All knotless addition of threadtatting over tails in separate elements, and lots of False CTMs (and more here) in order to start the chain as if the thread is continuous and later add in new thread/colour. Remember to cross the new thread around the old one
These (and more below) ‘tricks’ kept the SLT away!!! 

All rings are 6-6, the first of each 4-ring cluster has a large central picot.
All chains are 6 or 6-6-6.
Each triangular motif is worked with one shuttle and ball.
I wound 2 Pony shuttles separately one with yellow and other with orange and these lasted for the entire coaster. Respective ball when needed. 

Core thread under 2-coloured outer chain and when joining to inner black ring, have the core of same colour as start of chain.
The corner chains show 2 colours. For this, the core thread remains the same as the first half eg. yellow chain with yellow core. Midways, orange chain thread is added over the yellow core. The yellow chain thread is snipped off and whip stitched back (since I like to hide under different elements)
Similarly, the inner chains that join to the black ring have the same core thread, but different stitch colours. While making the join, I pulled up a loop of the new colour ball, passed the shuttle through and worked the chain, hiding one tail. The other tail was whip-stitched back.

Work moves counter-clockwise and can be tatted all from the front using direct tatted chains.
For the adventurous, this square can work as one block in a larger tatted quilt! Imagine the riot of designs and colours and shapes.
Each side of this quilt block square is 9½ cms and 12½ cms diagonally in Anchor Pearl Cotton size 8.
A separate medallion in the center is the easier version. If one wants to tat exactly like the sketch above, the inner 2-coloured ring can be worked as a SCMR, adding the 2nd colour midways using this method of adding thread WITHIN a ring.  

I debated whether to add an edging. My sketched ideas looked good on paper, not in tatting - overkill! Ended up with a simple outline which hubby approved!

All chains are 6-6, lock join.
Corner chains are 2-2—2---2—2-2. (graduated picots)

Avoid shoe lace trick: Keeping the SLT away is a personal preference. In needle tatting, this knot is made after every ring and chain, yet the lace looks beautiful. So for those who do not mind the SLT, wind 2 shuttles, one with each colour, and make a SLT after each element to shoe the colour you want. There won't be so many ends to add and hide then.

The same holds true for tatting this coaster. My notes pertain to how I approached it. Every tatter is free to choose their comfort tactics.

I will also share how to keep the colour blip on the backside when working and joining a chain backside. I've used this before, but not in this situation and I truly love the trick!


Thursday, 19 December 2019

monkey business

Pin It now!
Snowflake #23 in Land of Laces’ 25 Snowflake Project

Why did I title this post ‘monkey business’? I’ll tell you in a bit. Let me start from the beginning.

It was an amazing start in a sense. After a few beaded trials that needed more figuring out, I finally decided what I would do. But no lessons learnt, sigh. It ended up as a square. I think it looks superb as an ornament – pendant, earring, brooch?
While it holds well, if one wants to wear it, I think some stiffening will be needed otherwise the swinging beads will fold down with gravity. 
I wish I could capture the beautiful sheen & shine.

For the snowflake project though, I started a new one without beads. Folded rings are not often seen in snowflake patterns and I repeated the top ring inside the negative space as well. Lots of folded rings (need to practice, so don’t look too closely) and I like the overall design! 
Anita Barry spoiled it for me!!! I was pretty happy with my latest star but she saw a monkey face in it! She’s such a Goose. Now all I can see is a Monkey, too, or perhaps even a Lion or Tiger face. She even suggested a name like Monkey Mania and is determined to call her's 'monkey face'! Grrrr, I’m too Chicken to use it because then all everybody will see is that darned monkey!
I still know which name will stick, though ;-P
And do you see a Butterfly? I saw it while tatting and is worth pursuing.

While I have finalised the count, this star model can be considered a prototype since there is a bit of tweaking going on. So if you have suggestions, please do share. I might incorporate them.

It is too cold for me to work at my desktop for long, hence pattern will have to wait. I also want to make this a 6-armed snowflake. Then all 3 patterns can be uploaded in one go.

Meanwhile I have worked the first trial of #24. Should be able to work and share in a couple of days. 

Sunday, 24 November 2019

3 wave patterns

Pin It now!
Snowflake #19 in Land of Laces’ 25 Snowflake Project

I wanted to share more of the process of the large snowflake, but sharing the patterns before I relegate the task to the pending tray.
The square is where it all started, leading to the small and large snowflakes. The small snowflake was easier to do after my failed trial here (top right in collage). It showcases the swirl/wave effect more than the large flake.

All 3 can be worked in one pass, continuously.
  
Abbreviations/Notations, in order of appearance –
ctm = continuous thread ; = picot ; vsp = very small picot ; SS = switch shutte ;
SR = split ring ; ch = chain ; lj = lock join ; rw = reverse work ;
–– = decorative picot ; rs = reverse/unflipped stitch (optional)

Square Wave motif
muskaan ©Jan, 2018

Worked in Anchor size 20 (equivalent to Lizbeth 10). It is a tiny motif, hence better worked in size 20 or 10.

2 shuttles, ctm
Round1
split ring: 6 – 3 vsp 6. SS
chain :   2 – 2, SS
Repeat 3 more times and join back to A.
Tie and cut, or climb out with a split chain : 2/2, mock picot
Round2
SR : 4 / 4. SS
ch : 6 lj, SS
SR : 4 / 4. SS
ch : picot, 7, lj, 8, lj
Repeat 3 more times around. Tie & cut.


Swirl Wave snowflake - small
muskaan ©Nov, 2019


In Lizbeth size 20, this measures 2”.
It can be repeated and joined as a motif for larger fabric, each side of the hexagon measuring 1”

2 shuttles, ctm

Round1
A-ring: 7 – 8 vsp 6. rw
B-ch: 1 – 4 –– 4 – 1, lj to vsp,
C-ch: 1rs vsp 1rs.
Alternate C-chain : rw after B, SS, chain: 1 – 1 , SS.
Repeat 5 more times, joining last B chain to first. 
Climb out with last C-chain as follows –
To climb out one can make the last C-chain a split chain (1 / 1). However, since it is only 1 stitch, using Patty Dowden’s Ring on Picot method is simpler :
Pull up a loop of Sh1 thread through the picot on C, pass shuttle through from back to front, and leaving just the tiniest bit of bare thread behind, start the split ring. Work the 2nd half of SR with Sh2, again leaving a bit of bare thread on the back (enough to span the 1ds) and complete the SR.
The bare threads are not visible on the back, and the front also looks similar to the rest.

I have taken stepwise pics of this process. If anybody is interested, let me know & I will post the pictorial.

Round2
D-SR : 5 / 5. SS
E-ch : picot, 5, lj to nearest picot on ring, SS
F-SR : 5 / 5. SS
G-ch : 6, lj, 8, lj, SS
Repeat from D 5 more times.
Tie and cut and hide ends.


Swirl Wave snowflake - large
muskaan ©Nov, 2019
In Lizbeth size 20, this measures 3”.

2 shuttles, ctm

Round1
A-ring: 6 – 3 – 5 vsp 6. rw
B-ch: 1 – 4 –– 4 – 1, lj to vsp,
C-ch: 1rs vsp 1rs.
Alternate C-chain : rw after B, SS, chain: 1 – 1 , SS.
Repeat 5 more times, joining last B chain to first and last C-chain to base of first ring with a lock join.
To climb out : split chain (1/1) or the ring on picot option explained above.
Round2
D-SR : 5 / 5. SS
E-ch : picot, 4, lj to nearest picot on ring, SS
F-SR : 8 / 3 + 8. small mock picot
G-SR : 6 / 6. small mock picot
H-ring: 5 –– 5. SS
I-ch : 7, lj, 9, lj, 6, lj. SS
Repeat from D 5 more times.
Tie and cut and hide ends.


In case of any error or doubts, please let me know. Hope you enjoy these patterns :-)

My 20th snowflake has dimpled rings (hearts) and is worked in bits and pieces but no ends to sew in. I’m still tweaking it …. I’m calling it Heartland snowflake!